View Plugin Development Documentation
This document serves as the development guide for the "View" plugin, intended for developers with a foundation in front-end development and knowledge in Javascript, CSS, and HTML.
About View Plugins
What is a View Plugin?
A view plugin, also known as a "Customized view," enables developers to create fully custom view pages to display worksheet record data when HAP's built-in views—such as Grid, Kanban, Org, Calendar, Gallery, Detail, Resource, and Gantt — do not meet the user's needs. Customized views support features like search, filter, statistics, quick filter, and filter lists. Additionally, system components can also be invoked through the HAP common Javascript interface, such as displaying record detail pop-ups and invoking new record windows.
What is the difference between a view plugin and a system view?
From the user's perspective, there is no difference between view plugins and regular views. Once the organization administrator publishes, installs, or imports developer plugins, all activated plugins become available to all users within the organization. Users can utilize these views just like they do with tables, kanbans, calendars, and other system views, and can assign permissions and share views as usual.
Development Steps
Preparation
- Install Node.js (version 16.20 or above) and npm
- Set up an integrated development environment (IDE), with VS Code being recommended
- For team development, ensure you have a version control tool, such as Git
Creating a View Plugin
There are two methods to create a view plugin.
1. Create a Customized view
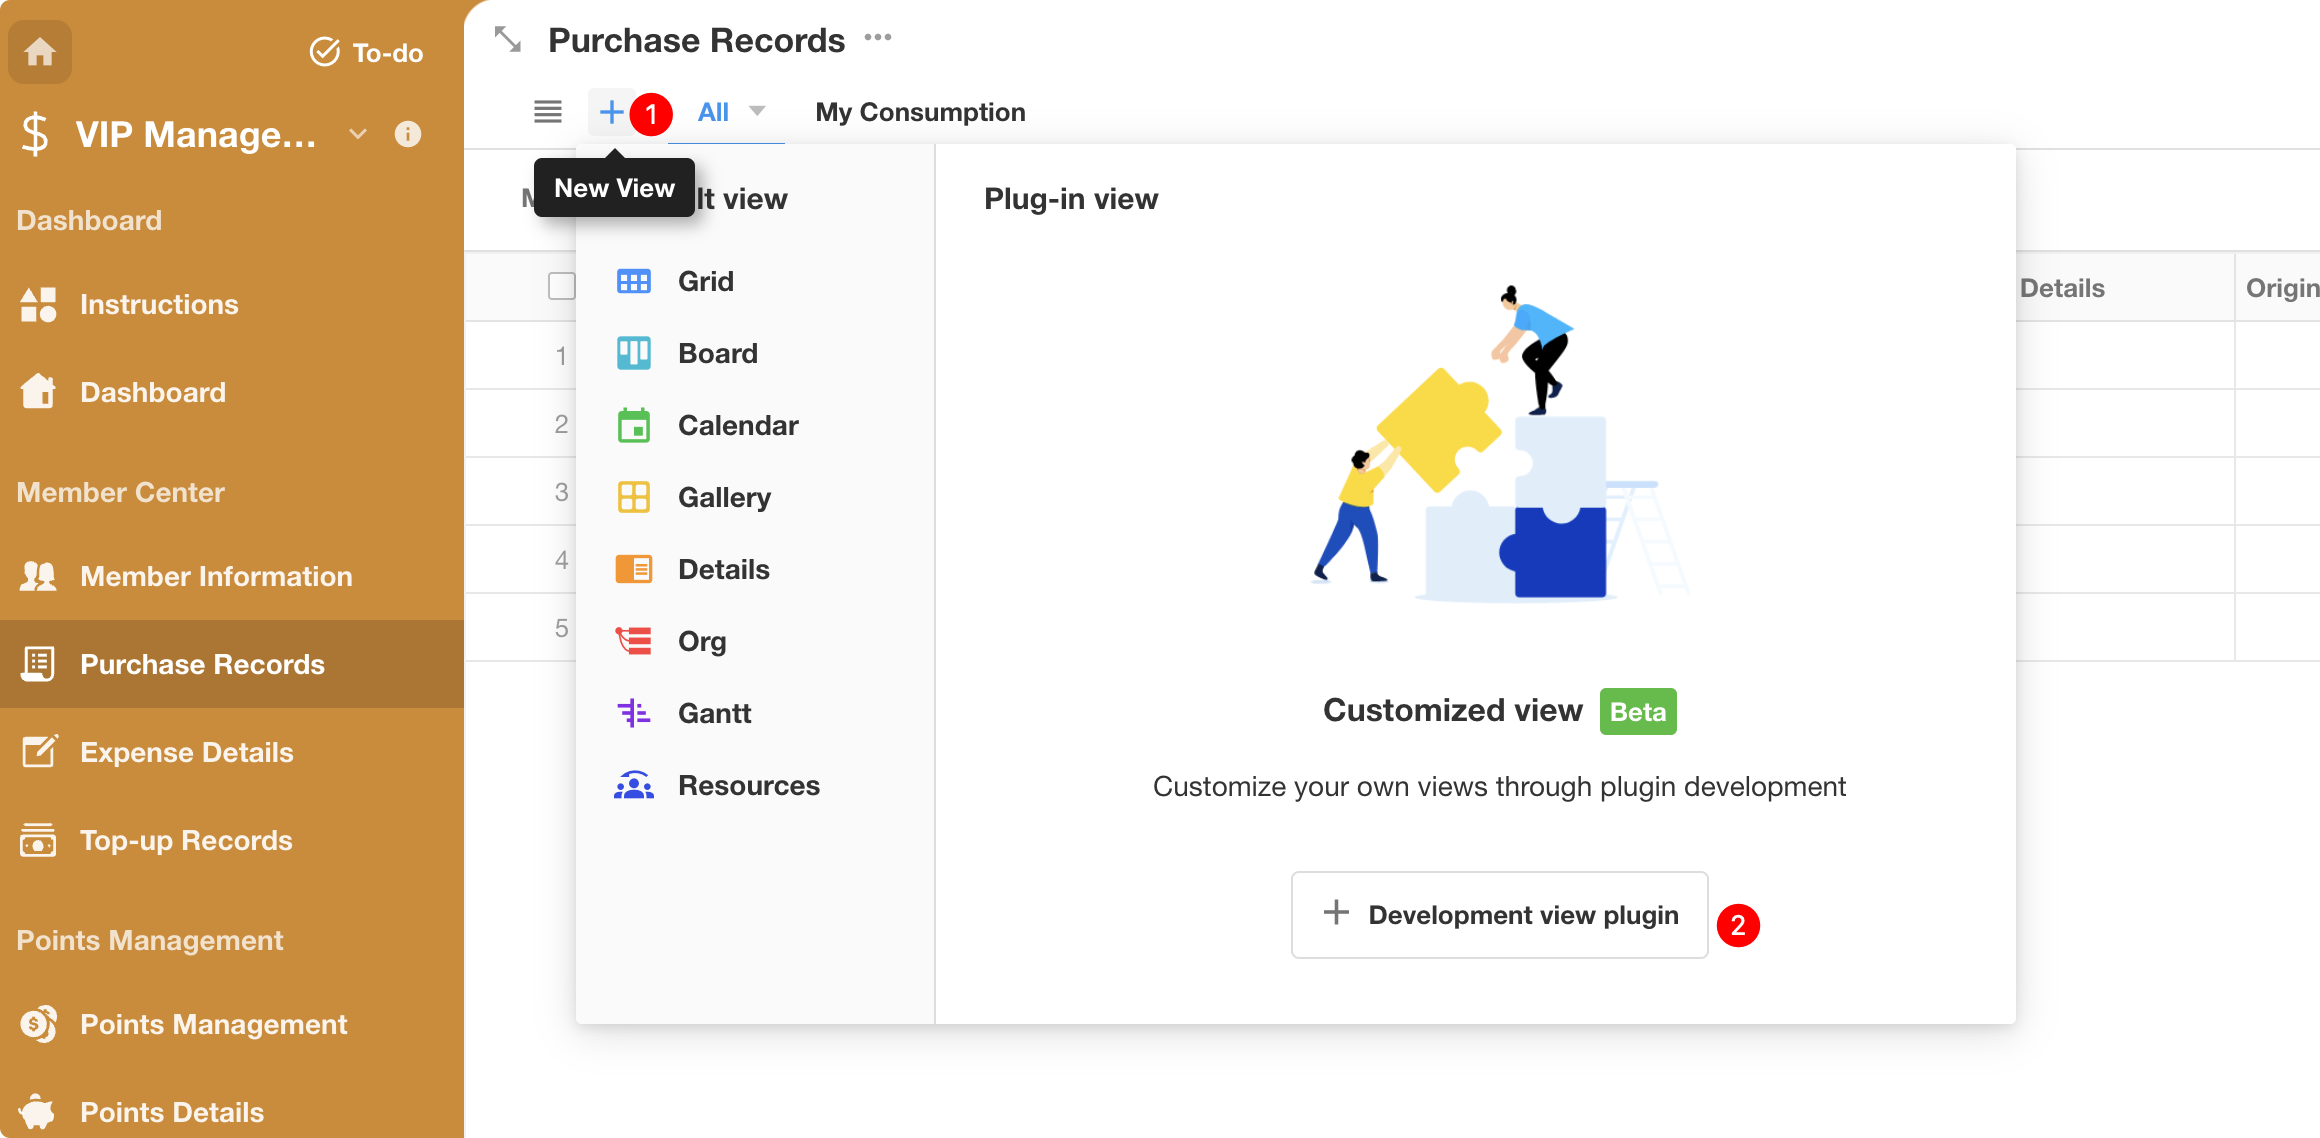
When creating a new view, select the "Customized view" option. The system will then automatically generate a view plugin, using the current worksheet as the development and debugging environment.
2. Create a Plugin in the Plugin Center
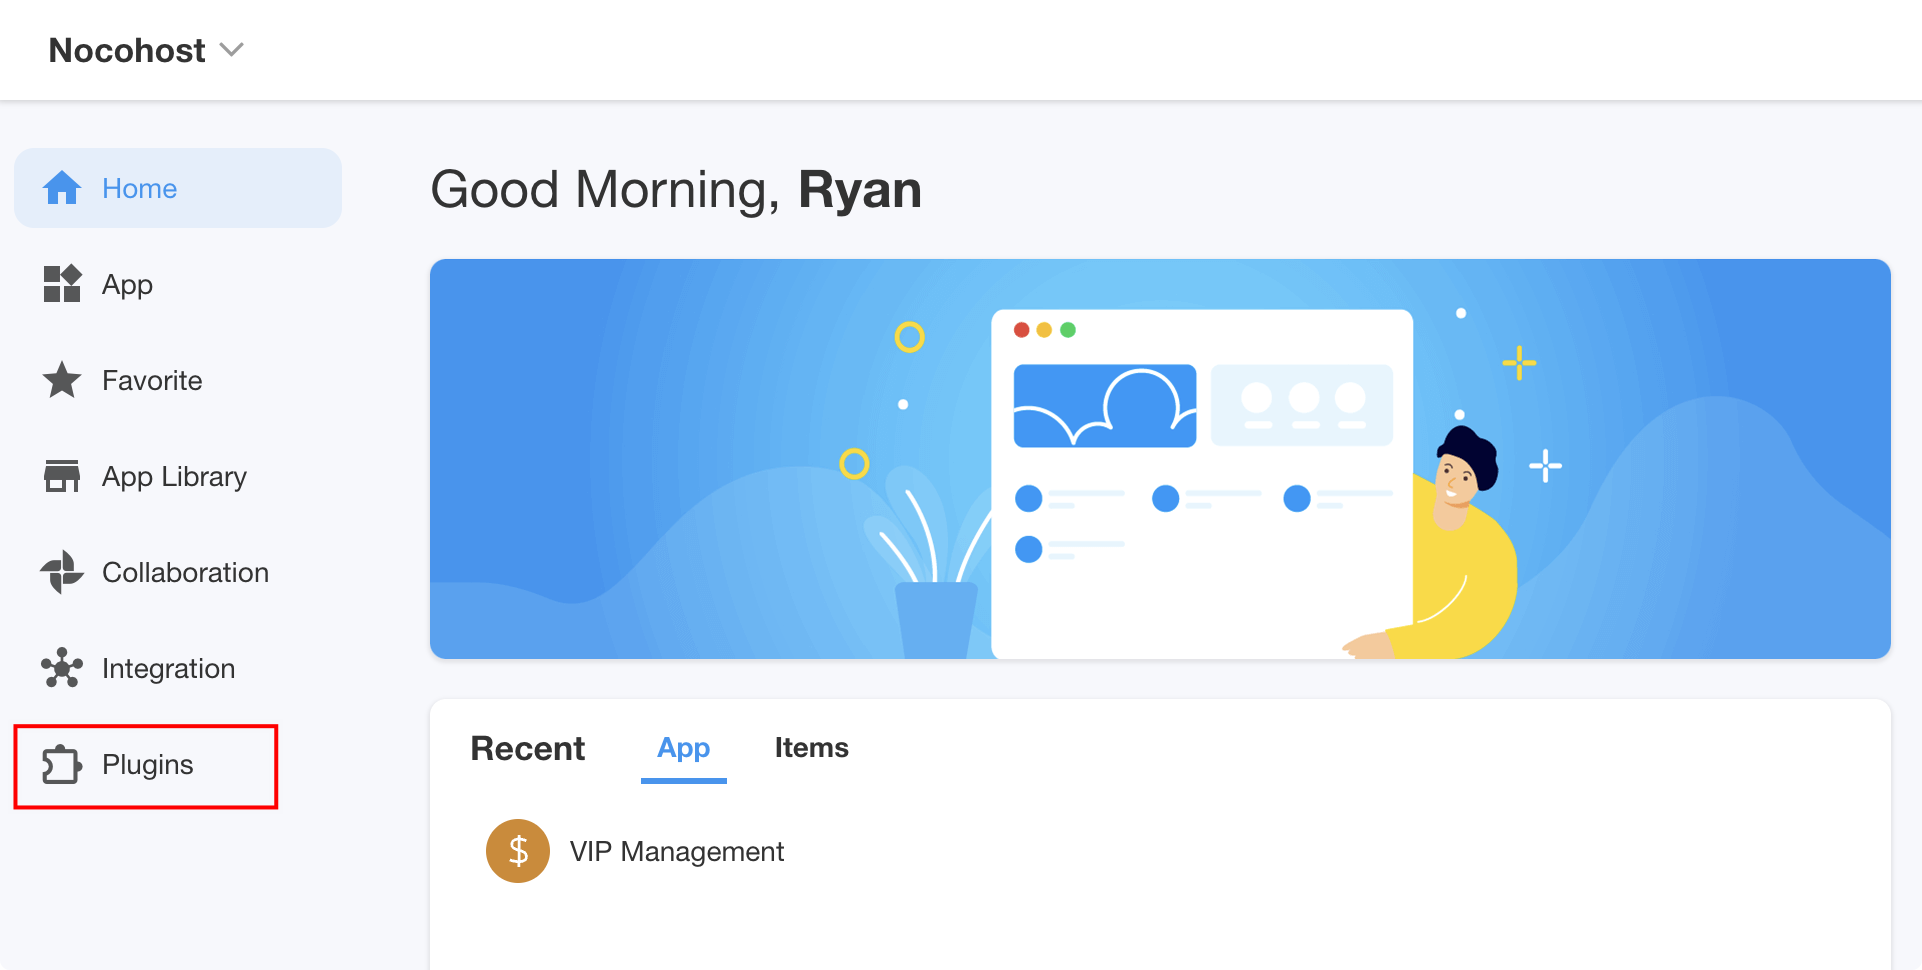
Navigate to the "Plugins" from the system homepage.
On the "Developed by me" page within the Plugin Center, click "Create Plugin".
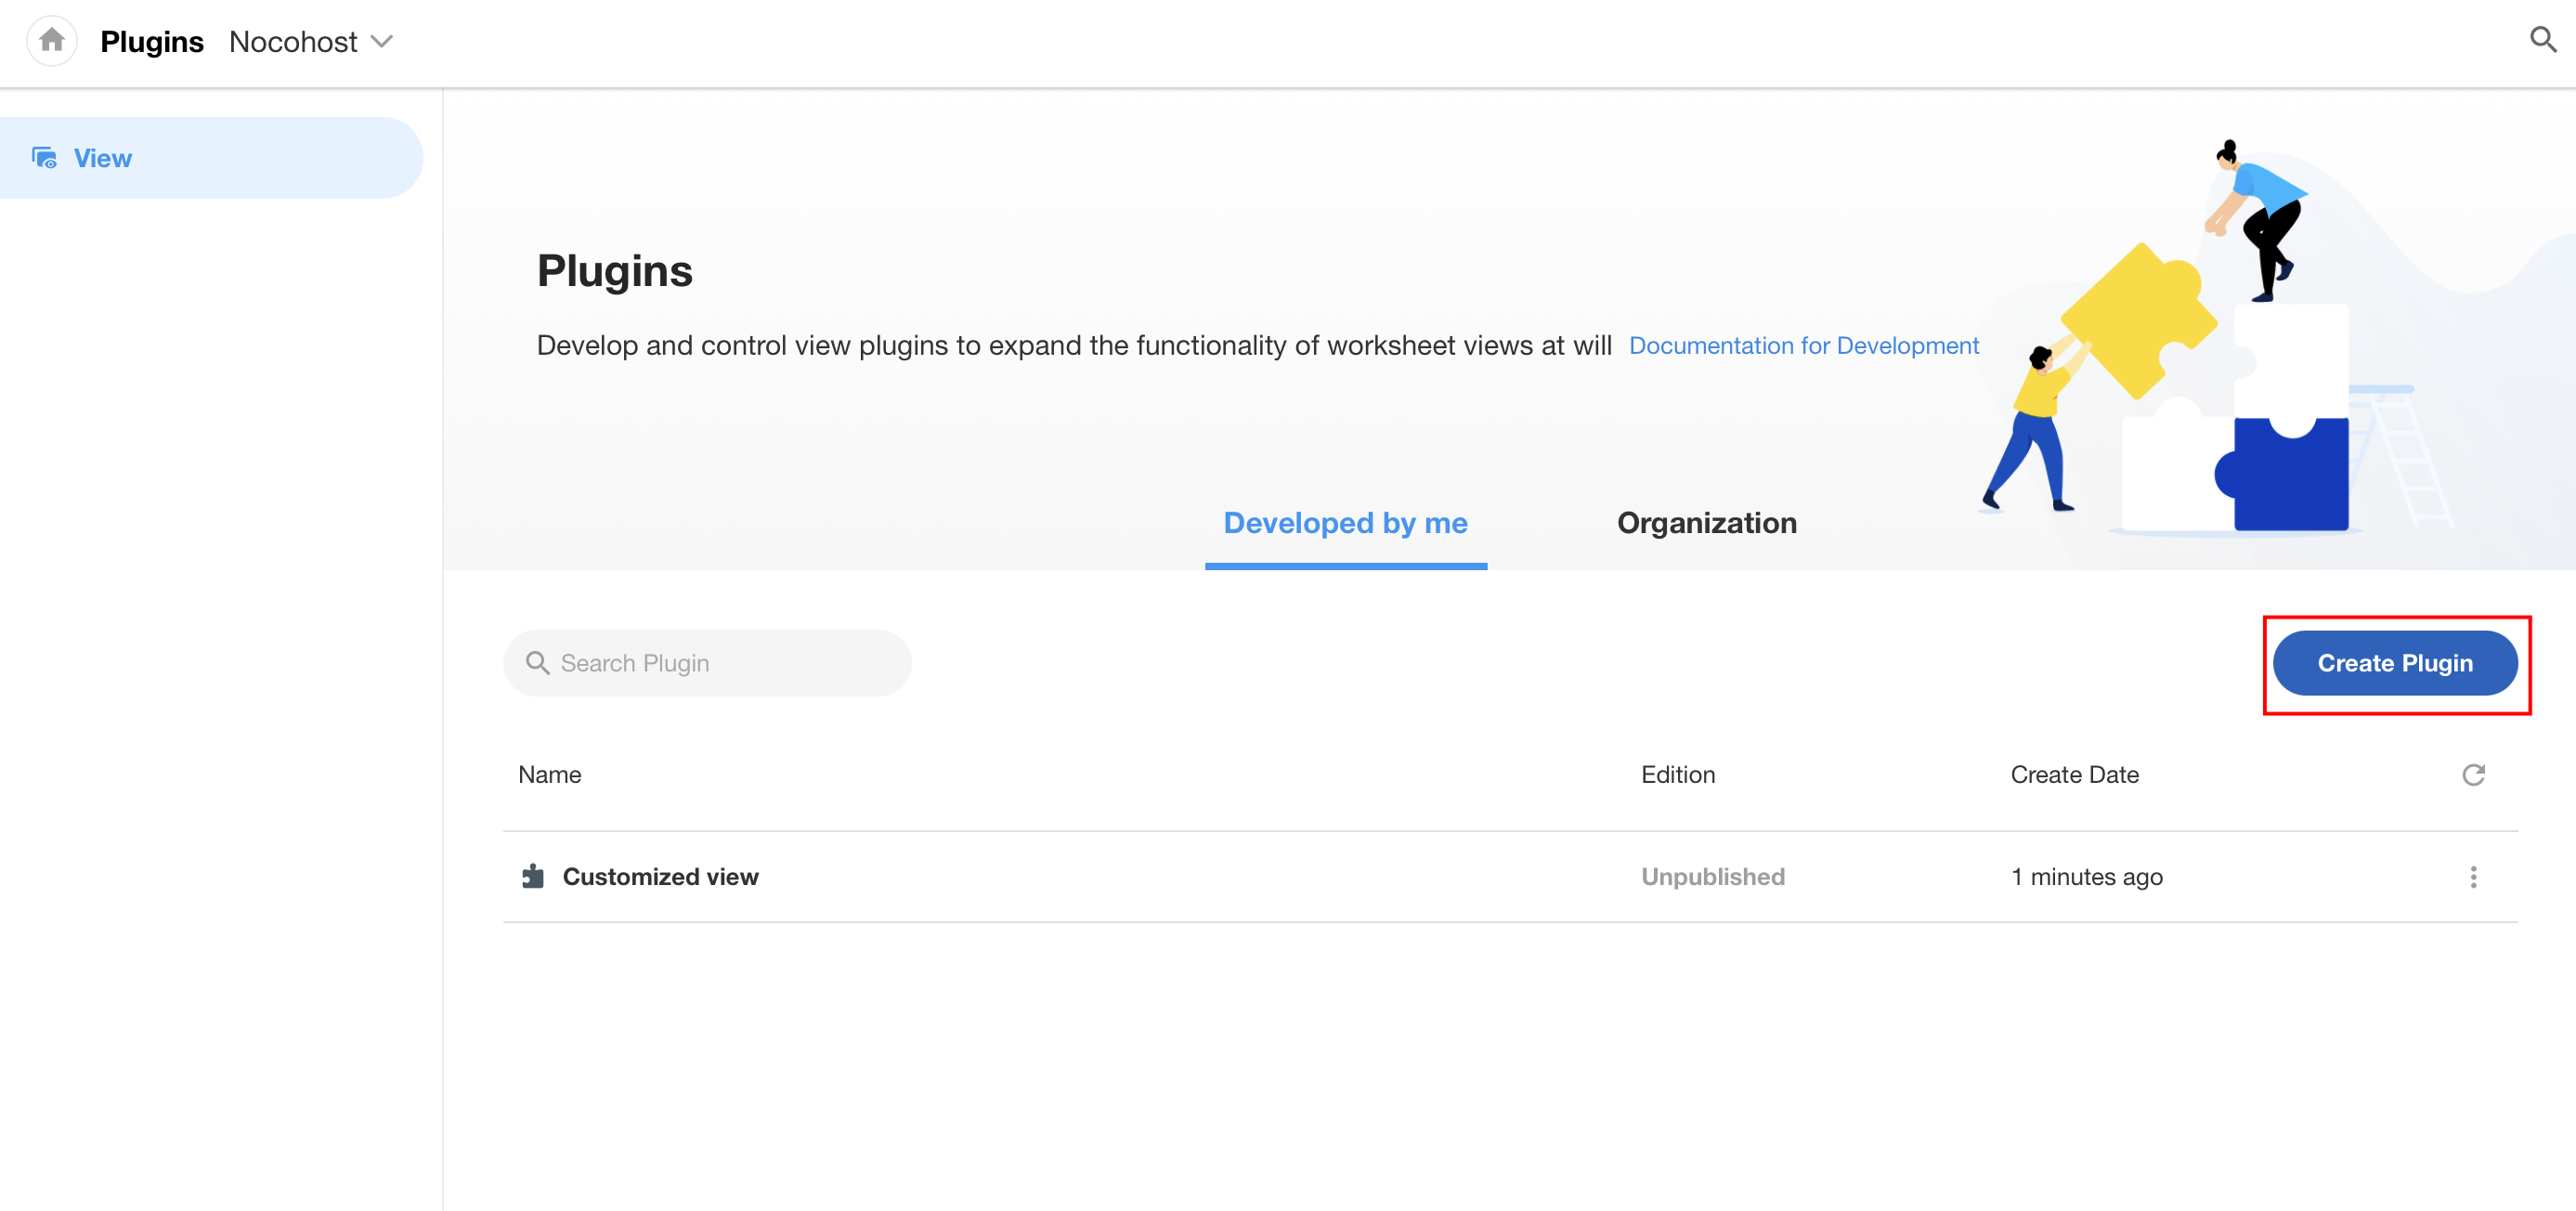
When creating a plugin via this method, you will still need to select a worksheet to serve as the development and debugging environment. After selection, a new view will be automatically created within the worksheet for developing and debugging the view plugin.
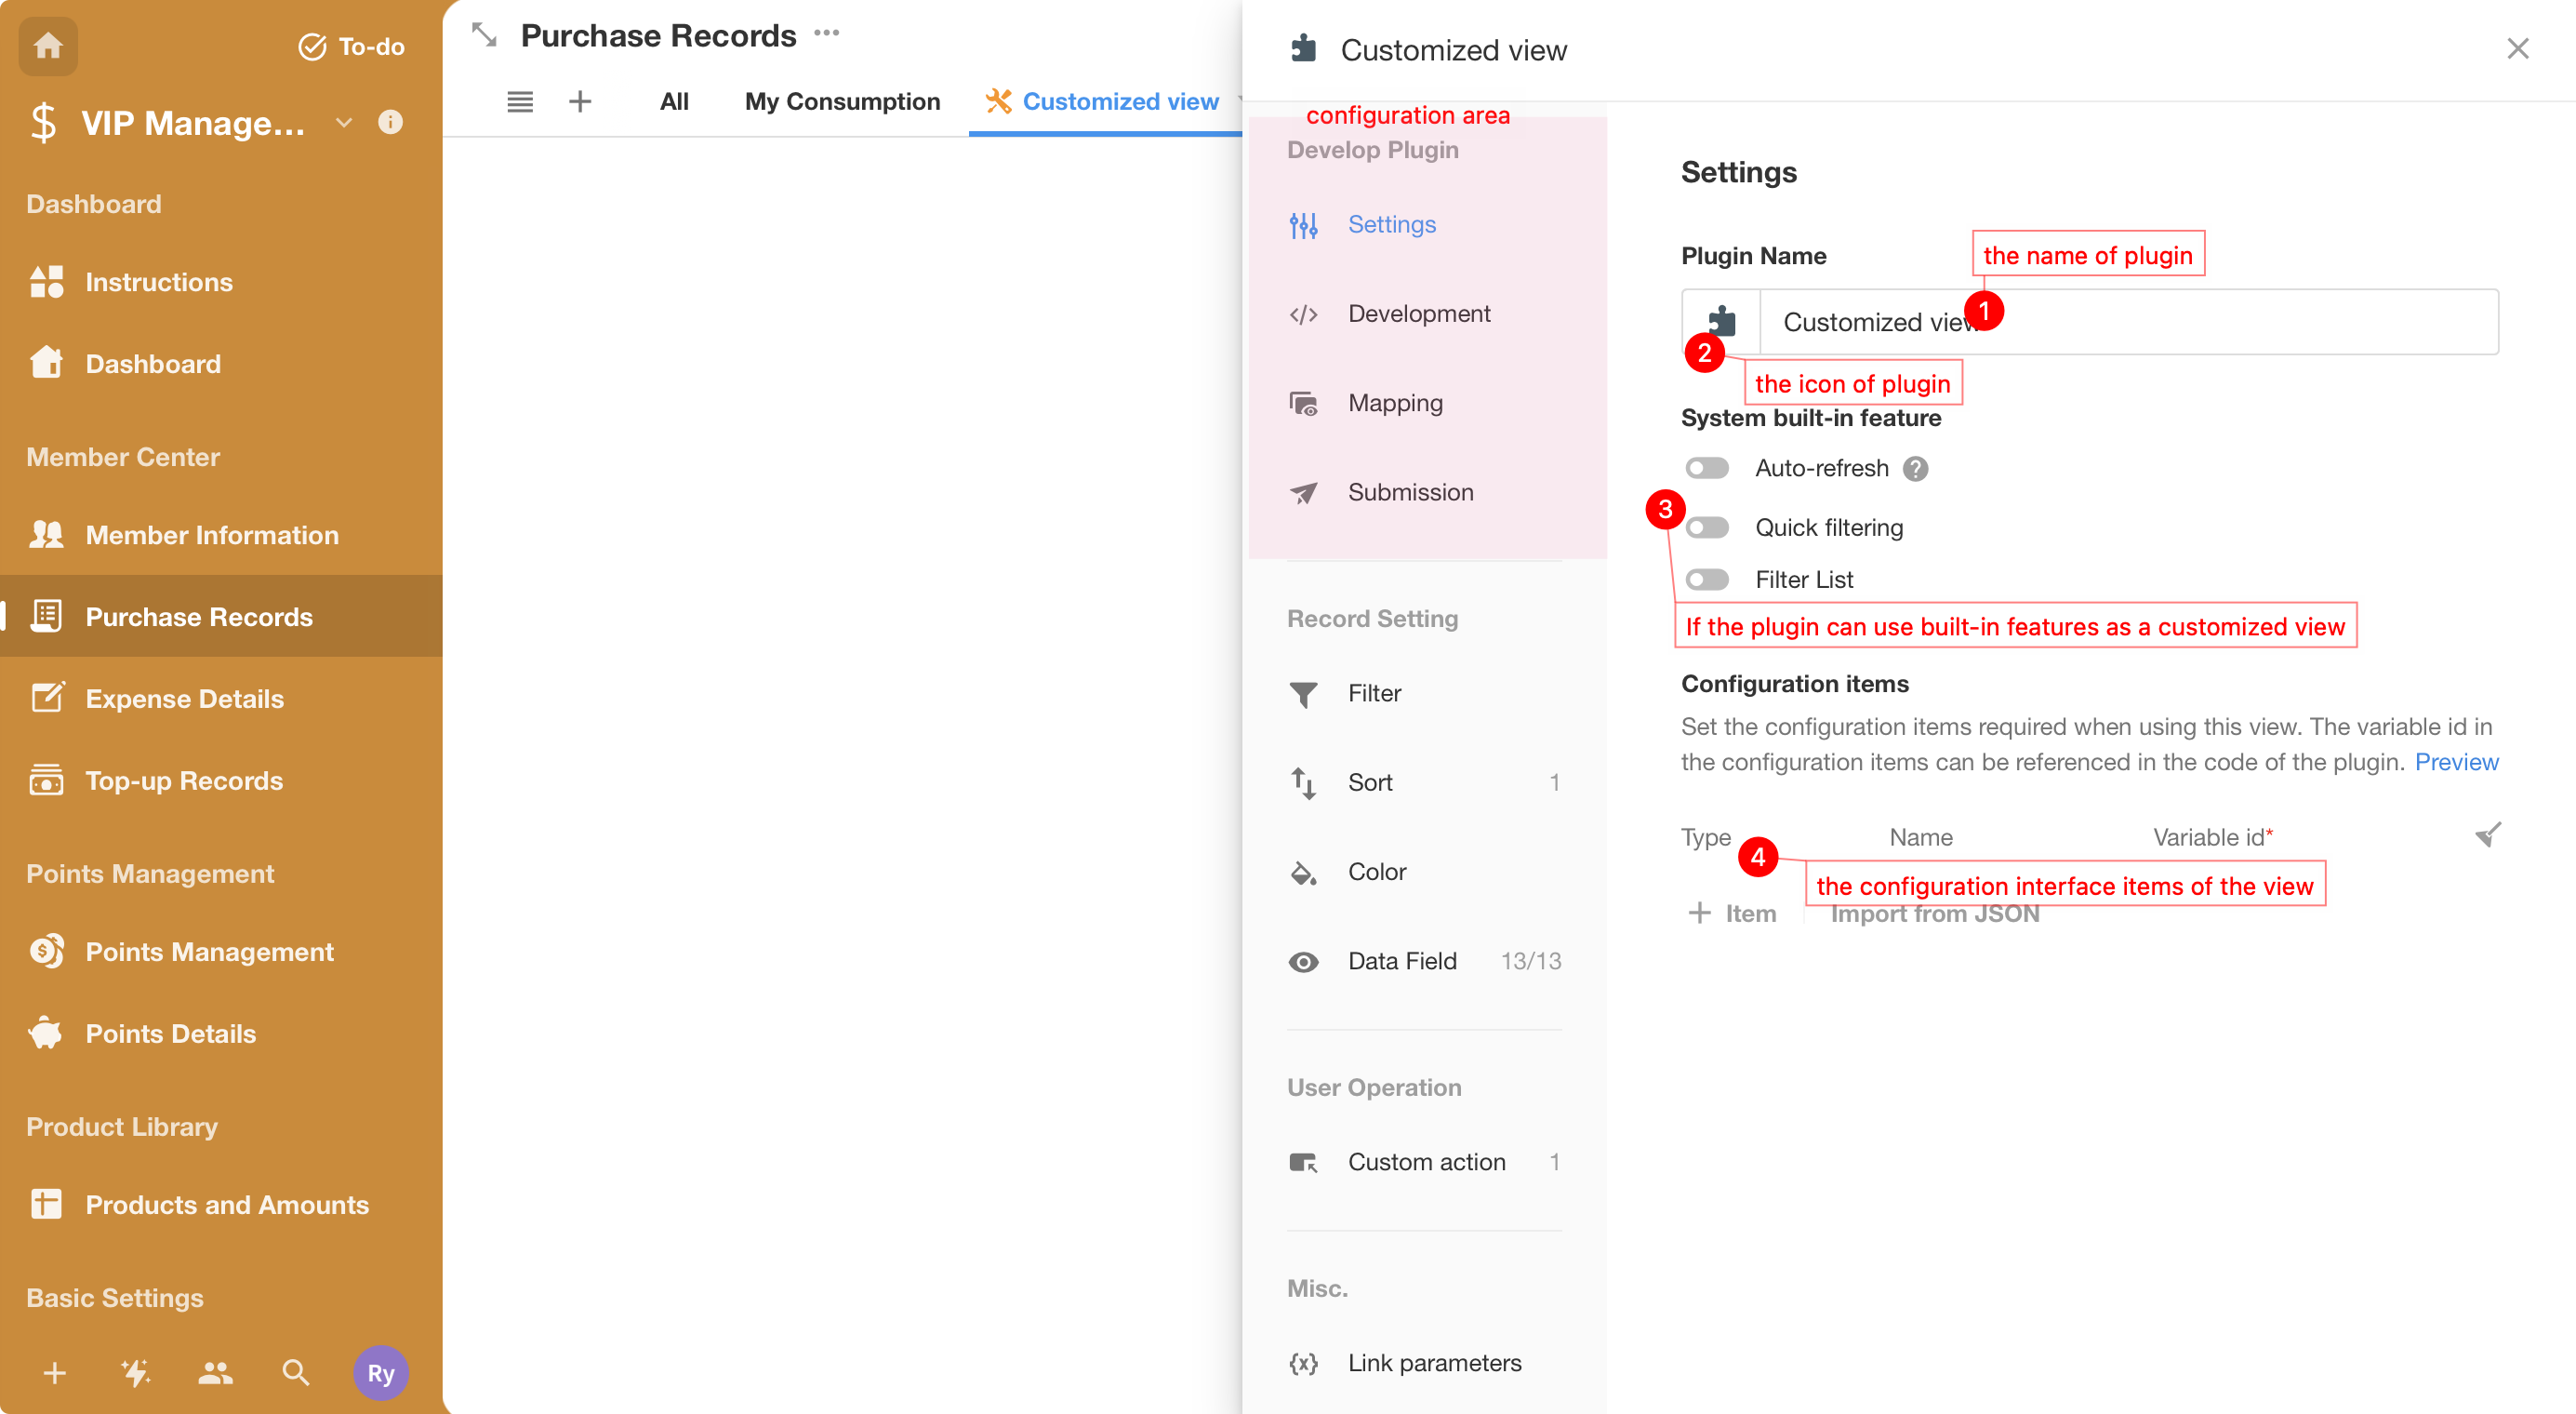
Once the plugin is created, enter the newly created Customized view within the worksheet to proceed with further development.
3. Analysis of Plugin Requirements
Before developing a view plugin, it is crucial to analyze the requirements of the view, define its scope of application, and enhance the plugin's versatility by designing appropriate settings.
For instance, consider two worksheets: Purchase Orders and Order Details.
| Orders Table | Order Details Table |
|---|---|
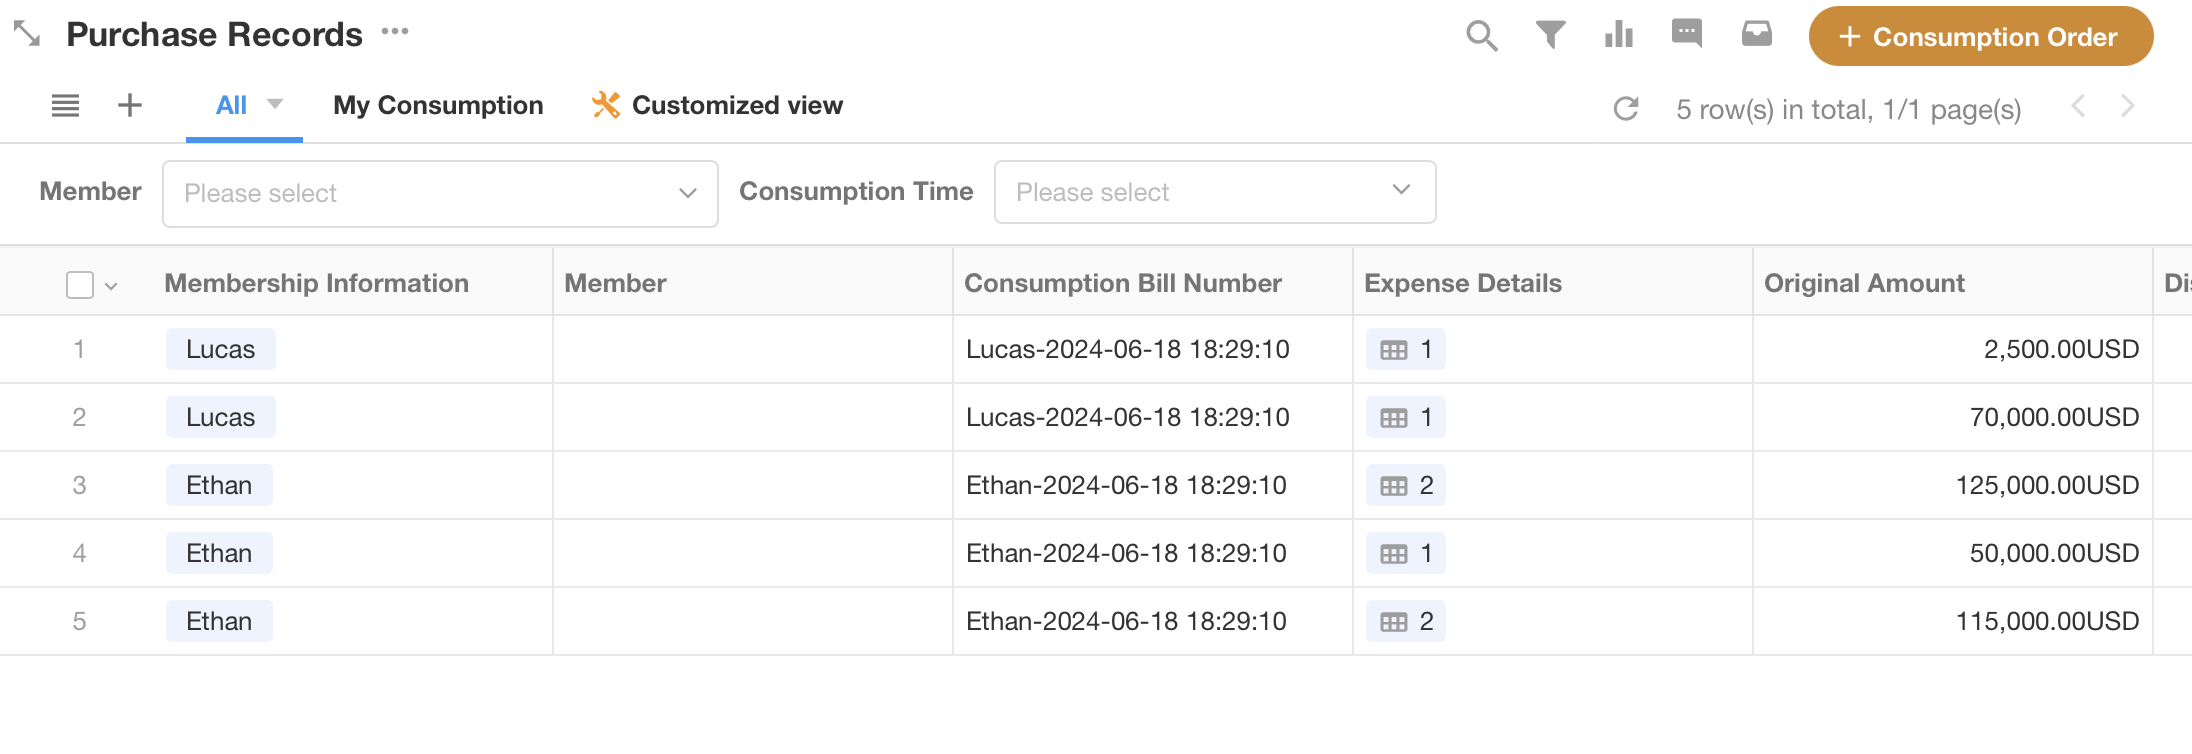 | 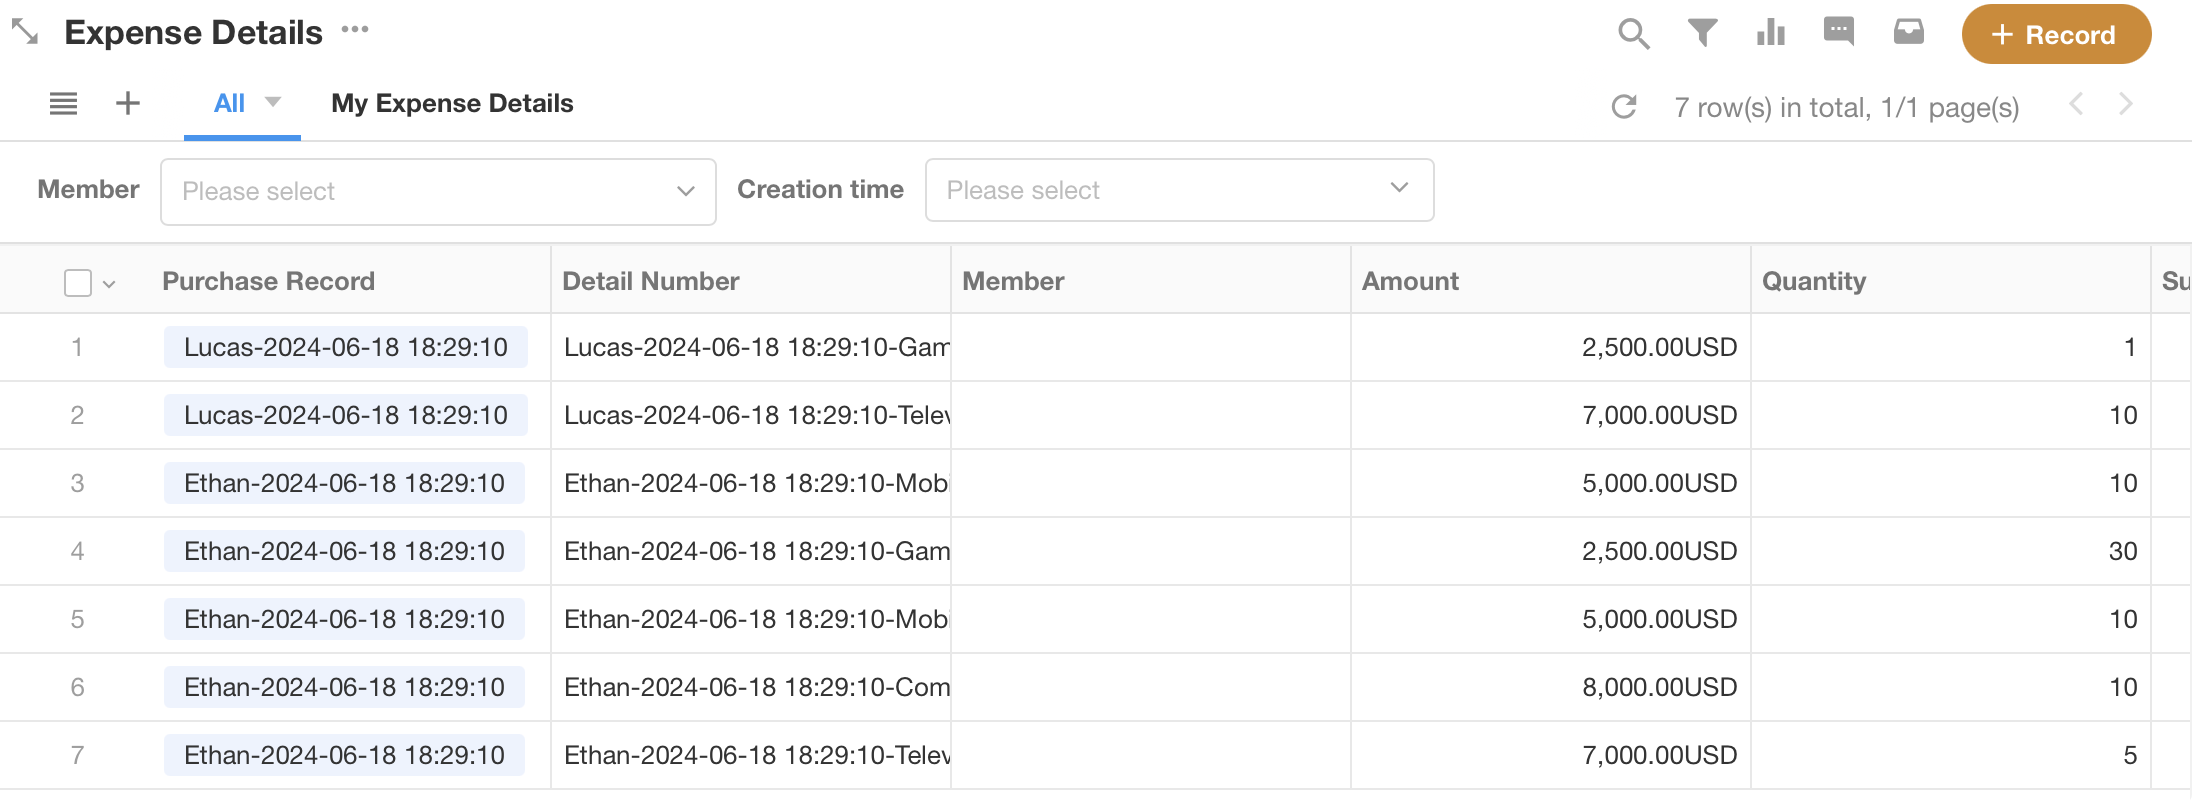 |
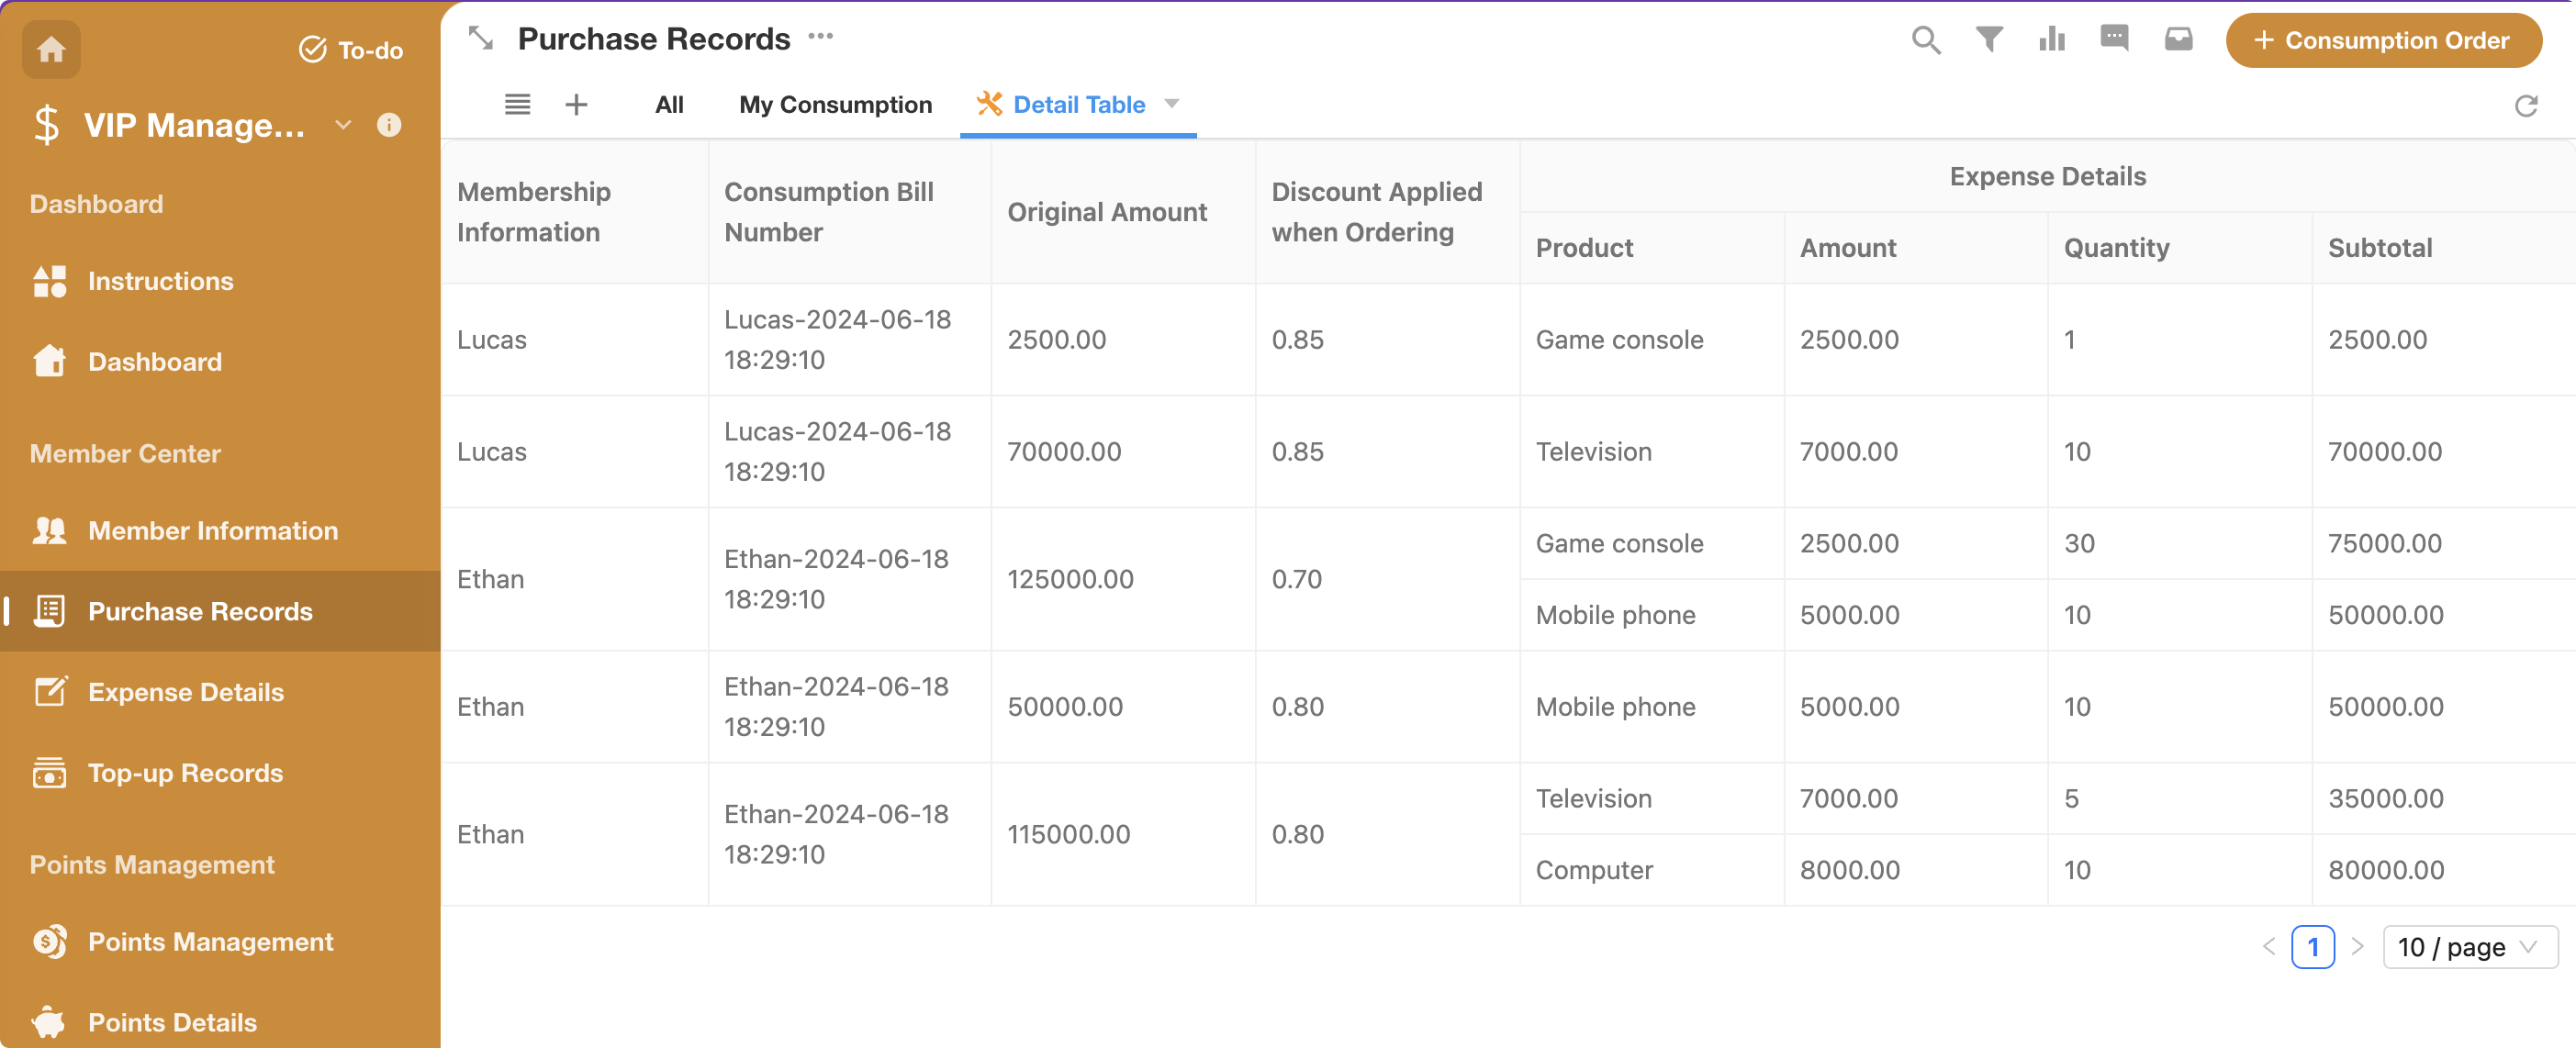
The developer intends to create a view that integrates the "Order Details" data into the main "Orders" table. The main orders data will be displayed in a merged cell format, presenting data from both tables simultaneously, as shown below:

Firstly, to implement this functionality, we can initially load the main table and then asynchronously load the sub-table data.
Secondly, to ensure the view plugin is versatile enough to be used with any worksheet, it should include some configurable options for the user:
- Users should be able to adjust and configure the display fields and their order in the view table;
- Since a worksheet might have multiple sub-tables, users should be able to configure which sub-table to display in the main table;
By clarifying the view requirements, users can better understand the development objectives and implementation boundaries, making it easier to create a plugin that fits a variety of general scenarios and reduces development costs.
4. Basic Plugin Settings
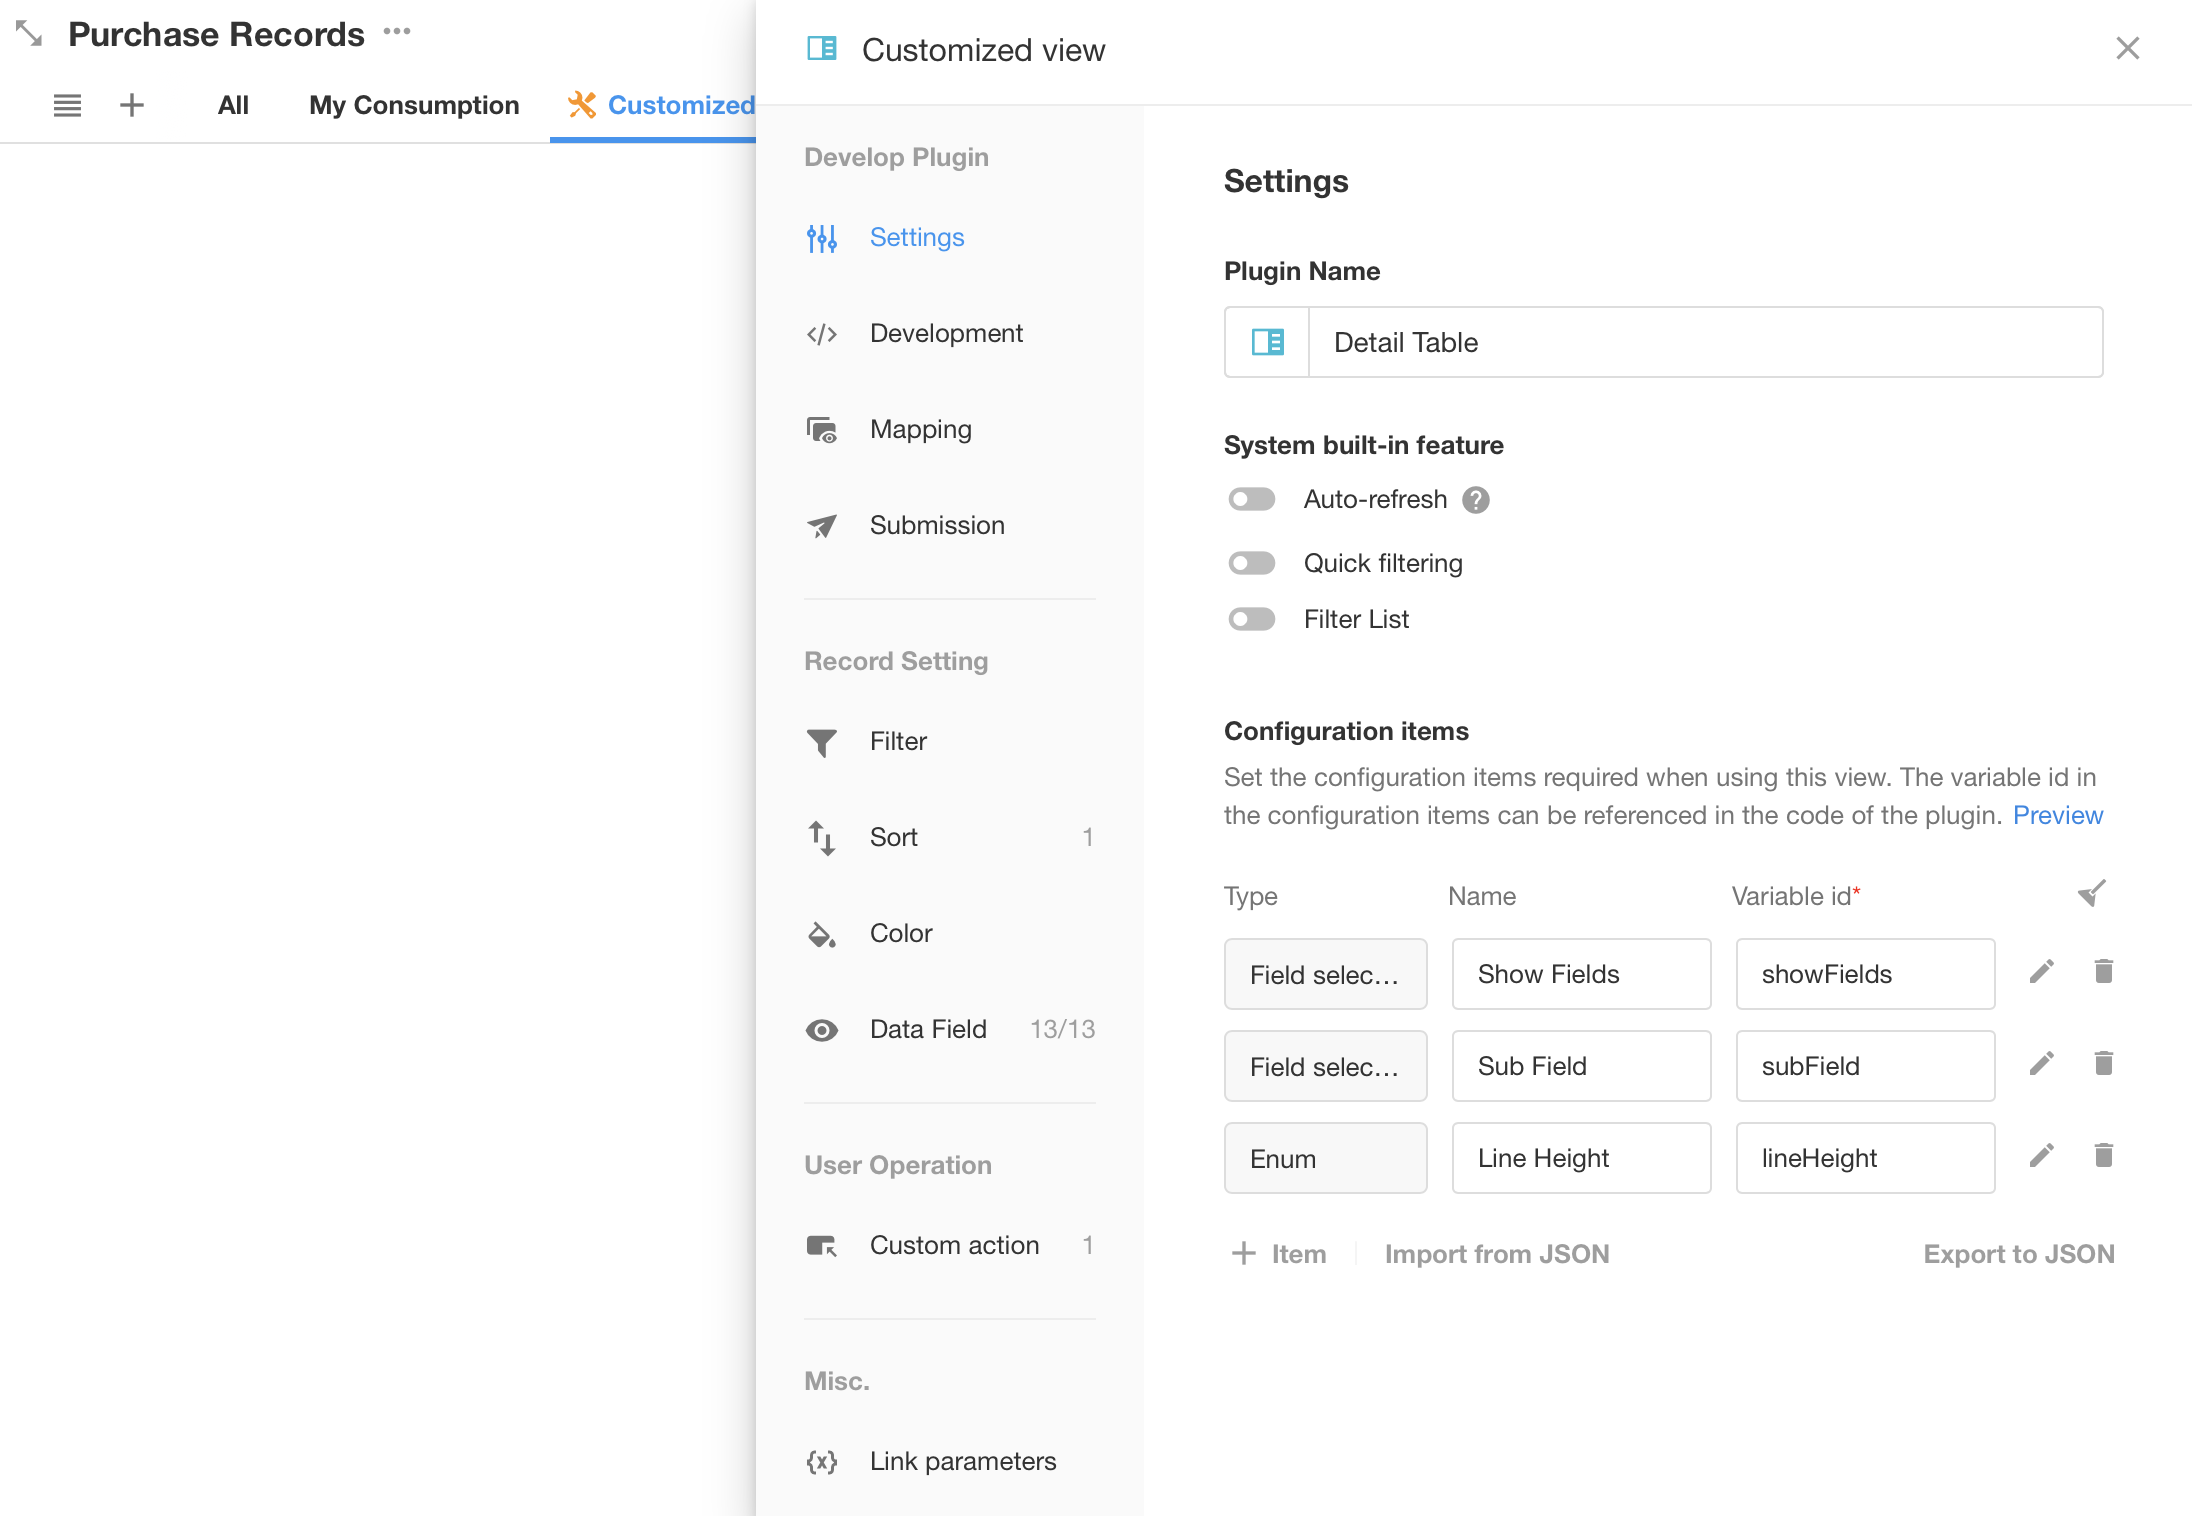
i. Icon and Name
It is recommended that the plugin name accurately conveys its functionality without including the word "view", for example: "Map", "Mind Map", "Tree Table", etc. The icon can be customized, serving as the plugin's logo.
ii. Enabling Features
View plugins allow users to choose whether to enable "Quick Filtering" and "Filter List". When enabled, after users interact with the quick filter items and filter list, the system will send an event trigger message to the plugin. Developers need to add event handlers in the plugin to handle data filtering logic based on the provided filter conditions. Refer to the sample code of the mdye Message System in the appendix of this document.
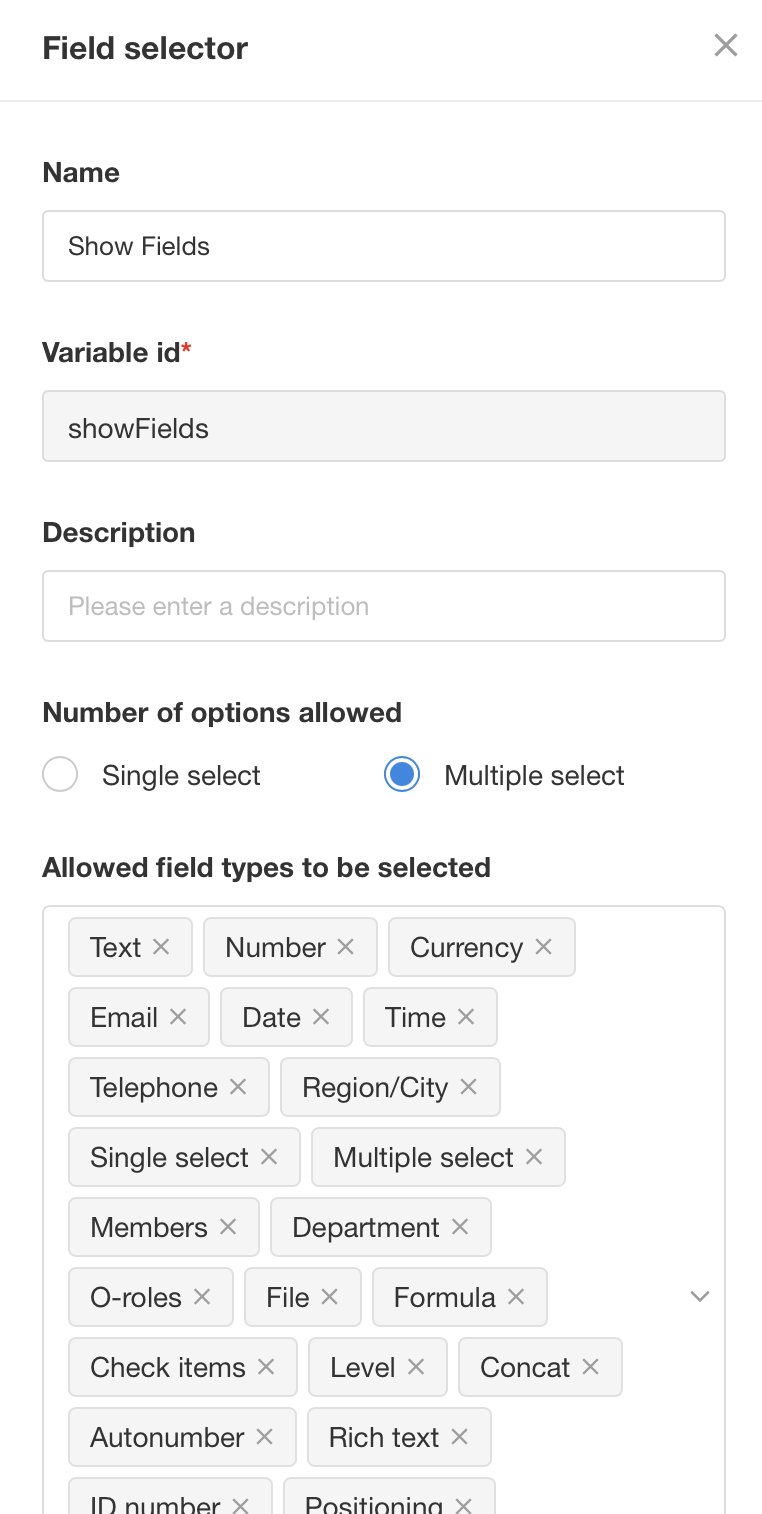
iii. Defining View Setting Parameters
 | 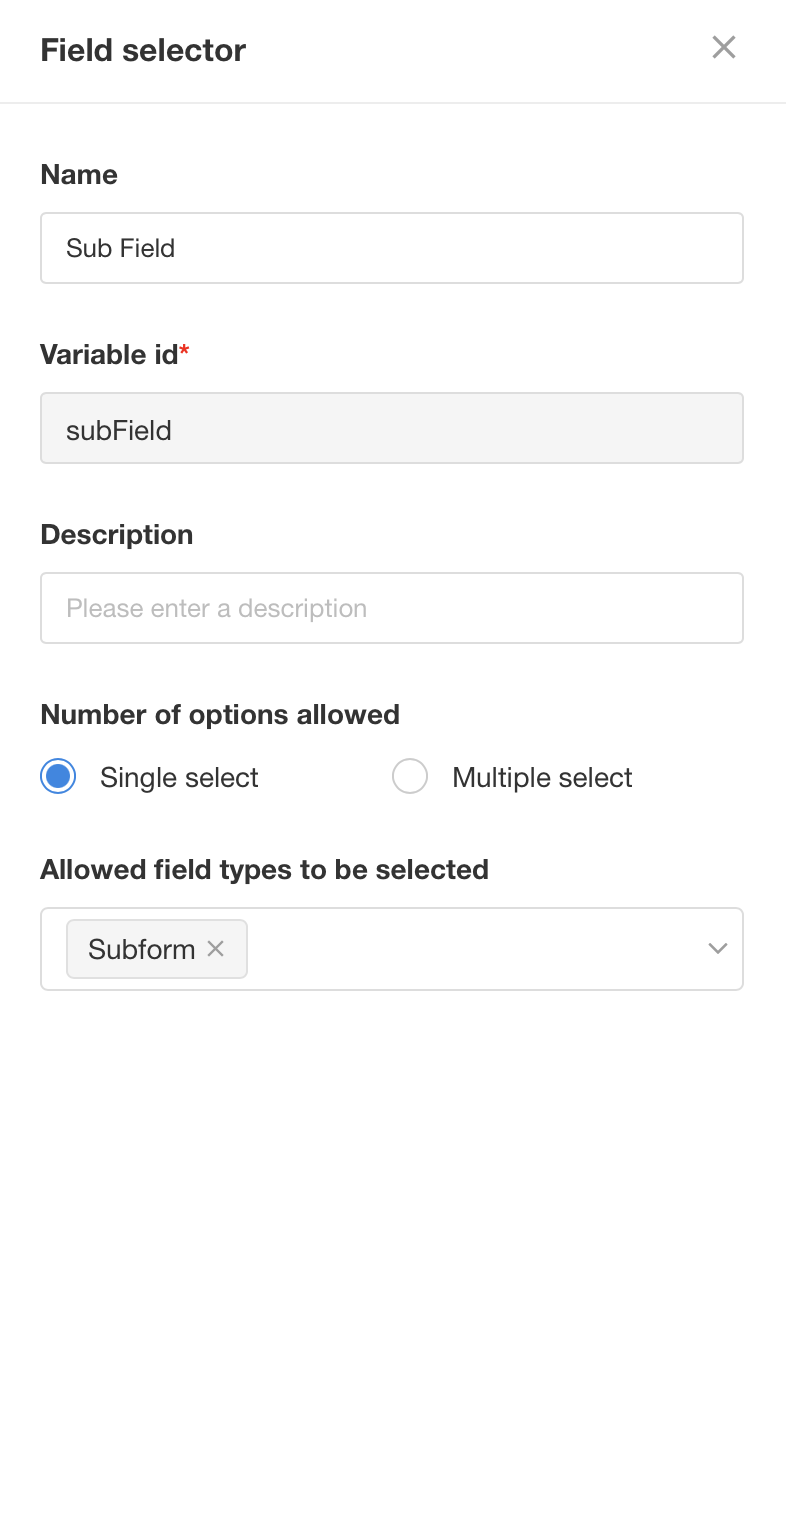 |  | 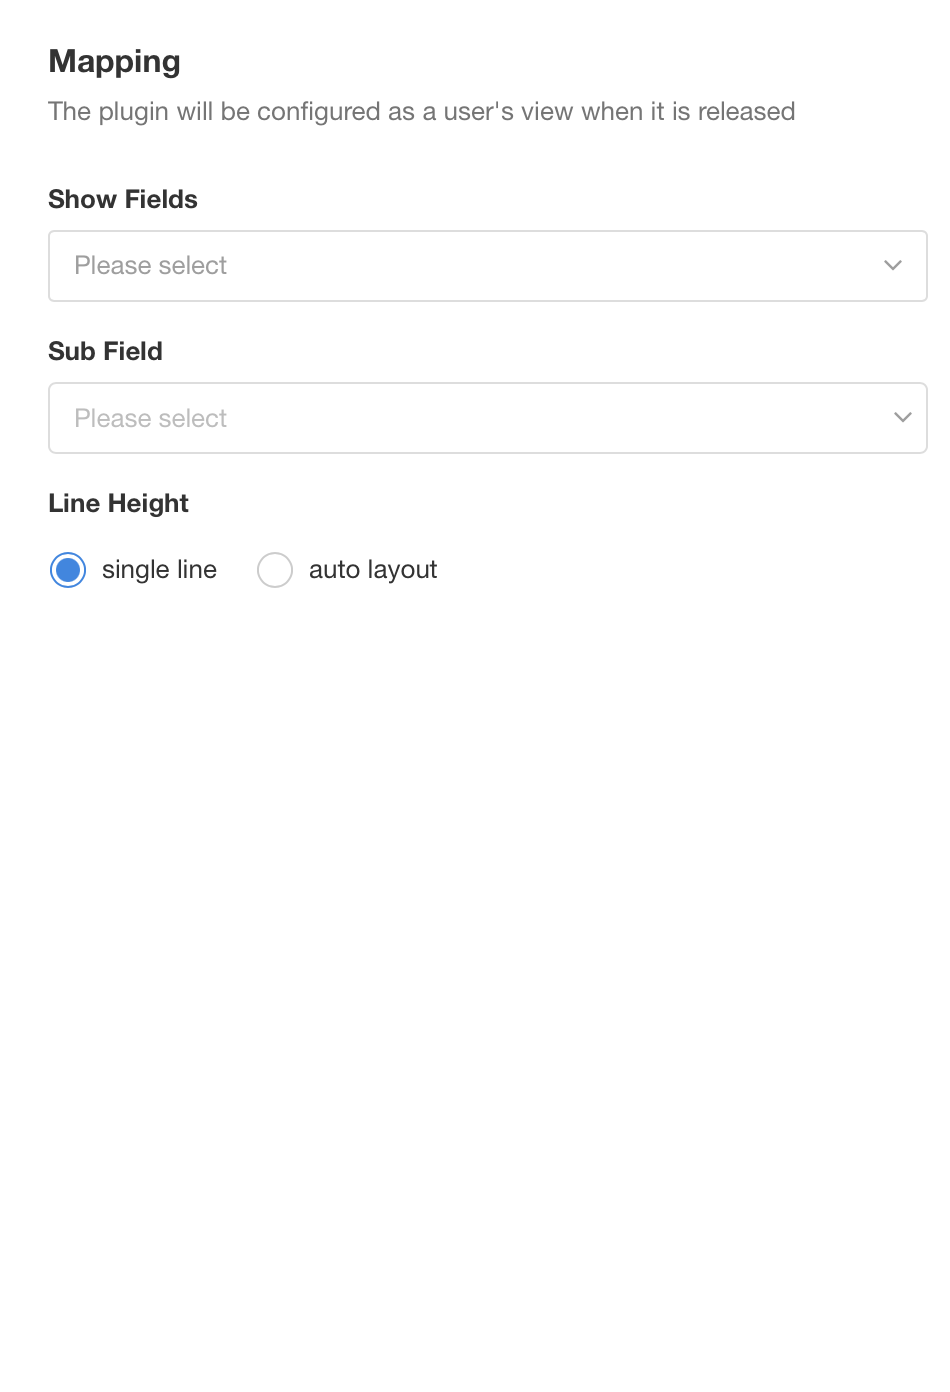 |
|---|---|---|---|
| Main Table Display Fields | Detail Table Fields | Line Height | Parameter Mapping |
In the above example, we have defined three view setting parameters: "Display Fields (showFields)","Sub Table Detail Fields (subField)", and "Line Height (lineHeight)" corresponding to the needs of three configurations. In "Parameter Mapping", developers can map the actual view configuration to the fields and retrieve its value in the code through the env variable.
Refer to the code:
import { env } from "mdye";
const { showFields, subField, lineHeight } = env;
// showFields,subField and lingHeight are the values configured by the user, and the variable names correspond to the variable IDs in the configuration one-to-one
The setting parameters include the following types:
| Setting Type | Subtype | Value Type | Remarks |
|---|---|---|---|
| Field Selector | Single Field Selector Multiple Field Selector | array[string] | When multiple fields are selected, the number of selected fields can be limited |
| String | string | ||
| Number | double | ||
| Enum | Radio Group Dropdown Menu | array[string] | The format for options is key=value, where value is the text shown to the user, and key is the value retrieved in the code; When styled as a radio, you can choose horizontal or vertical layout; |
| Boolean | Switch Checkbox | boolean | |
| Group | null |
5. Creating a Local Project
Next, switch to the "Development" panel. We will follow the wizard to create a local project and run it in the debugging worksheet.
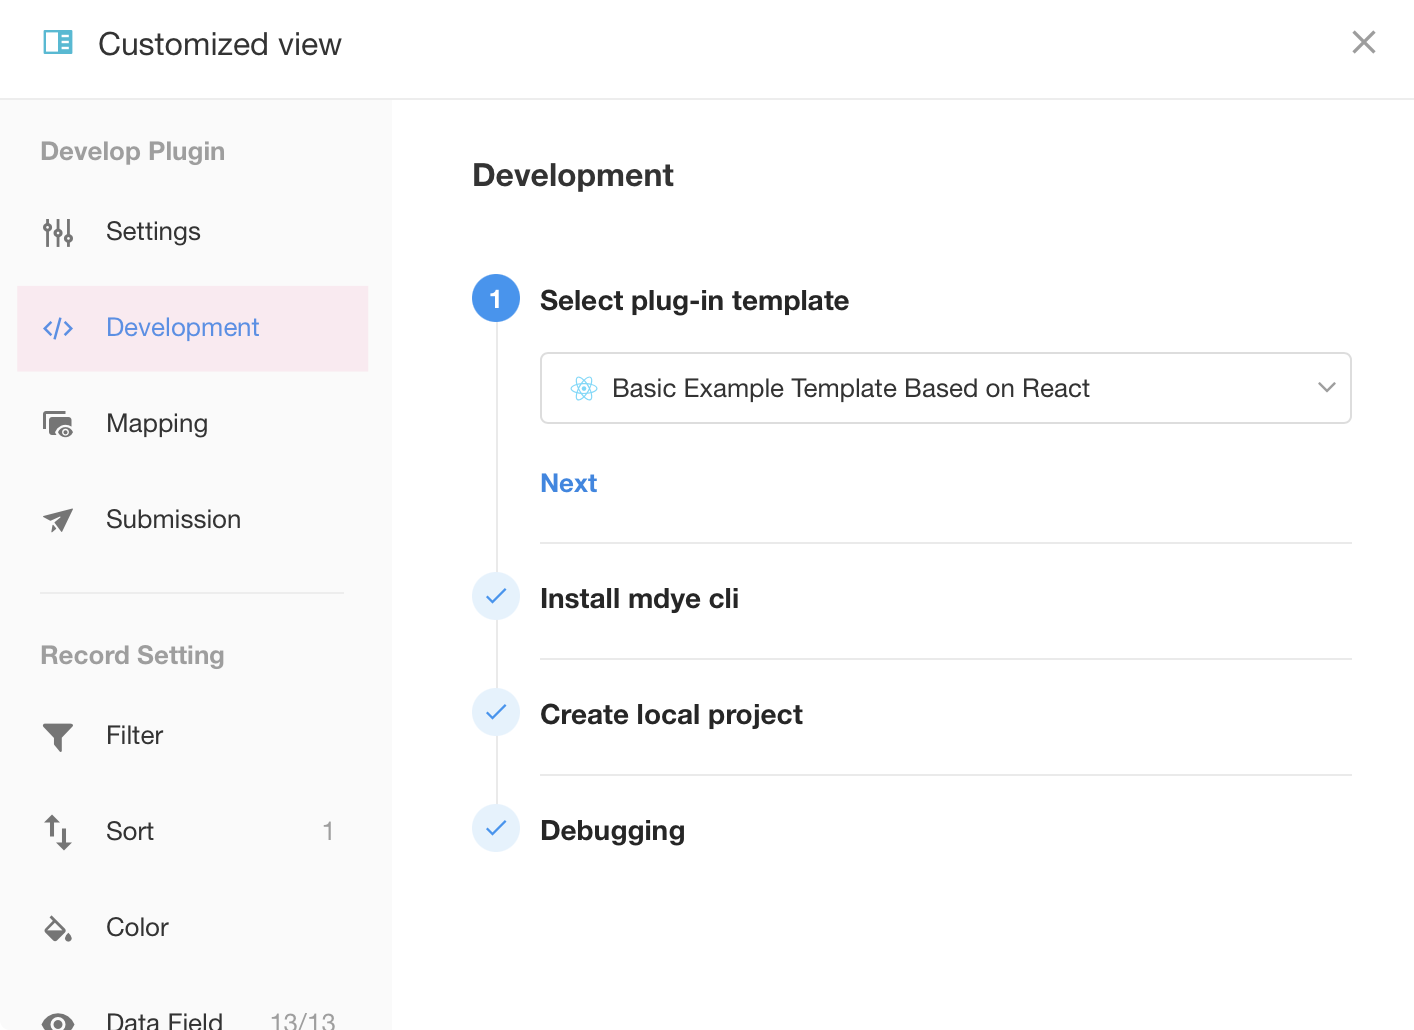
i. Selecting a Scaffold Template
Before starting local development, you need to choose a built-in scaffold template. When you execute the initialization command locally, the corresponding template files will be created. The system currently offers the following templates:
- React Basic Example Template
- JavaScript Basic Example Template
- React + Tailwind CSS Template
- Vue 3 Template
- Vue 2 Template
ii. Installing the mdye CLI Tool
The initialization of the local project is done through the HAP command line tool mdye, so you need to install this tool globally beforehand.
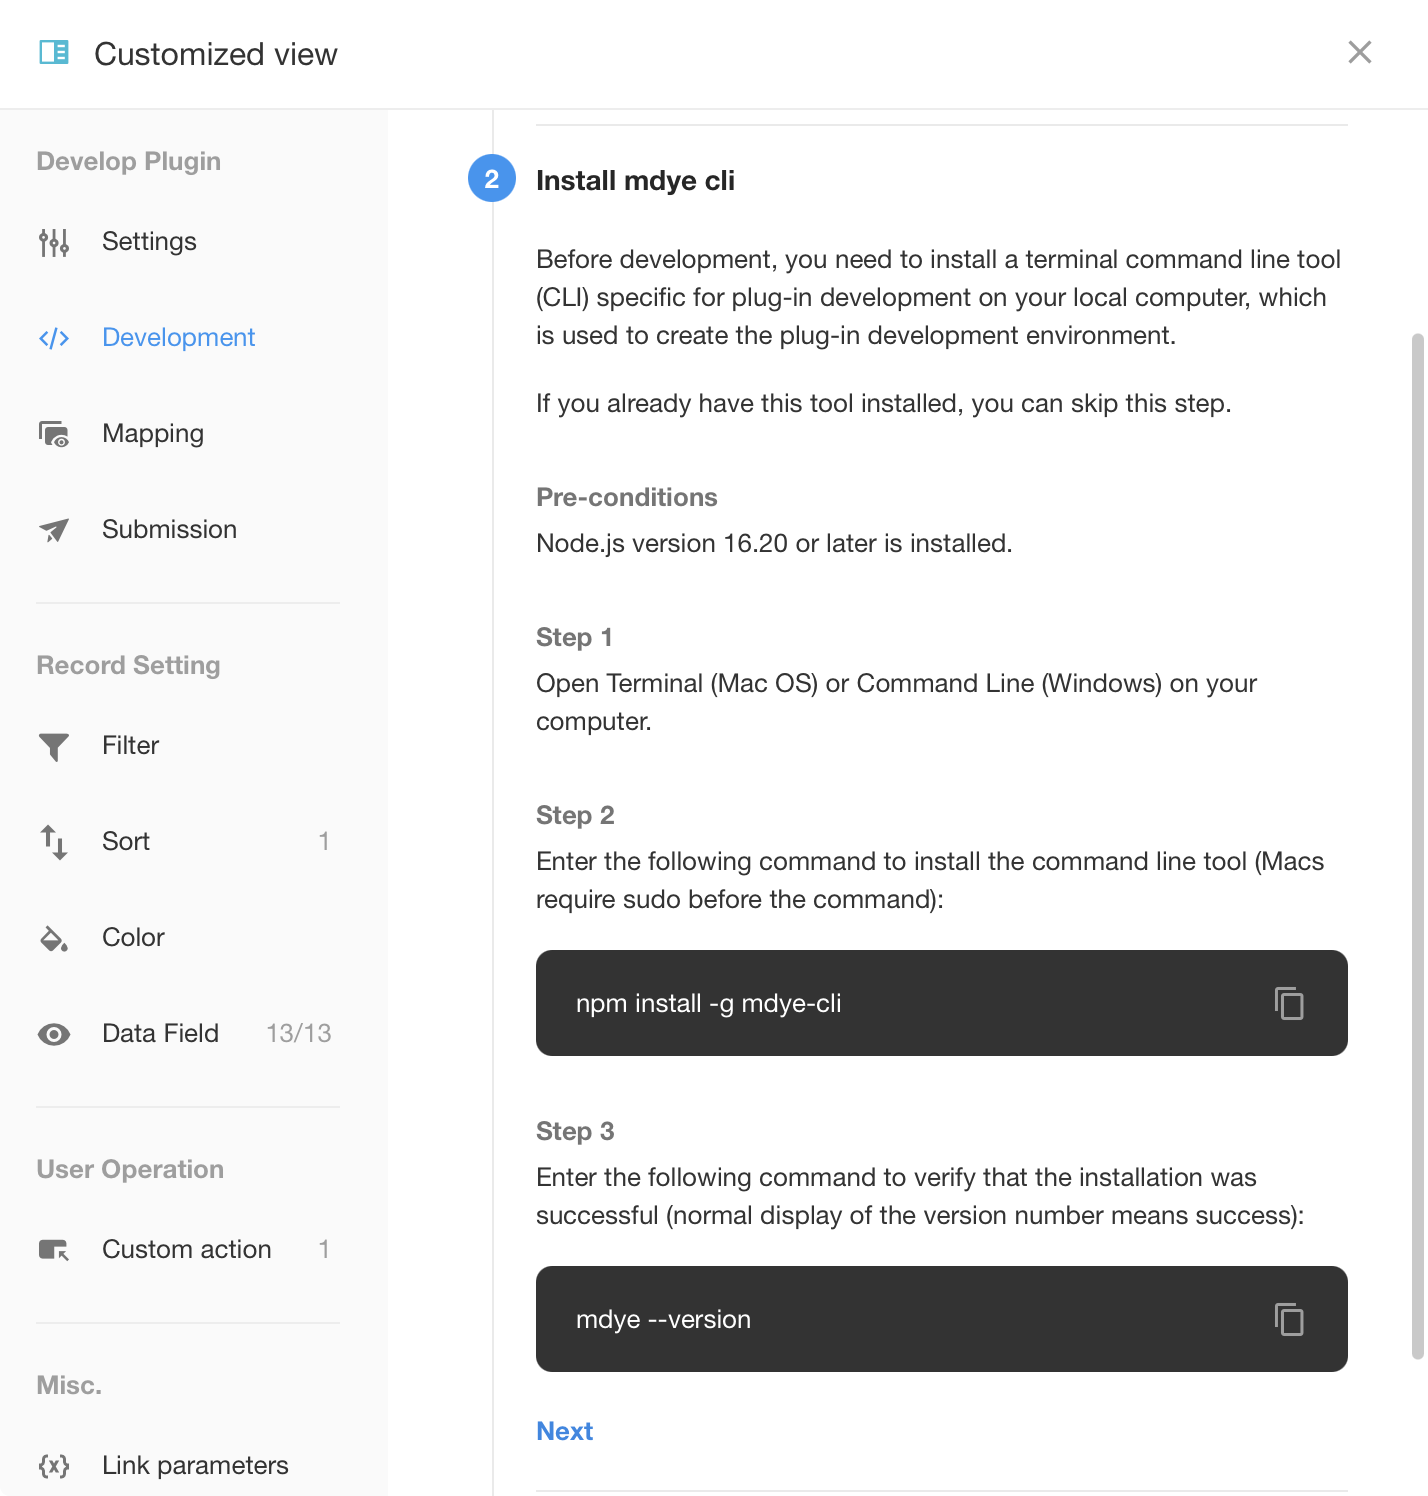
Use the following command to install it in your terminal:
$ npm install -g mdye-cli
If you encounter a permission error, use sudo to install:
$ sudo npm install -g mdye-cli
Once the installation is complete, verify the installation with the following command:
$ mdye --version
beta-0.0.37
If the version number is displayed correctly, the installation was successful. This tool usually only needs to be installed once, so you won't need to install it again when developing new plugins in the future. If a new version of the tool is released, you can reinstall it to upgrade.
mdye full command list:
Usage: mdye [options] [command]

Options:
  -v, --version          Check the mdye version
  -h, --help             Display help information

Commands:
  auth [options]         mdye auth  Authorize login to HAP
  init [options]         mdye init view --id <id> --template <template-name> Initialize a project, please copy the command from the web
  start [options]        mdye start Start development
  build [options]        mdye build
  push [options]         mdye push -m <message> Submit the plugin to HAP server
  whoami [options]       mdye whoami  Display current user information
  logout [options]       mdye logout  Log out of the currently logged in user
  sync-params [options]  mdye sync-params -f <file-path> Sync plugin configuration items, -f[optional, default file path is ./.config/params-config.json]
  help [command]         Display help for a specific subcommand
iii. Initializing the Local Project
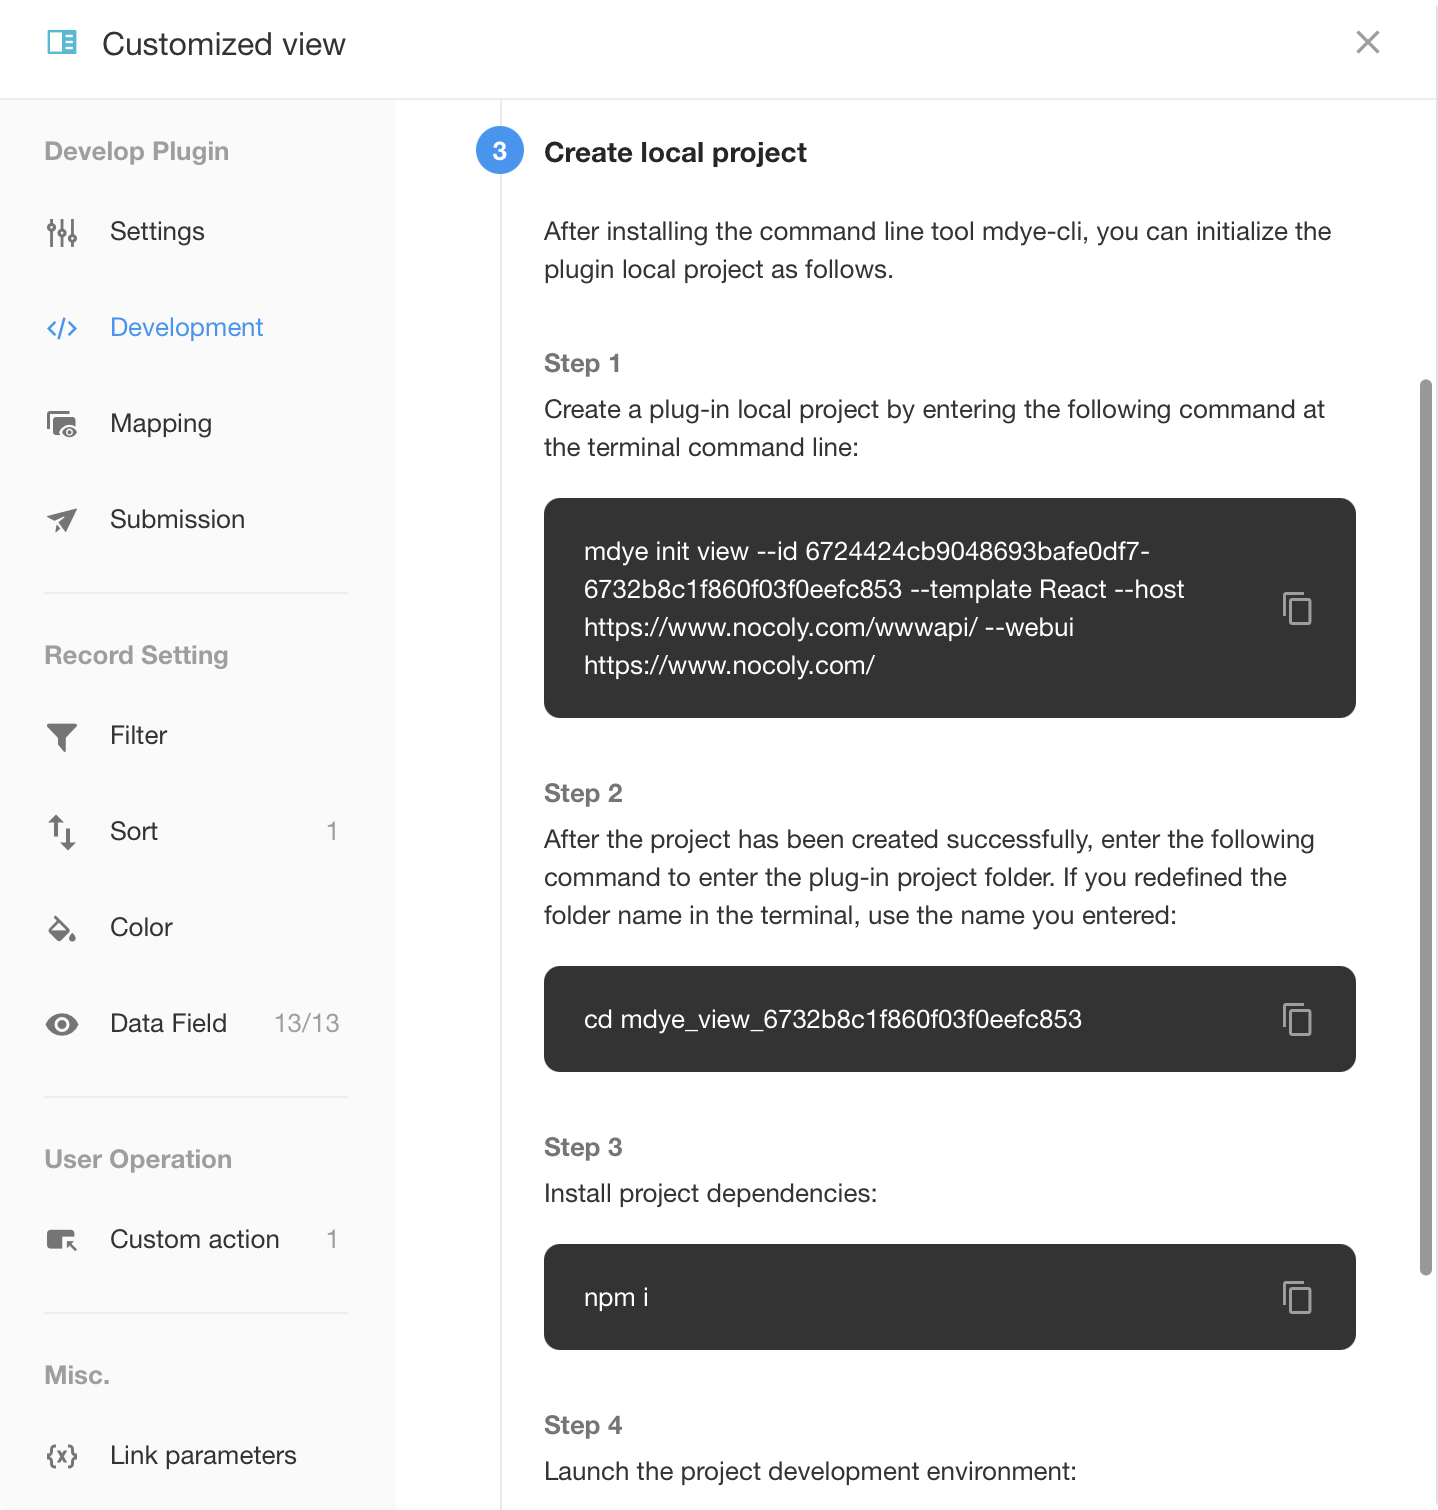
In the "Create local project" step, copy the command to create the plugin project and run it in your local terminal.

You can customize the name of the local project folder, or simply press Enter to use the default folder name provided by the system.
Next, you need to start the local project. First, navigate into the plugin's local project folder, then open VS Code. All subsequent plugin development tasks will be carried out in VS Code:
$ cd mdye_view_6541abe07a43f661079c234f # Navigate into the project folder
$ code . # Open the project in VS Code
After opening the project in VS Code, create a new "Terminal" window from the menu "Terminal > New Terminal" and enter the following commands one by one:
$ npm i # Install project dependencies
$ mdye start # Start local project debugging
Once executed, you should see the following screen:
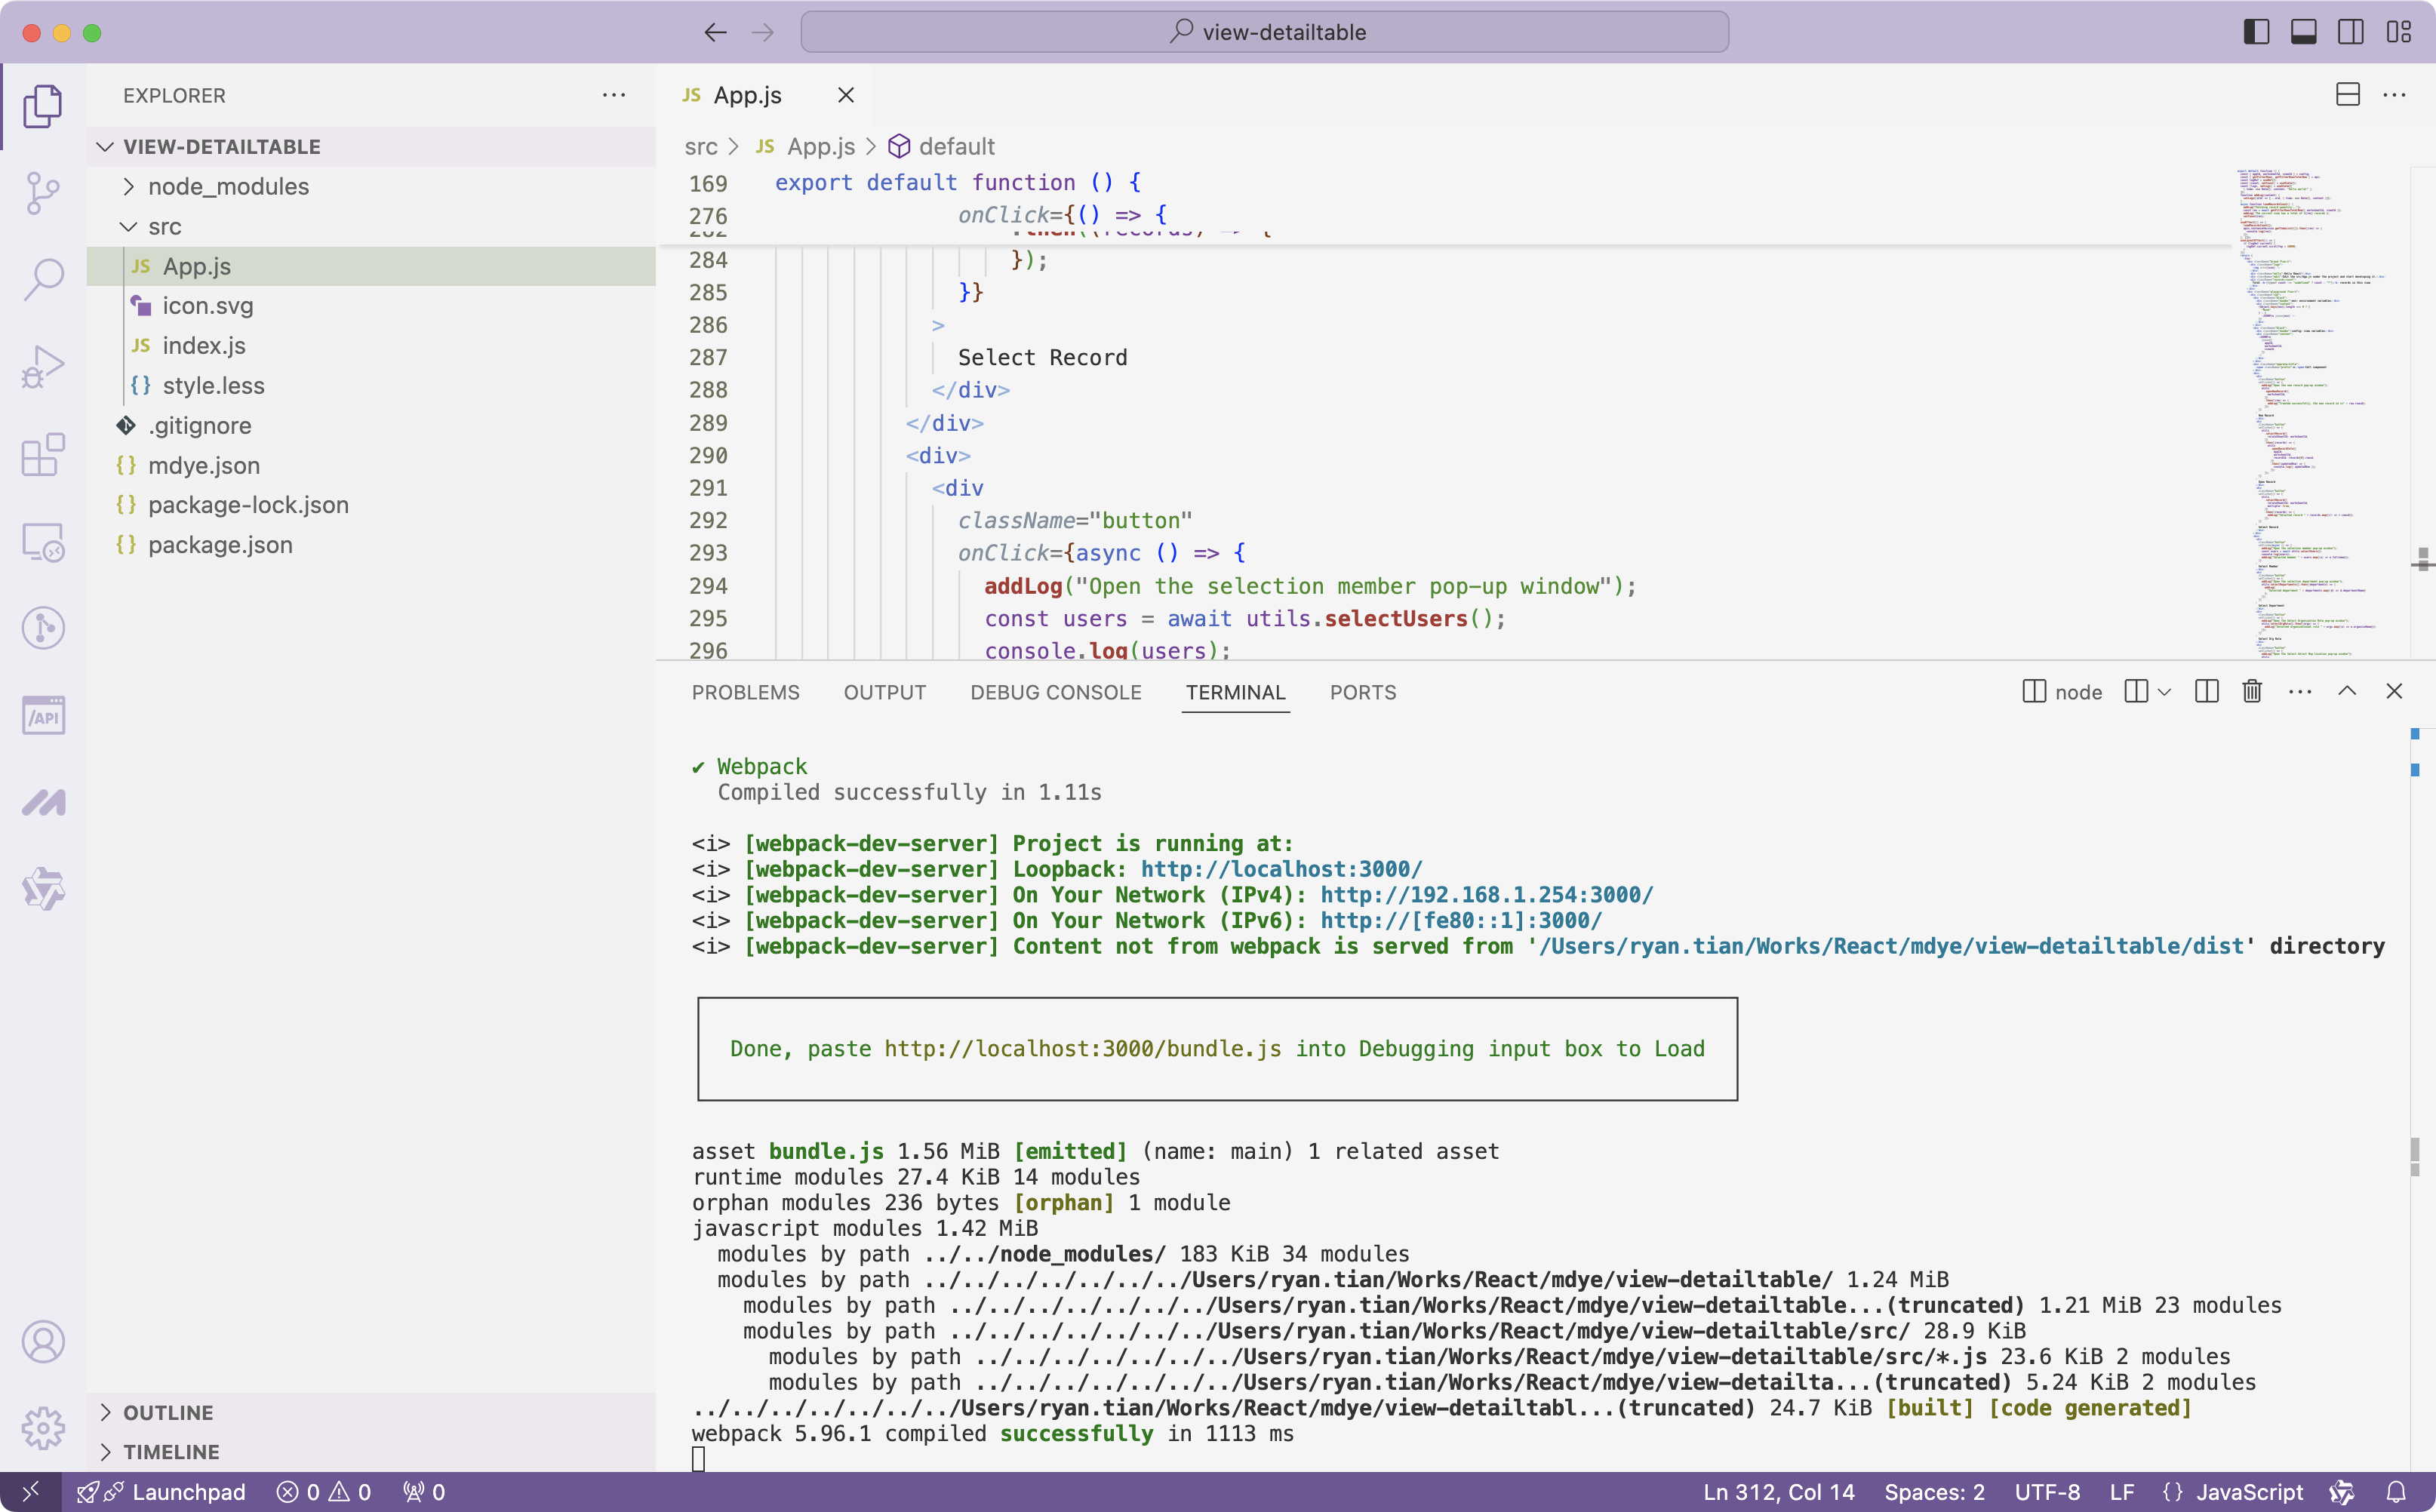
iv. Debugging Local Plugins
After the project runs successfully, a local server js file will be generated. Fill this address into the "Debug" page of the plugin and click "Load":
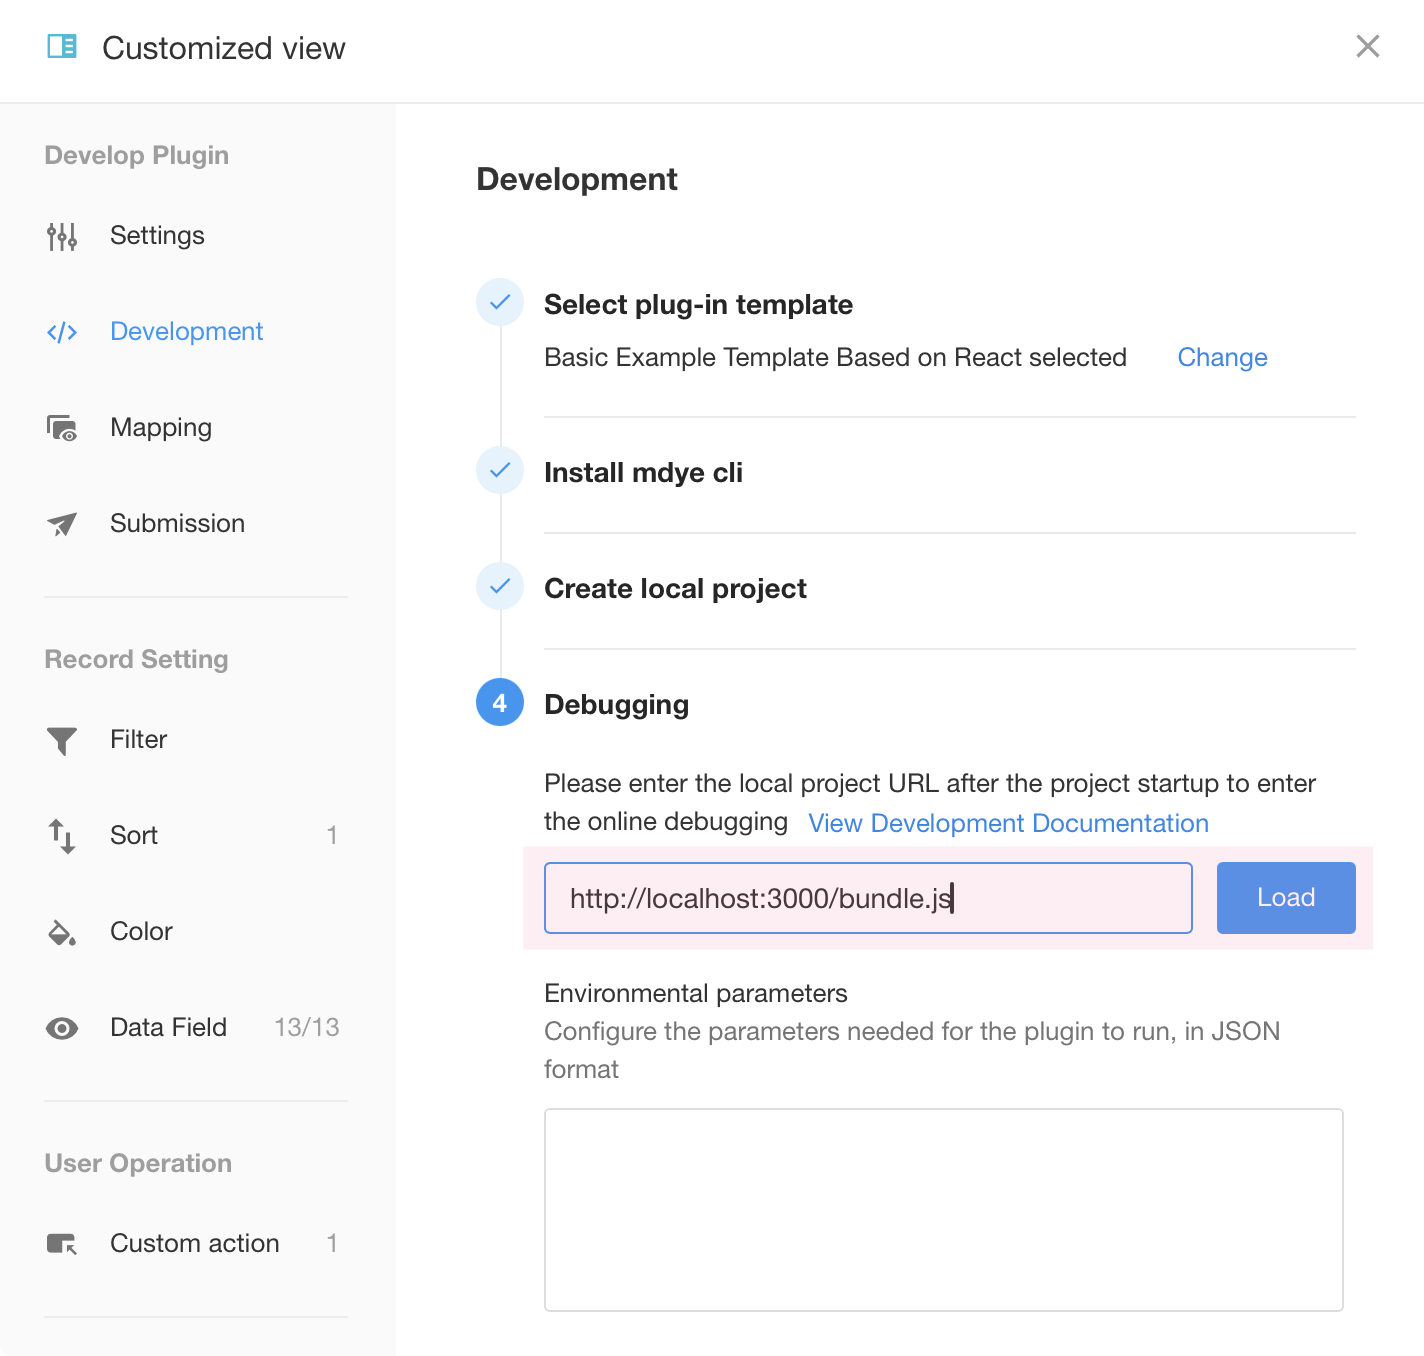
At this point, the view page will dynamically render the view plugin. We have written some simple methods to interact with the HAP worksheet in the initialization script:
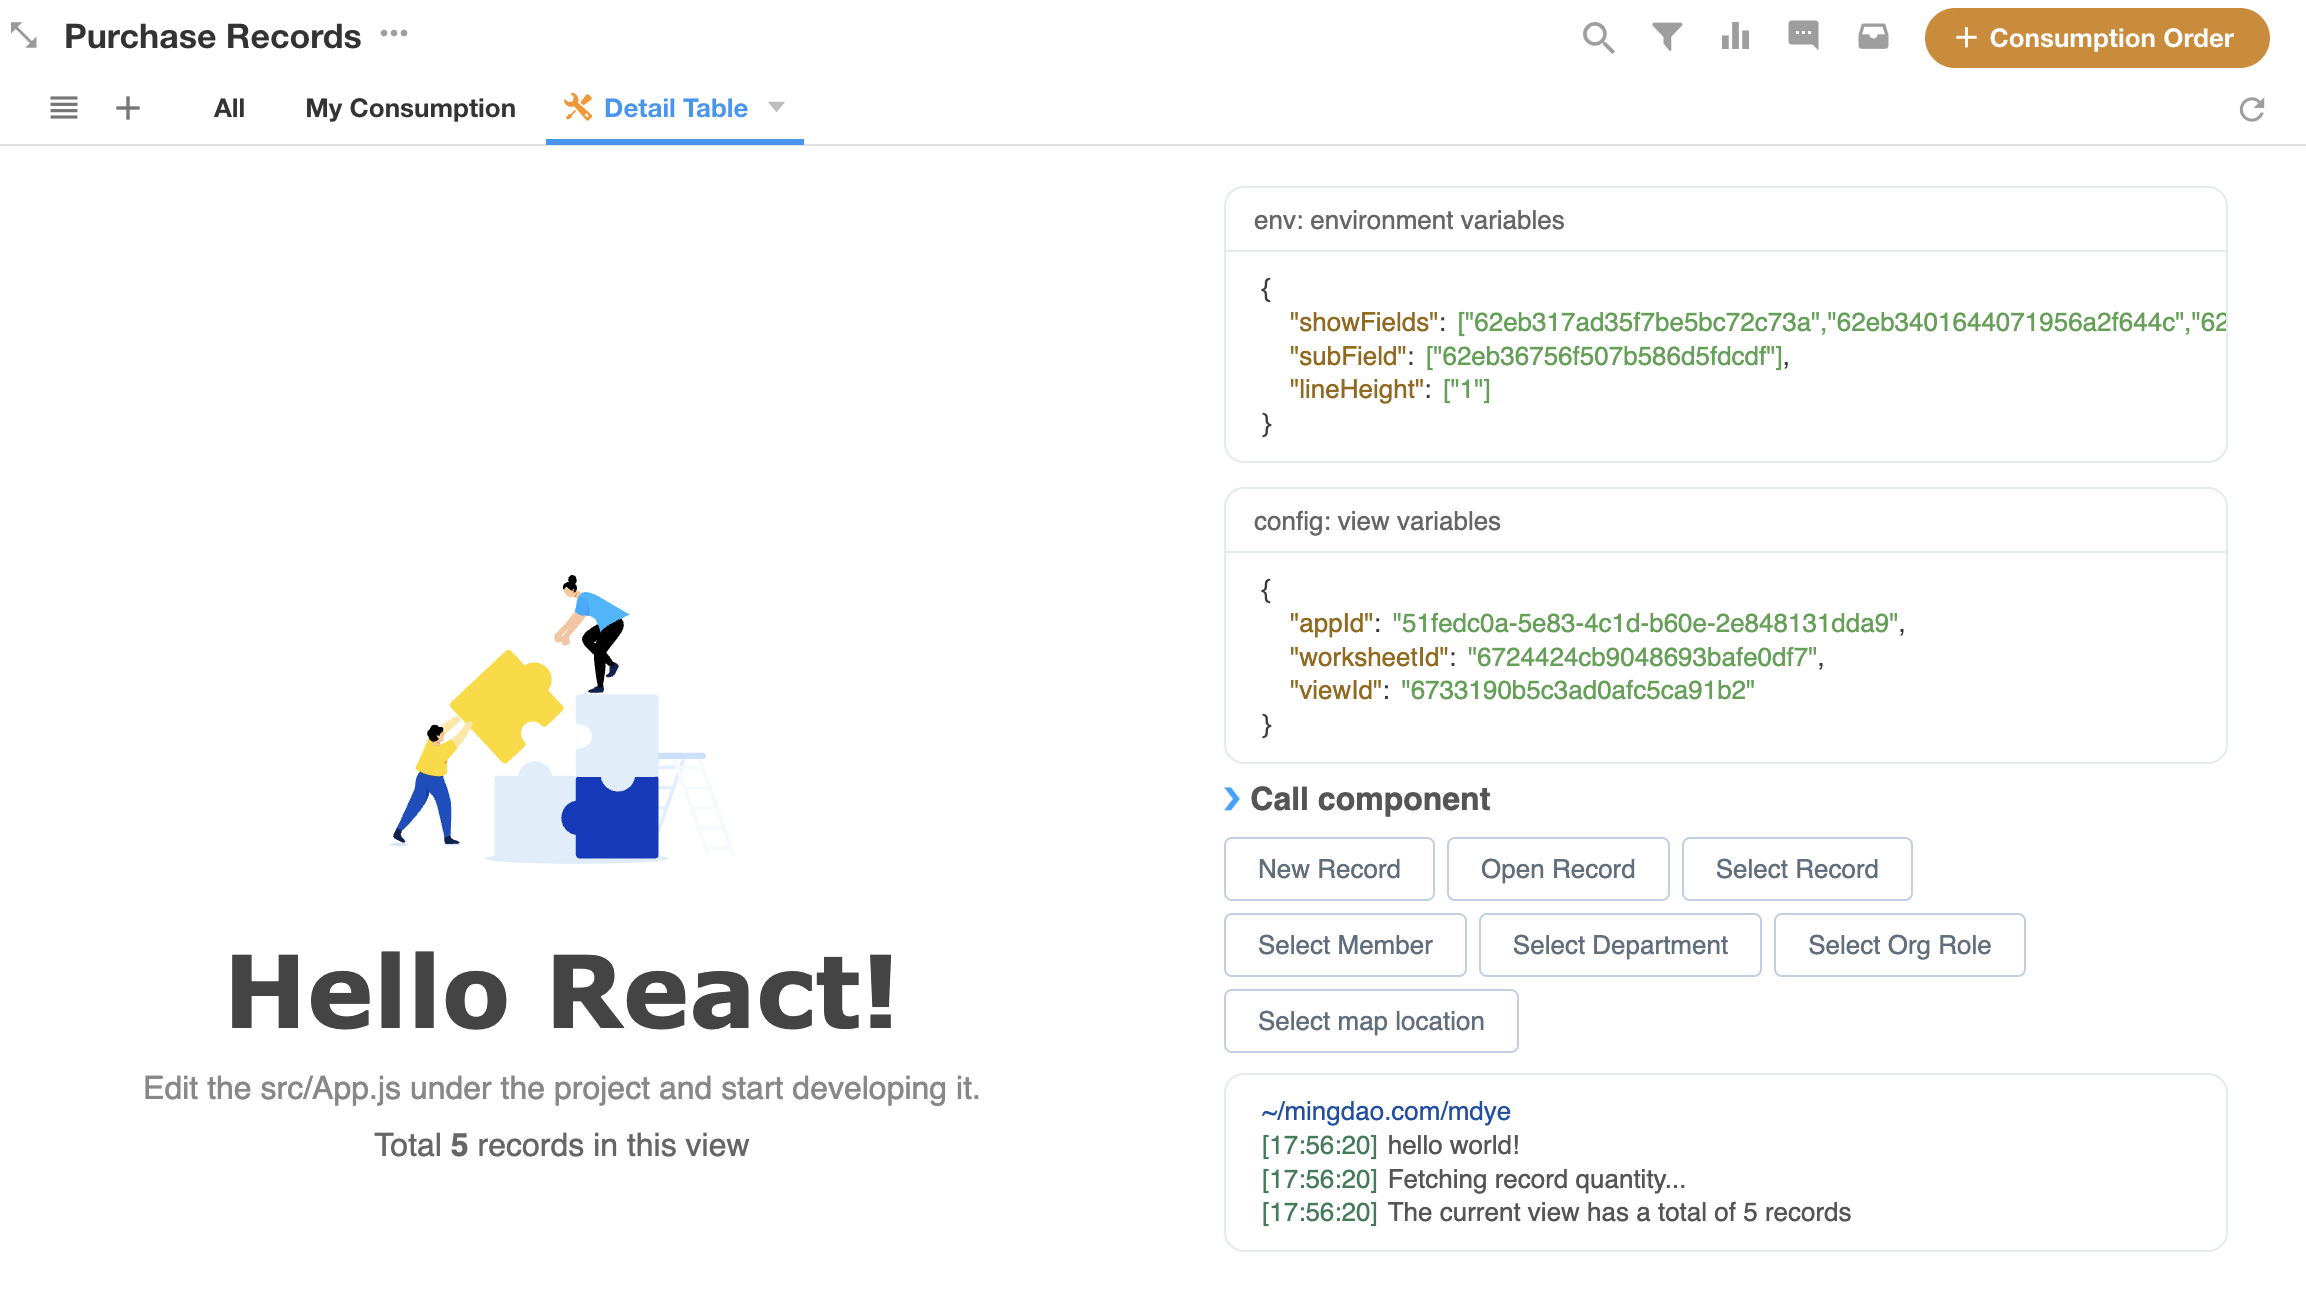
You can try modifying the src/App.js file and save it. Since hot update technology is adopted, the code modification will take effect in real time on the view after saving.
v. Configuring Code-Level Environment Parameters
Environment parameters for the plugin mainly store some development configurations that will be used at the code level. These are used to change configuration values when the plugin is installed or exported to another environment after being released. For example, if a developer uses a paid third-party component (frontend) while developing a view plugin, the developer fills in their own license key during development. The developer hopes that after users install or import the plugin, they can use their own key without sharing the developer's paid authorization. This can be handled using environment parameter configuration.
However, this configuration is not something the view users need to worry about, nor does it need to be configured every time the plugin view is used. Therefore, it is a value that only needs to be configured once at an administrator level.
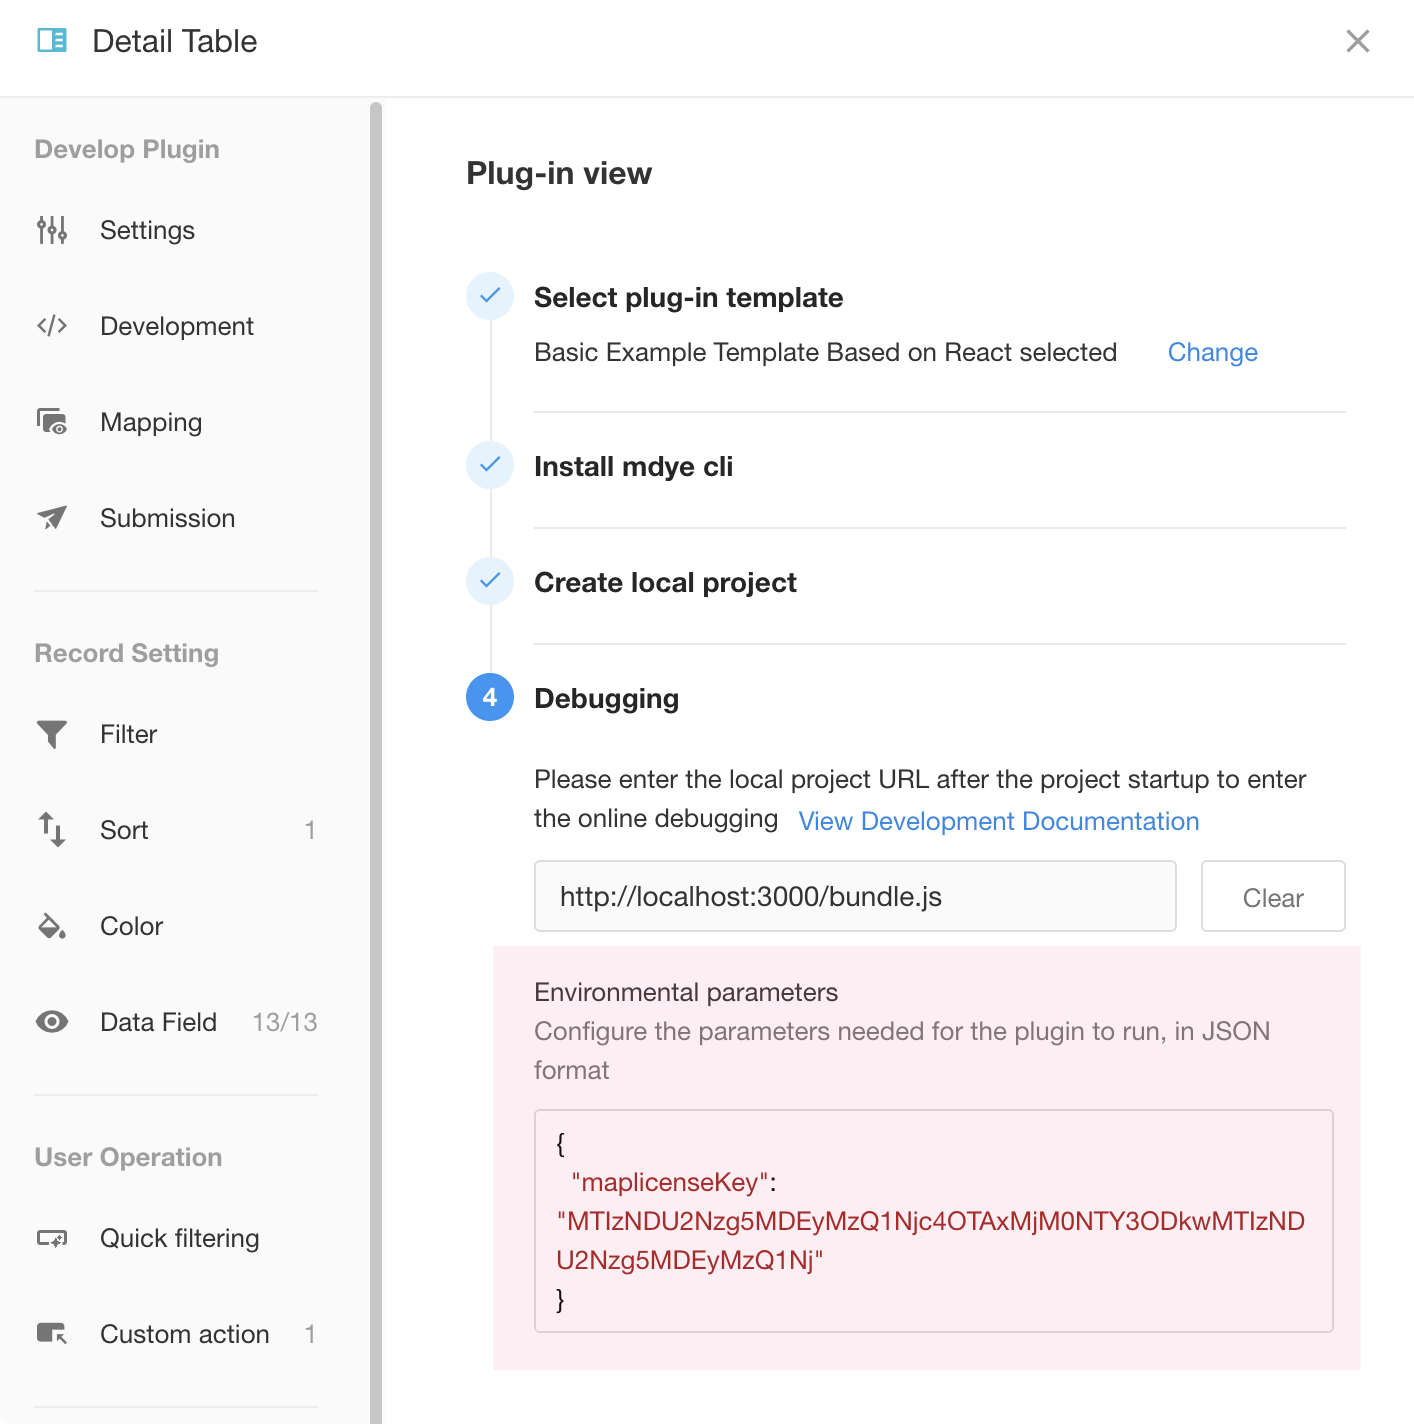
This parameter is in JSON format and will be directly injected into the mdye.env parameter. When writing environment parameters, developers should be careful not to duplicate the ID of the configuration item parameters.
6. Writing Plugin Code
i. File Structure
The view plugin is implemented by embedding an iframe to load and render the scripts submitted locally by users.
📢 It is important to note that developers need to handle mobile adaptation themselves. If there are special configurations for mobile devices, some configuration parameters can be added to handle them. Developers can use UA to determine whether they are on a mobile device.
ii. Code Debugging
The development and debugging of view plugin code are no different from regular front-end projects. Developers can use WebDevTools in the browser to track and debug the code.
iii. Interaction with HAP Data
We provide an mdye npm package to facilitate interaction with HAP application worksheet data. This dependency is already installed by default in the scaffold. If you need to install it manually, you can use the following command in your project:
$ npm i mdye --save
In your project code, import mdye :
import { env, config, api, utils } from "mdye";
mdye provides four objects:
envfor obtaining view setting parametersconfigfor obtaining configurations related to the current application, worksheet, and viewapiprovides a series of methods to interact with HAP worksheet datautilsfor calling HAP public components
For detailed usage, refer to the JSSDK API in the appendix of this document.
Below is a screenshot of the view plugin developed according to the above example requirements:
7. Submitting Local Code
During the development of a view plugin, you can submit the compiled plugin code to the server at any time for storage. If a Customized view uses a version that has been submitted as the current code (you need to clear the locally loaded debug files), then anyone with access to that view will see the server-rendered version. In "debug" mode, the local address is only visible to the developer for previewing the view's style.
To submit local code, use the following command:
$ mdye push -m "init version"
If the developer has not yet logged in and authorized the local project, the system will prompt for authorization automatically. The code will then be compiled, packaged, and submitted under the current user's credentials.
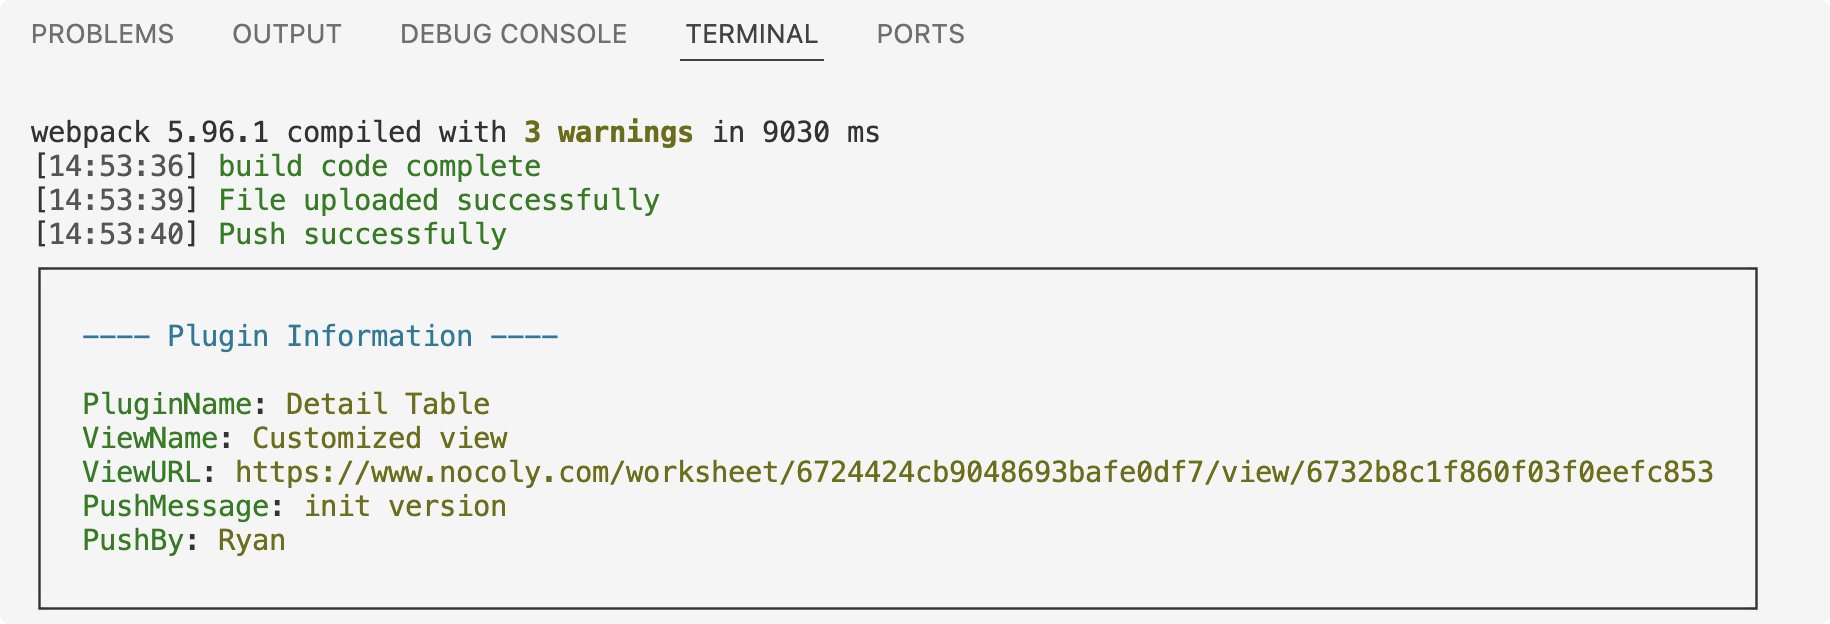
Upon successful submission, the submitted code can be viewed in the plugin's "submitted" versions.
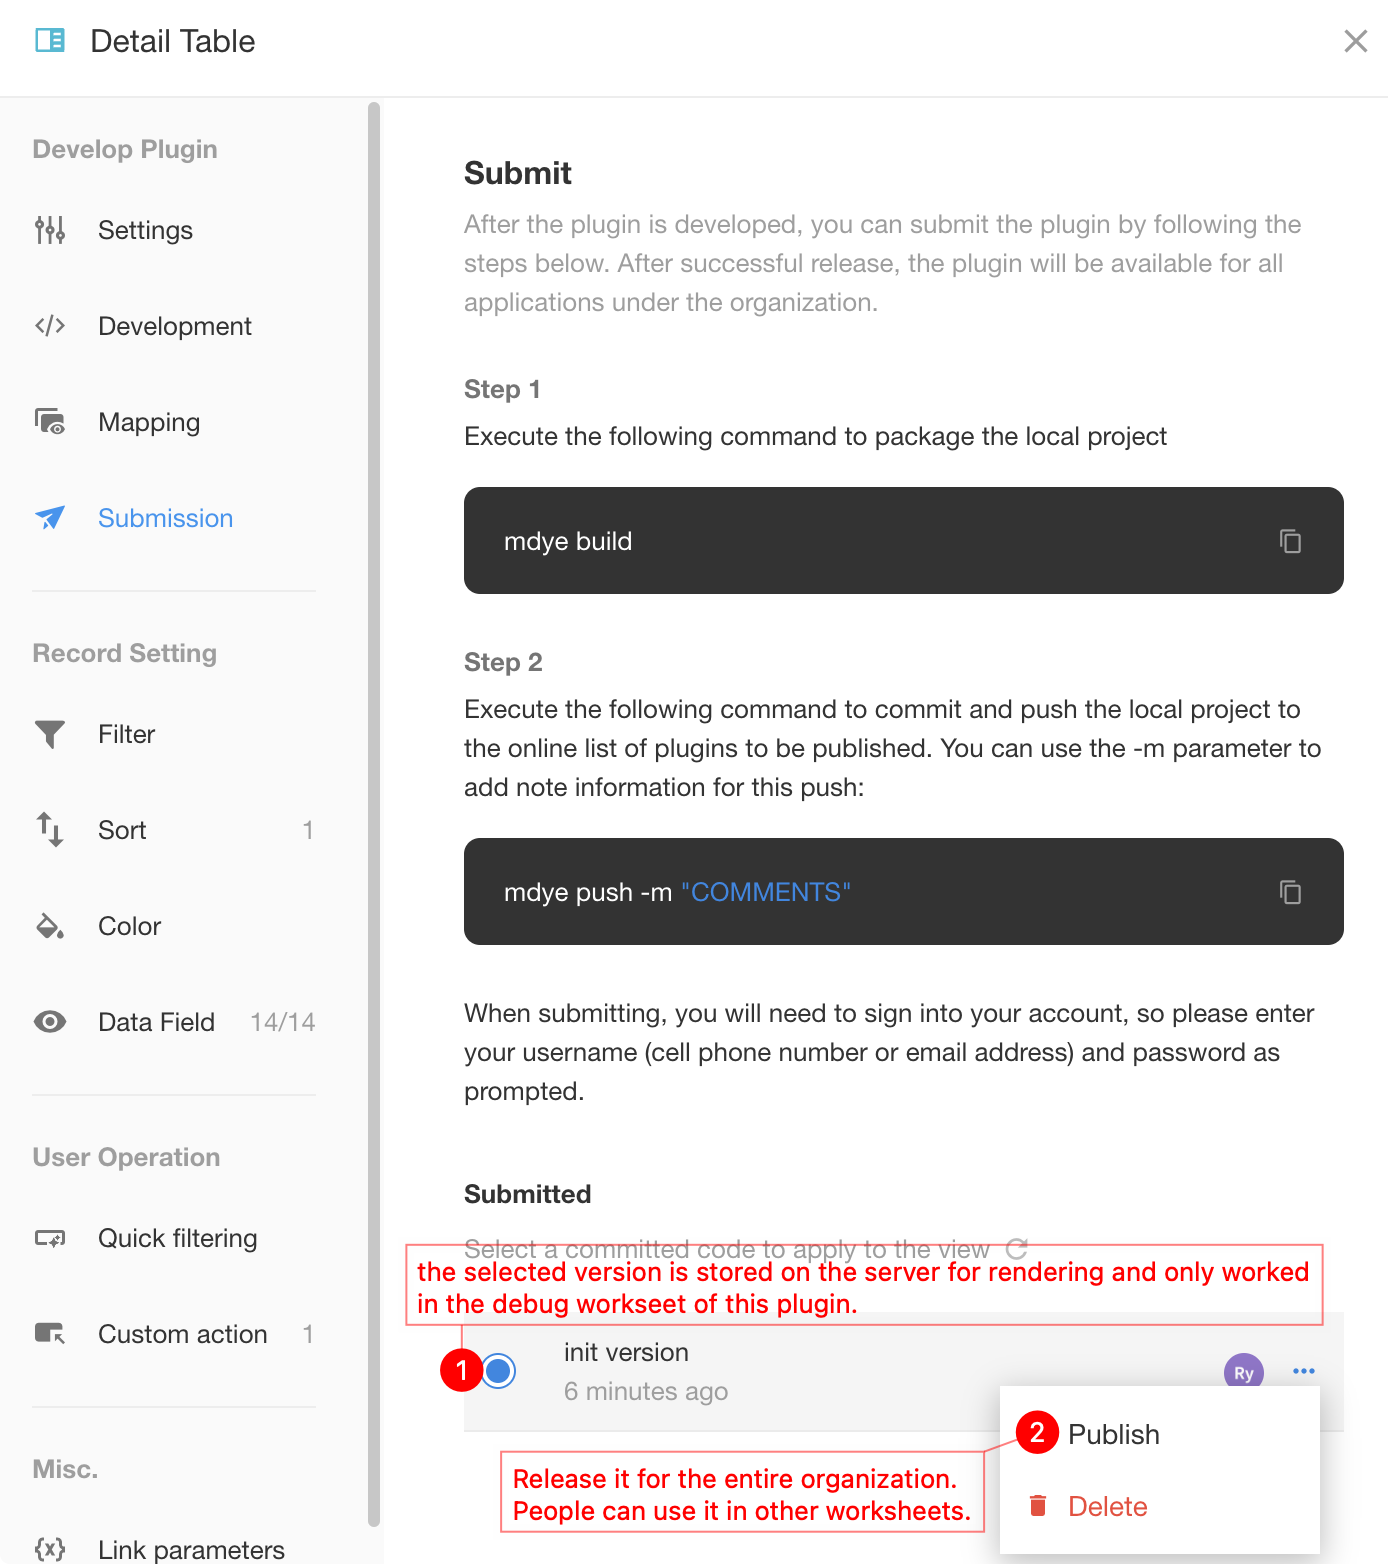
8. Publishing the Plugin
Before a view plugin is published, it can only be used within the debug application. To make the developed plugin available to the entire organization, you need to publish it to the organization. The publishing process is based on the code submitted by the developer, who can choose to release a specific submission as an official version. During publishing, a version number must be defined, and each new version number must be greater than the current version number.
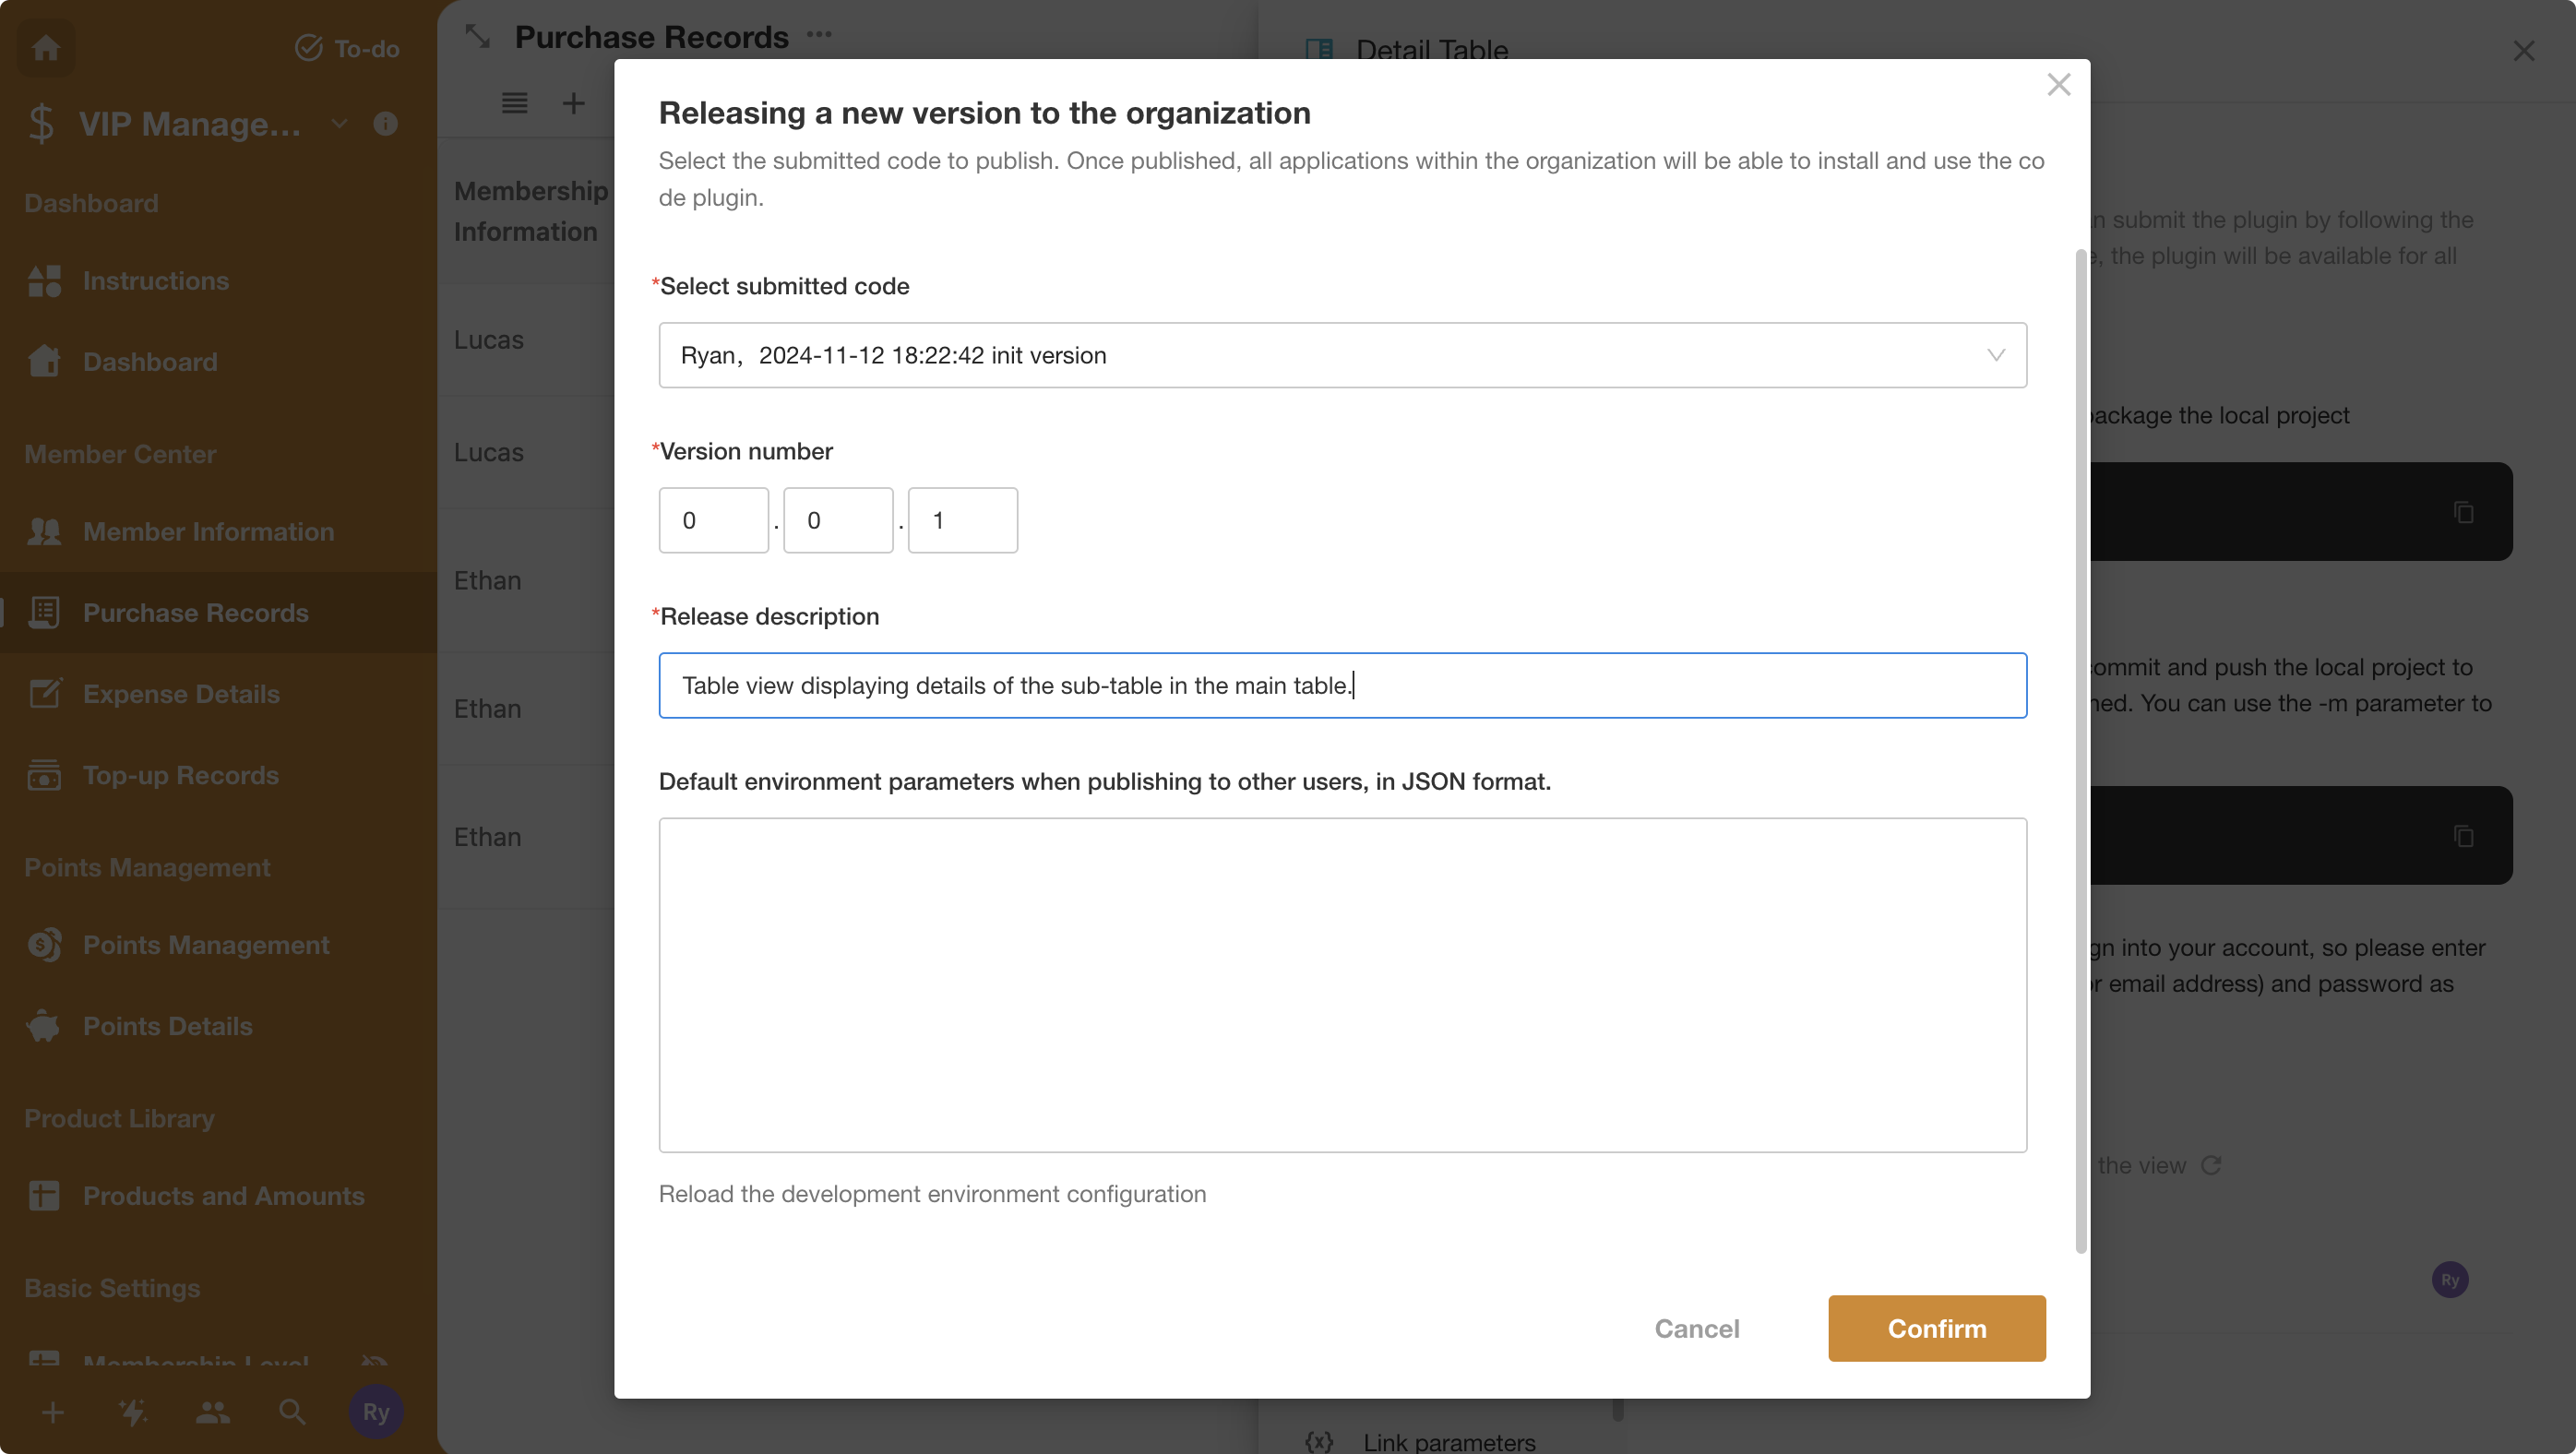
If the administrator enables the plugin in the "Plugins", it will be available to all members of the organization, allowing everyone to use the view when building applications.
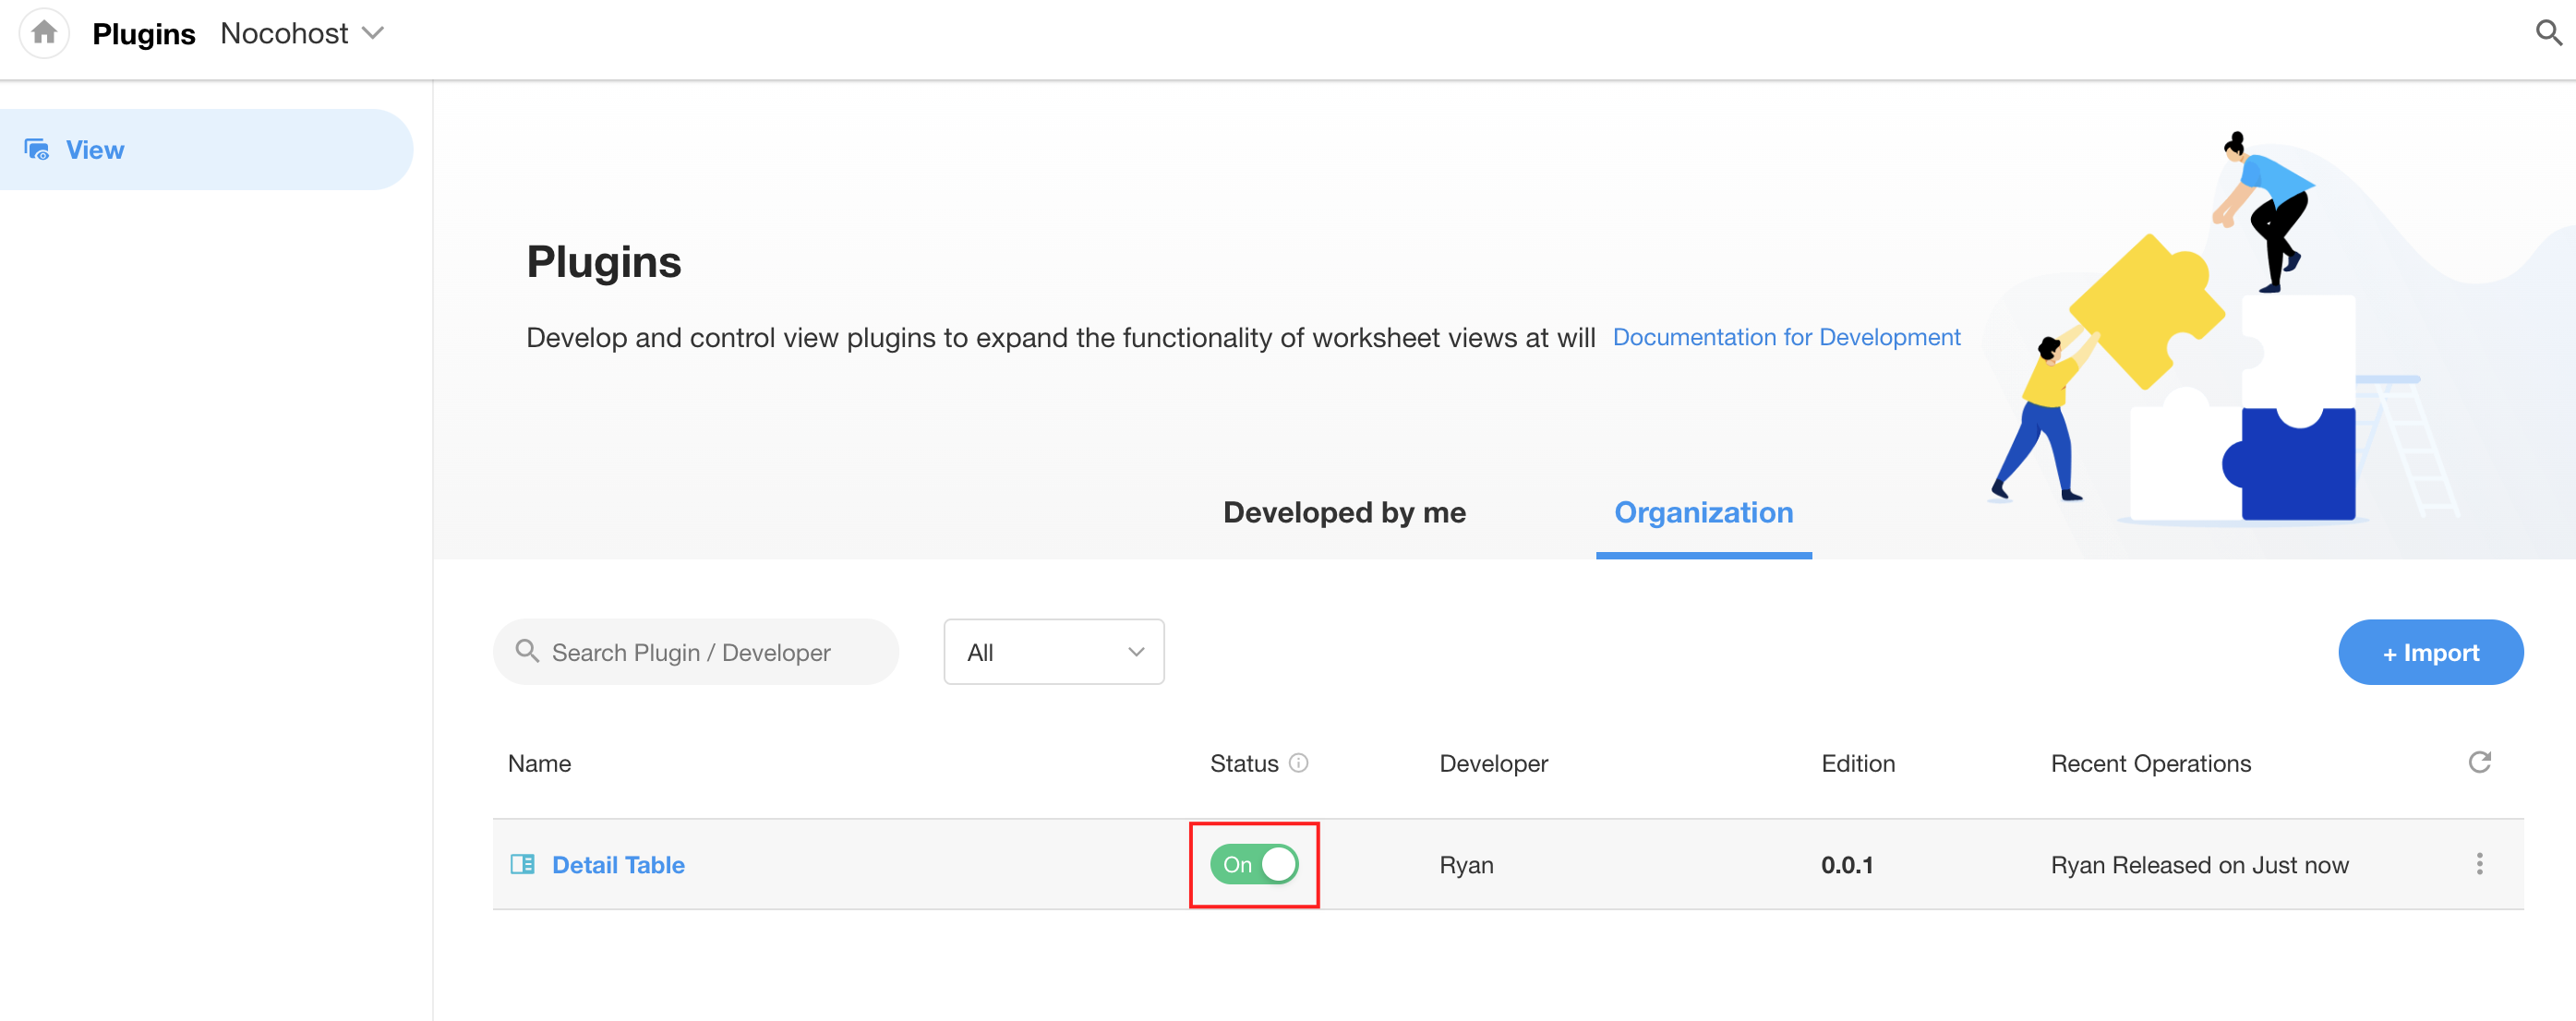
At this point, the option to add the view plugin will appear when adding a view to another worksheet:
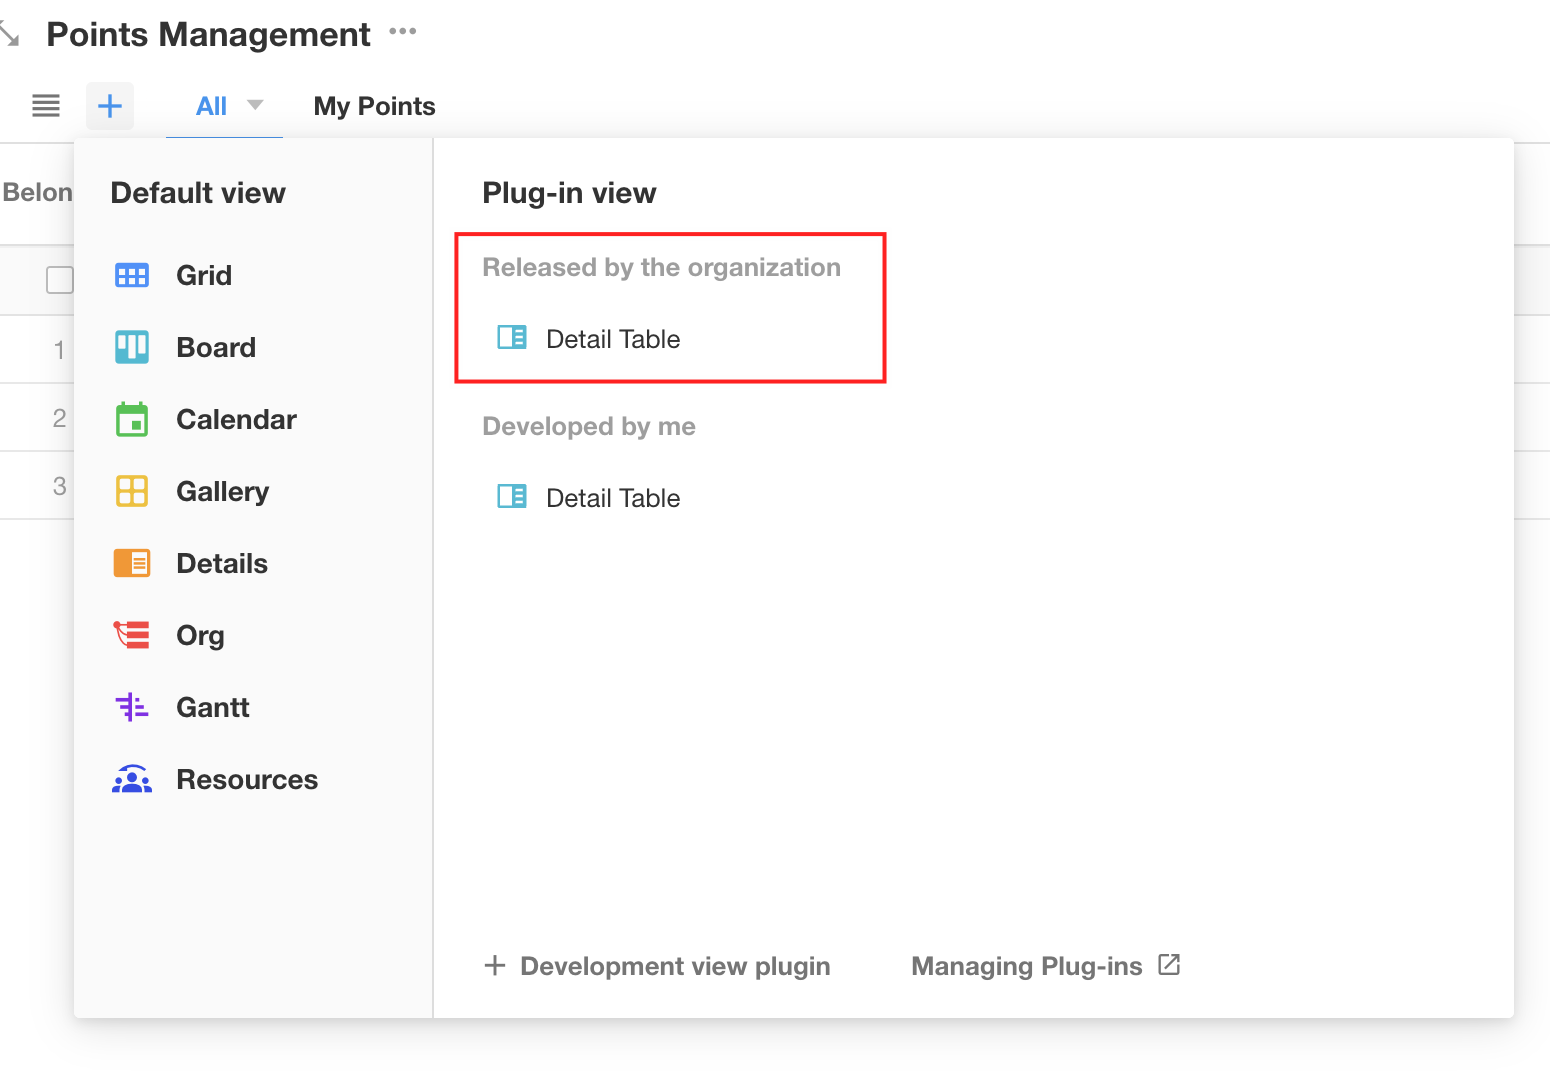
9. Plugin Management
In the "Plugin Center," you can manage both plugins that are currently in development and those that have already been released.
The "Developed by me" list contains plugins created by the developers themselves. Here, you can add debugging applications to these plugins, view their submission and release histories, and publish new versions.
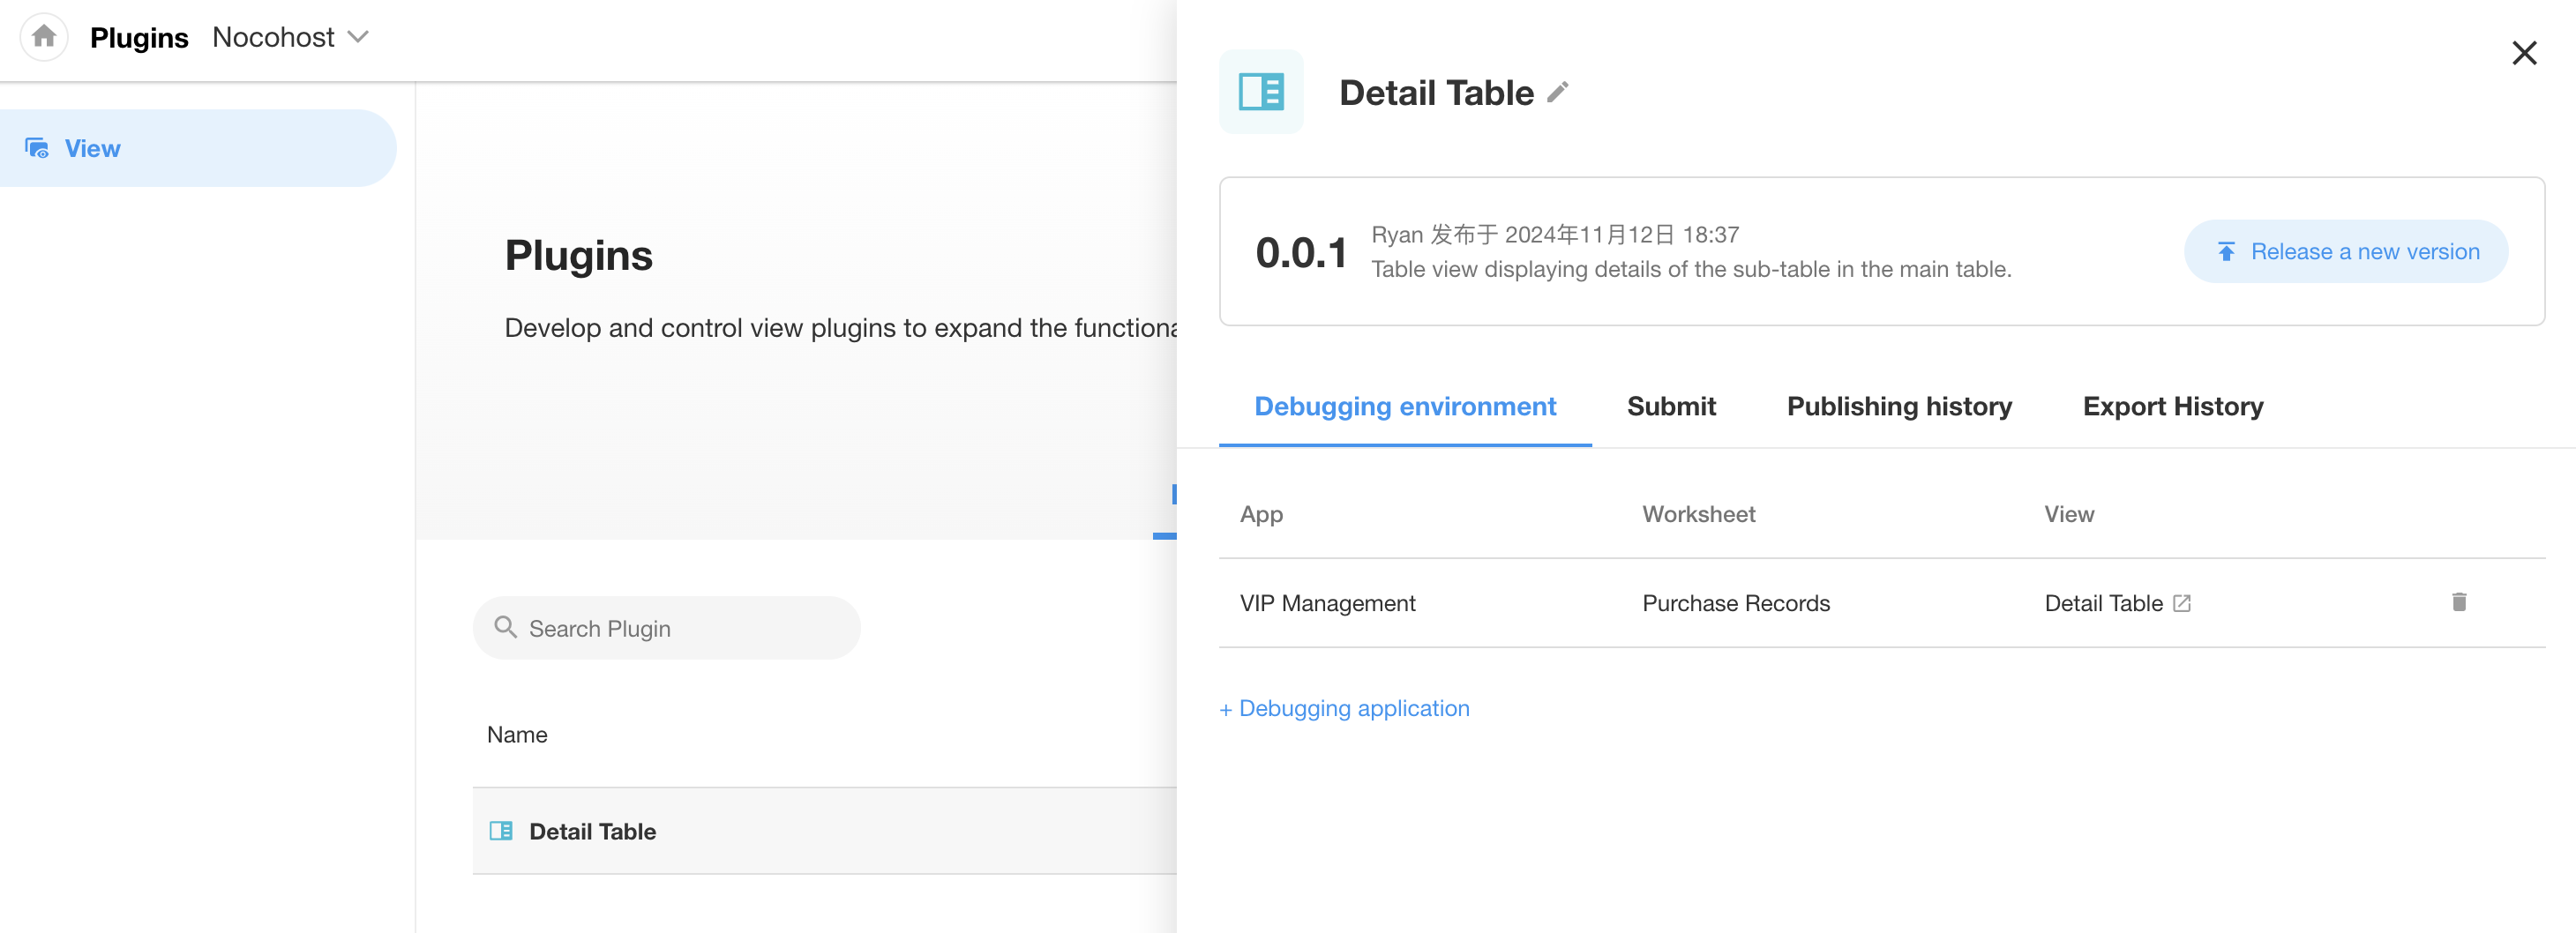
The "Organization" list includes all plugins released under the organization. Here, you can view the release history, configure environment parameters, and check the usage details of these plugins. Administrators also have the ability to publish new versions for upgrades or rollbacks.
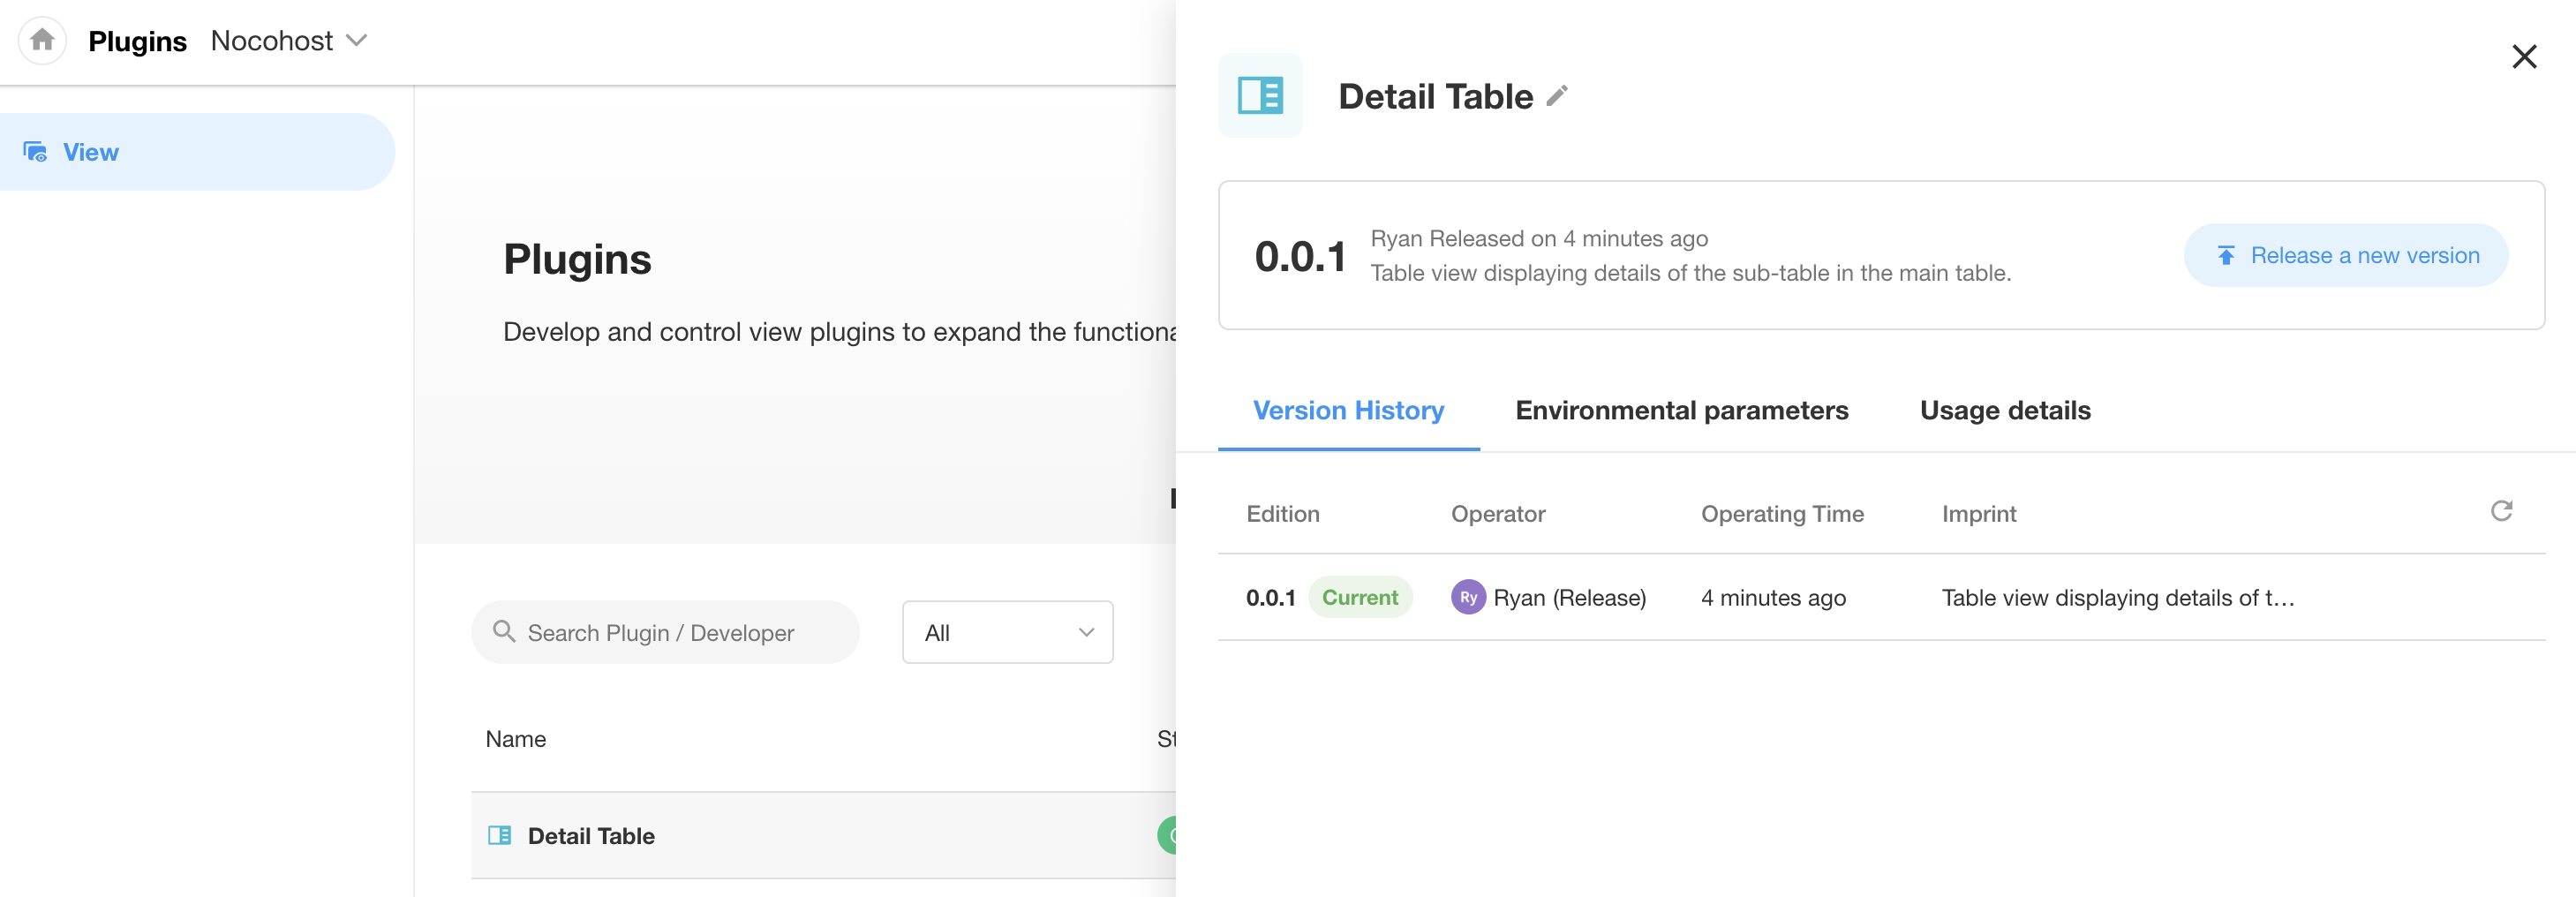
Note: Regular users (non-organization application administrators) only have viewing permissions for the organization's plugin list and cannot manage them.
10. Exporting and Importing Plugins
Developers can export a published plugin as a .mdye file from the "Plugins" and distribute it to other organizations or private deployment users. These users can then import the plugin from the "Plugins" and use it.
i. Exporting Plugins
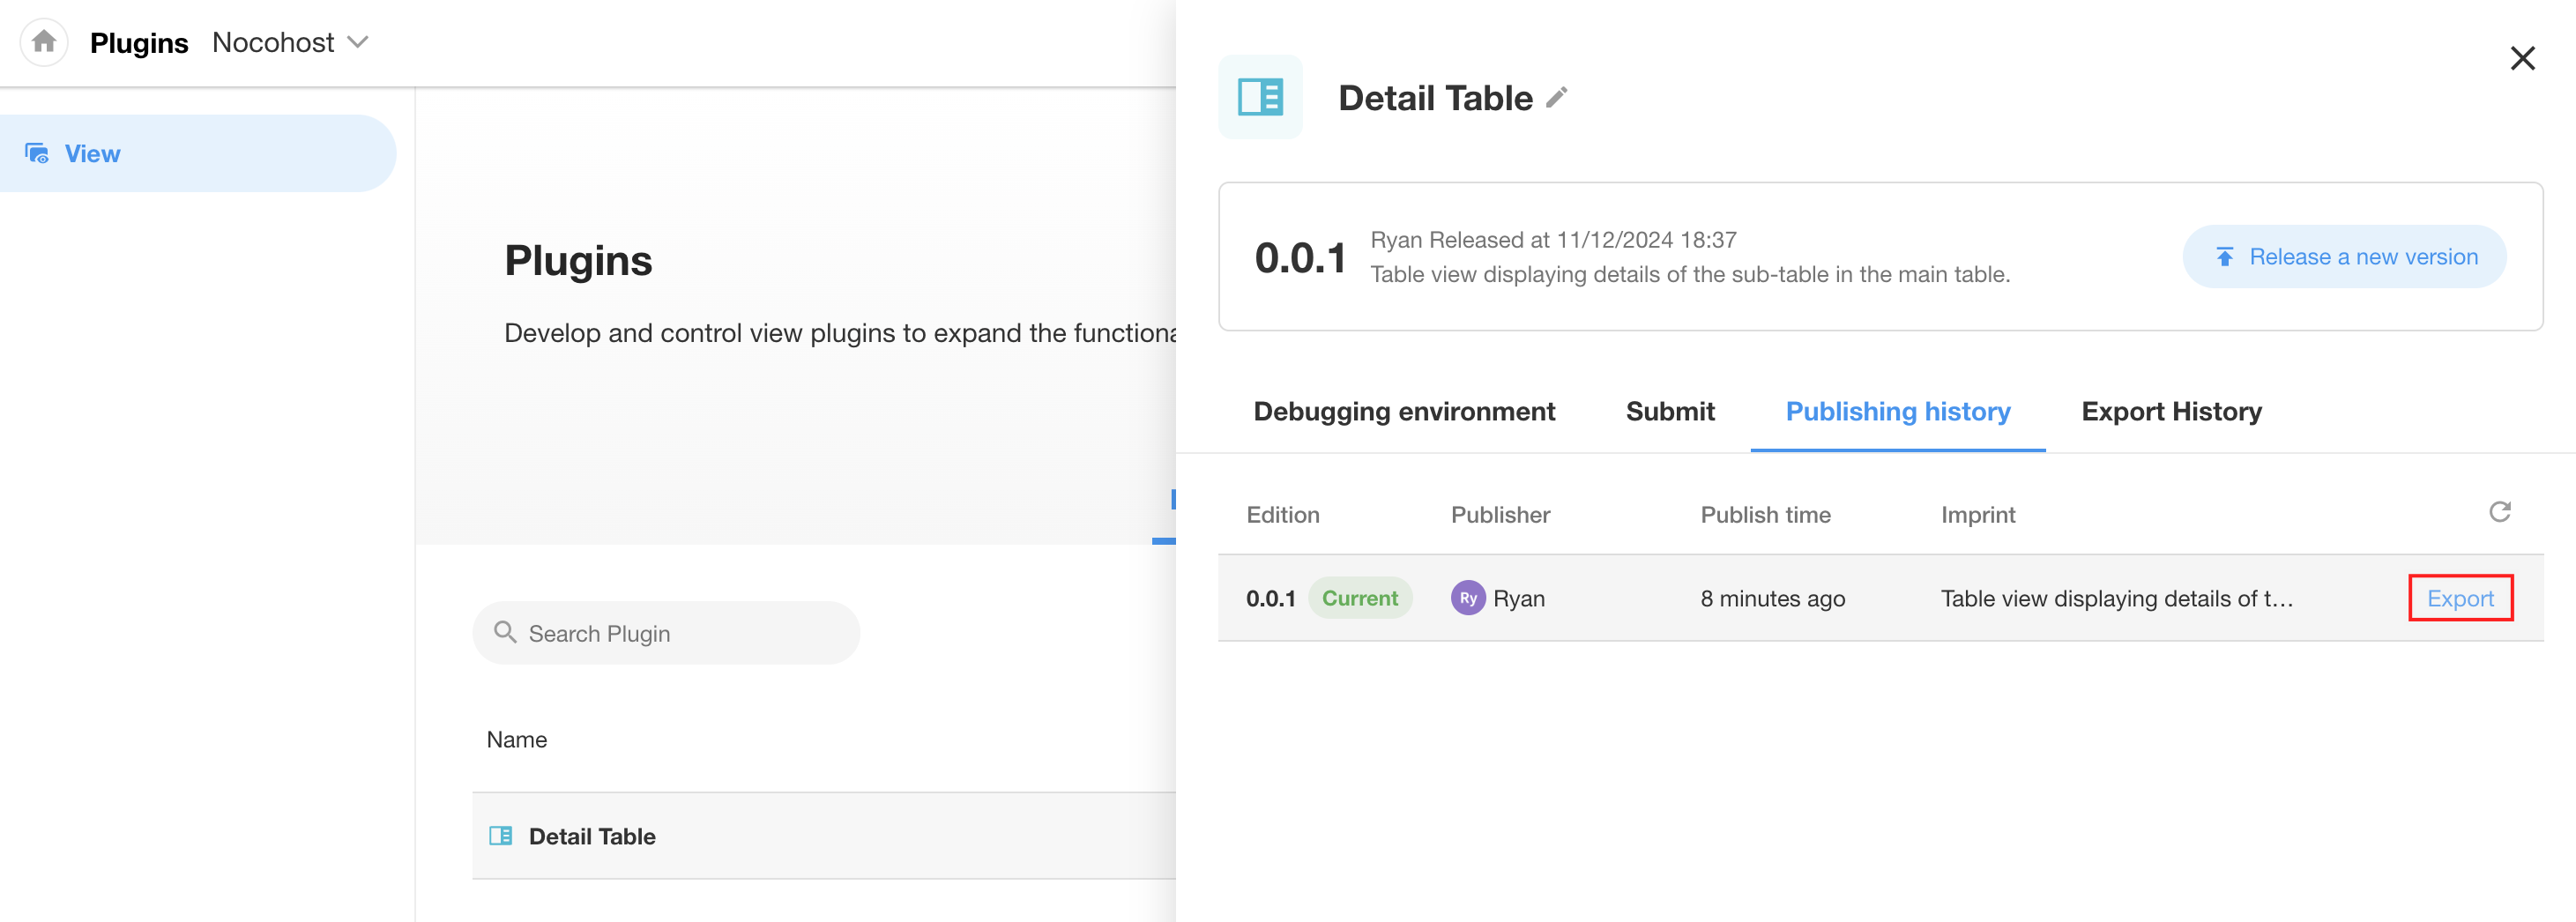
Developers can export a plugin by clicking the "Export" button in the "Plublishing History" section of the plugin details, which is found under the "Developed by me" list in the "Plugins".
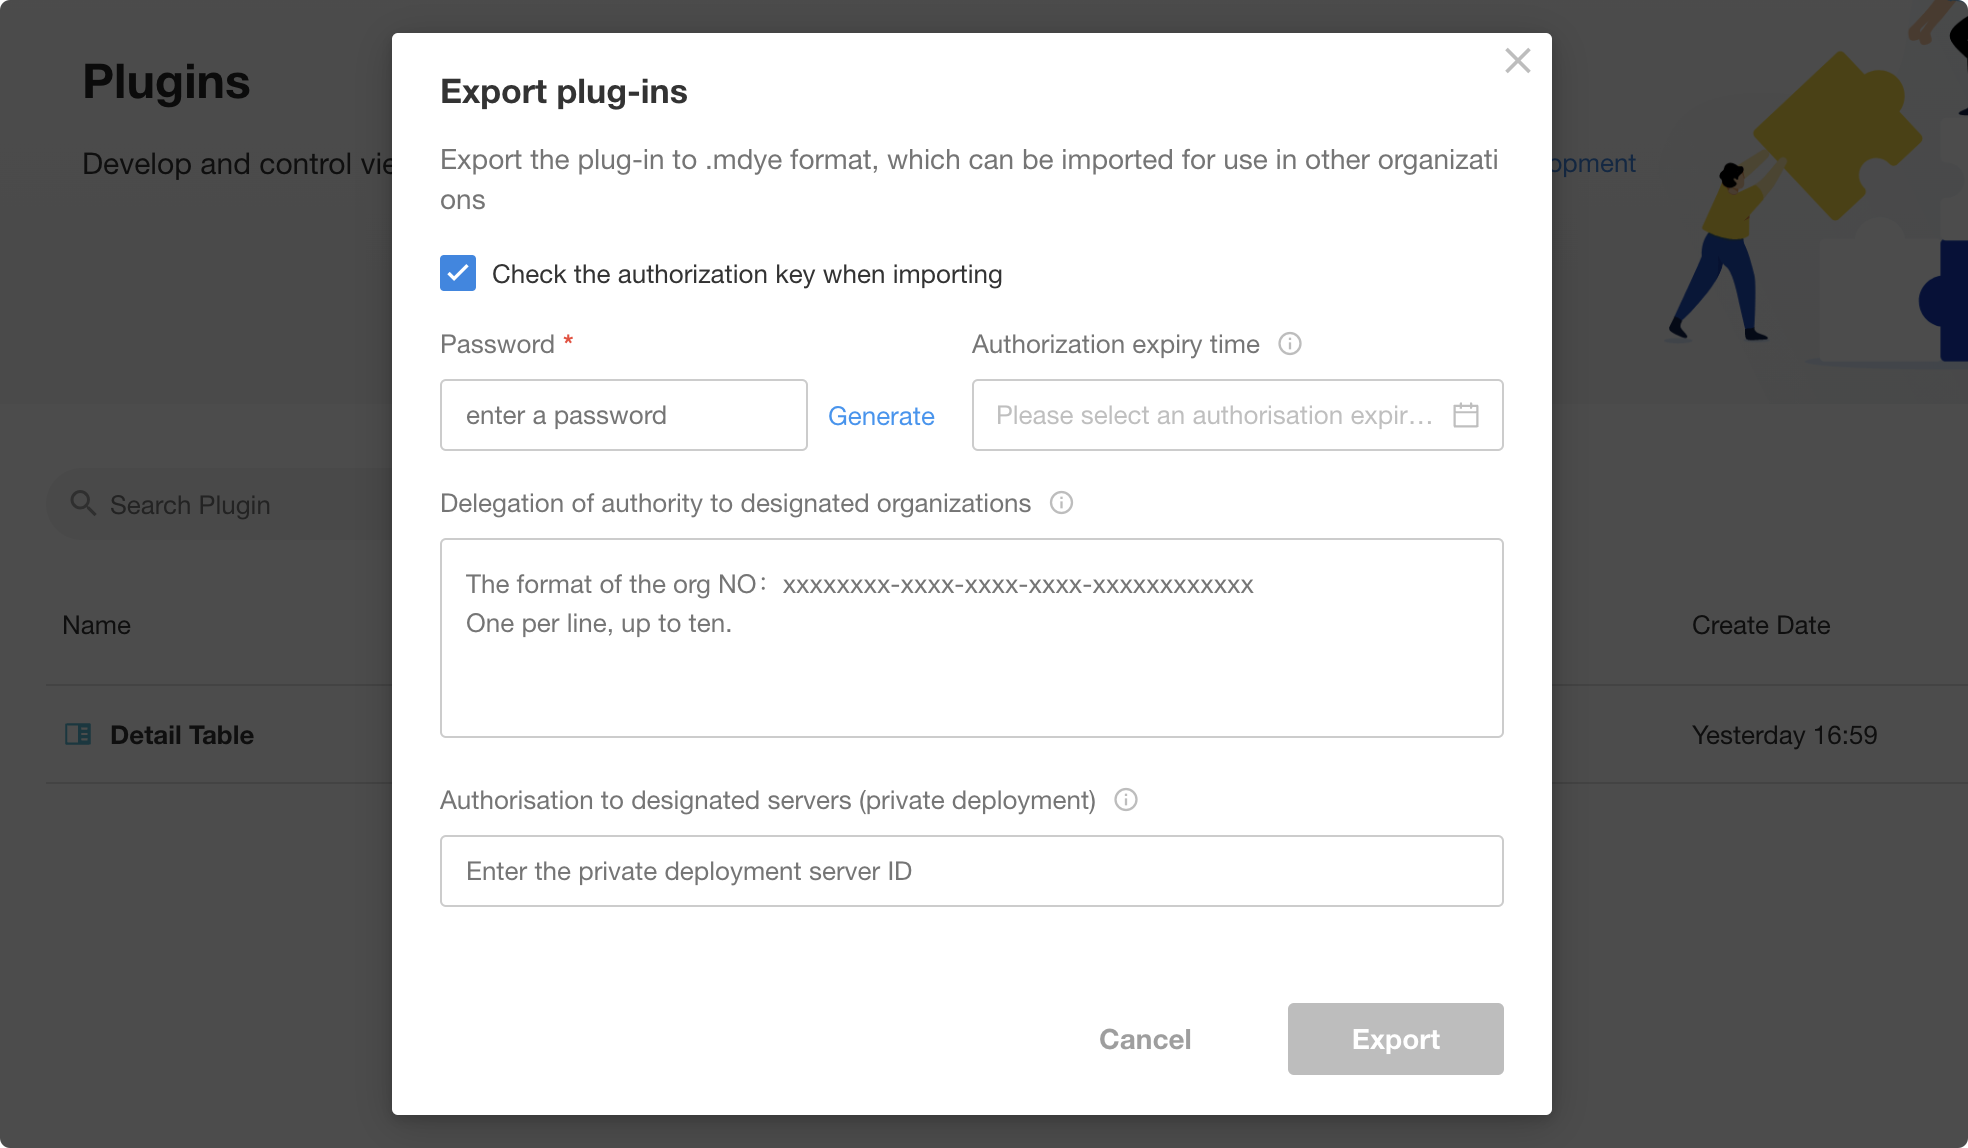
When exporting a plugin, developers can set an authorization key to impose the following restrictions on the importer:
- Set an import password. The plugin cannot be imported if the password entered during import is incorrect;
- Set an authorization expiration time. Once the authorization period expires, the plugin will be unavailable to the entire organization;
- Set an authorized organization. The plugin cannot be imported if the importer's organization is not authorized by the key;
- Set a private deployment authorization server. The plugin cannot be imported if the importer's server is not authorized by the key.
When these settings are used in combination, all conditions must be met for the plugin to be imported and used properly.
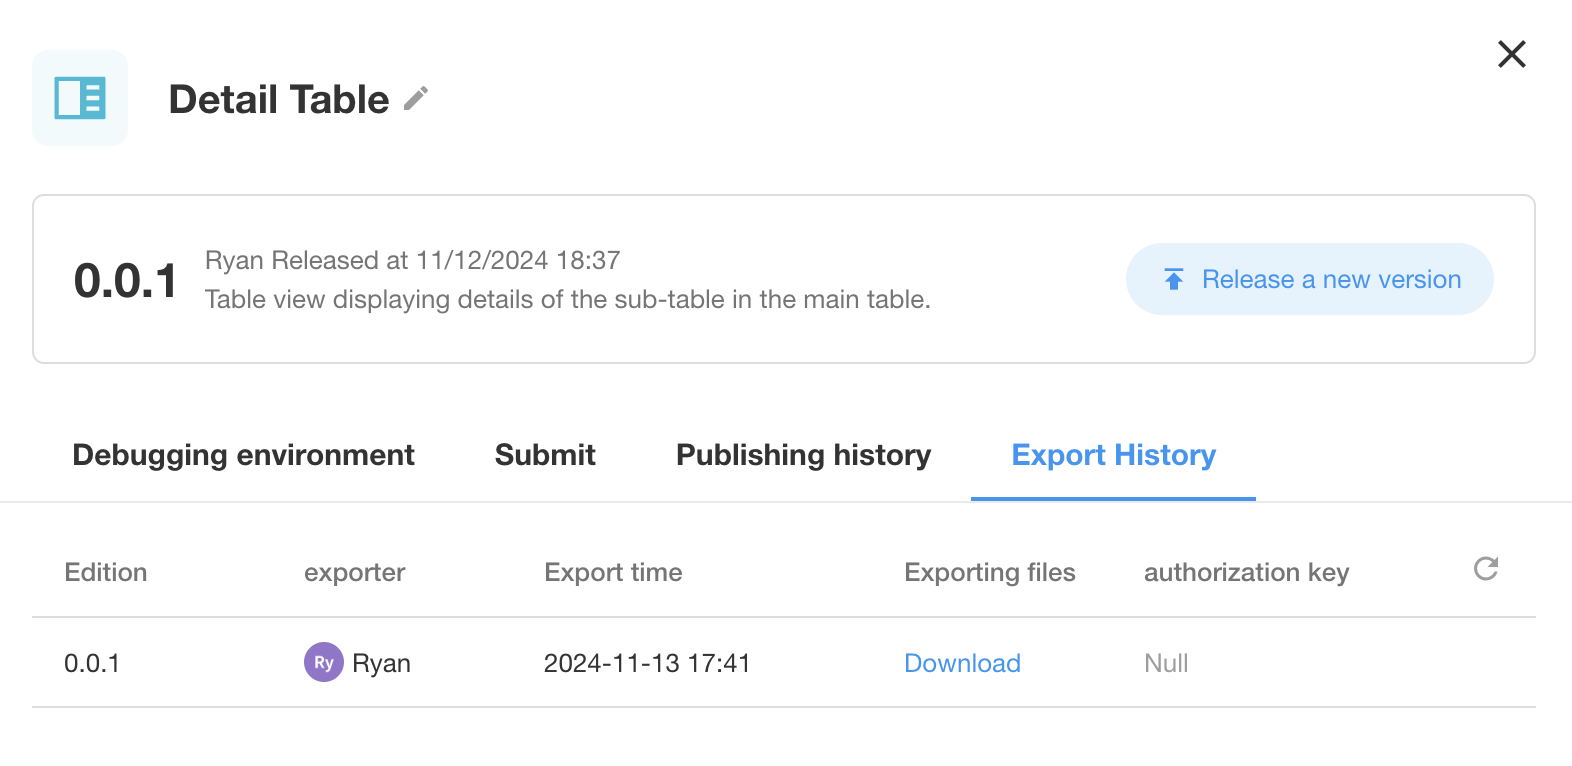
After a successful export, developers can download the export file from the "Export History" and view the key information of the file:
ii. Importing Plugins
To import a plugin, click the "+Import" button on the "Organization" page and select a .mdye file to import.
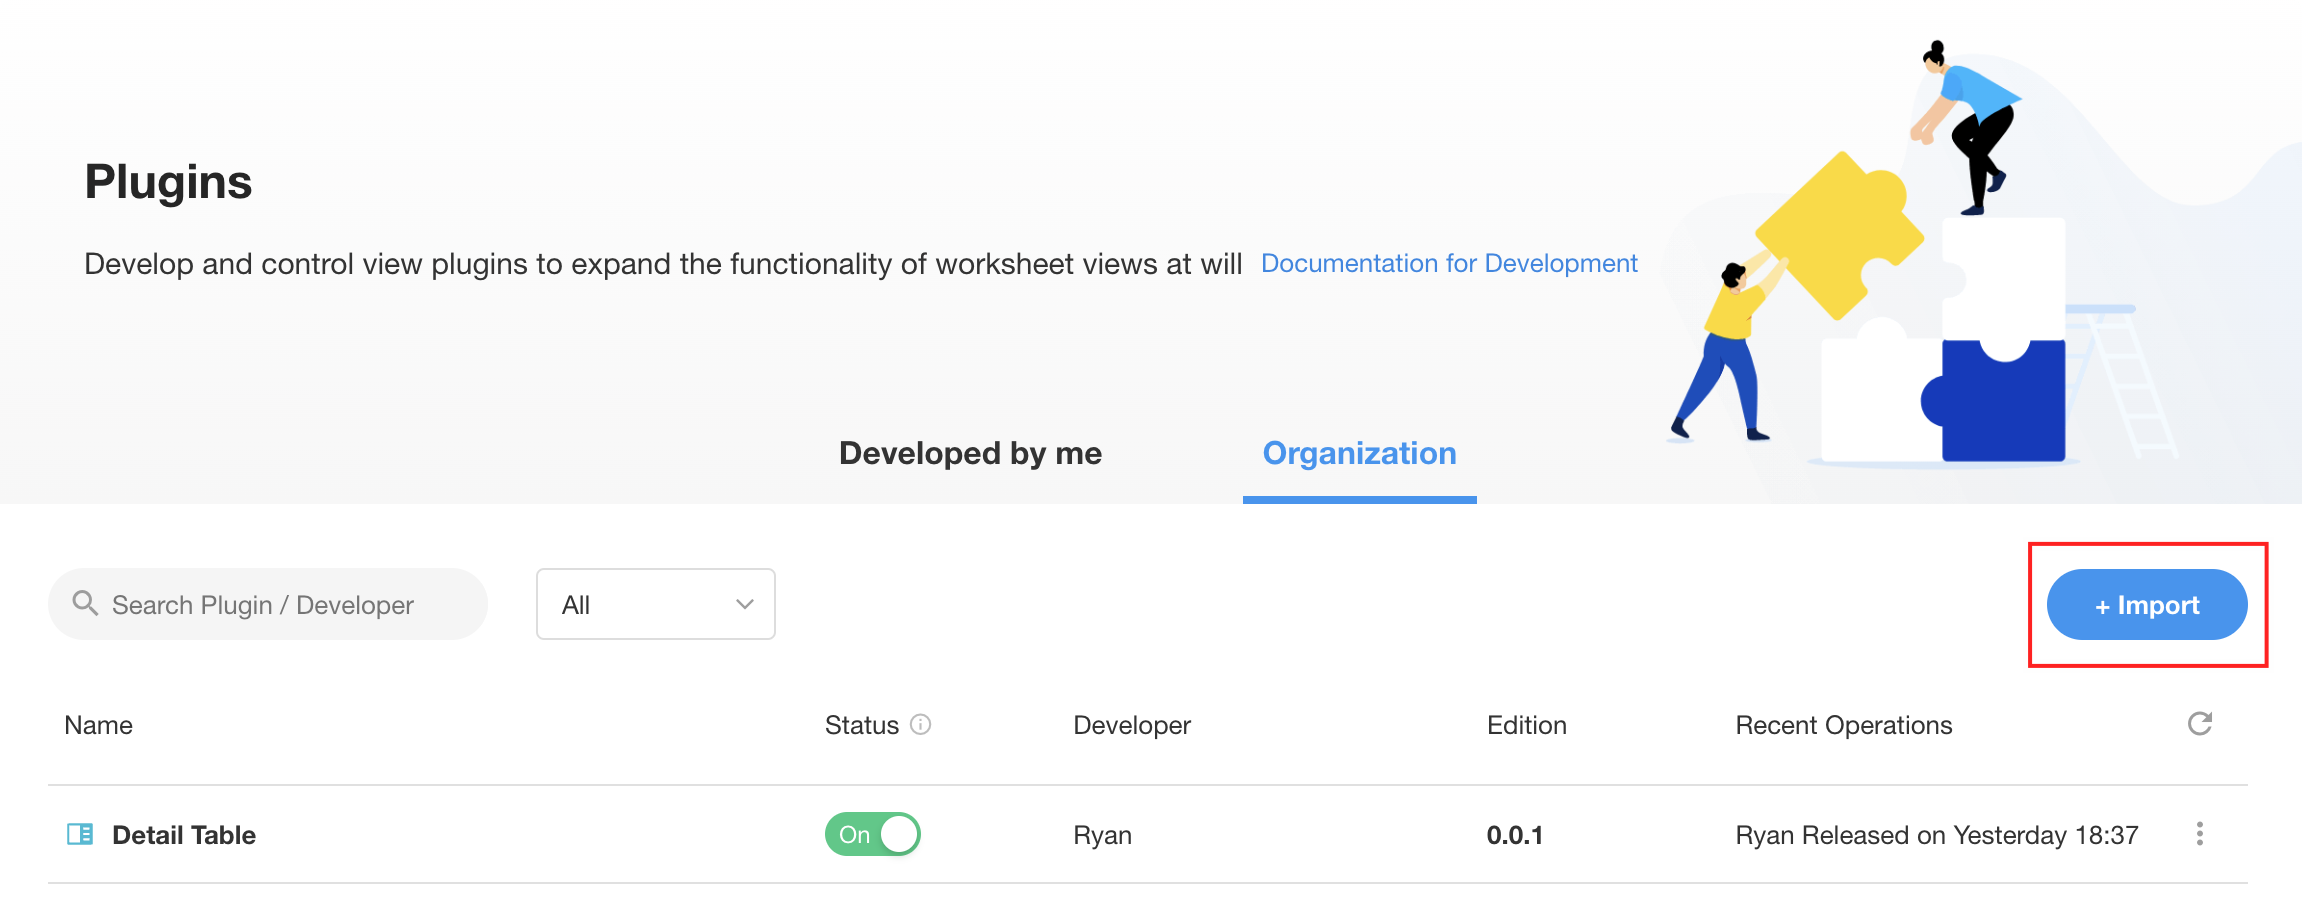
If the plugin has an export key set, the correct password must be entered to import it. If the plugin specifies a particular organization or server, it will fail to import if the environment requirements are not met.
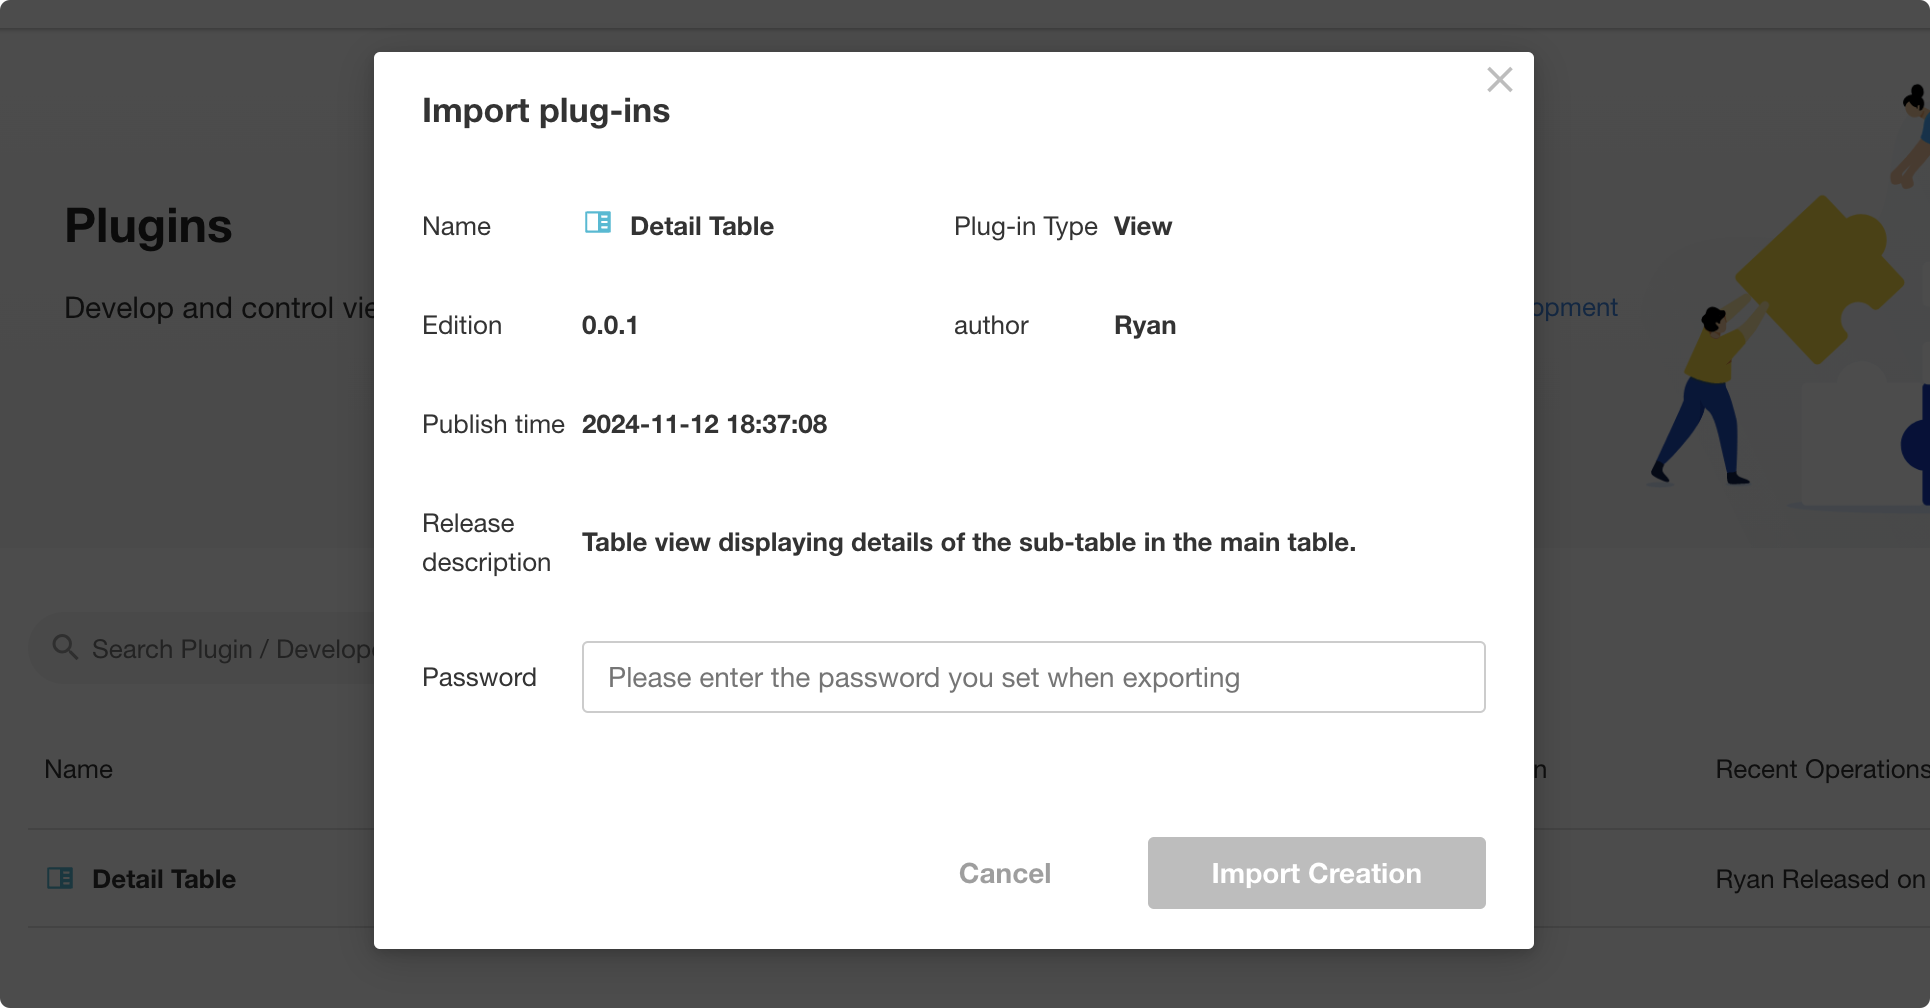
After a successful import, the plugin can be enabled within the organization, making it available for use by all members of the organization. Imported plugins cannot be exported again.

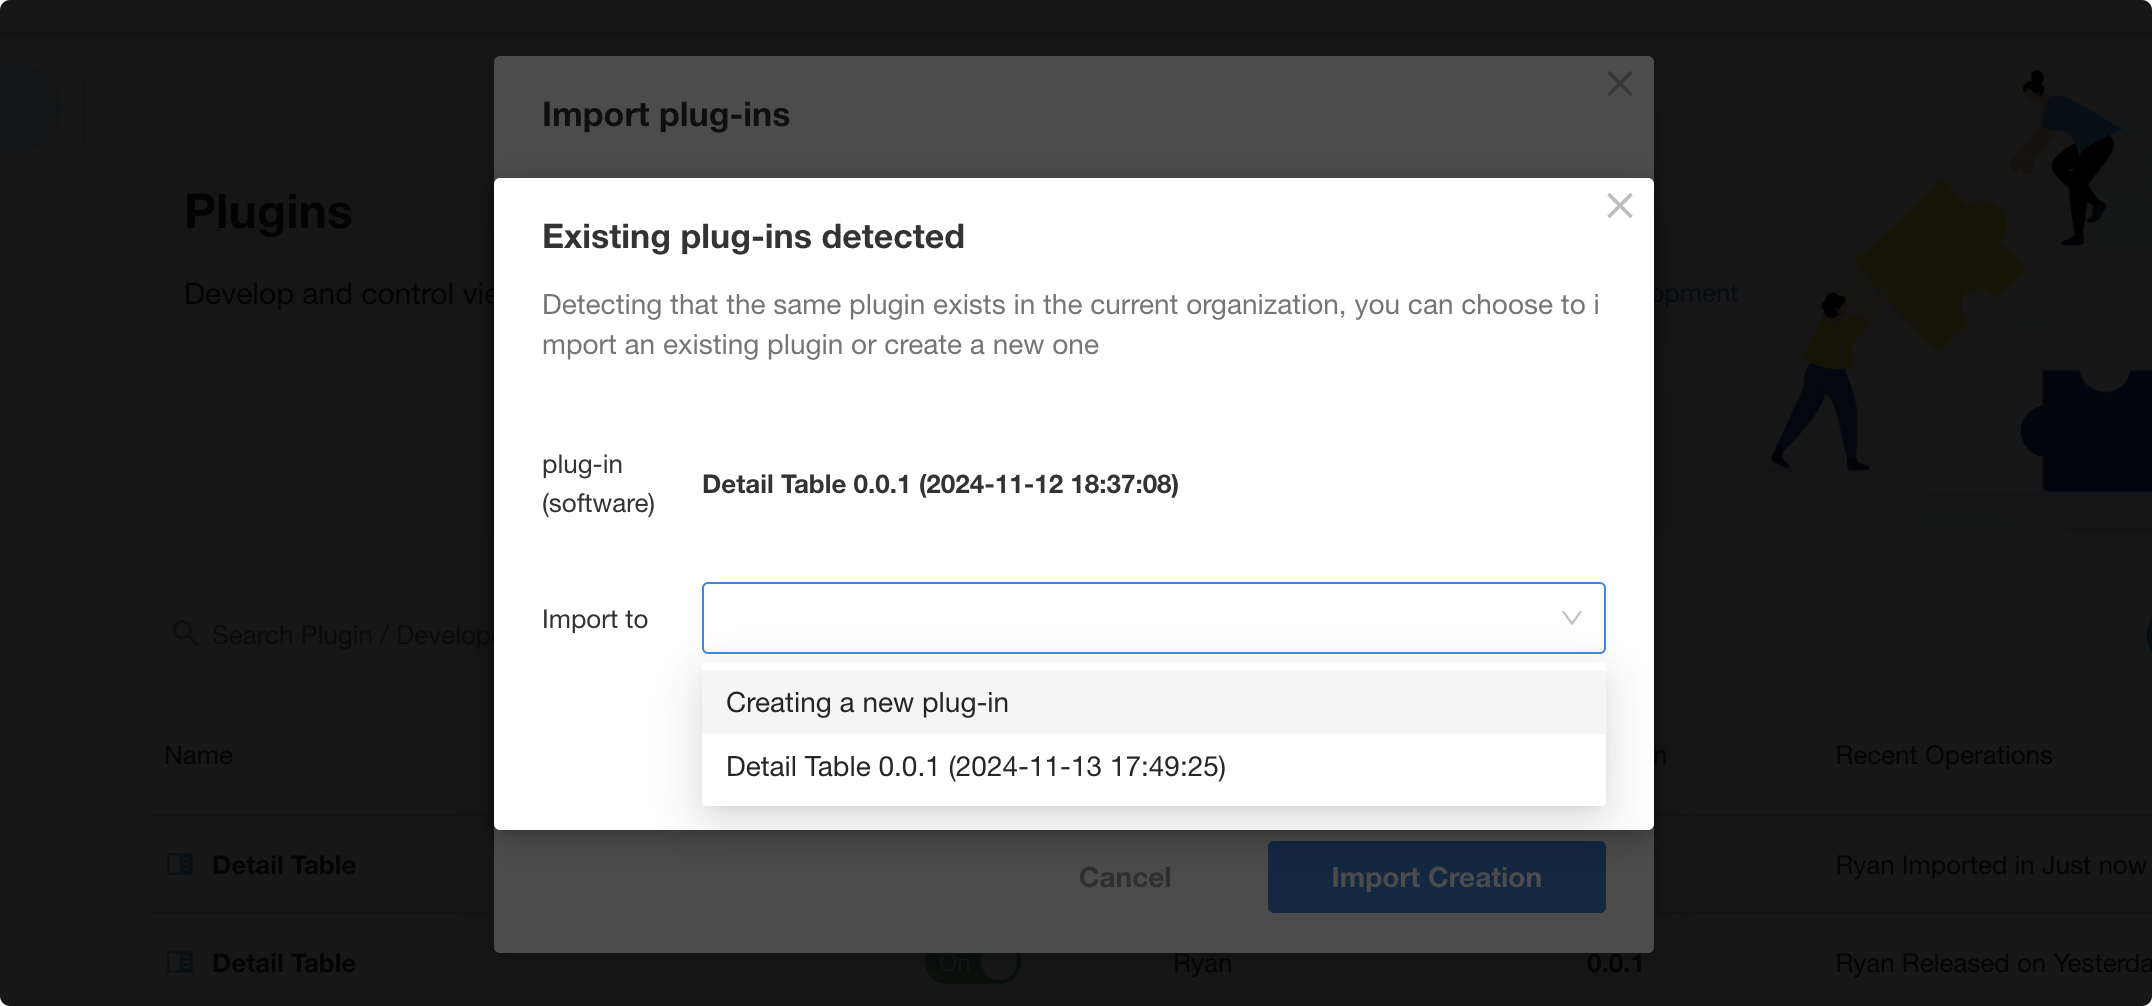
When importing a plugin, if the organization already has the same source plugin, you can choose to upgrade the existing plugin or create a new one (typically used for testing new plugin versions):
11. Publishing to the Plugin Library and Installing Plugins
The feature to publish to the plugin library is currently unavailable. Please stay tuned for updates.
Appendix I: mdye JSSDK API
mdye.env
{
  "env": {
    "fields": ["controlId"], // Field selector
    "string": "string", // String
    "numeric": 10, // Numeric
    "enum": ["key"], // Enum
    "boolean": true // Boolean
  }
}
mdye.config
{
  "config": {
    "appId": "string", // ID of the current application
    "worksheetId": "string", // ID of the current worksheet
    "projectId": "string", // ID of the current organization
    "viewId": "string", // ID of the current view
    "filters": [{}], // Filter conditions for the current view
    "query": {}, // URL query parameters for the current page
    "controls": [{ // Configuration information of fields in the current view
      "controlId": "string",
      "controlName": "string",
      ......
    }],
    "worksheetInfo": {...}, // Configuration information of the current worksheet
    "currentAccount": { // Information of the current user
      "accountId": "", // User's ID
      "fullname": "", // User's name
      "avatar": "", // User's avatar
      "lang": "", // User's language
    }
  }
}
getFilterRows(params)
Fetch worksheet row data
Parameters:
params: Object containing the following properties:params.worksheetId: ID of the worksheet, type is string.params.viewId: ID of the view.params.pageSize: Number of records returned per page.params.pageIndex: Page number to return.params.sortId: ID of the sort field.params.isAsc: Specifies if the sort order is ascending.params.notGetTotal: If set to true, the interface will not return the total number of records to enhance performance.
getFilterRowsTotalNum(params)
Fetch the total number of worksheet rows
Parameters:
params: Object containing the following properties:params.worksheetId: ID of the worksheet, type is string.params.viewId: ID of the view.params.pageSize: Number of records returned per page.params.pageIndex: Page number to return.
getRowDetail(params)
Fetch row record details
Parameters:
params: Object containing the following properties:params.appId: Application ID.params.worksheetId: ID of the worksheet.params.viewId: ID of the view.params.rowId: ID of the record.params.getTemplate: Returns corresponding table information.
getRowRelationRows(params)
Retrieve related records of a record Retrieve sub-table records of a record
Parameters:
params: An object containing the following properties:params.controlId: The controlId of the related record field or sub-table field.params.rowId: The ID of the record.params.worksheetId: The ID of the current worksheet (where the related record field or sub-table field is located).params.keywords: Keywords for searching records.params.pageSize: Number of records per page.params.pageIndex: Page number.params.getWorksheet: The corresponding related table object.
addWorksheetRow(params)
Create a new record
Parameters:
params: An object containing the following properties:params.appId: The ID of the application.params.worksheetId: The ID of the worksheet.params.receiveControls: Field data, the specific format can be found in the web interface of the same name in browser DevTools or Update Field Data Example.
updateWorksheetRow(params)
Update a record
Parameters:
params: An object containing the following properties:params.appId: The ID of the application.params.worksheetId: The ID of the worksheet.params.rowId: The ID of the record.params.newOldControl: Field data, the specific format can be found in the web interface of the same name in browser DevTools or Update Field Data Example.
deleteWorksheetRow(params)
Delete a row from the worksheet
Parameters:
params: An object containing the following properties:params.appId: The ID of the application.params.worksheetId: The ID of the worksheet.params.rowIds: A list of record IDs.
mdye.utils
openRecordInfo(params)
Open the record details popup
Parameters:
params: An object containing the following properties:params.appId: The ID of the application.params.worksheetId: The ID of the worksheet.params.viewId: The ID of the view.params.recordId: The ID of the record.
Returns: Returns a Promise that resolves to the updated record.
{
  action: "update",
  value: {
    rowid: string,
    [key: string]: any
  }
}
openNewRecord(params)
Open the create record dialog
Parameters:
params: An object containing the following properties:params.appId: The ID of the applicationparams.worksheetId: The ID of the worksheet
Returns: Returns a Promise, which resolves to the newly created record.
{
  rowid: string,
  [key: string]: any
}
selectUsers(params)
Select users
Parameters:
params: An object containing the following properties:params.projectId: The ID of the organization [optional] Defaults to the organization of the current applicationparams.unique: Only one user can be selected
Returns: Returns a Promise, which resolves to the selected users.
[{
  accountId: string,
  avatar: string,
  fullname: string
}]
selectDepartments(params)
Select departments
Parameters:
params: An object containing the following properties:params.projectId: The ID of the organization [optional] Defaults to the organization of the current applicationparams.unique: Only one department can be selected
Returns: Returns a Promise, which resolves to the selected departments.
[{
  departmentId: string,
  departmentName: string
}]
selectOrgRole(params)
Choose Organization Role
Parameters:
params: An object containing the following properties:params.projectId: The organization ID [optional], defaults to the organization of the current applicationparams.unique: Only one can be chosen
Returns: Returns a Promise, which resolves to the selected organization.
[{
  organizeId: string,
  organizeName: string
}]
selectRecord(params)
Choose Record
Parameters:
params: An object containing the following properties:params.projectId: The organization ID [optional], defaults to the organization of the current applicationparams.relateSheetId: The corresponding worksheet IDparams.multiple: Allow selecting multiple records
Returns: Returns a Promise, which resolves to the selected records.
[{
  rowid: string,
  [key: string]: any
}]
selectLocation(params)
Choose Map Location
Parameters:
params: An object containing the following properties:params.distance: The distanceparams.defaultPosition: The default position {lat, lng}params.multiple: Allow selecting multiple locations
Returns: Returns a Promise, which resolves to the selected locations.
[{
  address: string,
  lat: string,
  lng: string,
  name: string
}]
Update Field Data Example
[
  {
    "controlId": "661514c080547873603db341",
    "type": 2,
    "value": "Nocoly",
    "controlName": "Text"
  },
  {
    "controlId": "6615151480547873603db355",
    "type": 6,
    "value": "11",
    "controlName": "Number"
  },
  {
    "controlId": "6615151480547873603db356",
    "type": 8,
    "value": "12.00",
    "controlName": "Amount",
    "dot": 2
  },
  {
    "controlId": "6615151480547873603db357",
    "type": 5,
    "value": "hap@nocoly.com",
    "controlName": "Email"
  },
  {
    "controlId": "6615151480547873603db358",
    "type": 15,
    "value": "2024-12-10",
    "controlName": "Date"
  },
  {
    "controlId": "6615151480547873603db359",
    "type": 46,
    "value": "14:22:00",
    "controlName": "Time"
  },
  {
    "controlId": "6615151480547873603db35a",
    "type": 3,
    "value": "+12025550108",
    "controlName": "Phone"
  },
  {
    "controlId": "6615151480547873603db35c",
    "type": 11,
    "value": "[\"a49c9652-5551-4c3d-8fca-cb70bb009b08\"]", // The key here is the key attribute under the option object in the options field, the field data is in mdye.config.controls
    "controlName": "Single Select"
  },
  {
    "controlId": "6615151480547873603db35d",
    "type": 10,
    "value": "[\"e978414d-ccee-4cde-8e45-780d27afa8e7\",\"9ace844e-e737-4a8f-9362-96e4c83ebe91\"]", // The key here is the key attribute under the option object in the options field, the field data is in mdye.config.controls
    "controlName": "Multi Select"
  },
  {
    "controlId": "6615151480547873603db35e",
    "type": 26,
    "value": "[{\"accountId\":\"60149342-0453-4c8c-bae9-6120c62ac58d\"}]",
    "controlName": "Member"
  },
  {
    "controlId": "6615151480547873603db35f",
    "type": 27,
    "value": "[{\"departmentId\":\"0a192f2b-7ad0-40b4-b6f8-db3f502e00a5\"}]",
    "controlName": "Department"
  },
  {
    "controlId": "6615151480547873603db360",
    "type": 48,
    "value": "[{\"organizeId\":\"52b067a8-696e-4e68-9473-be415cef1cd1\"}]",
    "controlName": "Organizational Role"
  },
  {
    "controlId": "6615151480547873603db362",
    "type": 36,
    "value": "1", // Selected '1' Unselected '0'
    "controlName": "Checkbox"
  },
  {
    "controlId": "6615151480547873603db363",
    "type": 28,
    "value": 3,
    "controlName": "Rating"
  },
  {
    "controlId": "6615151480547873603db364",
    "type": 41,
    "value": "<h2>HAP</h2>",
    "controlName": "Rich Text"
  },
  {
    "controlId": "6615151480547873603db365",
    "type": 7,
    "value": "321324200001010101",
    "controlName": "ID"
  },
  {
    "controlId": "6615151480547873603db366",
    "type": 40,
    "value": "{\"x\":-77.036530,\"y\":38.897733,\"address\":\"1600 Pennsylvania Avenue NW, Washington, DC 20500, USA\",\"title\":\"\"}", // x Longitude y Latitude
    "controlName": "Location"
  },
  {
    "controlId": "6615151480547873603db368",
    "type": 29,
    "value": "[{\"sid\":\"df201312-5606-4d56-8342-ec2b00f9bf89\"}]", // Rowid of the record
    "controlName": "Emitter"
  },
  {
    "controlId": "6615151480547873603db36a",
    "type": 35,
    "value": "[{\"sid\":\"def7cd2a-d6c2-4524-bcd6-2b1df58ed6a9\"}]", // Rowid of the corresponding cascading record
    "controlName": "Cascading Select"
  }
]
mdye Messaging System
The mdye system supports a publish-subscribe model to respond to external plugin operations. For instance, when the view filter changes, the plugin can receive the updated filter values to request data anew.
import React, { useEffect, useState, useCallback } from "react";
import { env, config, api, utils, md_emitter } from "mdye";
import { parseEnv } from "./utils";
const { getFilterRows } = api;

export default function App() {
  const { appId, worksheetId, viewId, controls } = config;
  const mapViewConfig = parseEnv(env);
  const { loadNum } = mapViewConfig;
  const [records, setRecords] = useState([]);
  const [filters, setFilters] = useState({});
  async function loadRecords() {
    const res = await getFilterRows({
      worksheetId,
      viewId,
      pageIndex: 1,
      pageSize: loadNum,
      ...filters,
    });
    setRecords(res.data);
  }
  const handleFiltersUpdate = useCallback((newFilers) => {
    setFilters(newFilers);
  }, []);
  useEffect(() => {
    loadRecords();
  }, [filters]);
  useEffect(() => {
    md_emitter.addListener("filters-update", handleFiltersUpdate);
    return () => {
      md_emitter.removeListener("filters-update", handleFiltersUpdate);
    };
  }, []);
  return <div>{records.length}</div>;
}
Currently supported events:
filters-update: Filter condition changesnew-record: Button to add a record