External Portal
Overview
For business operations, some business processes often require upstream and downstream collaboration with external users, in addition to collaboration between internal staff, such as
-
Supplier Management
-
Work Order Management
-
Member Information Management
For these external users, their participation is often required only for a certain scenario. Due to the large number of participants or temporary participation, it is not necessary to require external users to download the app to sign up and collaborate.
To respond to the above needs, HAP developed the external portal, where users can quickly sign up and login. External users can only operate on the current application, and other functional modules are not visible to them, which greatly facilitates the management of external users.
Features of External Portal:
-
Simple and fast signup and login
-
Users can sign up quickly by phone number or email.
-
Users can log in by verification code, password, or scanning QR code by WeChat.
-
-
Simple interface
After login, only the current application is visible to external users, and other modules like Collaboration, Message, and Contacts are hidden.
I. Configuration of External Portal
Example
For the external portal, you can configure how users sign up and log in, settings of the signup and login interface, user invitations, approval and management, roles and permissions and statistics.
The following takes the application Work Order as an example. The features that need to be implemented are:
- Quick sign up and login for users
- Submit work orders
- Modify work orders
- Notify users of new changes
1. Enable external portal
As shown in the figure below, click [User] > [Enable external portal] > [Enable external portal].
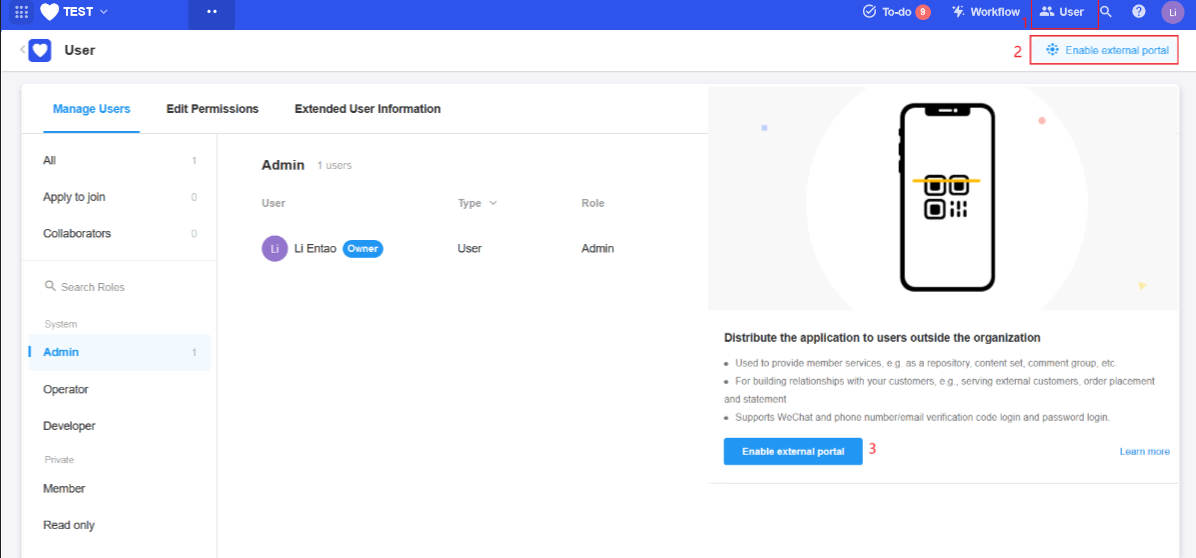
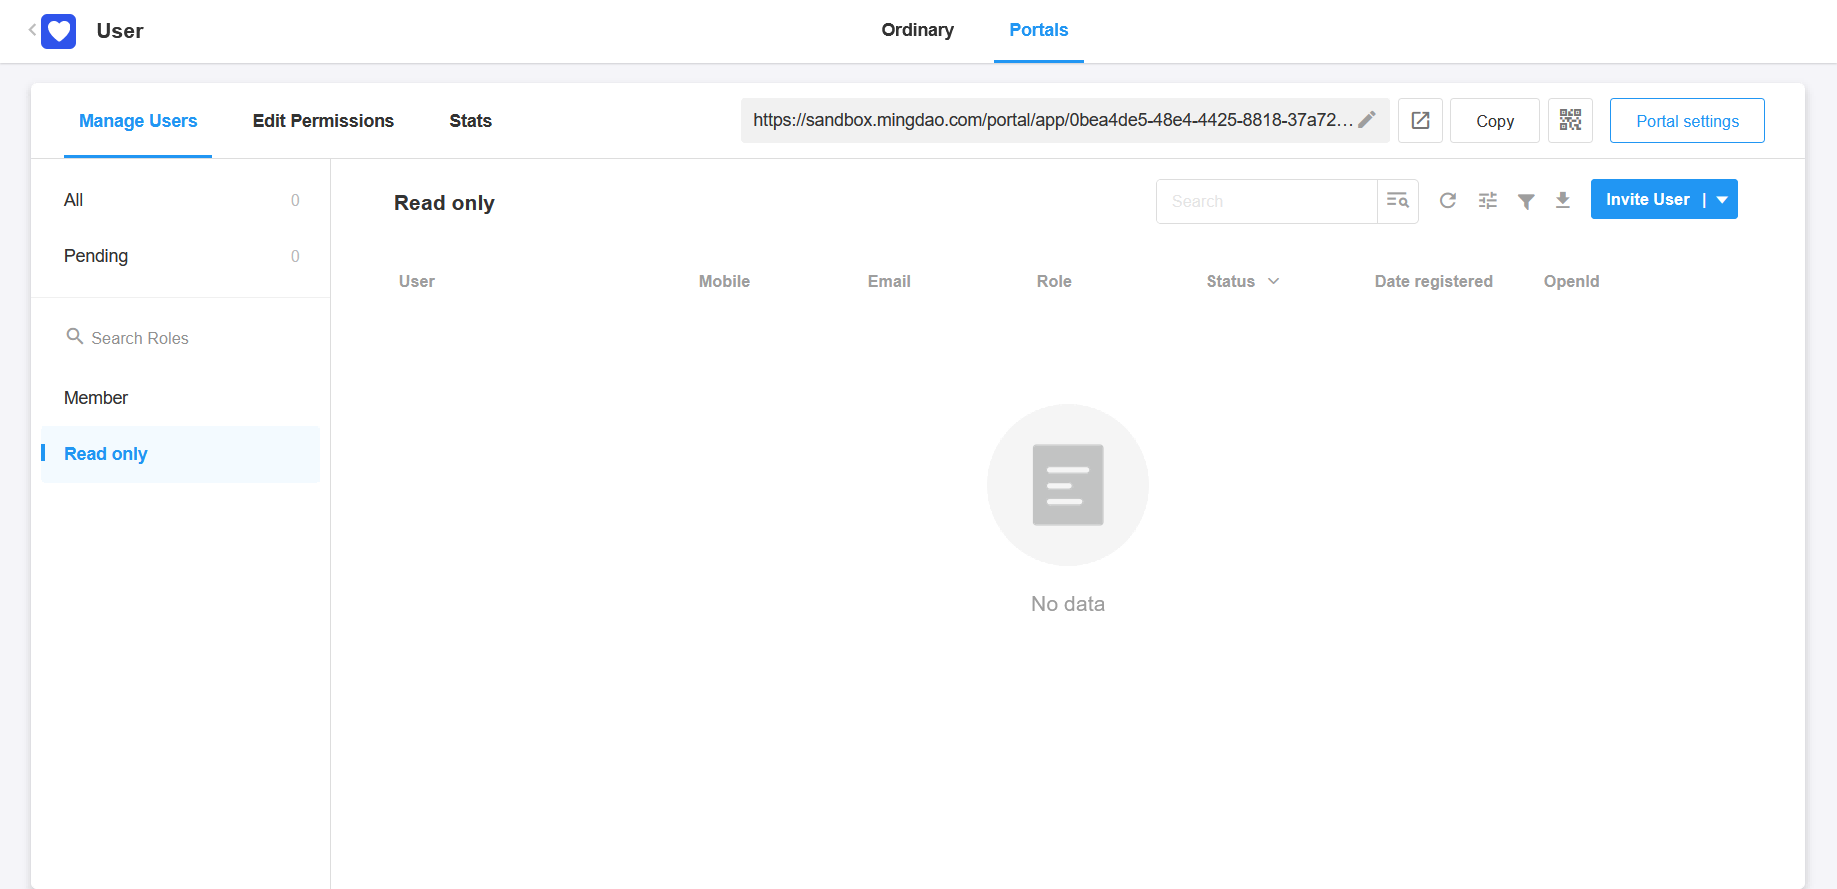
Enabled:
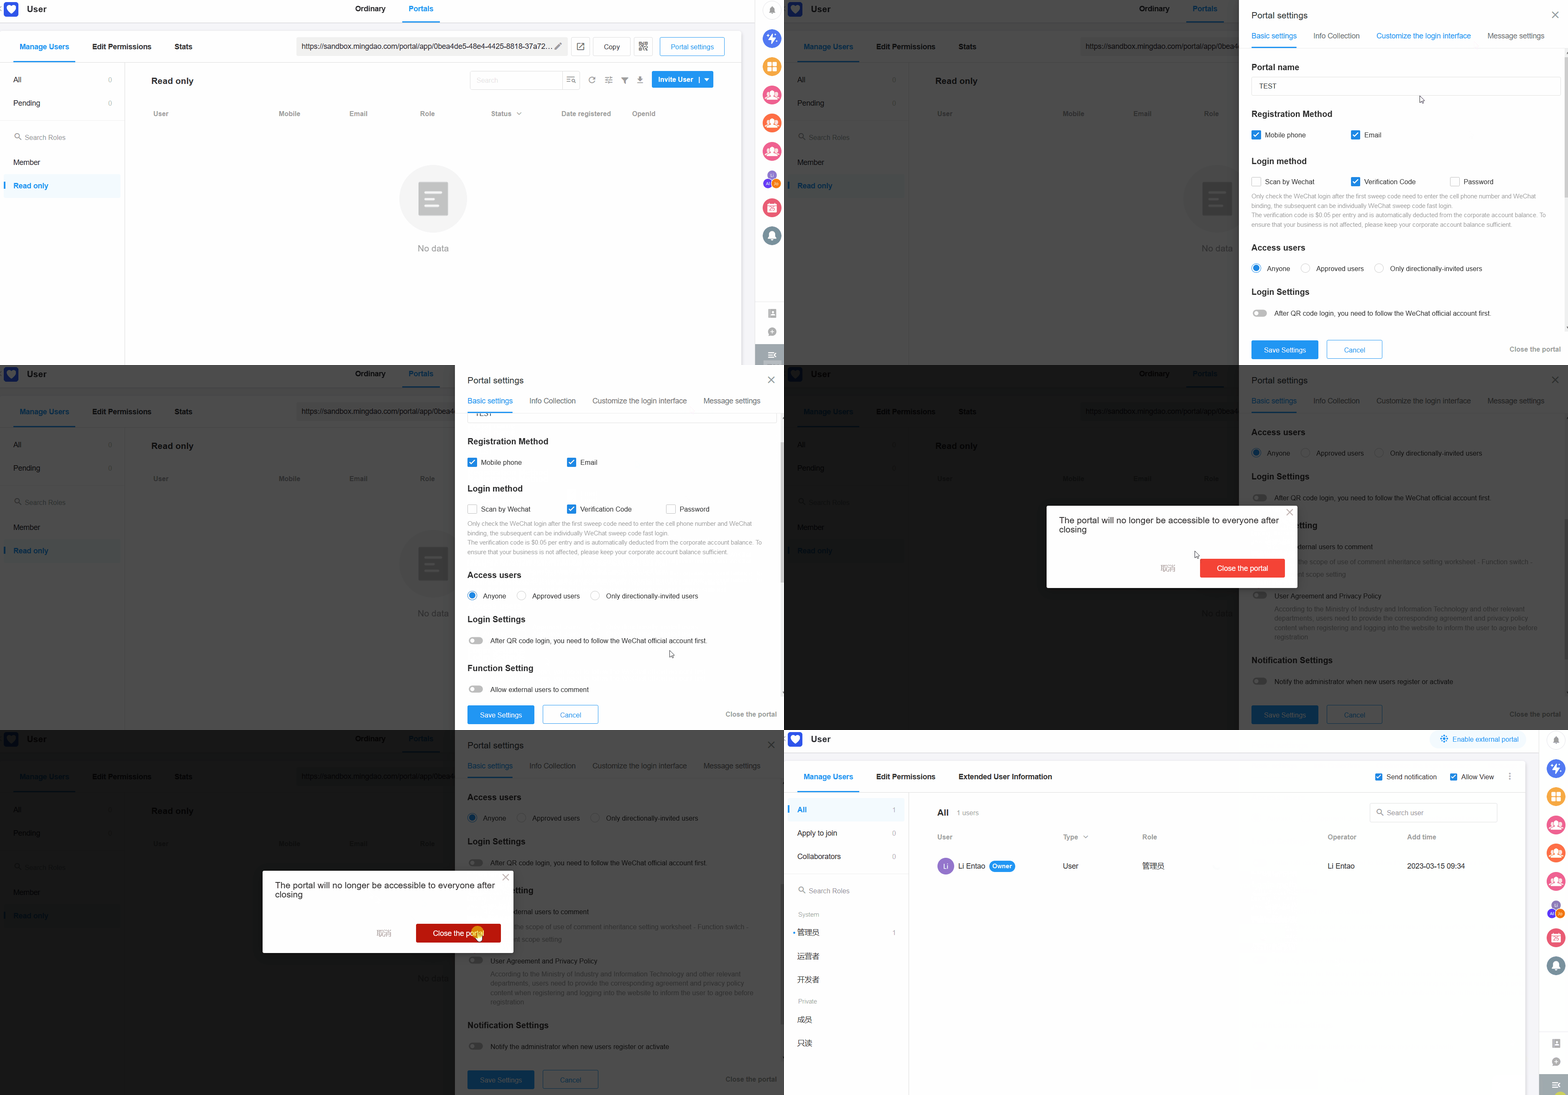
How to disable the external portal
If you need to temporarily disable the external portal, you can go to [User] > [Portals] > [Portal settings]. If disabled, external users can no longer access it.
2. Customize the access domain name
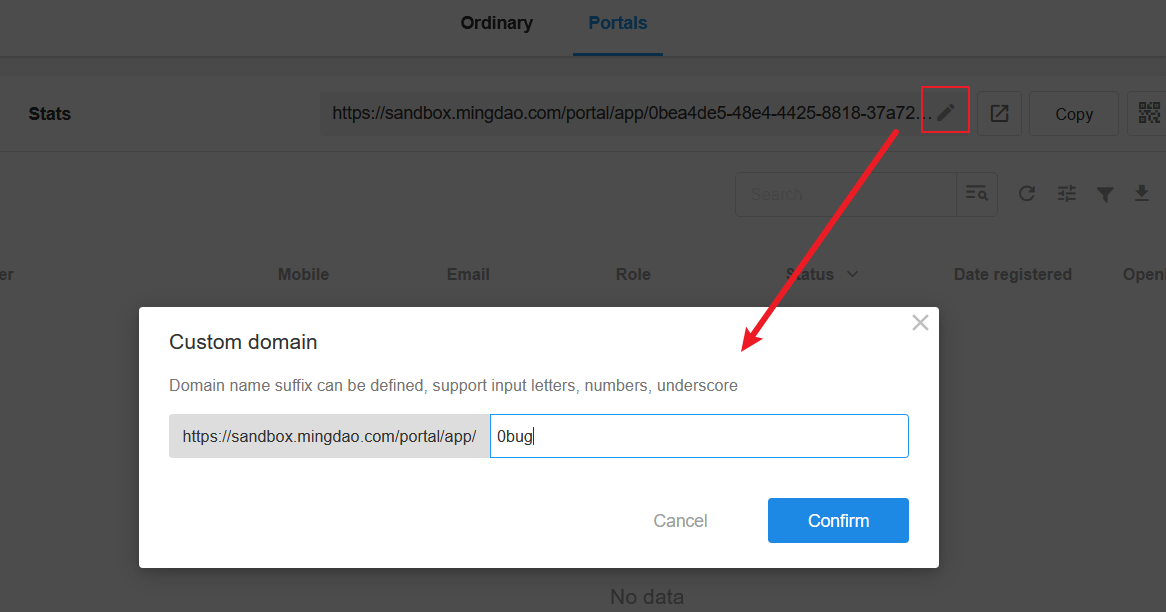
The default access link of external portal is domain name plus application ID. You may replace the application ID with custom content.

-
Only the link suffix can be customized, and the domain name cannot be modified.
-
Only number, letter and medium dash can be entered.
-
It cannot start or end with a medium dash.
-
It contains at least 4 letters or numbers.
-
It can't be duplicated, and there will be a prompt if it is the same as someone else's setting.
-
If deleting the custom domain name, it is restored to the default link.
3. Link/QR code for signup and login
After enabling the external portal, you can see the link and QR code for signup and login of the external portal.
Signup and login are in the same portal. The first login is to sign up as well.

4. Design the signup/login page
Go to [Portal Settings] > [Custom Login Interface] to configure the page related elements.
You can configure the name, logo, layout, background image or background color of the page.
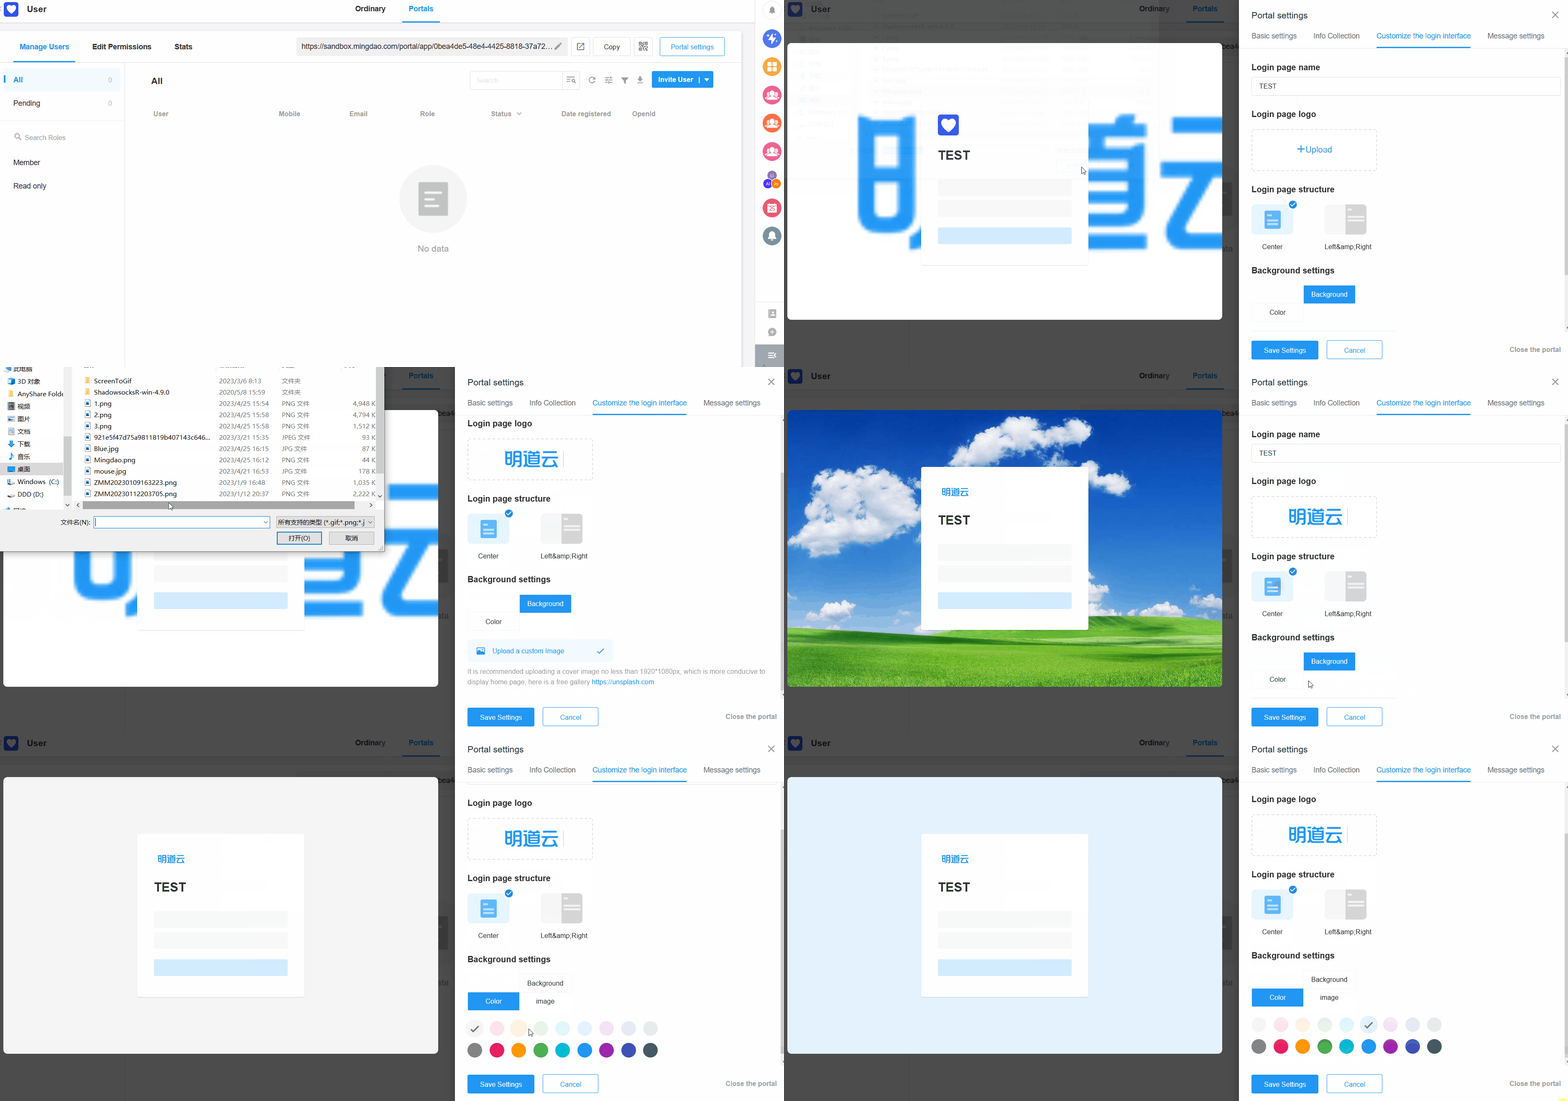
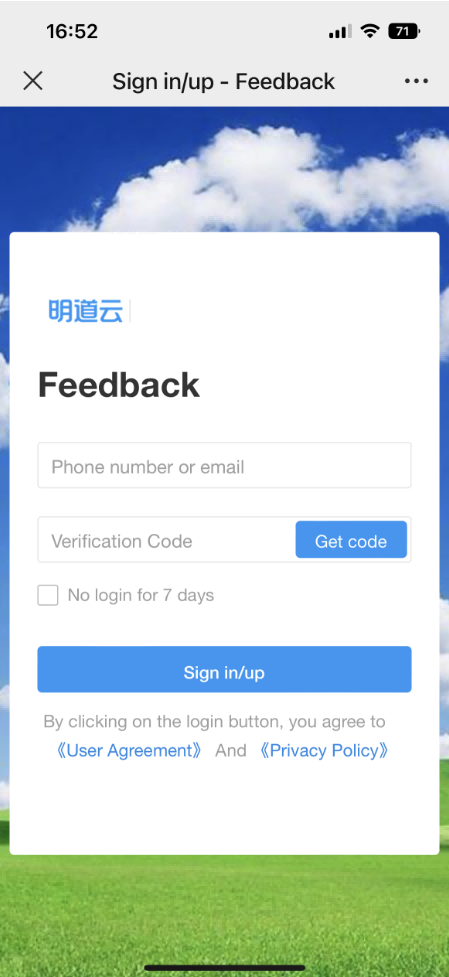
After saving, you can scan the code on your phone or test it with your browser.
App:
PC browser:
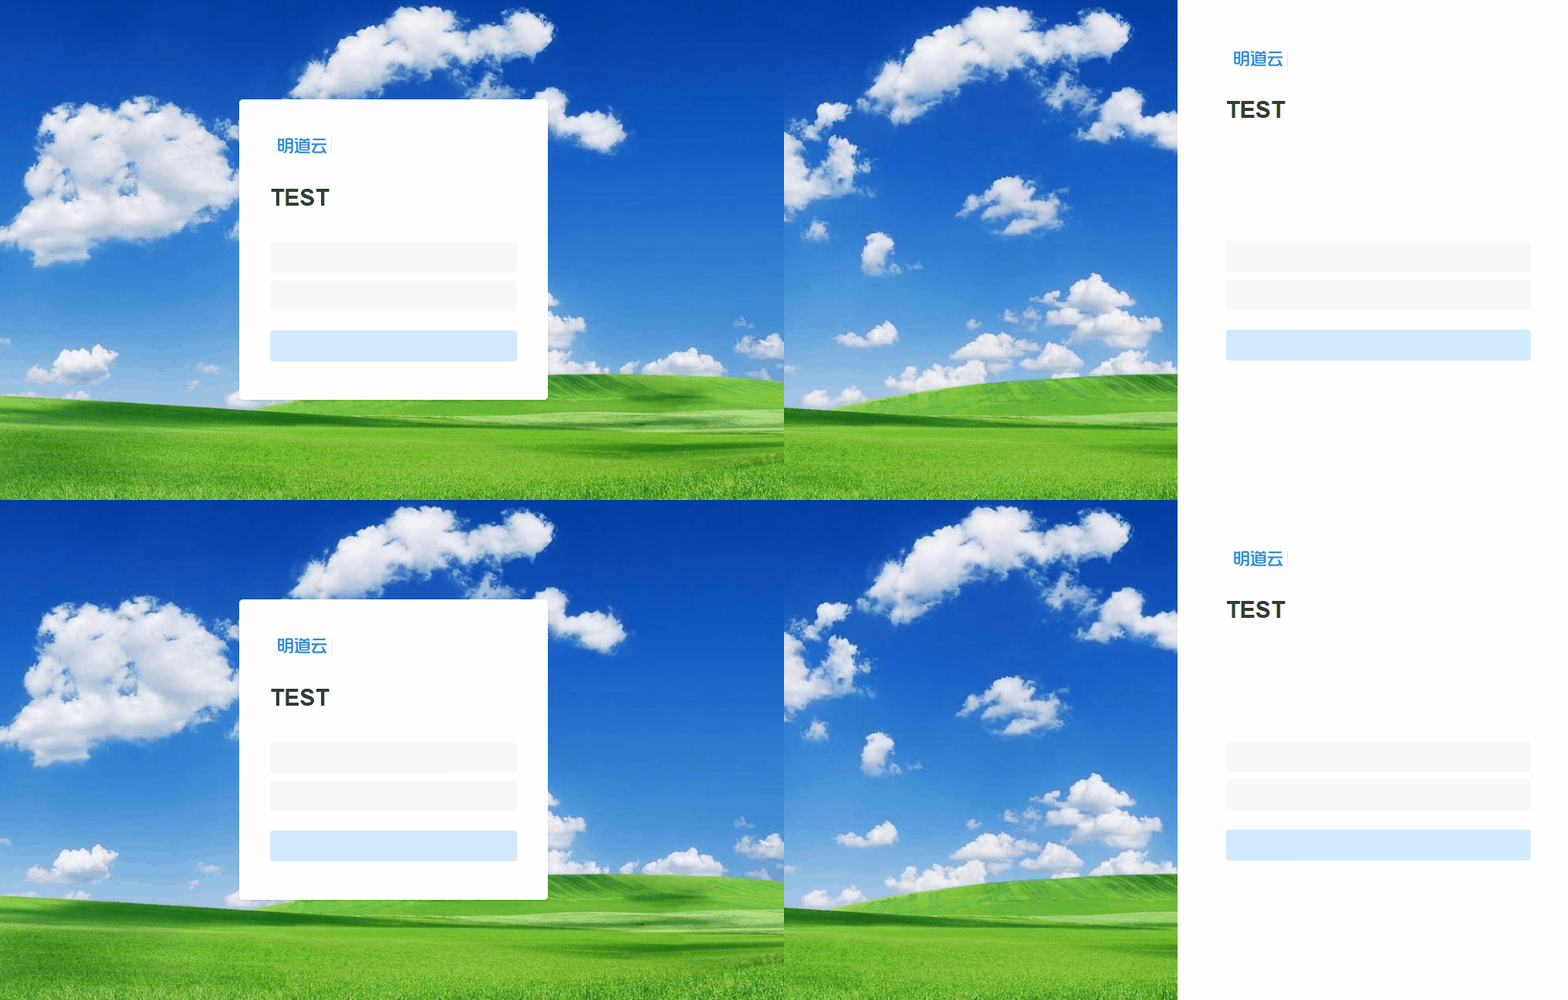
The left-right structure is only valid on the PC web. It is always the centered structure on mobile.
5. Set the portal name
In an application, sometimes only some worksheets may be open to external users, so the application name may no longer be suitable for external users.
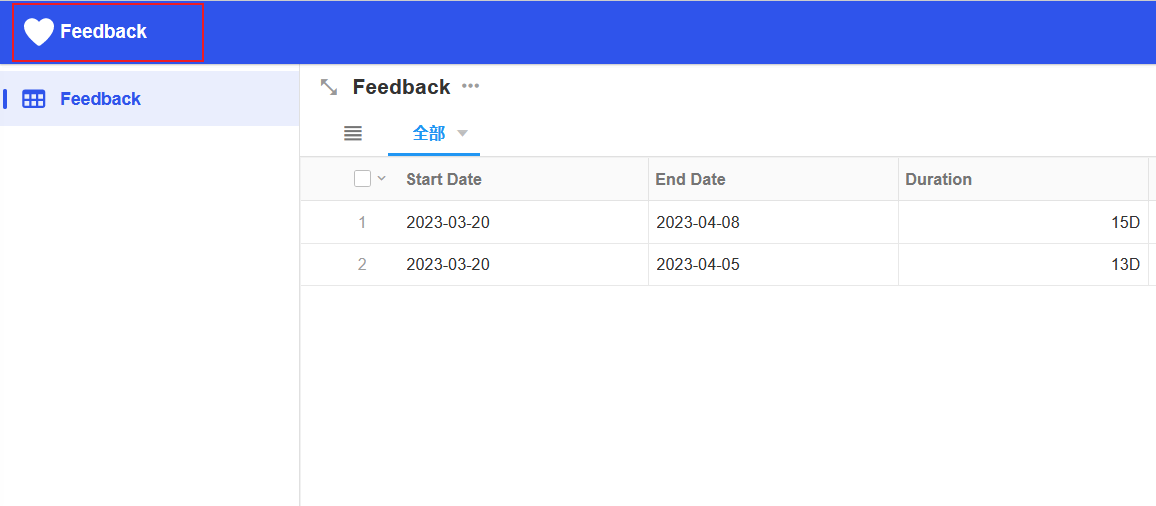
For example, in the application Work Order, only one of the worksheets Feedback is open to external users. In this case, when an external user logs into the application, it is not suitable to be displayed as Work Order, but rather as Feedback.
Therefore, you can set the portal name separately and display it as the name of the application.
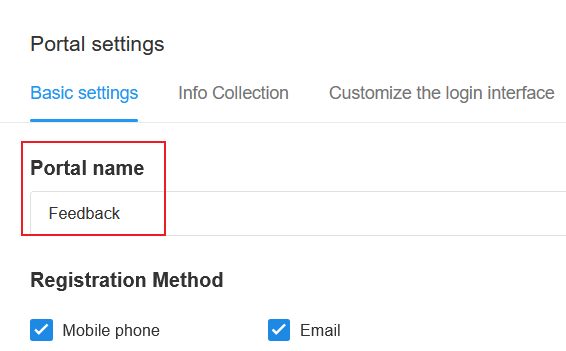
For internal members:
For external users:
6. Signup and login methods
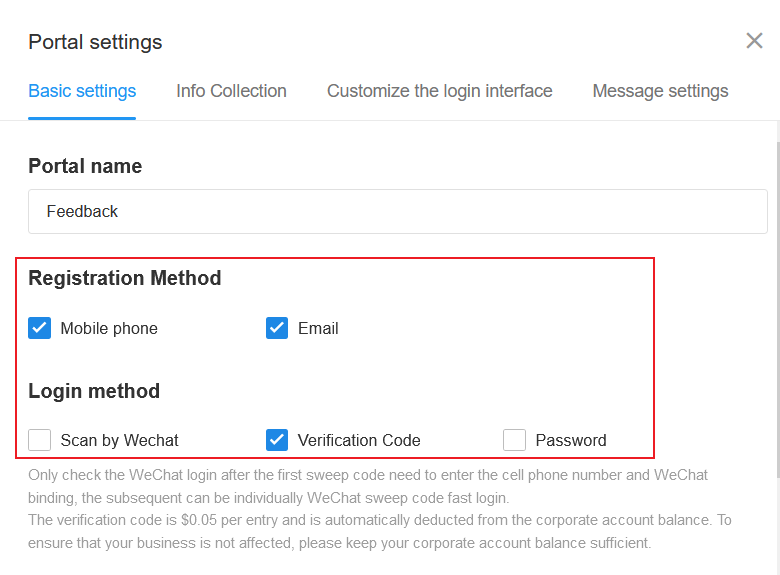
-
Signup: You can sign up with your phone number or email address.
-
Login: You can log in by verification code, password and scan QR code by WeChat.
(1) Verification code
Every time you log in, you need to be verified by the verification code. If you don't sign up when you first login, it will automatically create an account and login with the entered phone number or email address.
SMS verification code is RMB 0.05 each and email verification code is RMB 0.03 each. To ensure that your business will not be affected, please keep your enterprise account balance sufficient.
(2) Password
After signing up, in the personal center you can set the login password.
(3) Scan QR code by WeChat
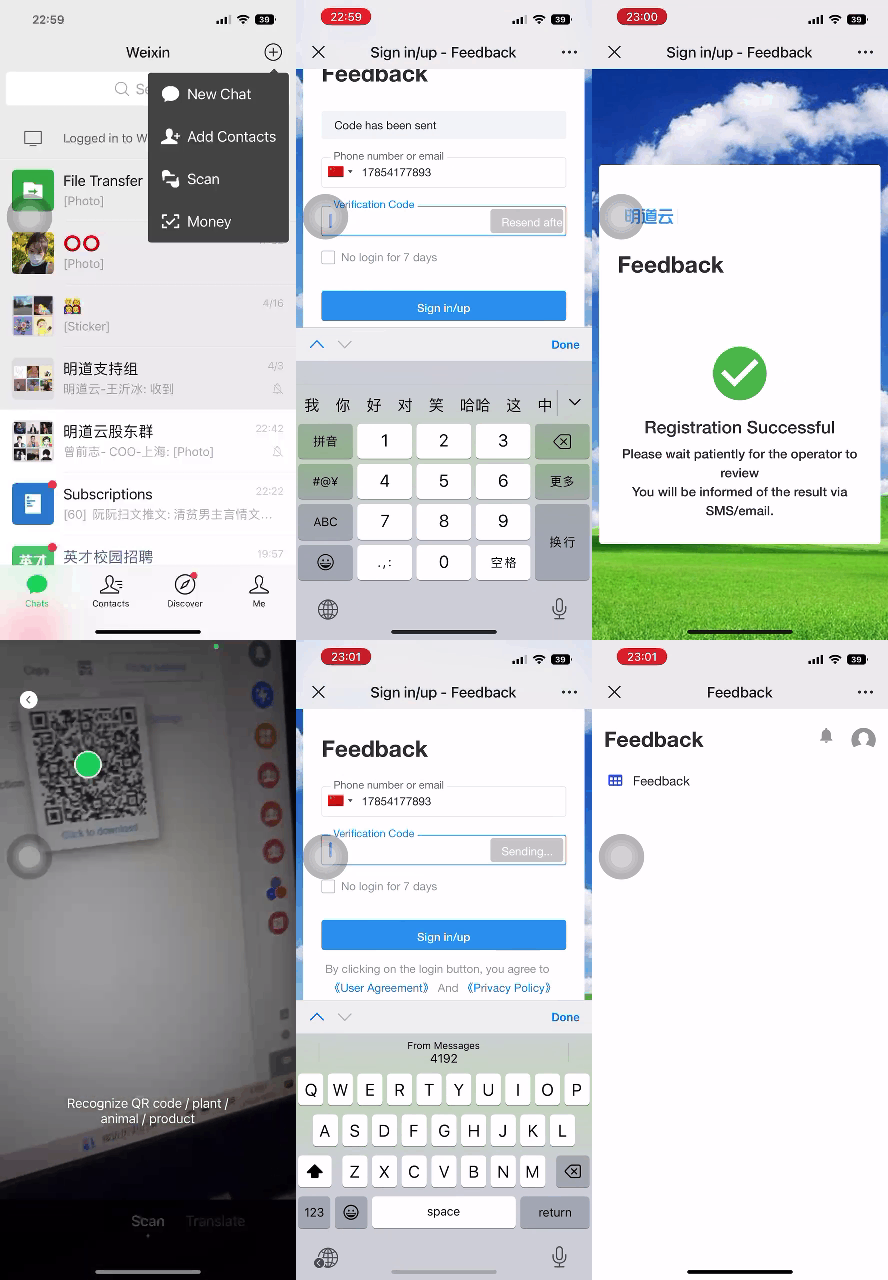
If the organization is bound with a WeChat service account, users can scan the QR code and authorize it and then they can log in the application directly. Users can also scan the code on web terminal to log in.
Effect:
Whether to follow the service account first
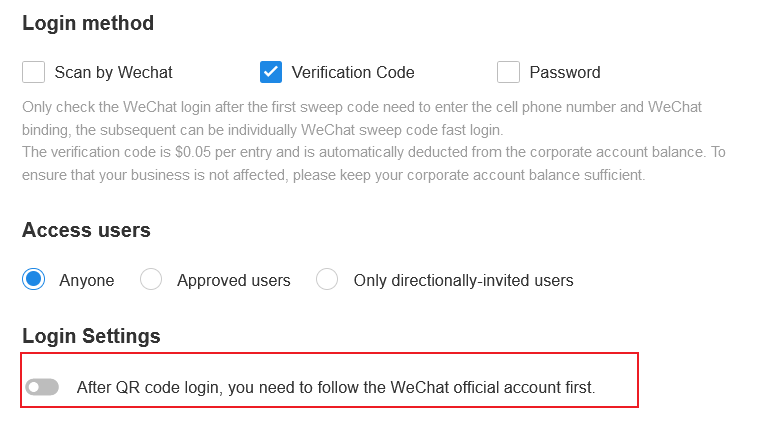
If enabled, if need to authorize WeChat to scan the QR code to log in, you must first follow the service account.
When you scan the QR code to login for the first time, it will jump to the page to guide you to follow the service account.
(4) Two-step verification
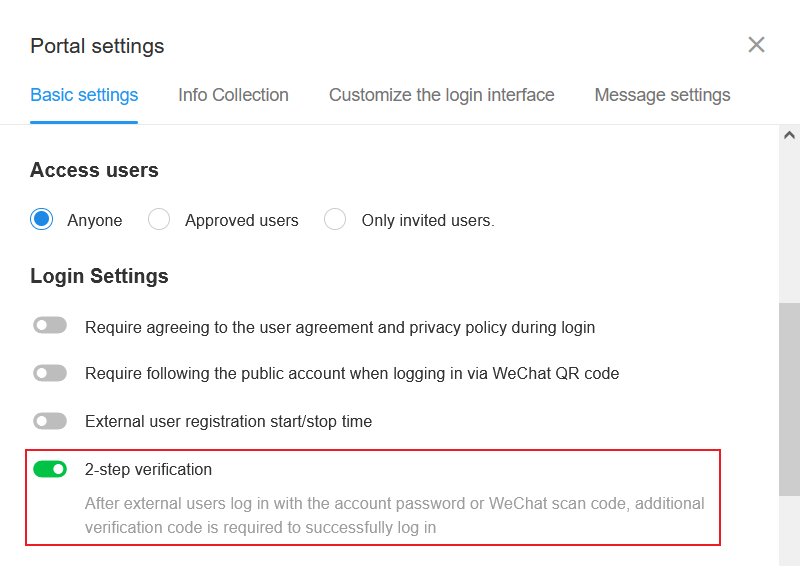
If enabled, external users will also need to be verified with a verification code after logging in via password or scanning QR code by WeChat, and they can log in successfully after successful verification.
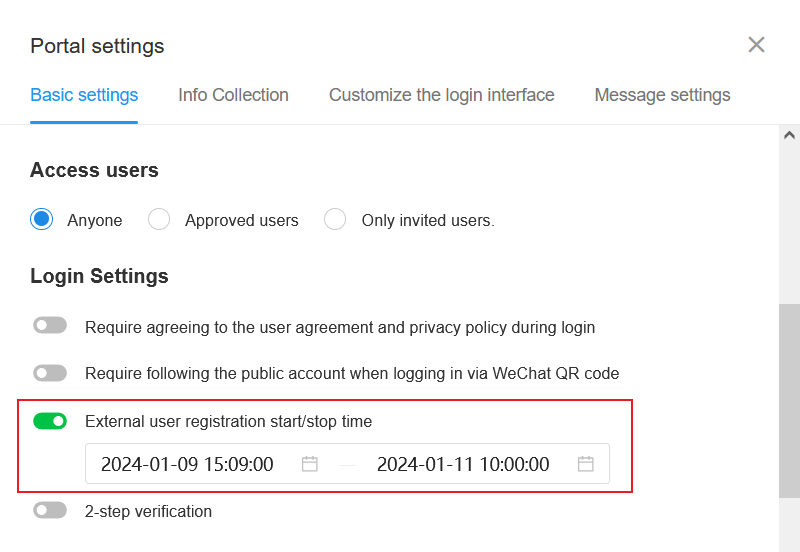
(5) Start/stop time allowed for signup
You can set a time period during which external users can sign up.
7. Set users who are allowed to access
Due to the wide spread of QR codes and links, restrictions are needed on users who can access the application.
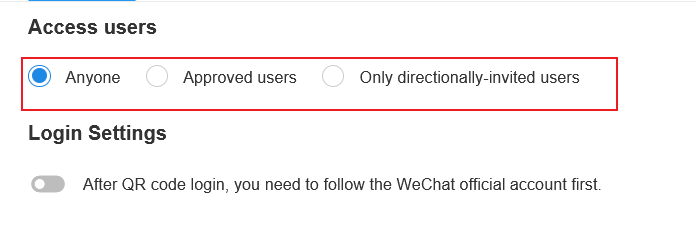
Three kinds of users are supported, which are anyone, approved uers, and only directionally-invited users.
-
Anyone: It means anyone who gets the link can sign up and log in to access.
-
Approved users: Only approved users can access the application.
After signing up, users will be reminded that they need to be approved, and will receive SMS notification when the approval is completed.
-
Only directionally-invited users.: It means sending invitation messages to specified phone numbers. You can invite one by one or in bulk.
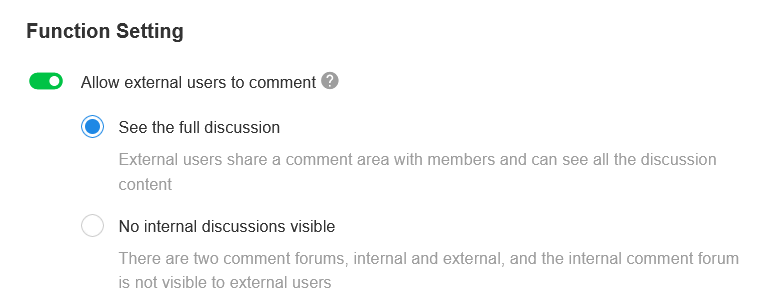
8. Whether to allow external users to comment
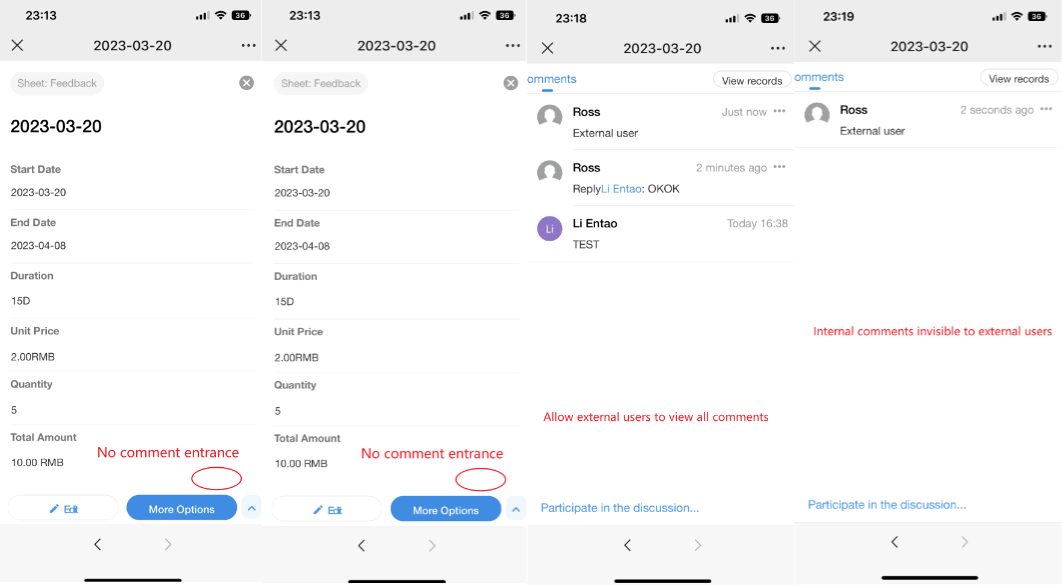
-
No discussion allowed
There is no entry for comments when external users view the record.
-
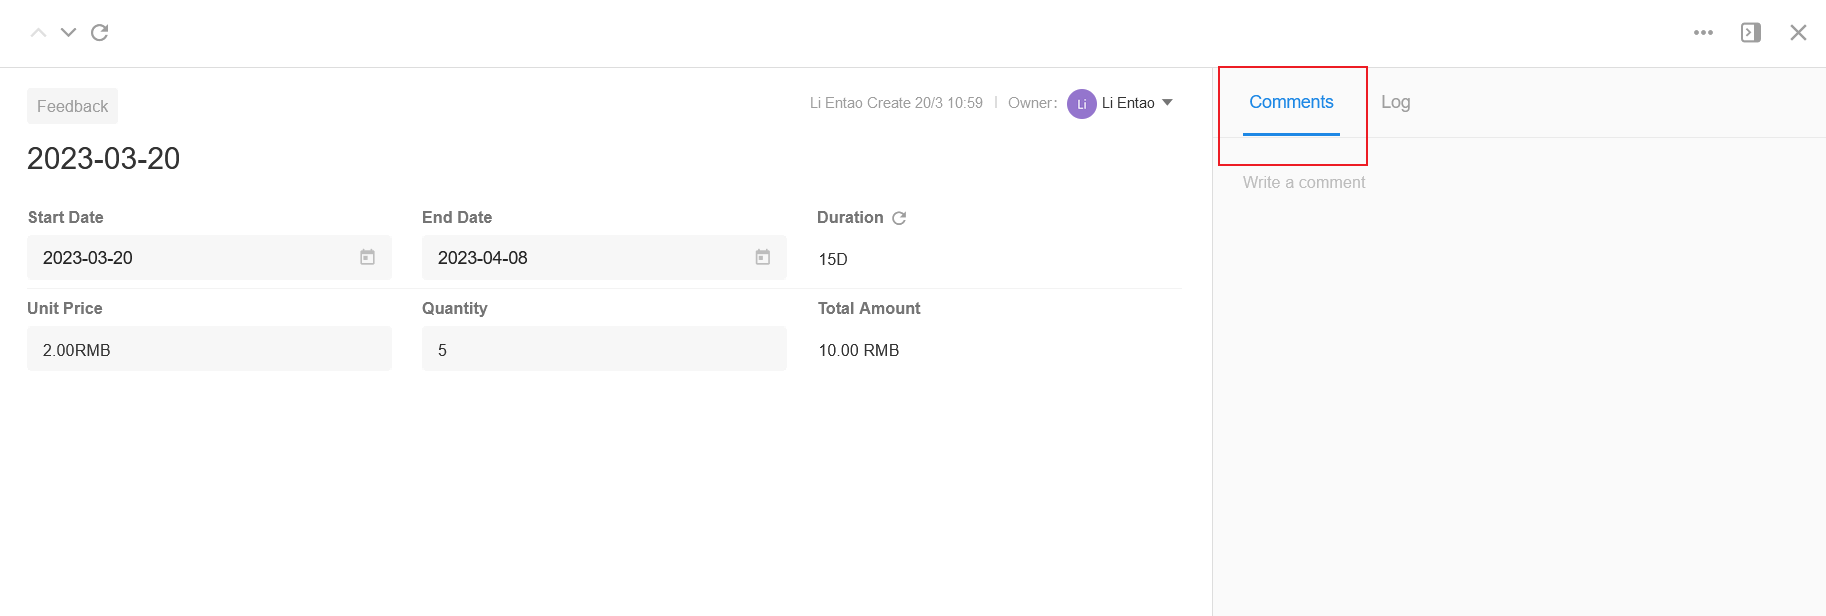
Discussion allowed - see all discussions
Organization members and external users share a common discussion and both can see the complete discussion.
For external users - on PC browser
-
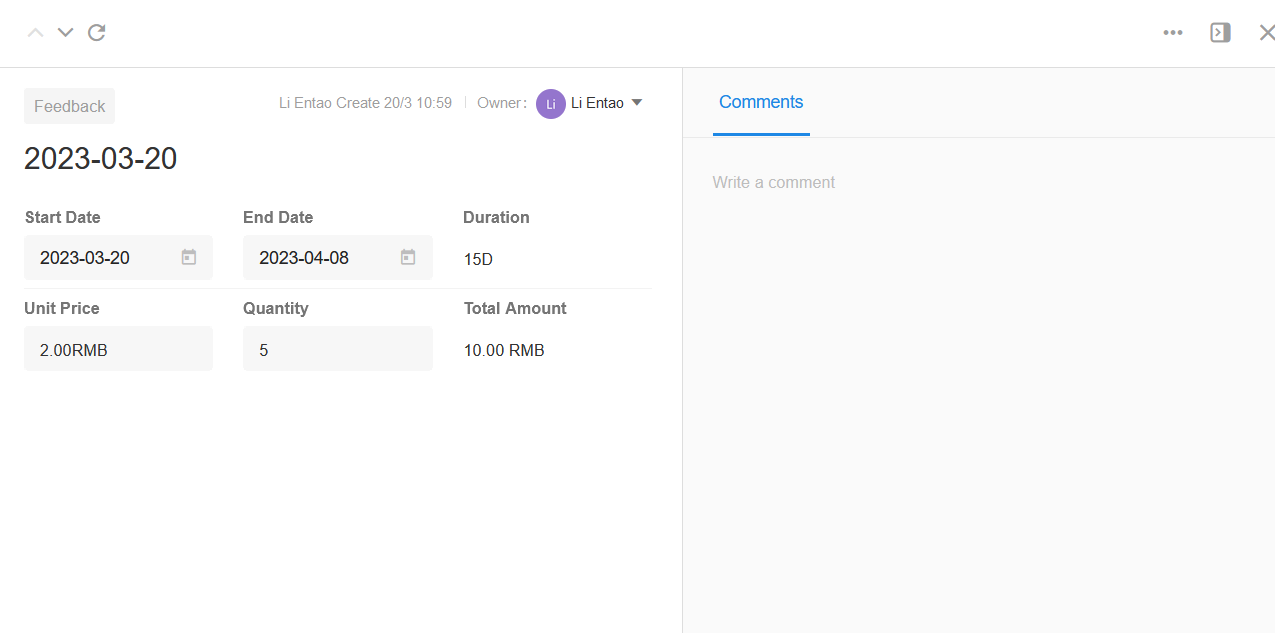
Discussion allowed - no internal discussion visible
There are two discussion areas, internal and external, and the internal discussion area is not visible to external users.
For internal users
Internal users can always see all discussions.

For external users
For external users - on Mobile
Note:
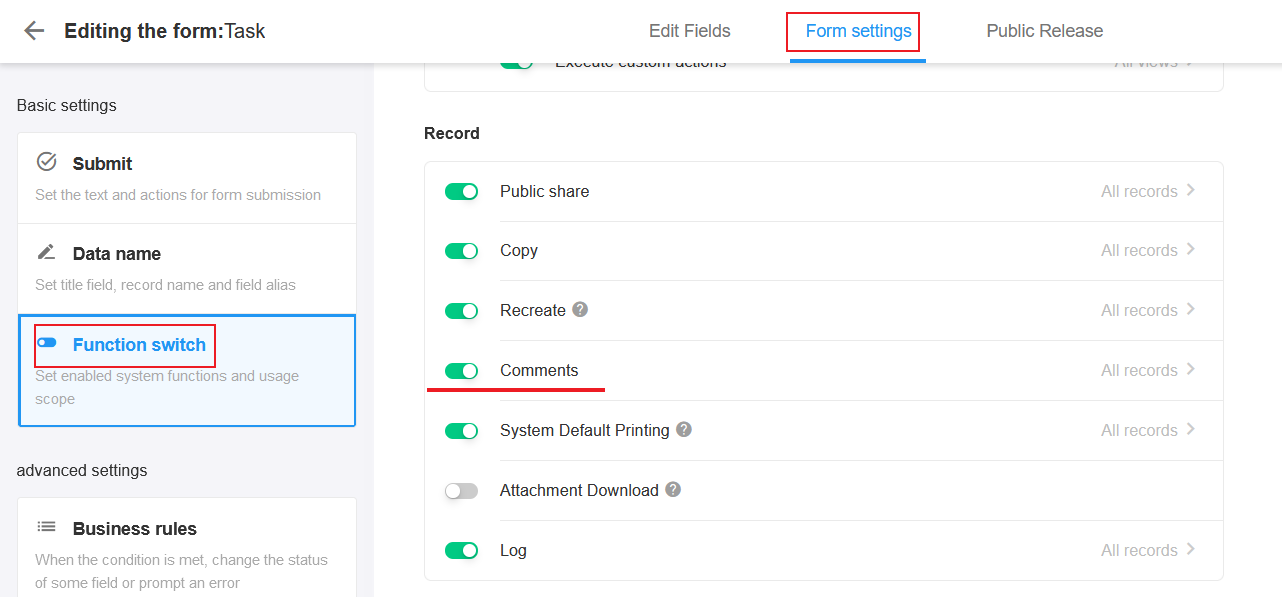
-
If the discussion for a record in the [Function Switch] in the [Form Settings] is disabled, users cannot discussed either.
-
The first time you switch [See the full discussion] to [No internal discussions visible], all the discussion history is placed in the internal discussion area and is not visible to external users, even if it is posted by oneself.
How to notify external users when there are new comments
When mentioning or replying to external users, external users can't receive notification directly because they don't have the app. Notification messages need to be sent via WeChat, SMS or email.
(1) How to enable notification of new discussion
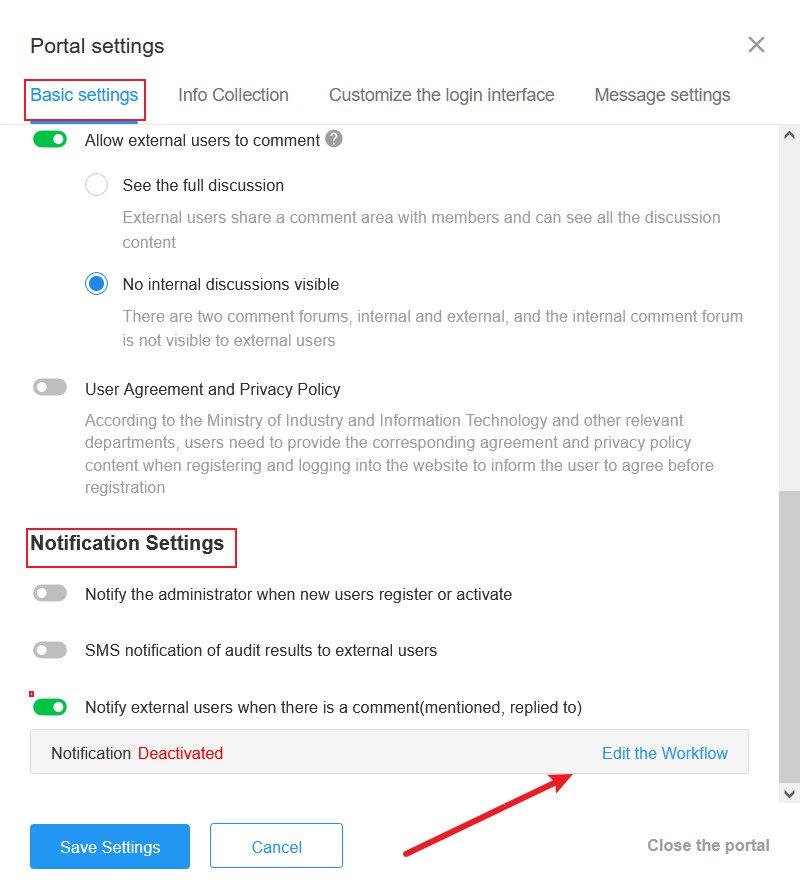
Go to [Basic Settings] > [Notification Settings] to enable [Notify external users when there is a comment(mentioned, replied to)].
Sending notifications depends on the workflow. If enabled, there will be a system workflow waiting to be configured, and you can click to start the configuration.
(2) Configure the workflow for sending notification
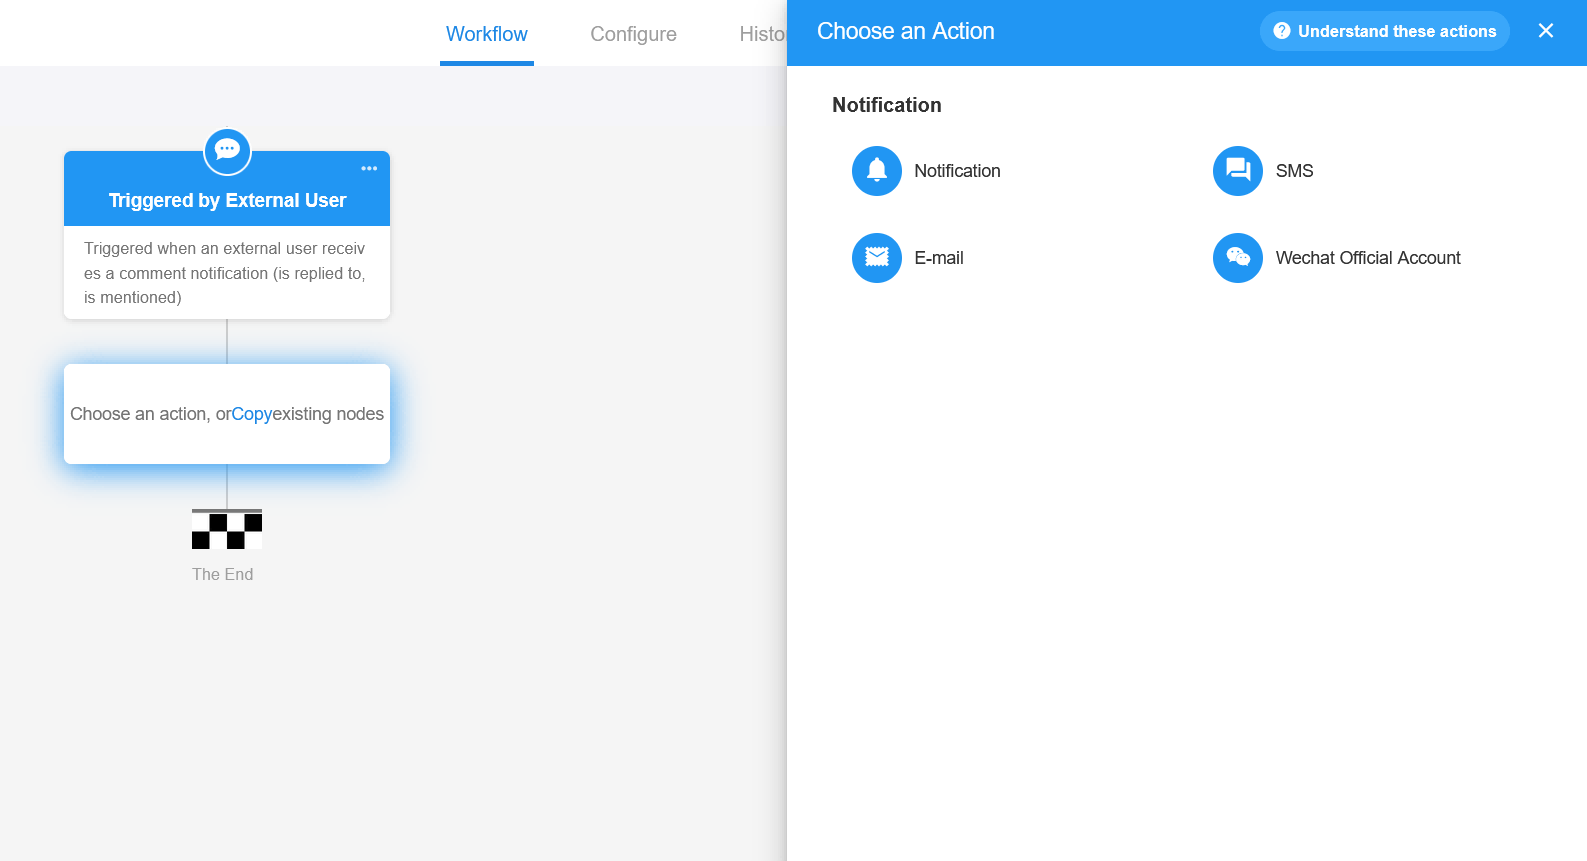
The trigger node does not need to be configured. As soon as a new comment mentions or replies to an external user, the workflow is triggered.
Then add the notification node as needed.
(3) Publish the workflow
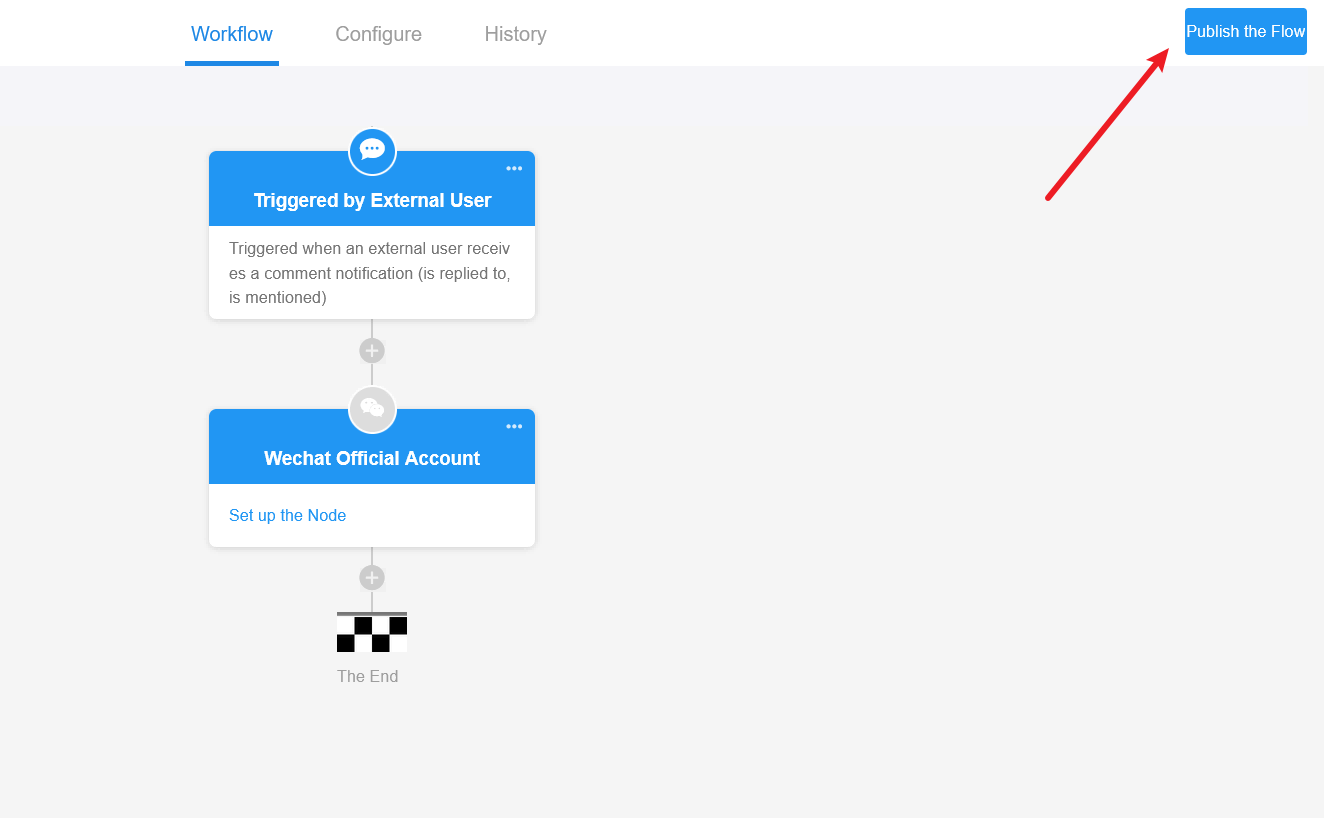
After configuration, publish and start the workflow for sending notifications.
You can mention an external user in the discussion area of a record in the application to test the workflow.
9. Enable User Agreement and Privacy Policy
Since each portal collects different user information, please make sure to re-upload the agreement that complies with the regulations according to the actual business of your company.
Click [User Agreement] and [Privacy Policy] to edit.
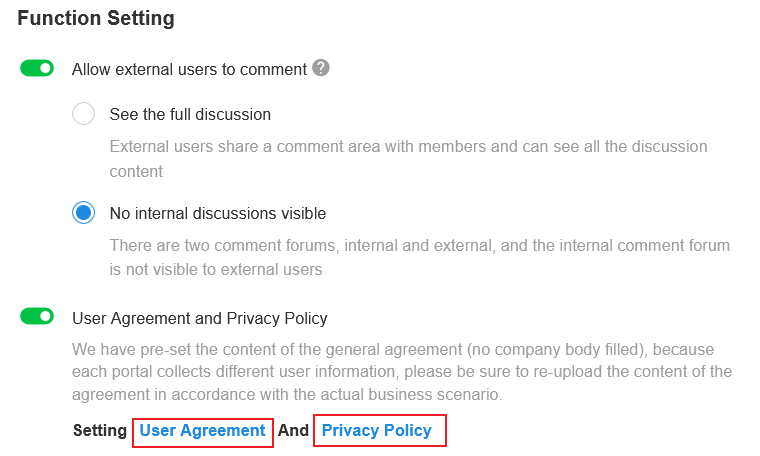
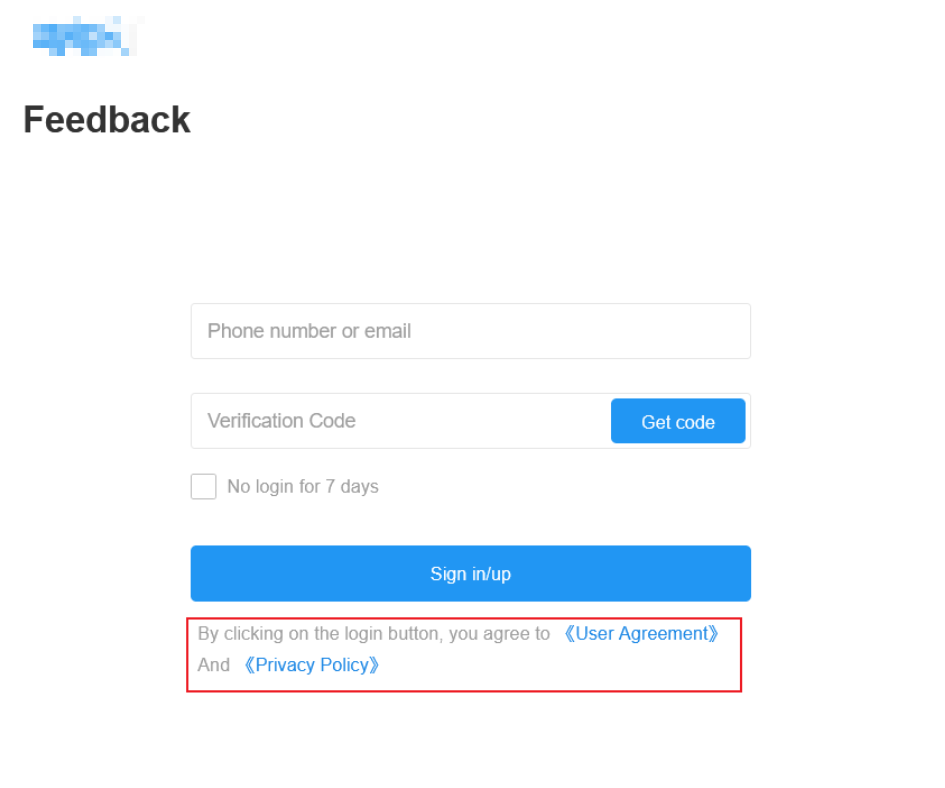
Users can see the agreement and policy when they sign up or login.
10. Notification settings when there is new signup
-
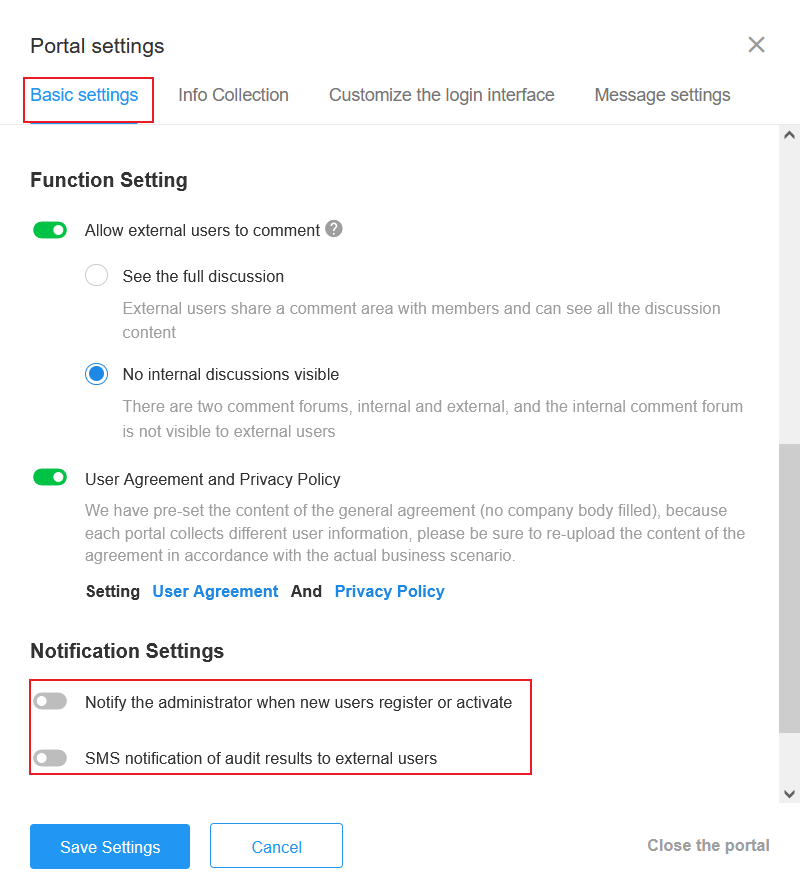
Whether to notify the admin when a new user is signed up or activated
If enabled, the admin will receive a system notification when there are new signed up users.
-
Whether to notify the external user by SMS of the approval result
It means whether to notify external users by SMS that he is approved or rejected.
11. Information collection
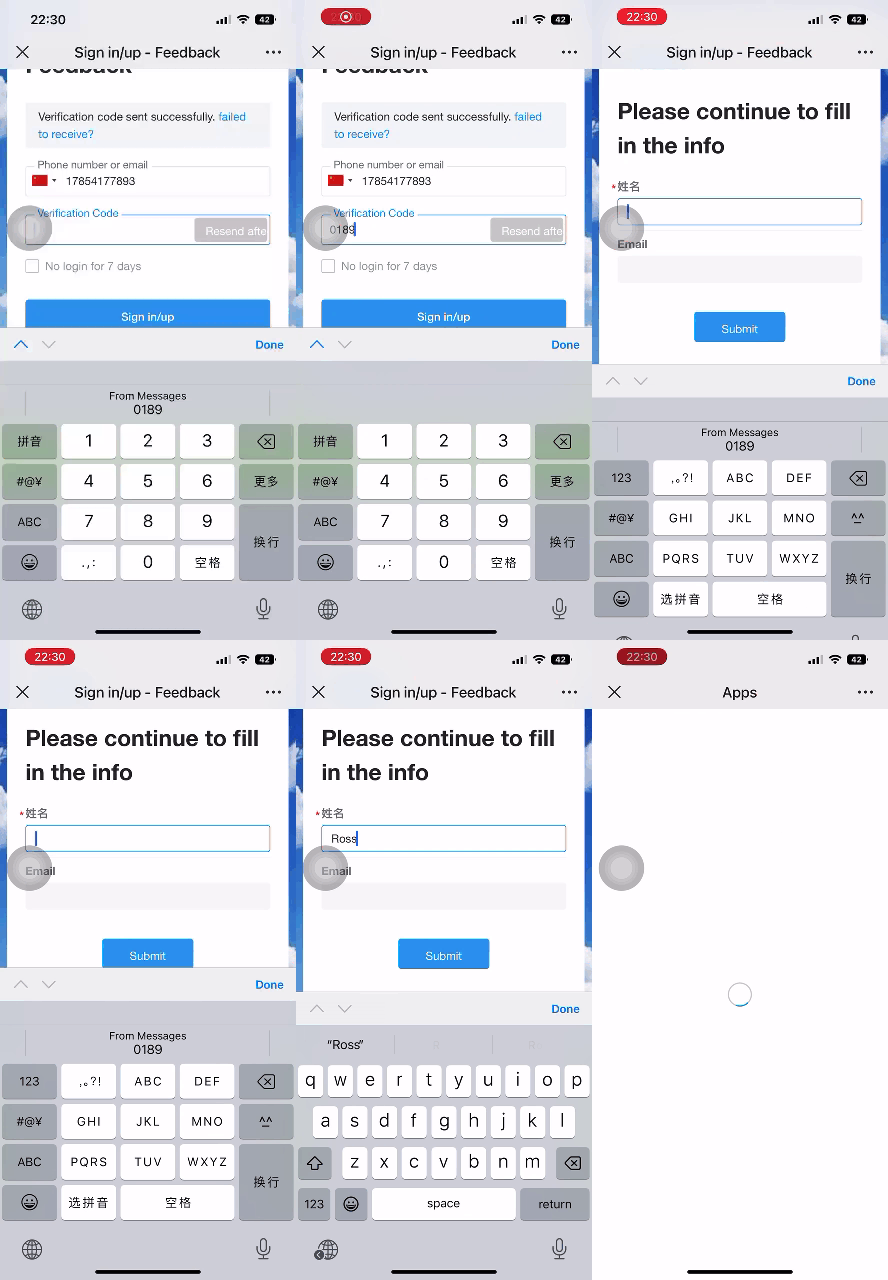
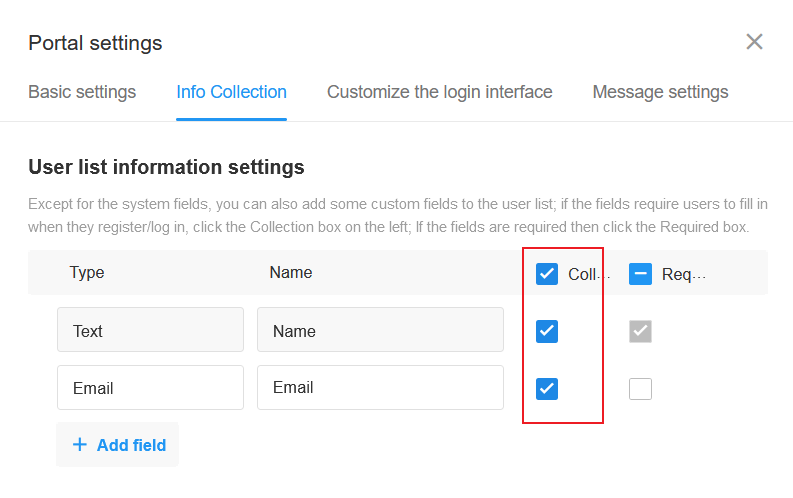
If you need to collect information about the user when signing up, such as real name, email, company, position, etc., when the user signs up for the first time, he/she will be asked to fill in the information to complete the signup.
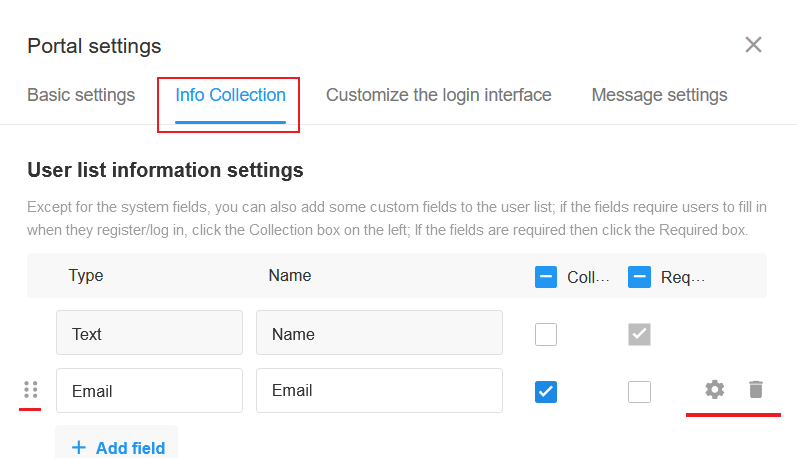
Set [Info Collection]
-
Check [Collect] to display the field on the page.
-
The first is the name (text), which cannot be modified or deleted. It is not collected by default, but required if collected.
- If the application requires the user's real name, it is recommended to check and collect it.
-
If you need to collect more information, you can add the appropriate field. Fields can be sorted or deleted.
-
The information follows the application and may be displayed differently for different applications.
-
If the user closes the page without filling in the information when signing up, the user is inactive. If approval is required, the user will need to log in again and fill in the collected information before waiting to be approved.
Effect:
12. Message settings
The verification code for logging in, the verification code when setting password, the notification of inviting users and the approval result (passed/rejected) of users will be sent to users by SMS or email. Notification includes two parts, SMS signature and content.
(1) SMS notification
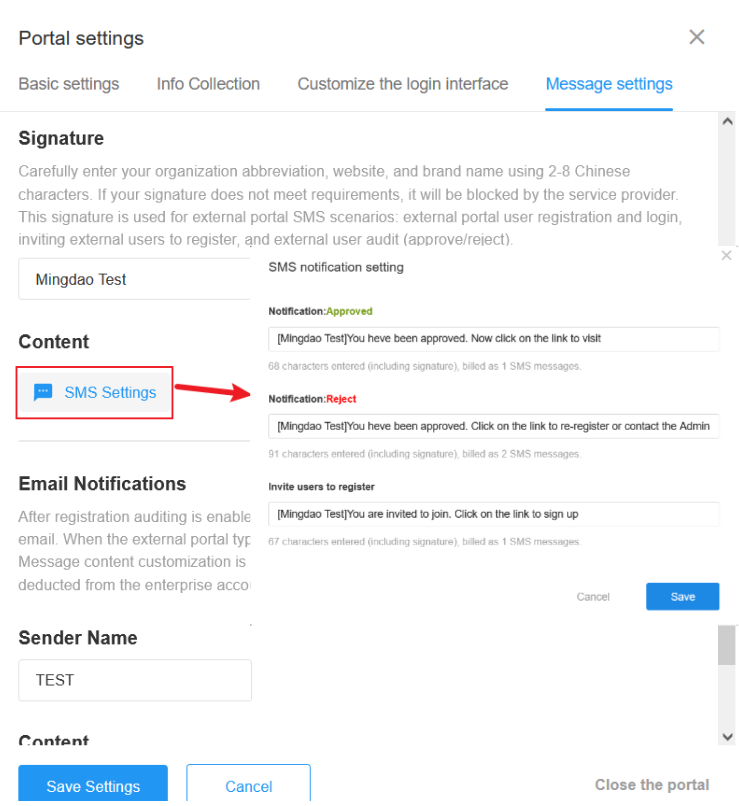
To customize SMS notification, you need to configure both signature and content parts. SMS is RMB 0.05 each, and it is automatically charged in the enterprise account center. 70 words count for one SMS; if it is more than 70 words, it will be charged at 67 words each. Each punctuation, space and English letter is counted as one word. There may be a 10 to 20 minutes delay in sending SMS.
Signature
The signature is at the beginning of the SMS. A signature is automatically added to every message.
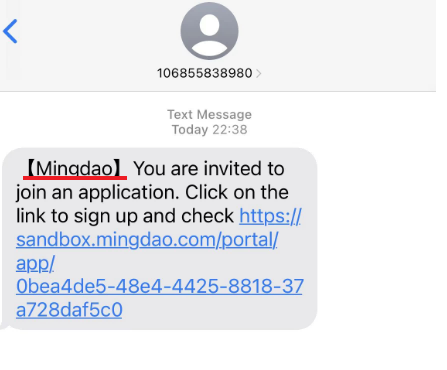
It is recommended that set the signature to your organization name, application name or portal name.
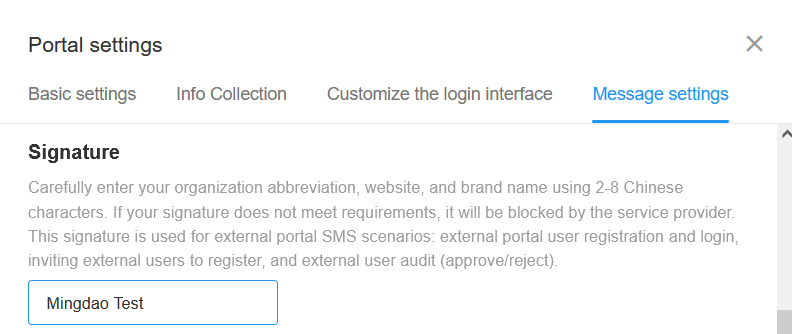
Signature is used for:
- SMS for verification code when external users sign up or log in
- SMS to invite external users to sign up
- SMS to notify external users of the approval result (passed/rejected)
SMS Content
For SMS to invite users or notify approval result, you can set the content.
Custom content is not supported for emails with verification code.
(2) Email notification
It is used for:
- Verification code when external users sign up or log in
- Verification code when setting password
- Invitation to external users to sign up
- Notification of external users' approval result (passed/rejected)
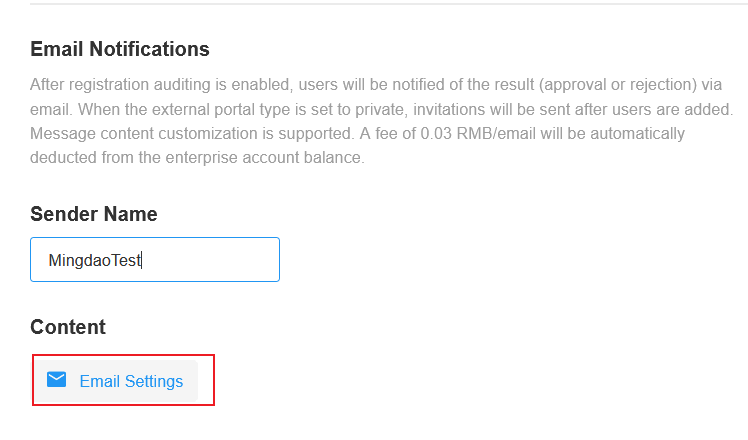
Each email costs RMB 0.03.
Click [Email Settings] to set the subject and content of the email:
13. Watermark settings
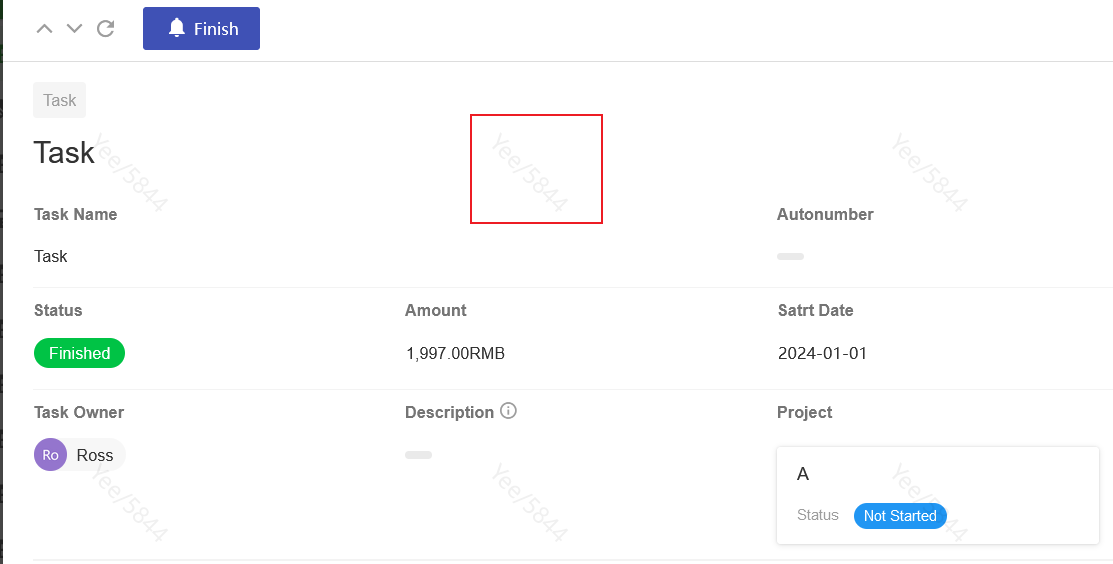
If enabled, the watermark for the external user's interface is the current user's name plus the last 4 digits of the cell phone number or email prefix.
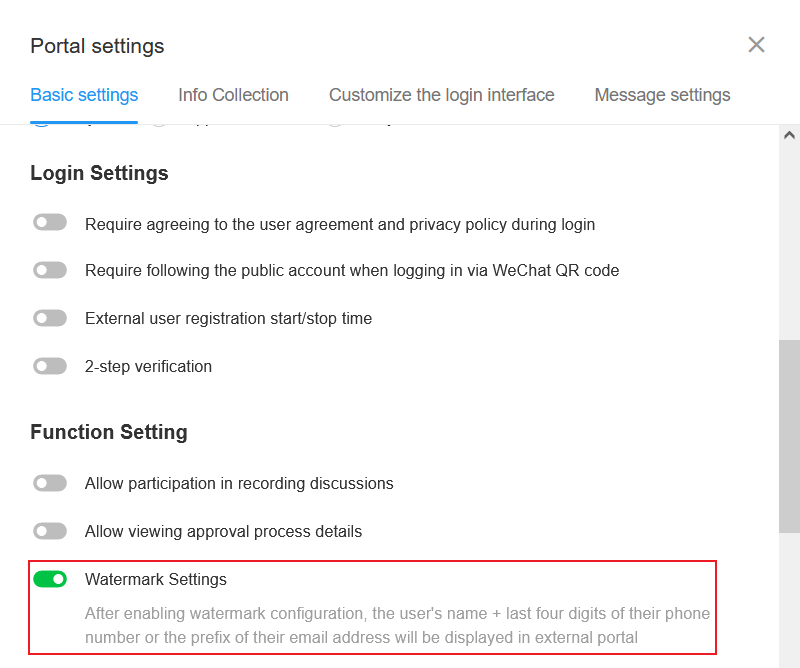
As shown below:
14. Business card for external users
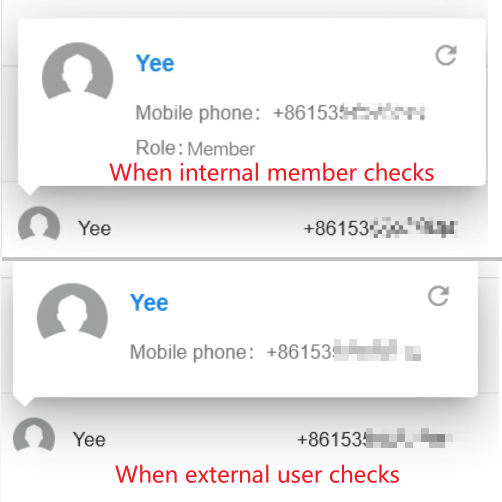
When internal members check the business cards of external users, they may need their names for quick identification and management, while external users are generally not allowed to check each other's cell phone numbers and email addresses to avoid information leakage.
In the business card configuration, you can set the information that can be seen for organization members and external users respectively.
Fields supported for configuration include system fields cell phone number, email, role; and fields for information collection. Up to 6 fields can be displayed(not including name).
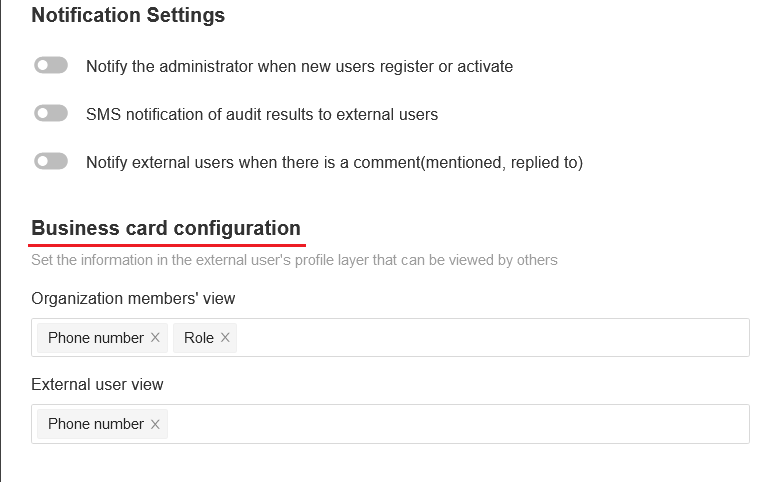
As shown below:
II. External User Management
1. Roles and permissions
Roles and permissions for external users need to be configured separately, in the same way as for roles in the application.

Unlike internal members:
-
External users can only join one role.
-
External users cannot be added to a role; instead, roles are assigned to external users.
Default Permissions
A default role needs to be set, and users are assigned to this default role after signing up. The role can be changed later in the user list.
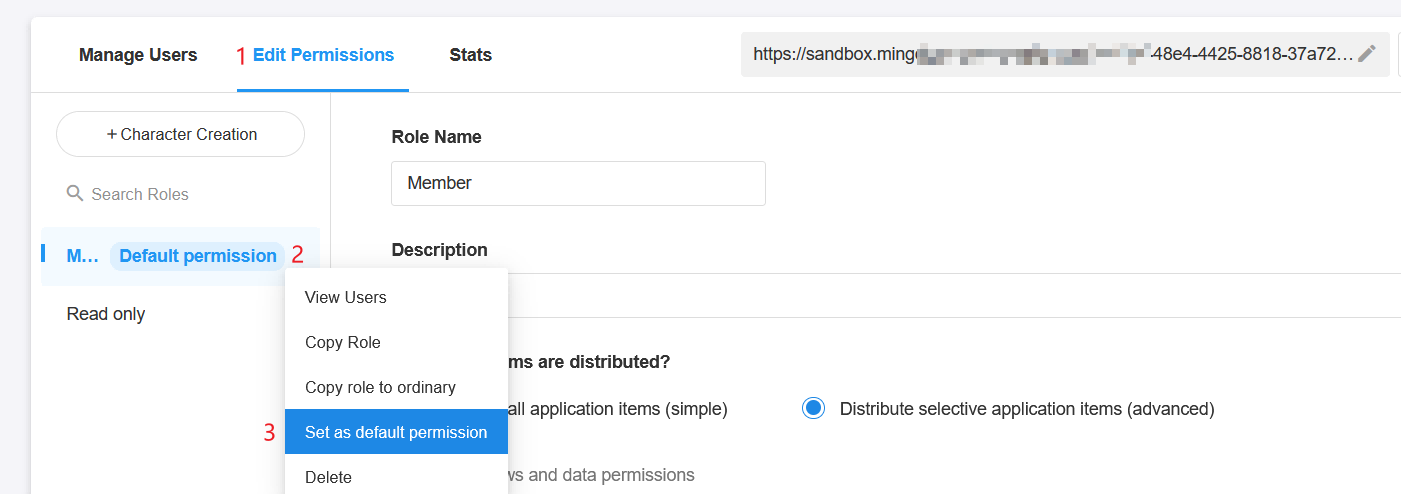
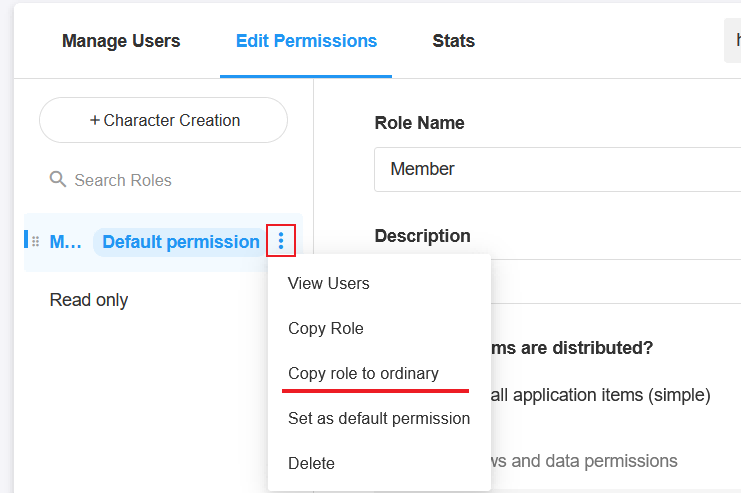
Copy Role
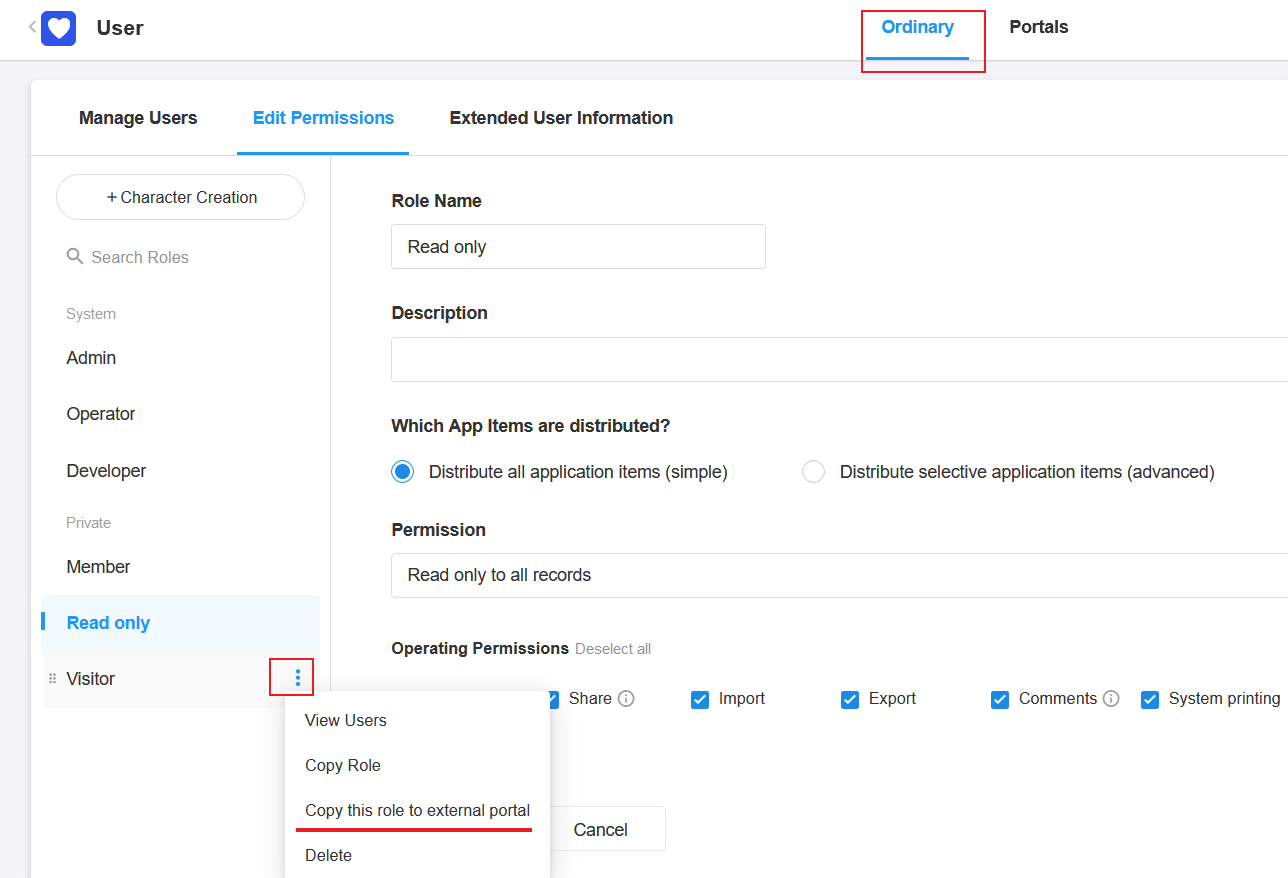
Ordinary roles and roles in the external portal have the same configuration, so they can be copied from each other.
Ordinary roles can also be copied to the external portal.
2. Invite external users
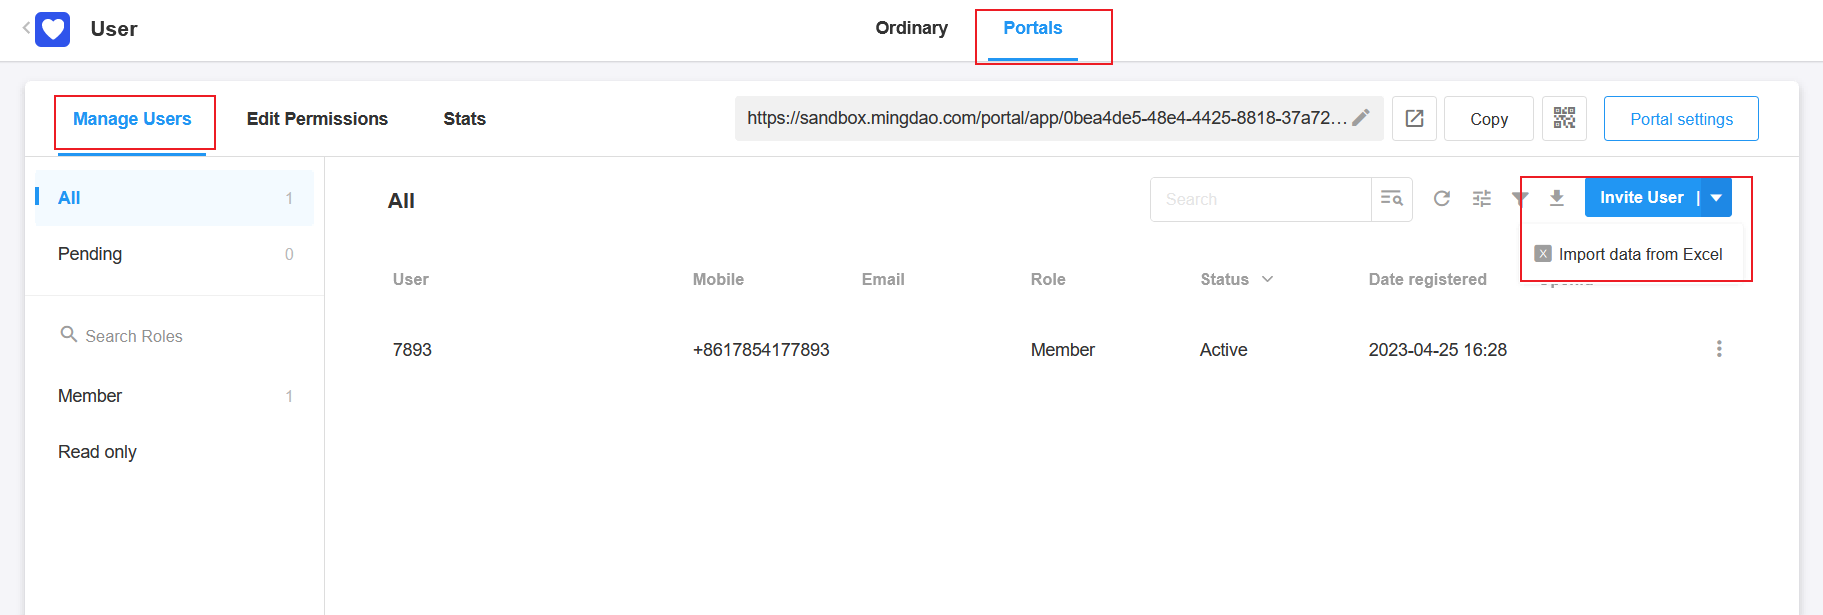
If external users are not allowed to sign up, you can invite or import users.
-
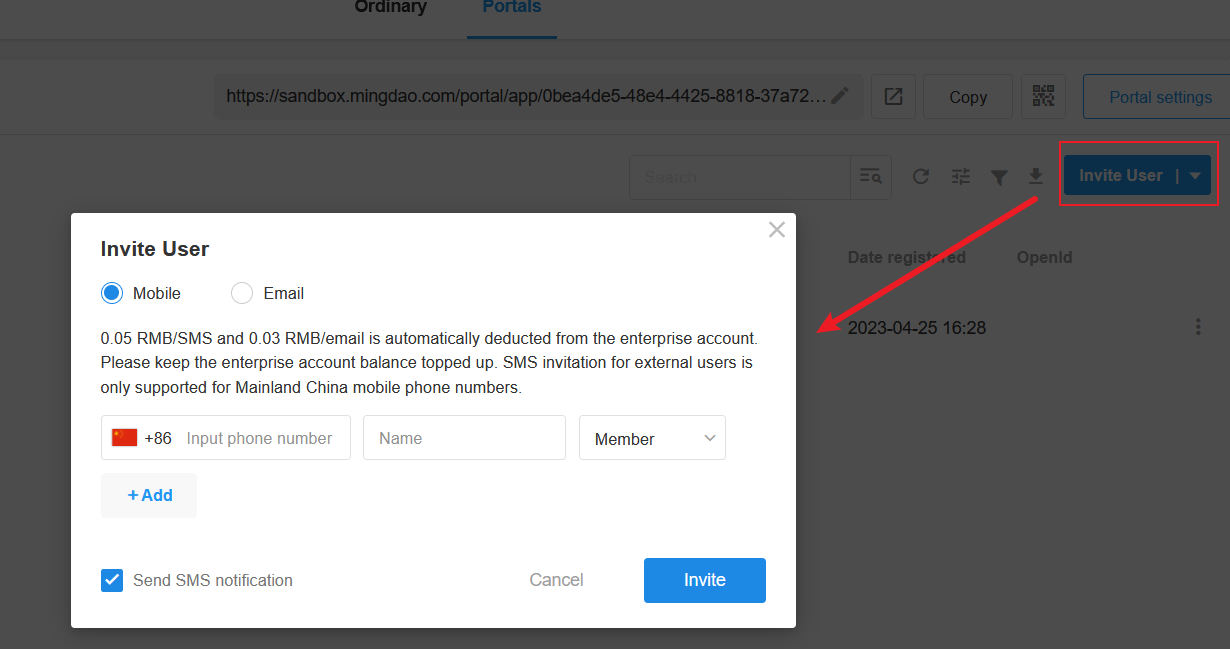
When there are not many invited users, click [Invite User]
-
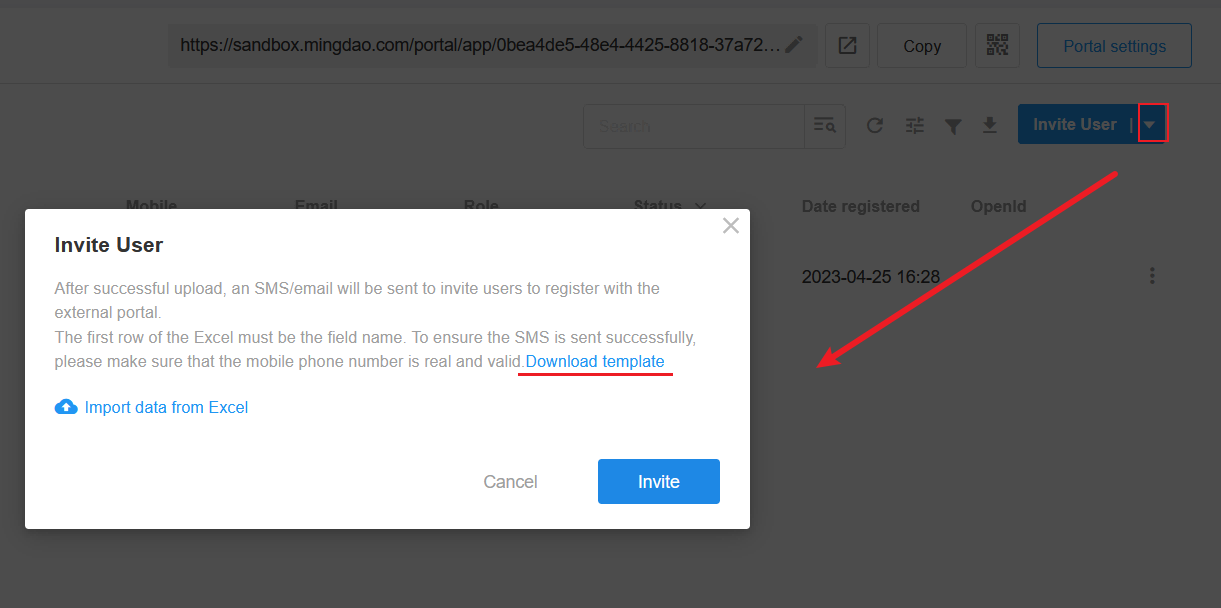
Import users if invite more
When importing users, please download the template first, fill in the data and upload it.
Both free and paid editions support 100 external users, if more than 100, you need to purchase expansion packages.
When inviting users to sign up, only phone numbers (+86) from mainland China are supported. If the number is from other regions, no invitation SMS will be sent. You can can ask the user to sign up through an external portal link.
3. Information of external users
(1) View information of external users
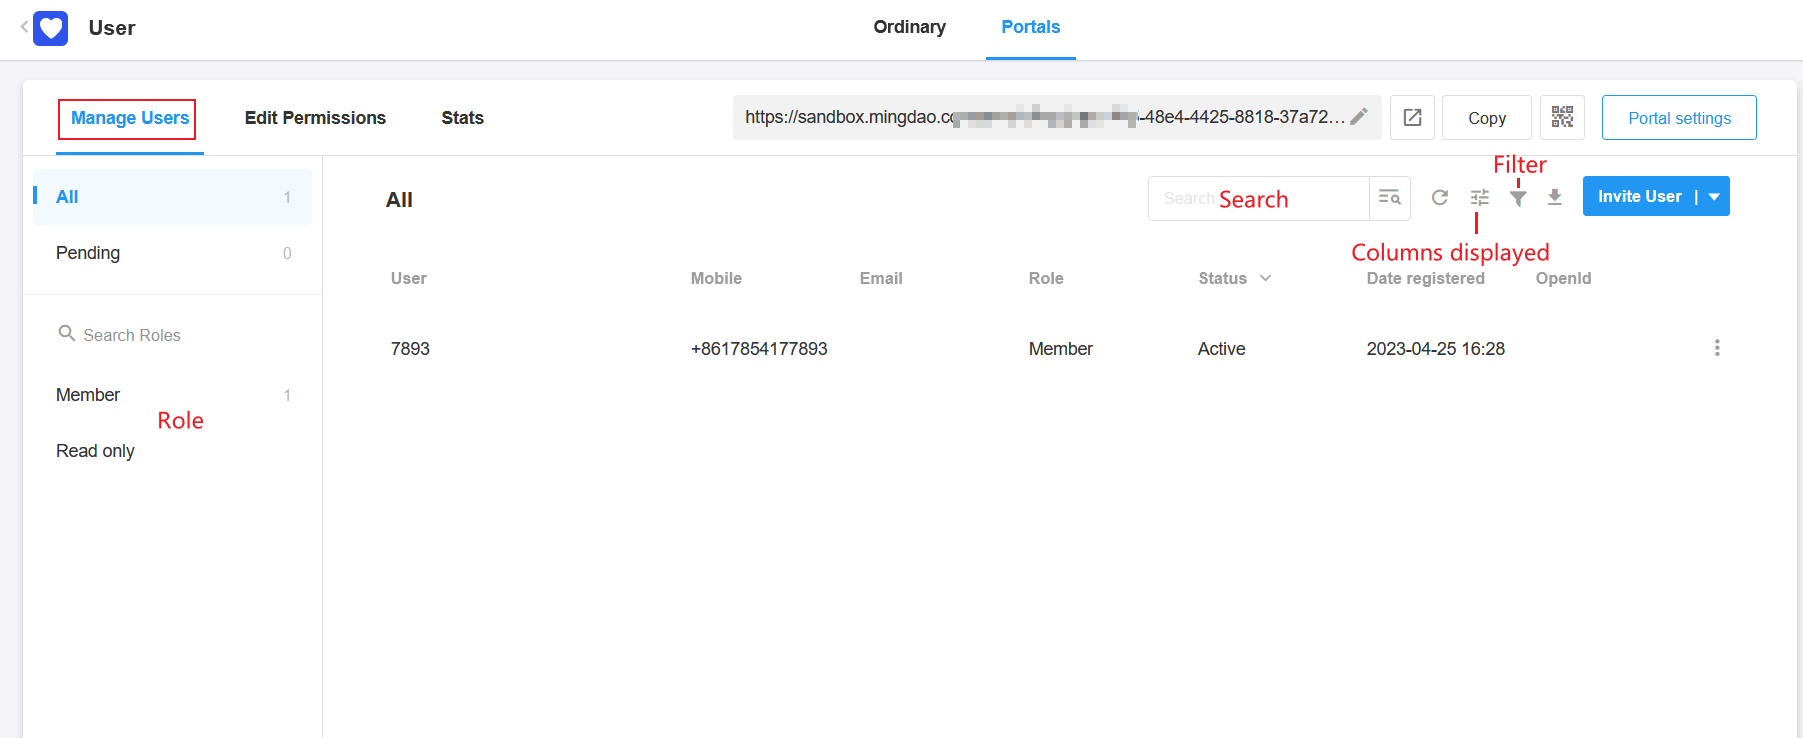
You can quickly filter and view external users by multiple dimensions:
- Role: External user's role
- Status: Activated, Deactivated, Inactive
- Search: Search by system fields and custom fields
- Filter: Filter by system fields and custom fields
- Display Columns: Set the fields to be displayed in the user list, including system fields and fields for information collection.
(2) Edit information of external users
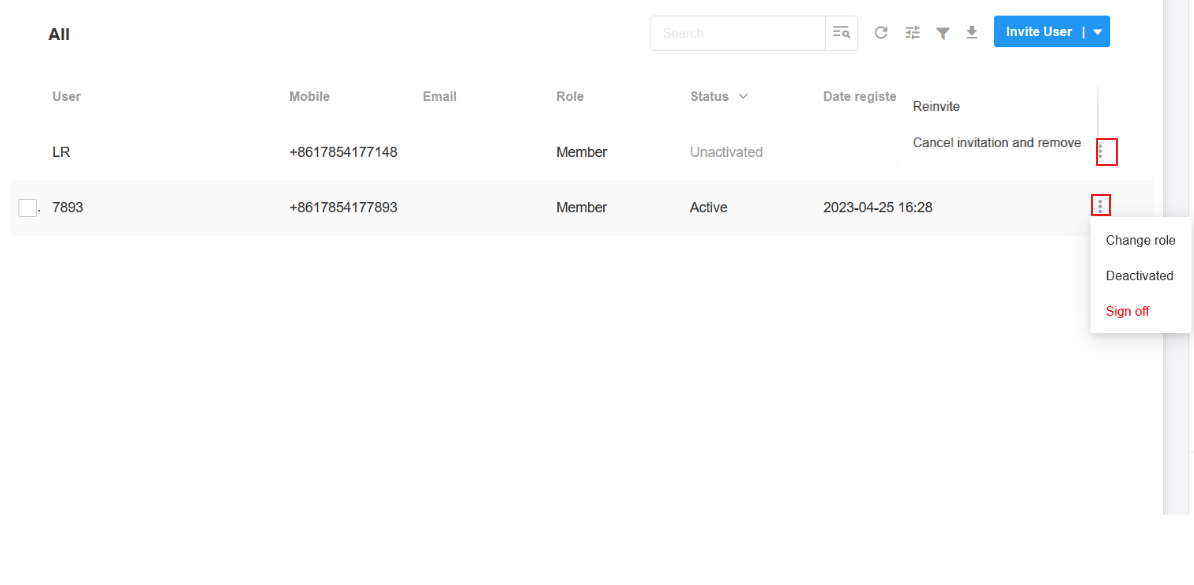
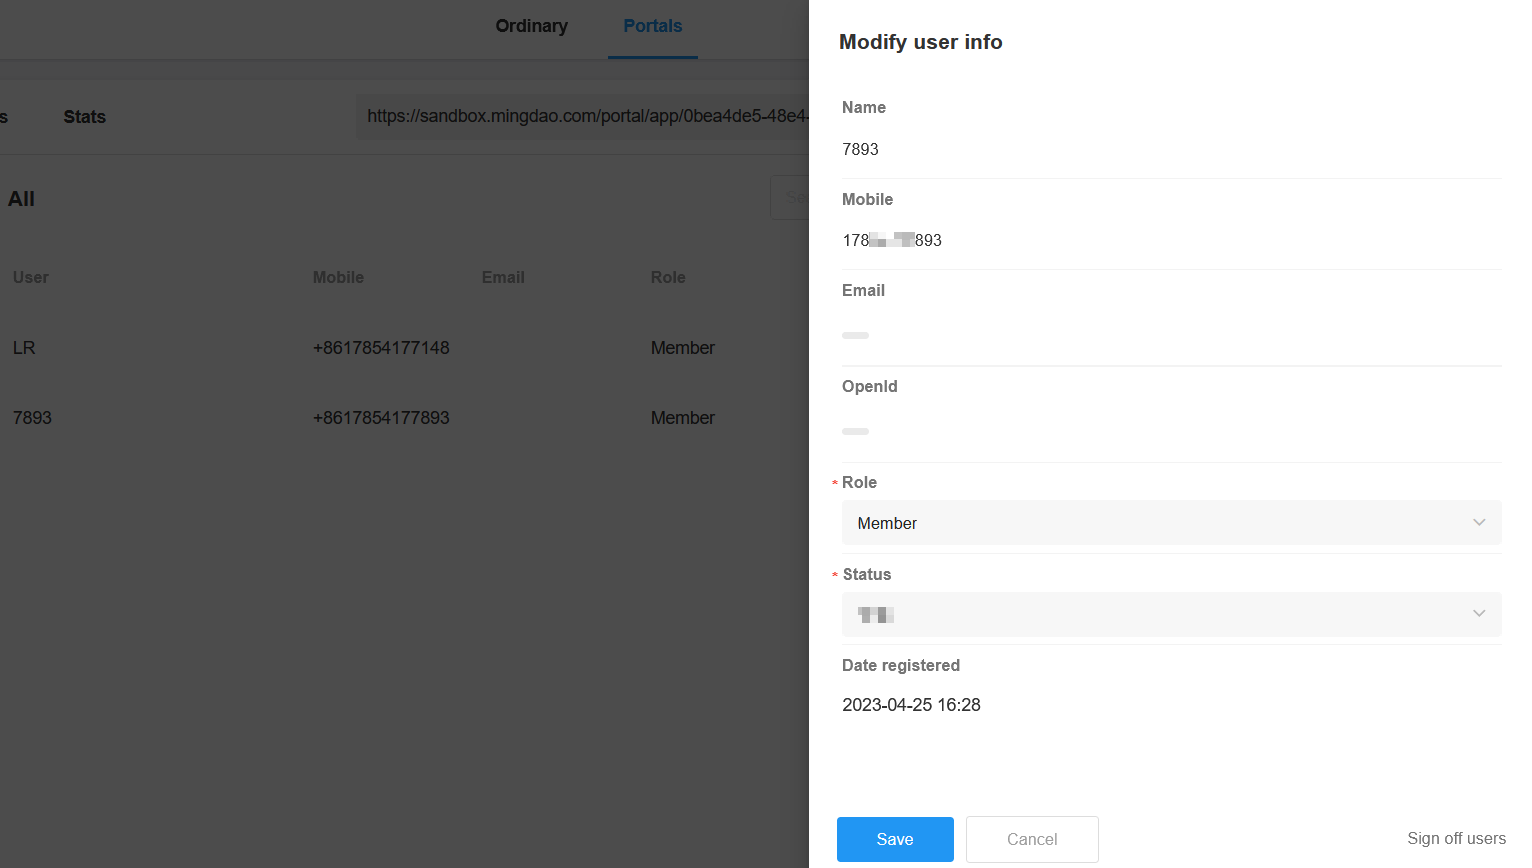
In the list, click the button to the right of the row to modify the role, status, and custom fields of the external user.
-
Change the user's role.
-
Change the user's status. An active user can be deactivated or signed out.
Sign out is to delete the account. External users themselves can also actively sign out.
-
For inactive users, you can re-invite or un-invite them.
Click on the user line to open a pop-up window to edit custom fields, status, role, while system fields (name, phone number, OpenId, and signup time) cannot be edited.
The fields displayed in the popup window are the same as the fields set in [Display Columns].
4. WeChat OpenId
In the user list, it shows the OpenId of the bound WeChat. If it is empty, it means that the user has not authorized to login by WeChat, but can only login by phone number or email.

If there is no column of [OpenId] in the list, you can set it in [Display columns].
5. Export external users
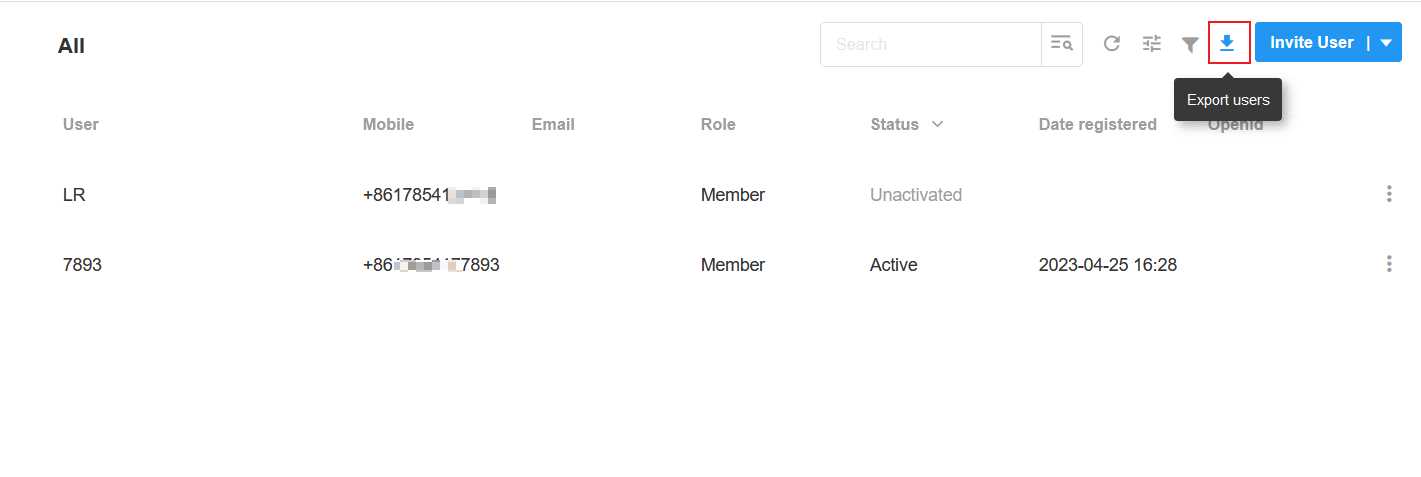
Way 1: Export all users shown in the list, and those not shown are not exported.
If you need to export all external users, please select all roles, without searching and filtering.
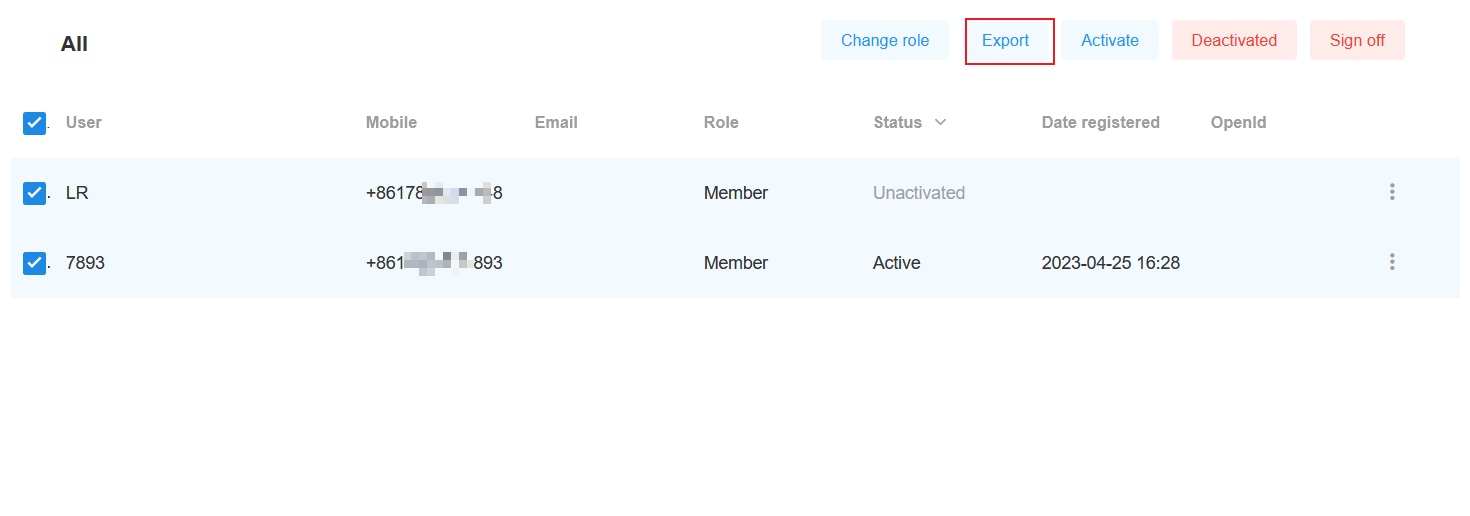
Way 2: Select and export some users.
6. Change user status/Delete external users
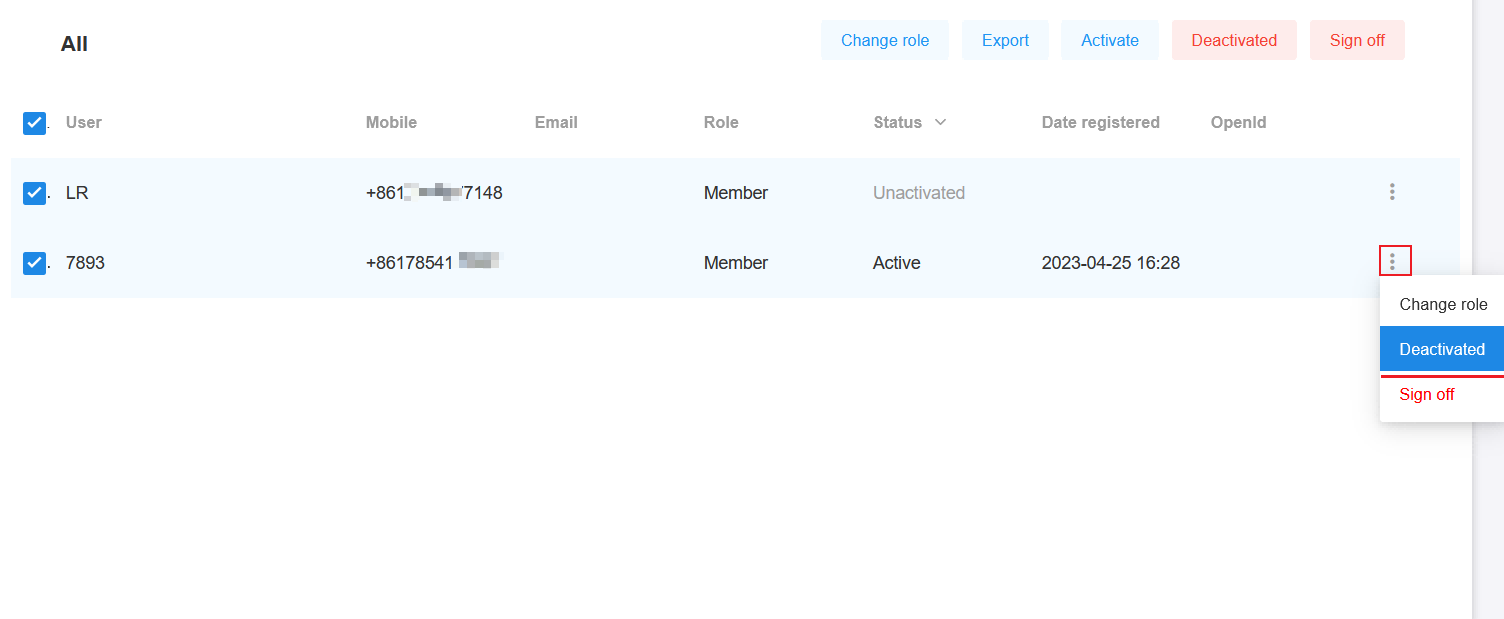
For an external user account, it can be activated, deactivated and signed off (deleted).
-
Single account
For a single account, it can be directly activated, deactivated and signed off (deleted).
-
Batch operations

External users themselves can also actively sign out.
7. Approved and approval-free users
If the application can only be accessed by approved users, new users need to be approved by the administrator signup.
You can also set the approval-free users list in advance, and the users will be approved automatically after signup.
Approval
Admins can approve one by one or approve in bulk. There are only two results, approved and rejected.

How to set the list of approval-free users
After setting the list of approval-free users in advance, when a user signs up for the first time, he will be approved automatically if he is on the list.
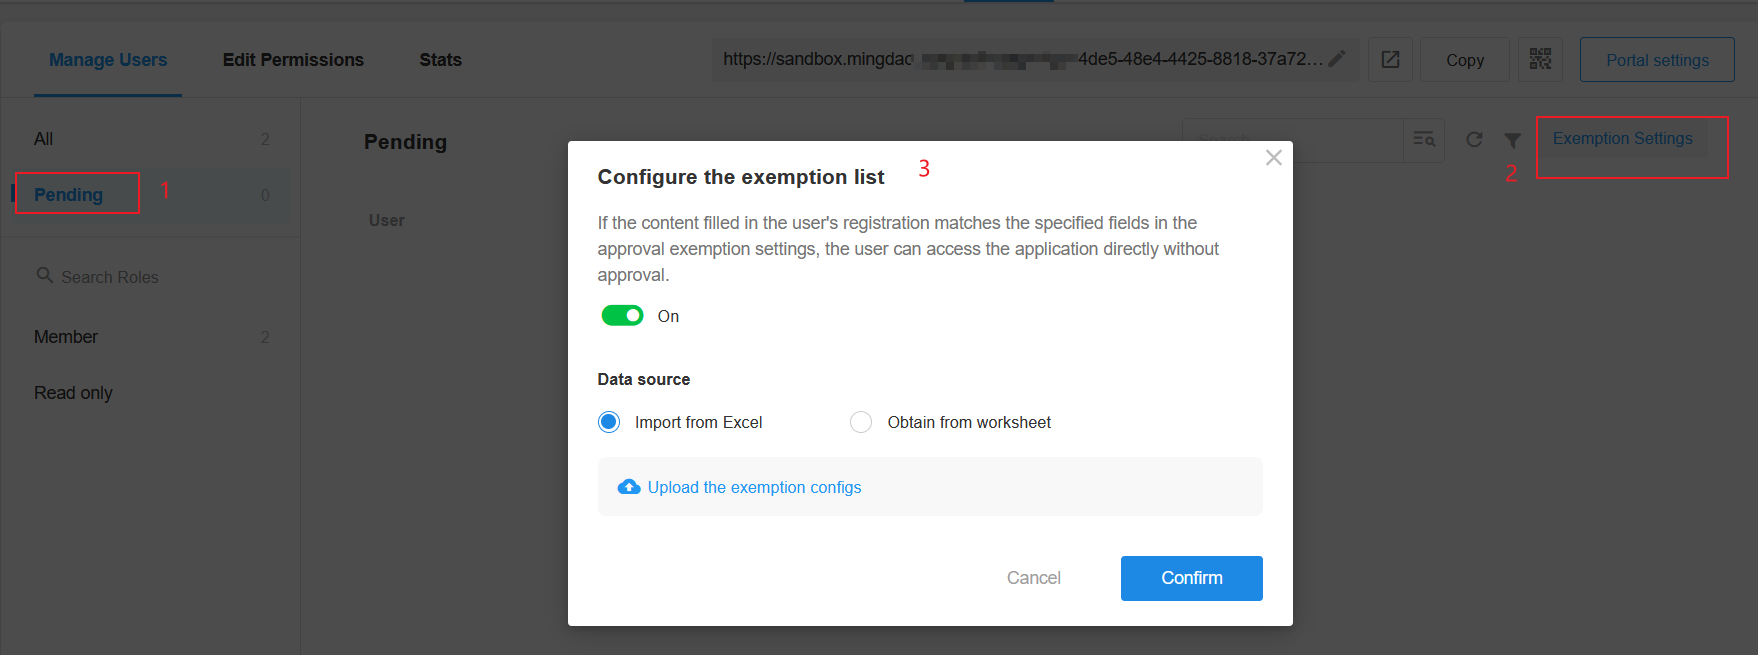
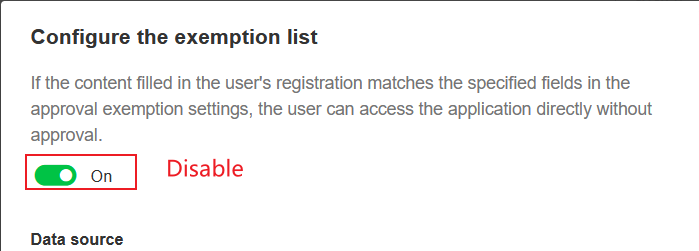
If you don't need the approval-free feature, you can disable it.
Set the list of approval-free users
-
Data source for the list
-
Mapping fields to the data source
-
Update and maintenance of the list
(1) Data sources for the list
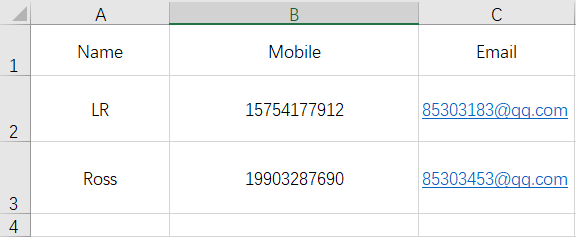
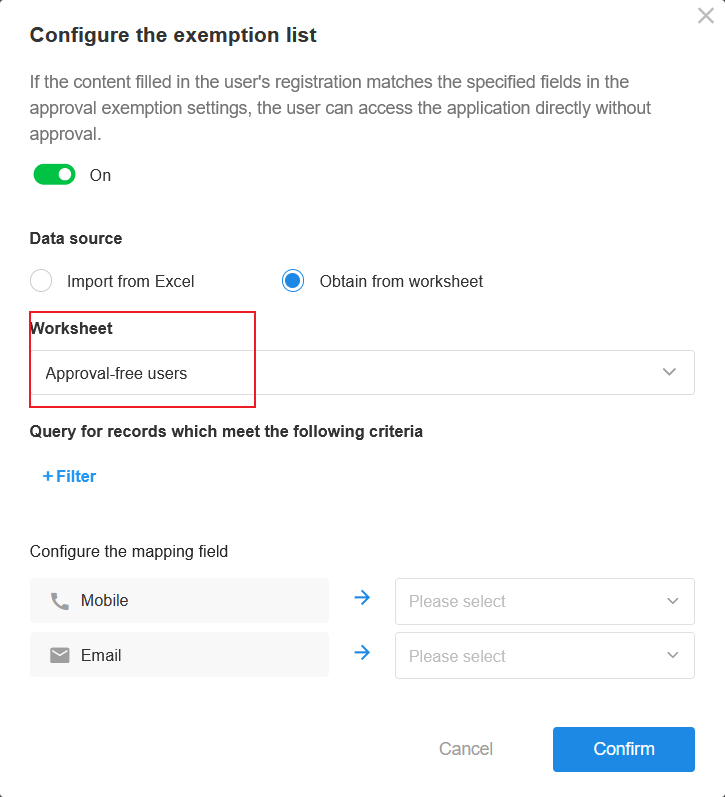
There are two data sources for the list, Import from Excel and Obtain from worksheet.
-
Data format for Excel:
The first row of the sheet must be the field name, as follows.
-
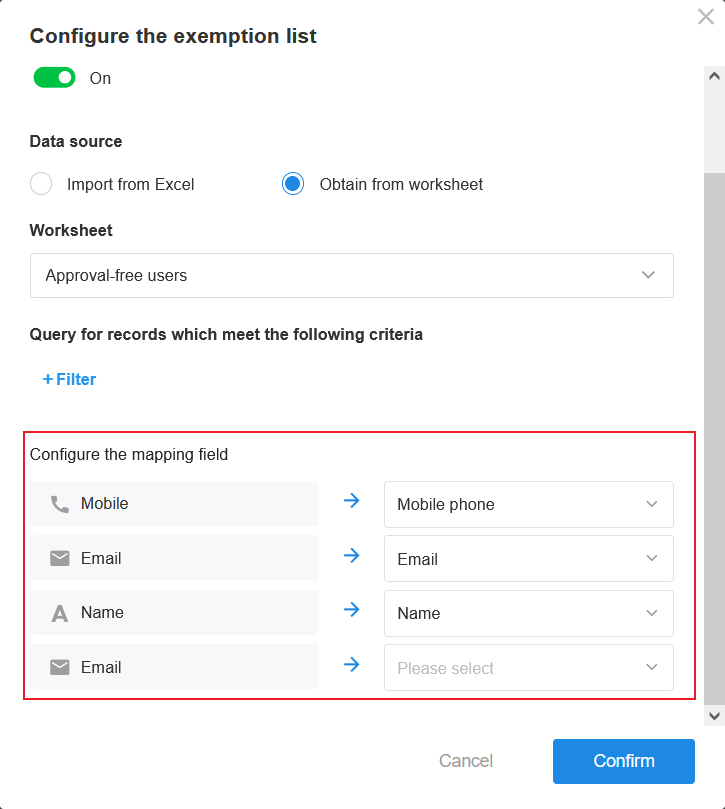
Obtain from worksheet
You can select a worksheet from the current application, or from other applications.
(2) Mapping fields
The signed-up user's information must be the same as all the information in the mapped fields to be free from approval.
-
If other fields are checked in the information collection settings, mapping will be displayed and created here as well, such as name and email in the figure below.
-
If no other information is collected, only the phone number field can be mapped.
(3) Update and maintain the list
-
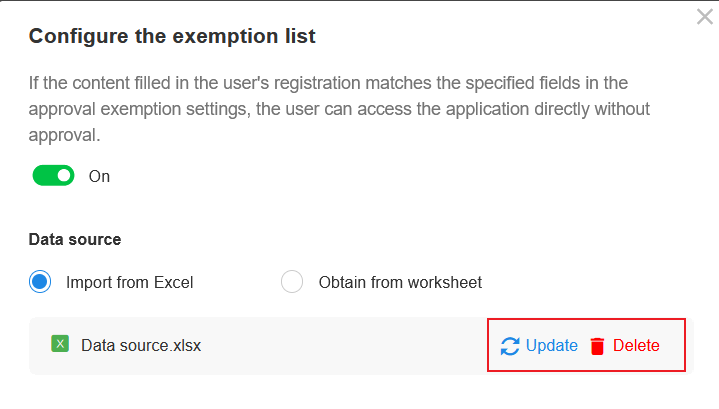
Data from Excel
-
You can re-upload the sheet of the list (update).
-
You can delete the imported data (delete).
-
-
Data from worksheet
You can delete or update the list directly in the corresponding worksheet.
8. Statistics
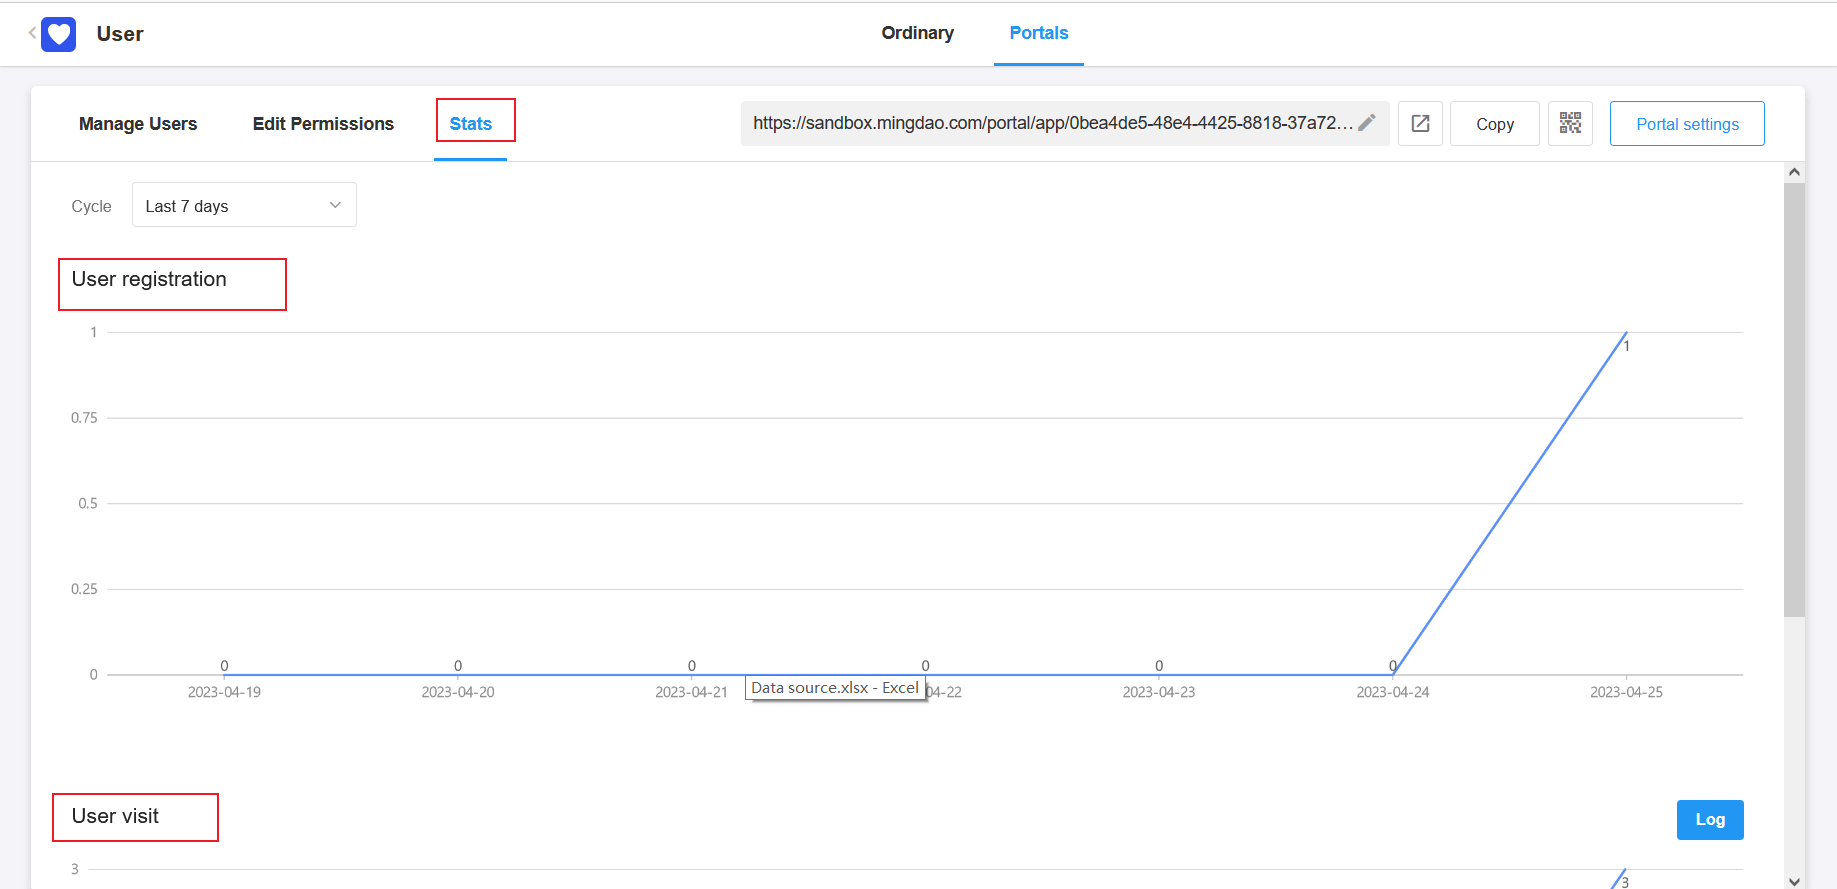
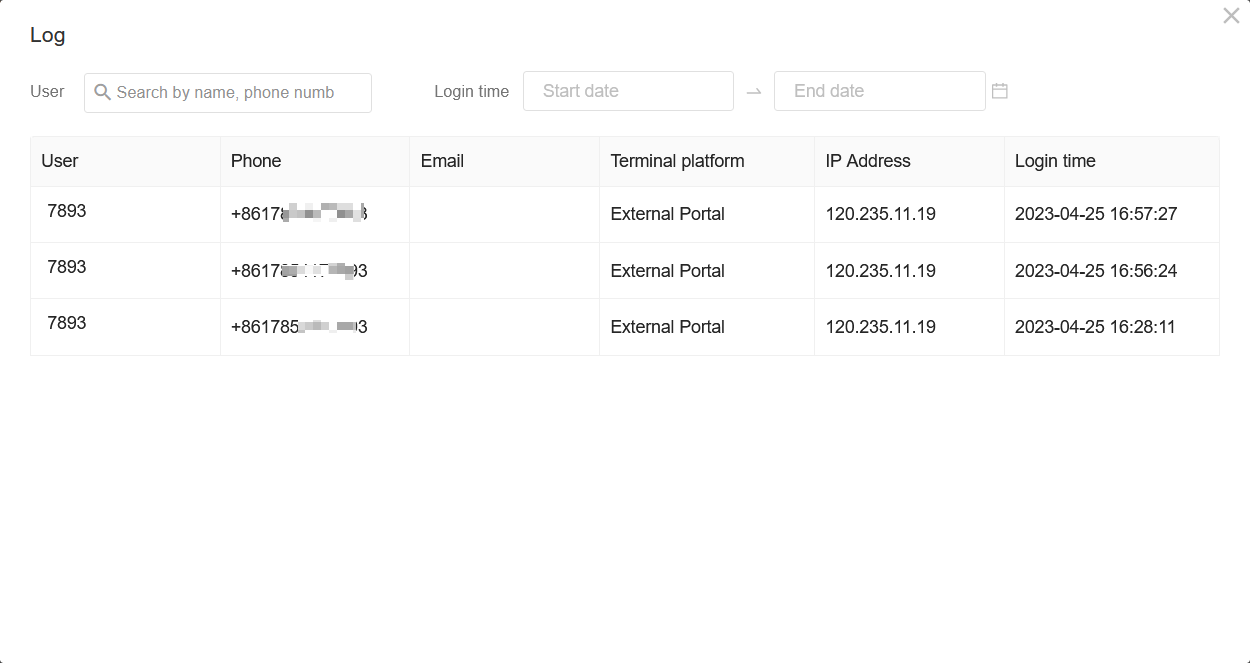
Currently you can view the number of signed-up users and the number of visits, and you can also view the login logs.
-
User signups
-
User visits

-
User login logs
9. Send messages to external users via service account
If you need to notify external users of record changes, in addition to sending SMS and email, you can also send WeChat messages to external users via WeChat service account.
External users need to follow the bound service account to receive notifications.
Detailed configuration of the workflow
III. Operation of External User
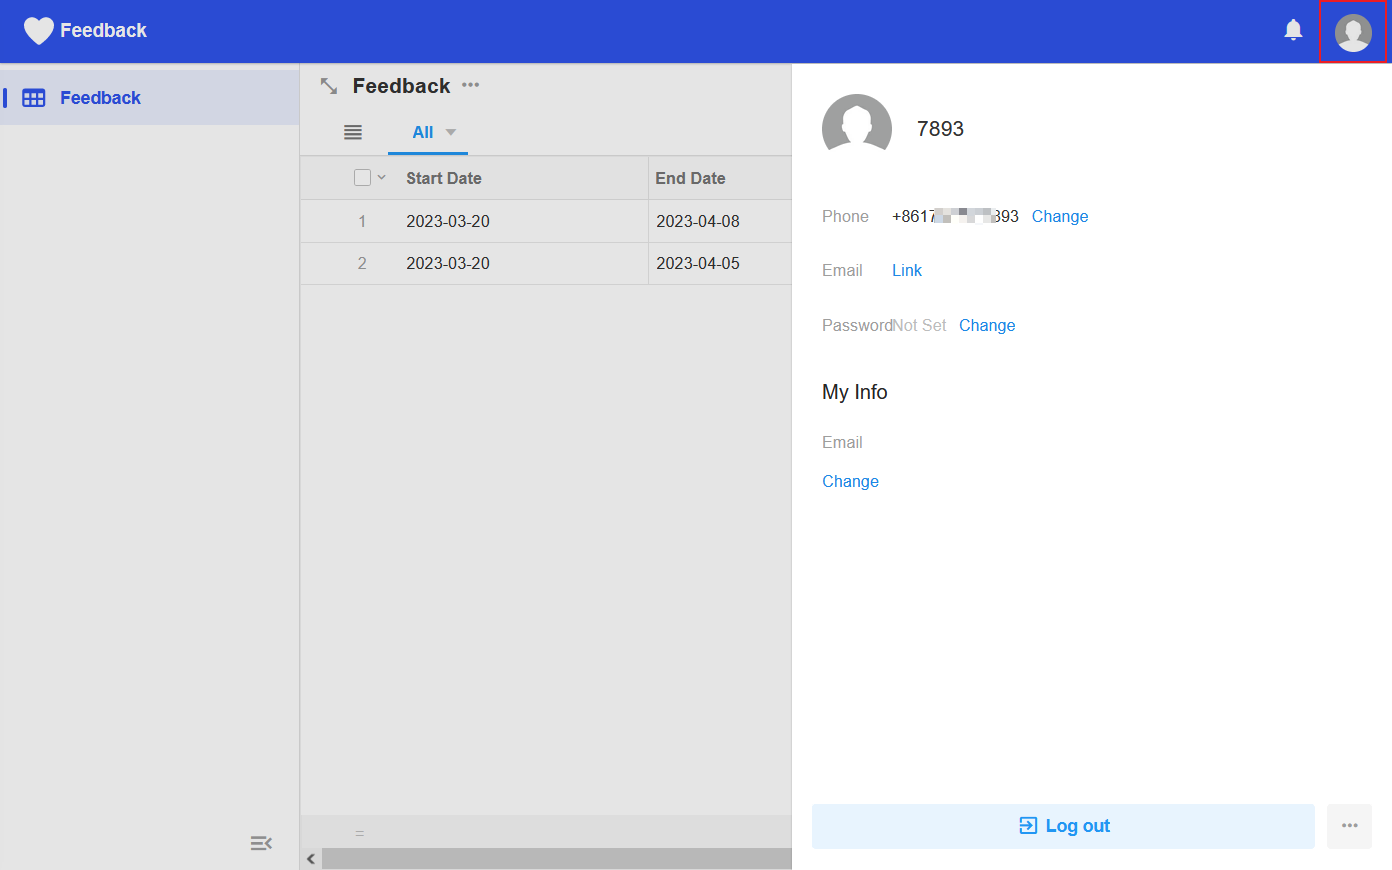
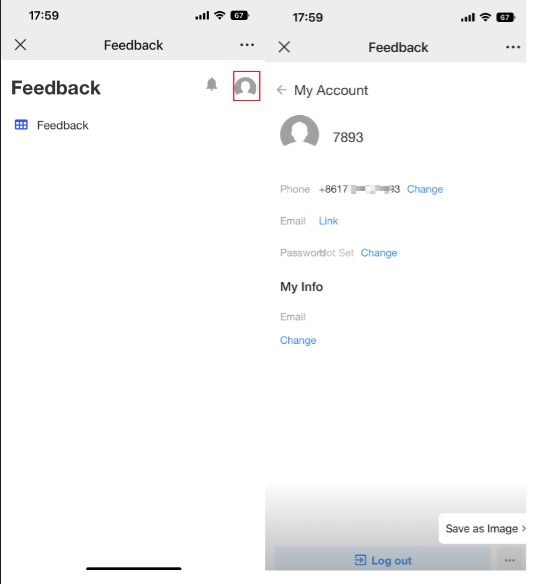
1. Set personal information
Click on the profile photo to enter the setting page of personal information, external users can:
-
Modify the name and upload the profile photo
-
Modify the bound phone number or email
-
Set password
-
Set system language
-
Fill in custom fields
-
Log out of the account
-
Exit
-
PC browser
-
App
2. Interface
After external users log in, they actually only enter the current application (Work Order), and according to their roles and permissions, they can check different views and records.
Collaboration, Contacts, and Chat are not available to external users.