Integrate HAP with Lark
Overview
Integrate HAP with Lark by creating a custom app in Lark Developer.
Once the integration is set up, you can:
- Sync users and departments from Lark to HAP.
- Open HAP directly from Lark
You can also make individual HAP apps available in Lark, allowing users to open an app or a specific worksheet directly.
Set Up the Integration
1. Open the Integration Settings in HAP
As an organization administrator, click your profile picture and go to My Org > Org Admin > Integration > Org Integration. Select Lark to start the setup.
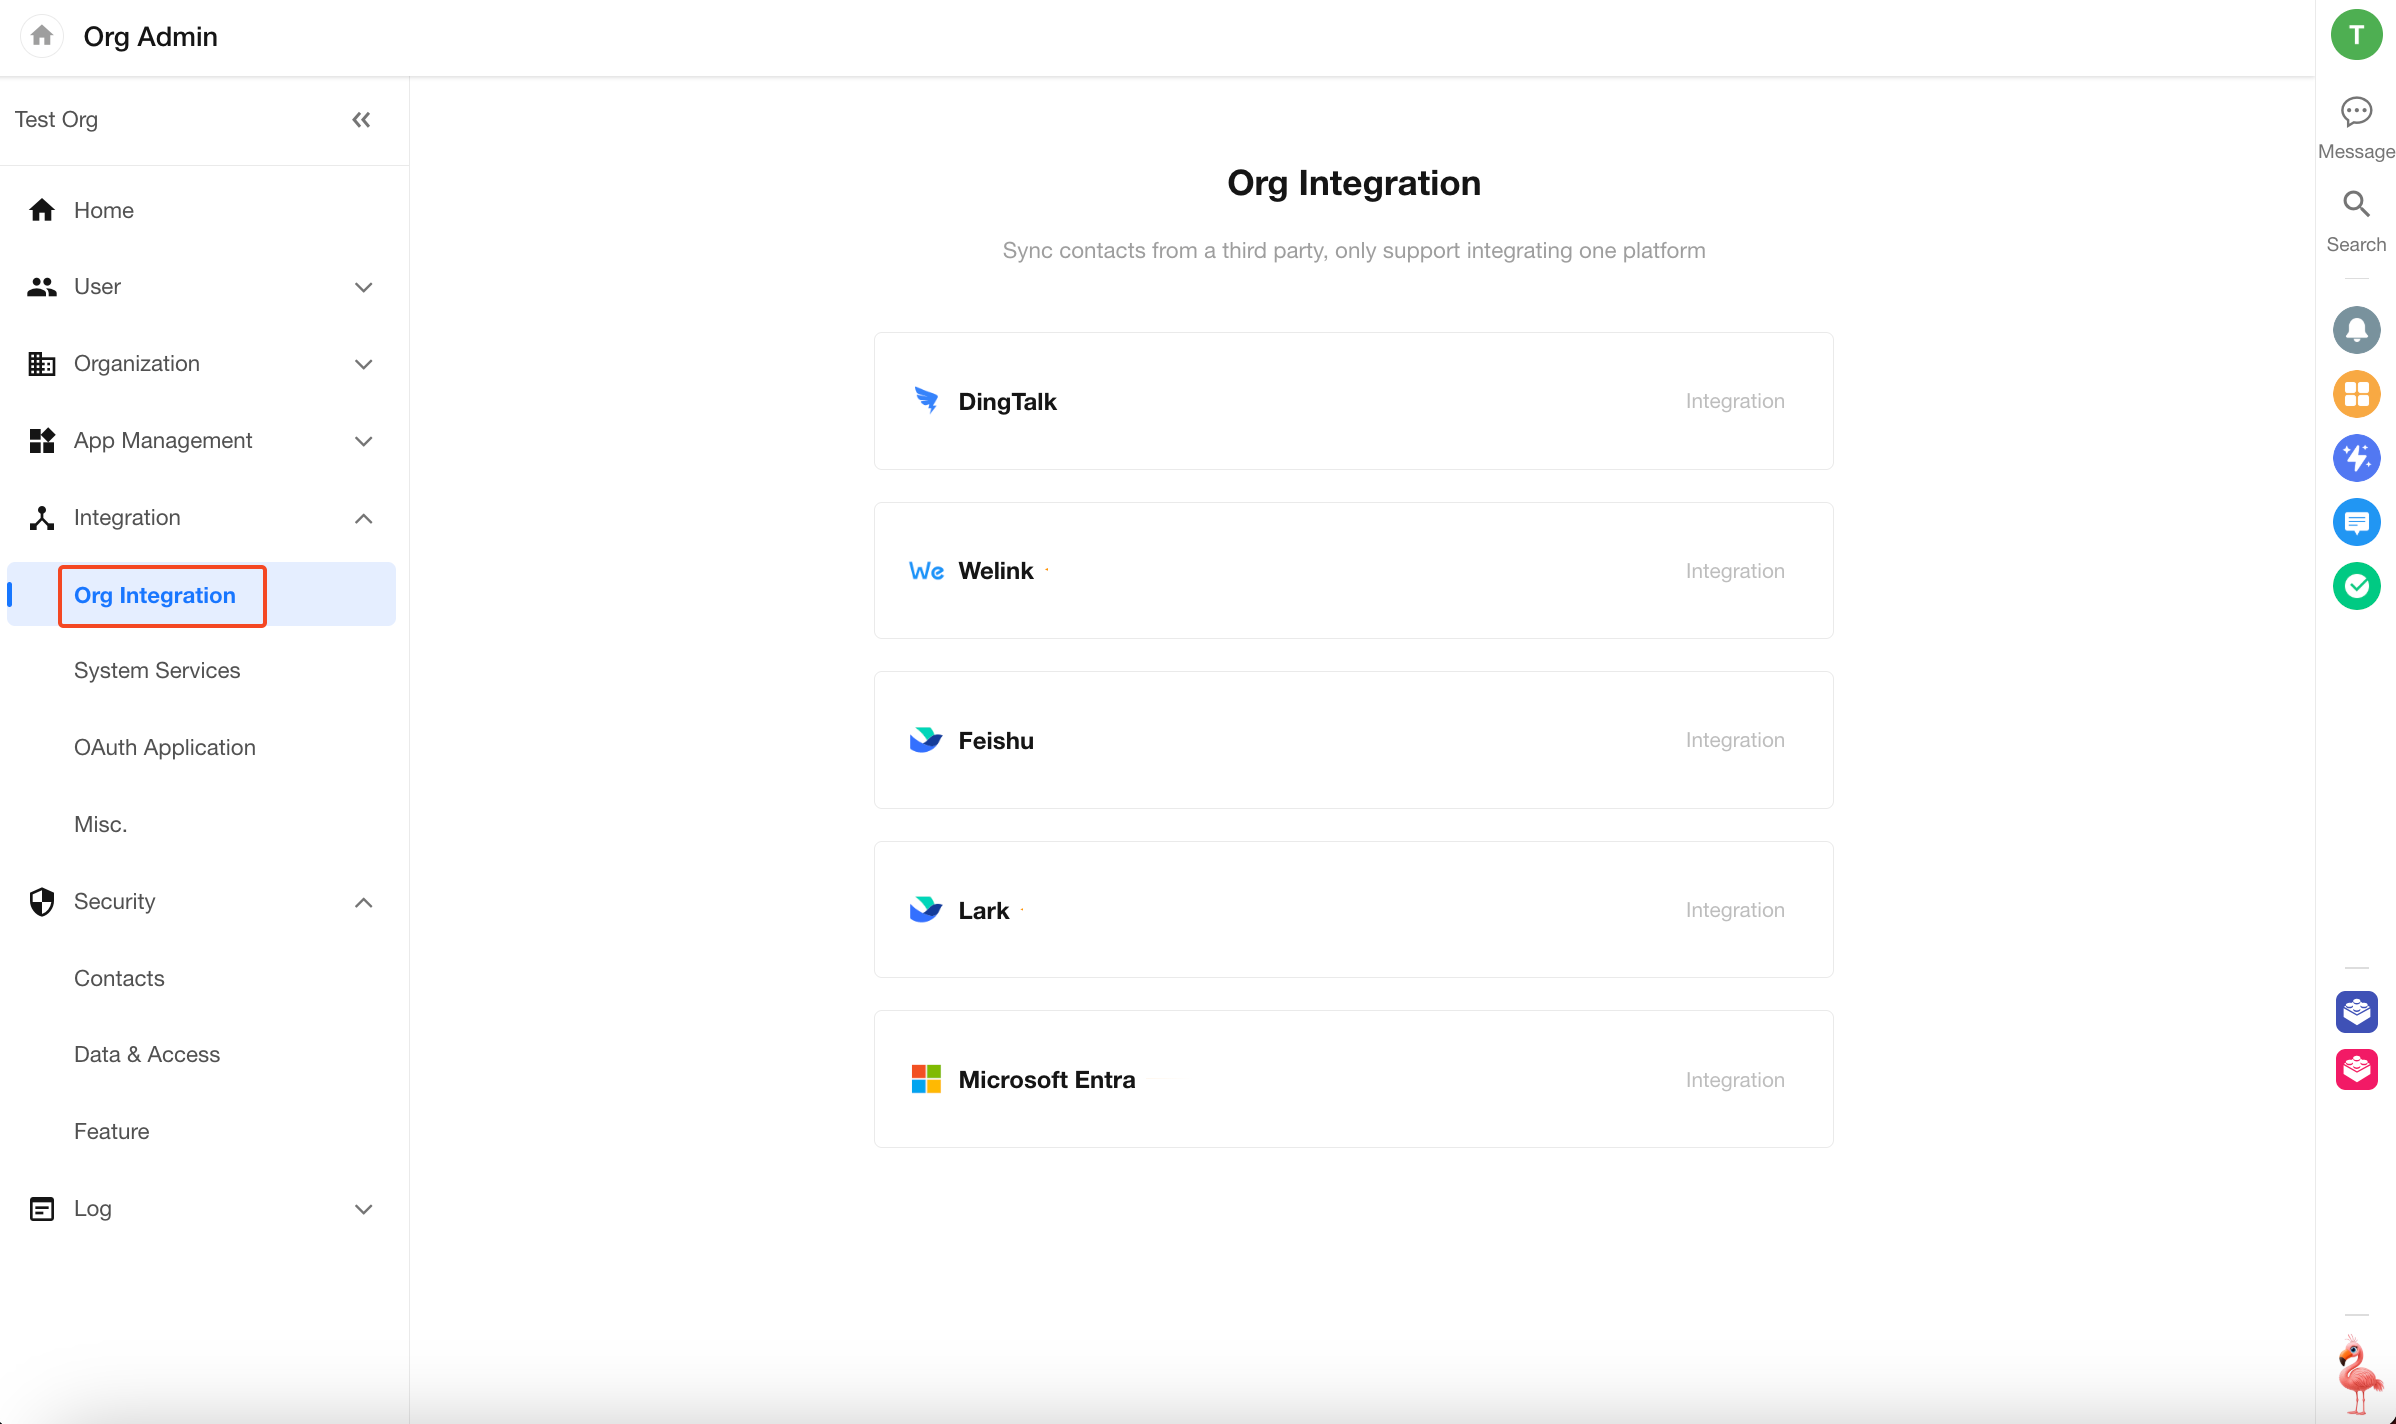
HAP can be connected to only one organization integration platform at a time. If another platform is already connected, the other integration options are not displayed. To connect a different platform, first disable the existing integration.
2. Get the Integration Information from HAP
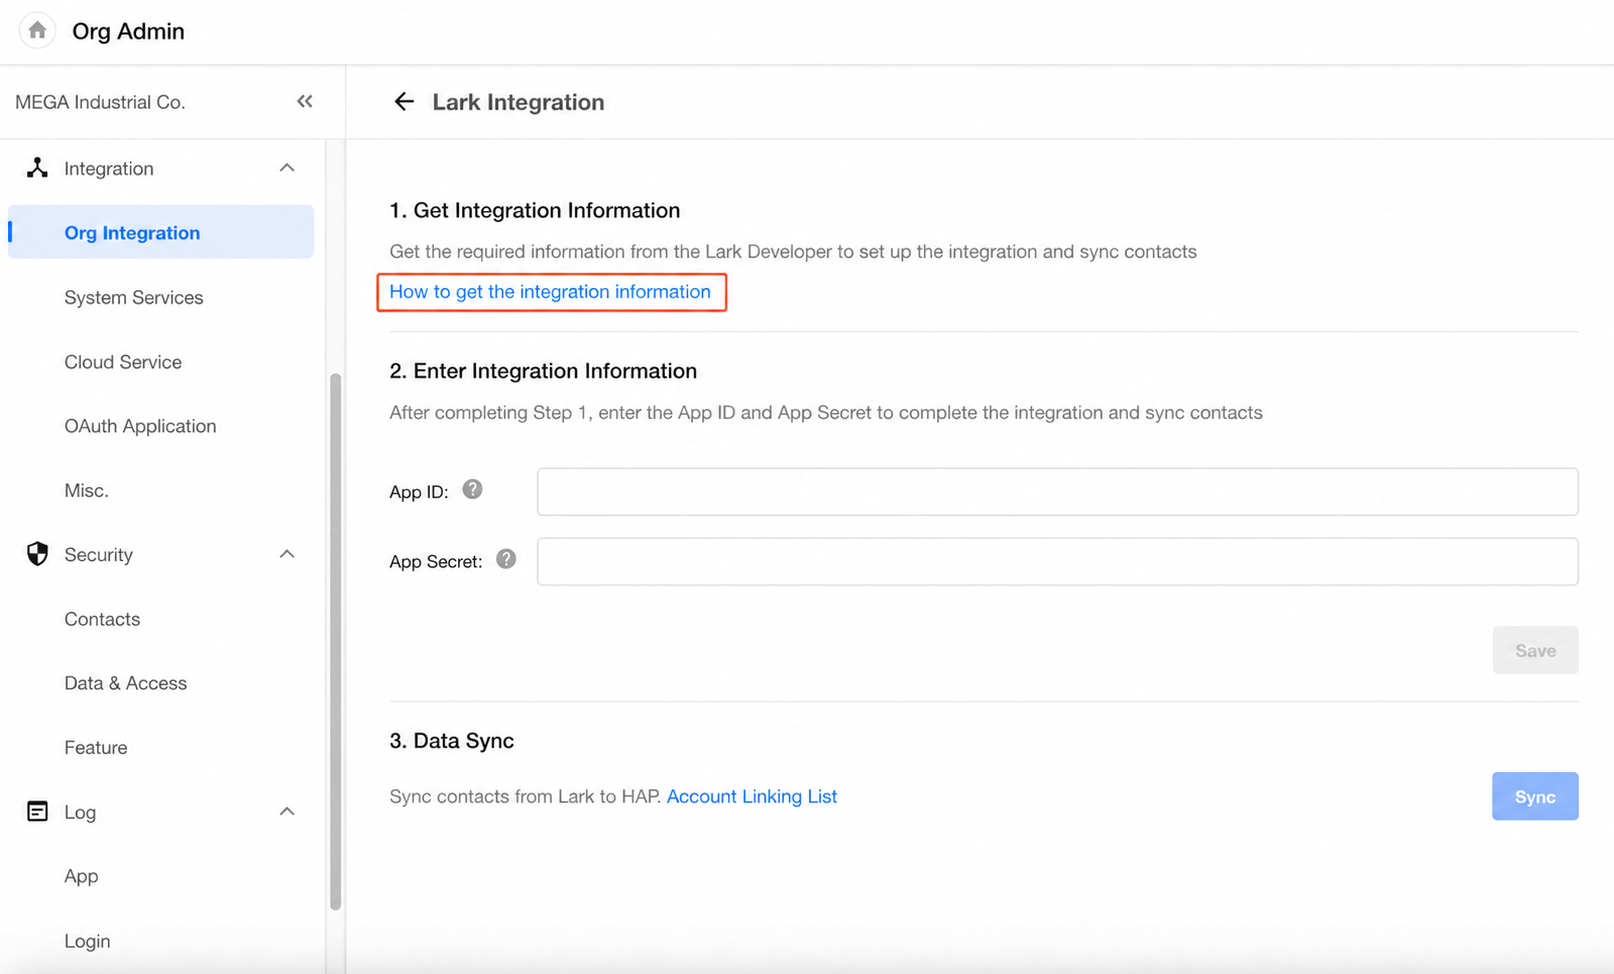
On the integration setup page, click How to Get Integration Information?.
Keep this page open while completing the setup. It provides the information required in the following steps, such as the homepage URL.
3. Create a Custom App in Lark
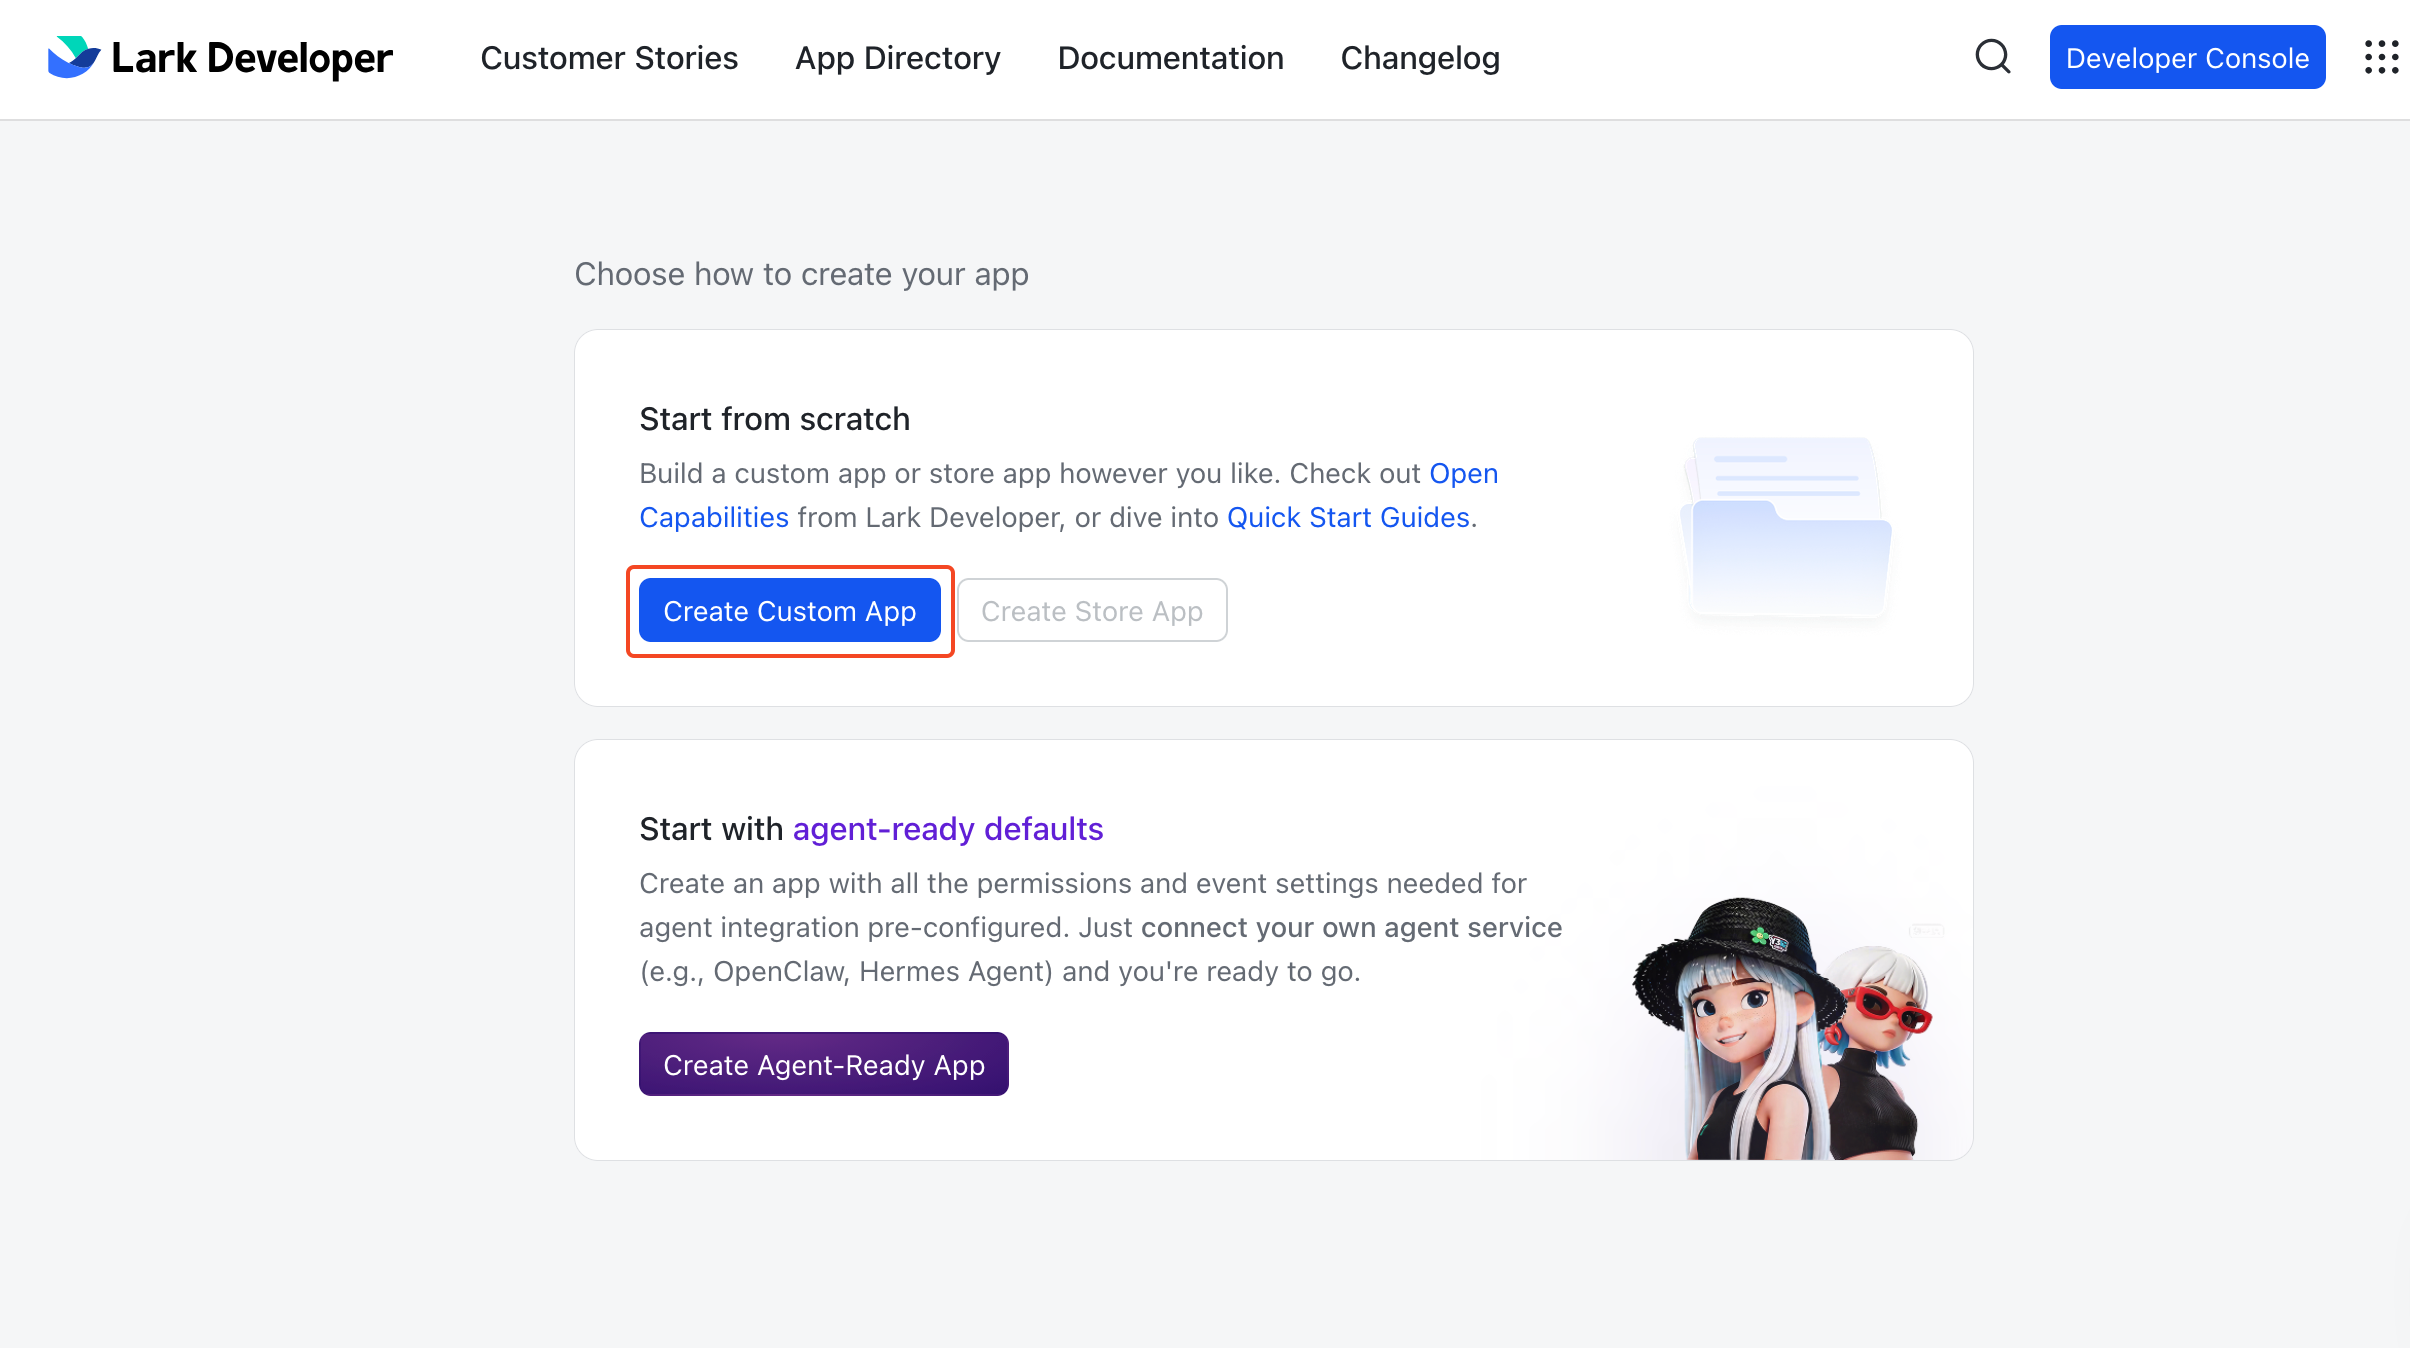
Go to Lark Developer and create a custom app for your organization.
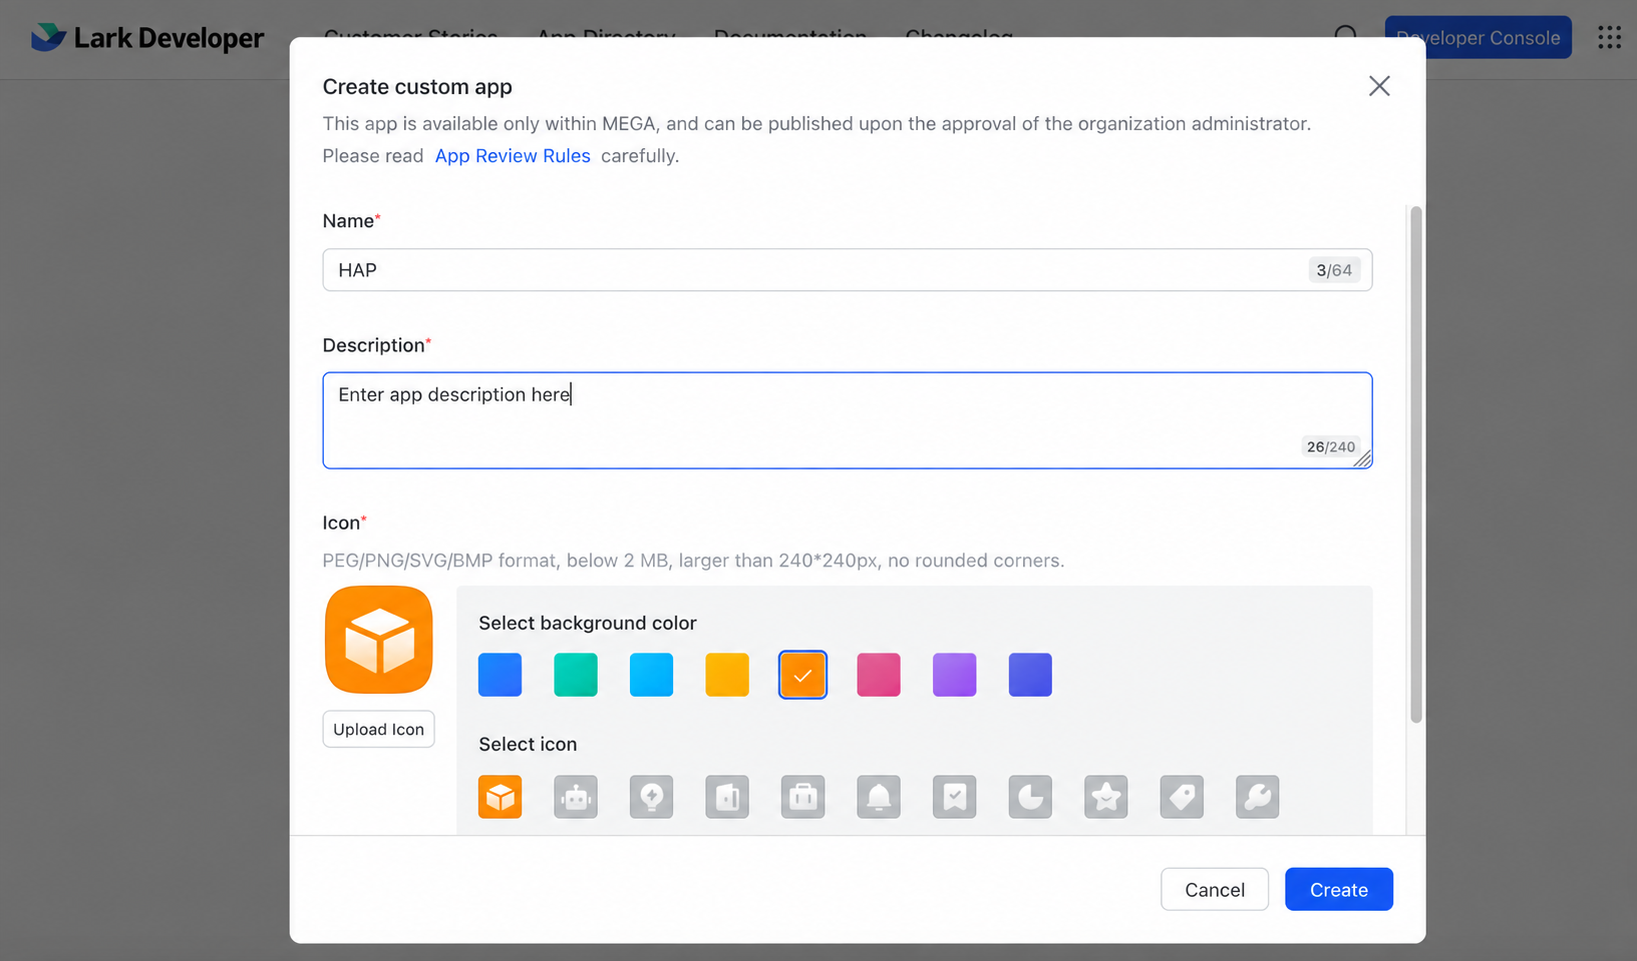
4. Configure the Basic App Information
Enter the required app information.
Download the app icon from the HAP integration information page opened in Step 2 and use it as the icon for your Lark app.
5. Open the App Settings
After creating the app, open it in Lark Developer.

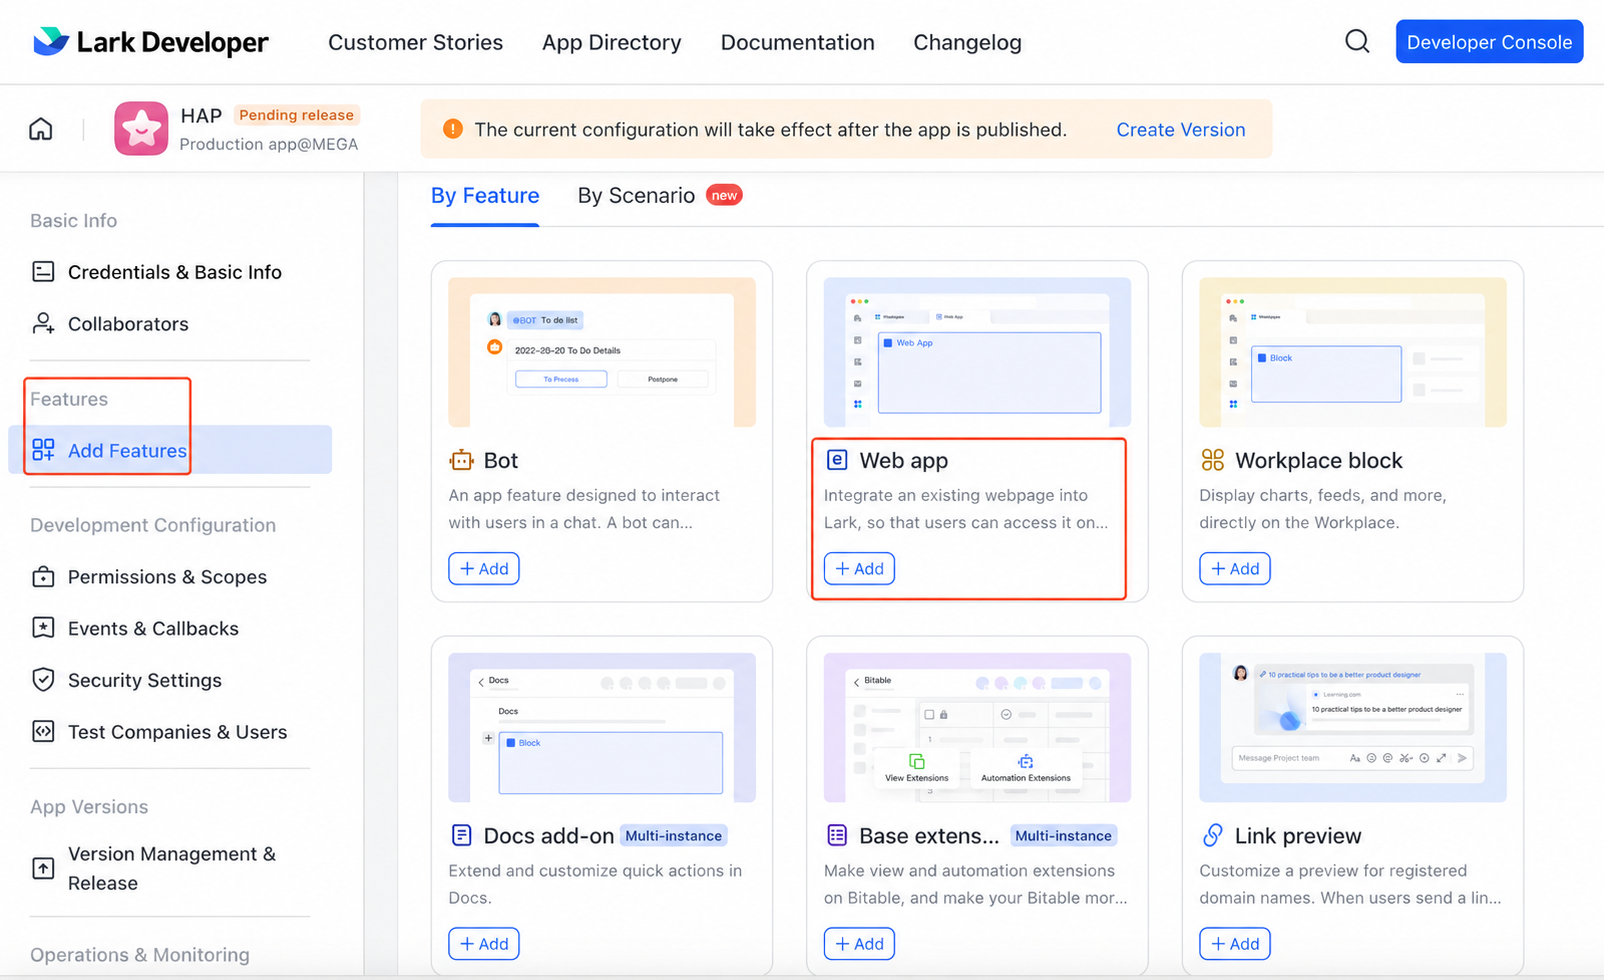
6. Configure the Web App
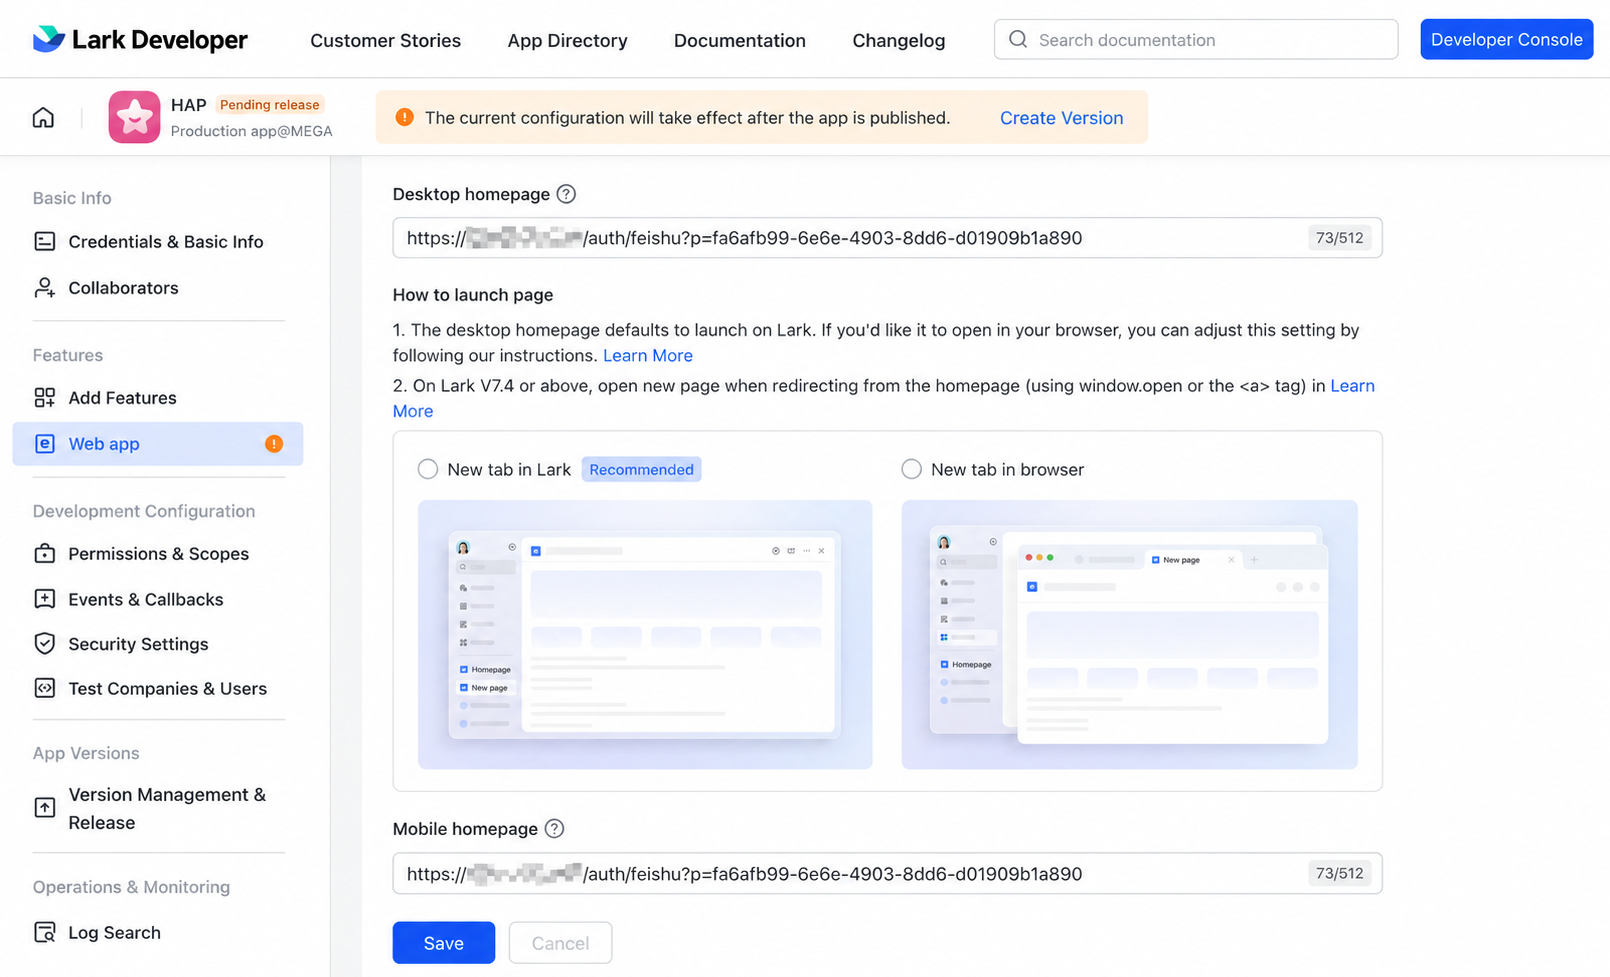
Use the homepage URL provided by HAP in Step 2.

-
Go to Add Features and add Web app.
-
In the Web app settings, use the HAP homepage URL for both the desktop and mobile homepages.
-
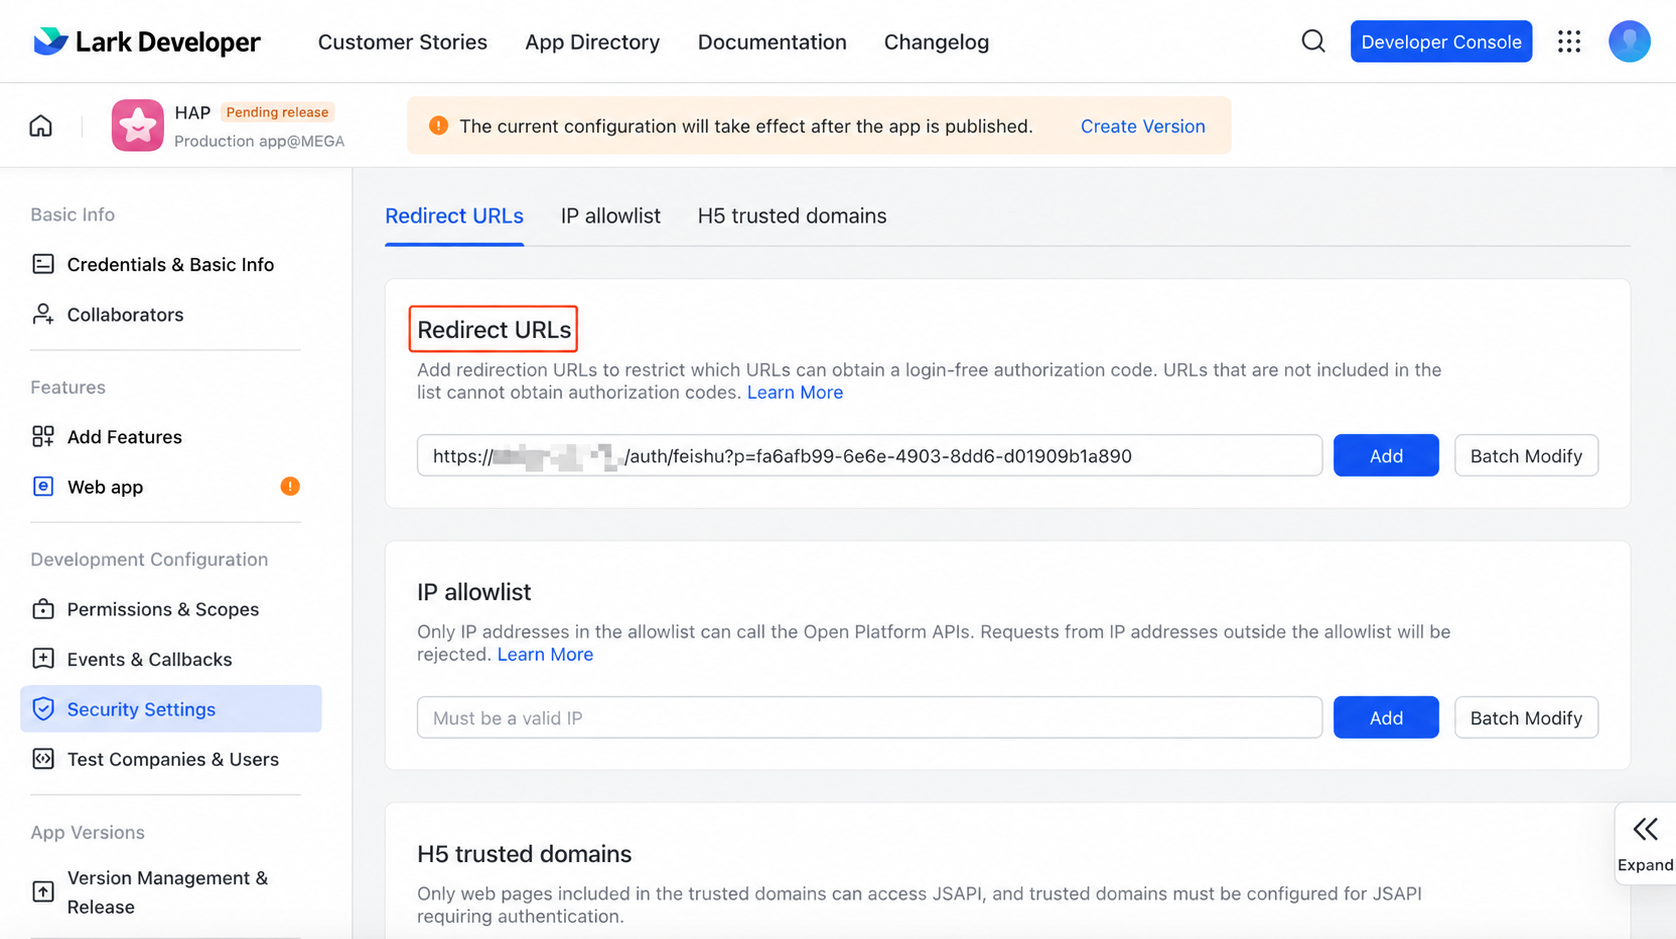
Go to Security Settings and add the same URL as a redirect URL.
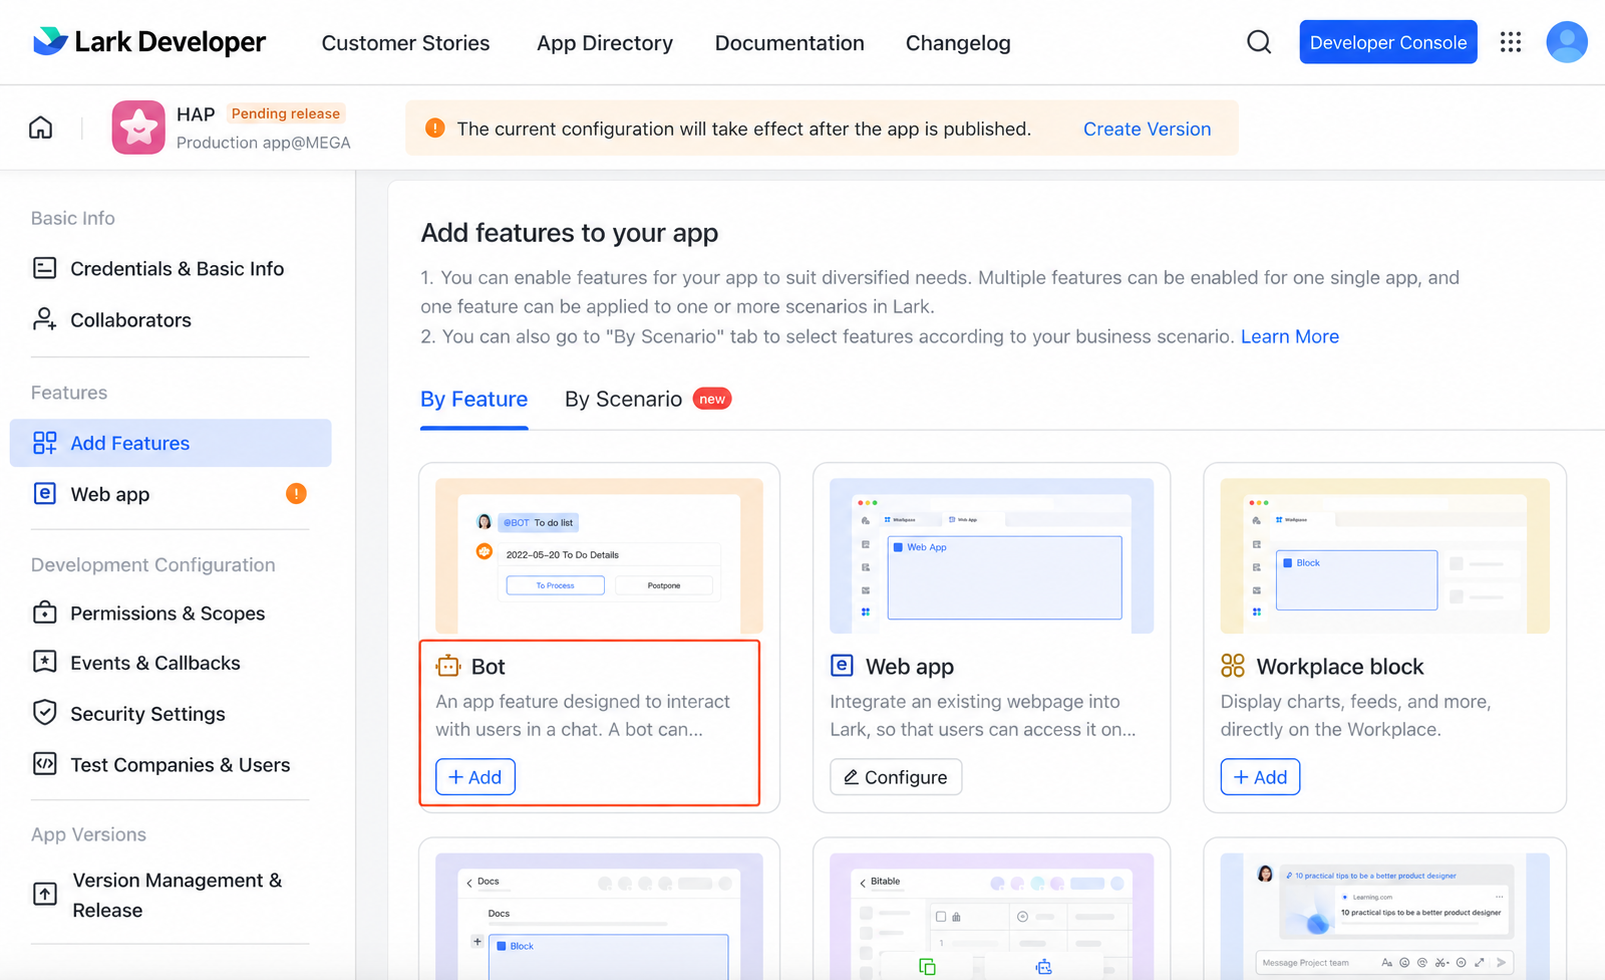
7. Enable the Bot
Go to Add Features and add Bot.
Once enabled, the bot allows HAP to send to-do notifications, app notifications, and workflow messages to users in Lark.
8. Configure Permissions and Data Access
Add Permission Scopes
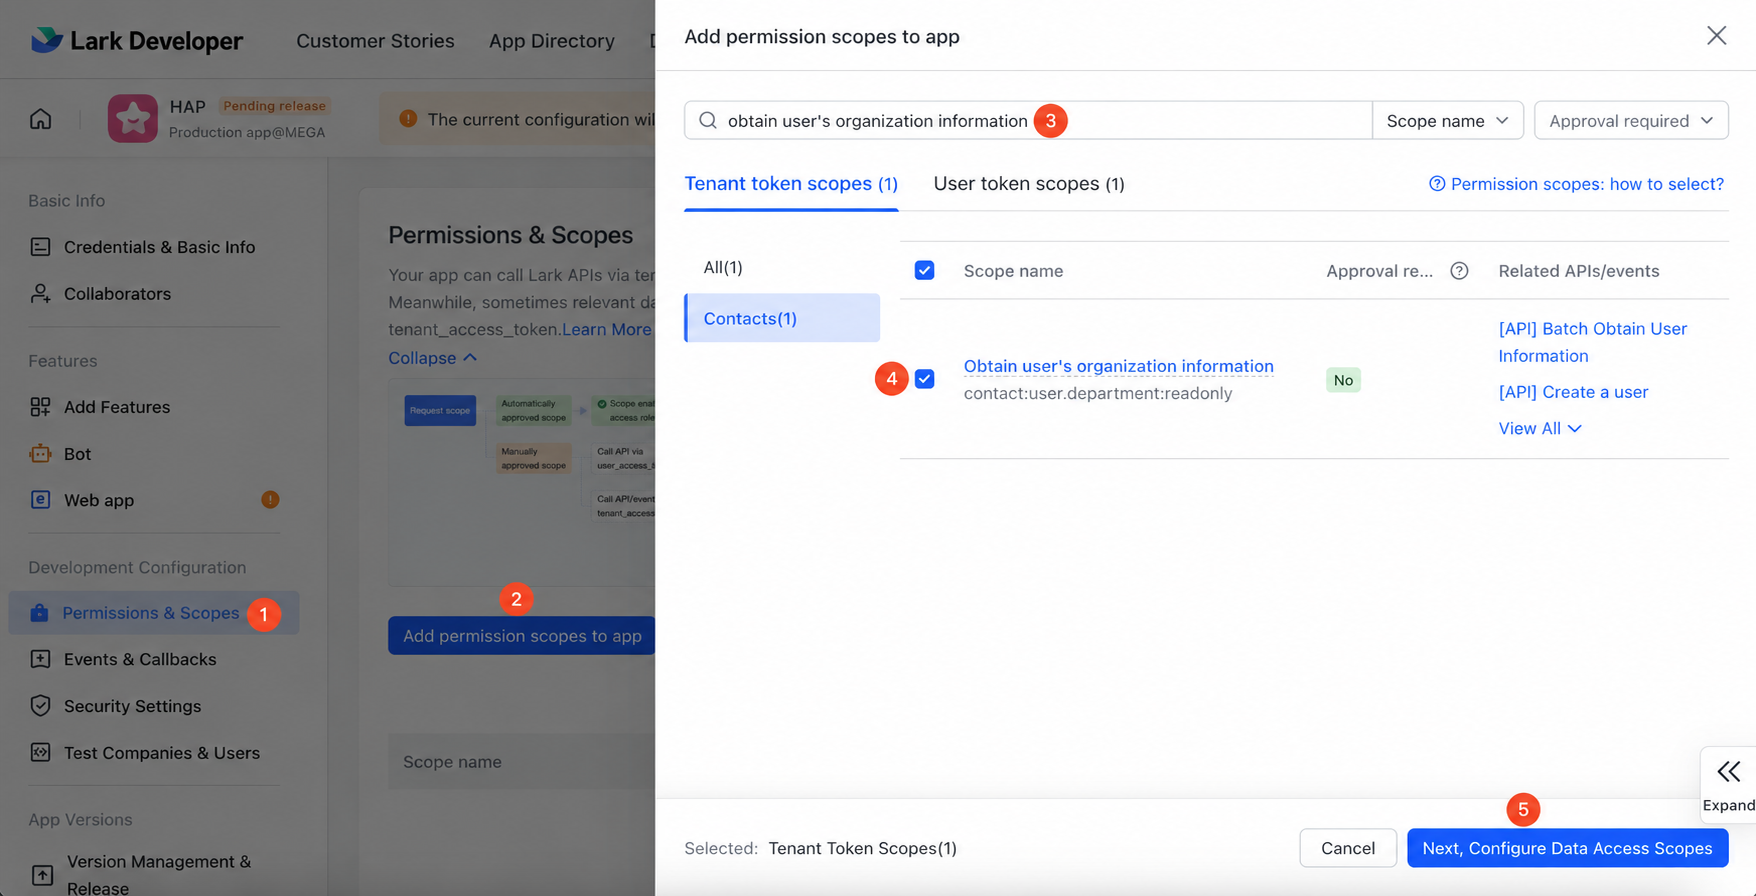
In Lark Developer, go to Permissions & Scopes and click Add Scopes. Under Tenant token scopes, add the following scopes:
-
Get apps' information
-
Obtain department's organizational structure in contacts
-
Obtain user's basic information
-
Obtain user's organization information
-
Obtain user's employment information
-
View, create, update, and delete info of Approval app
-
Get basic information in contacts
-
Obtain department's basic information
-
Obtain user ID
-
Obtain user's mobile number
-
Read and send direct messages and group chat messages
-
Read direct messages and group chat messages
-
Send messages as an app
-
Send batch messages to multiple users
Make sure you select the scopes under Tenant token scopes, not User token scopes.
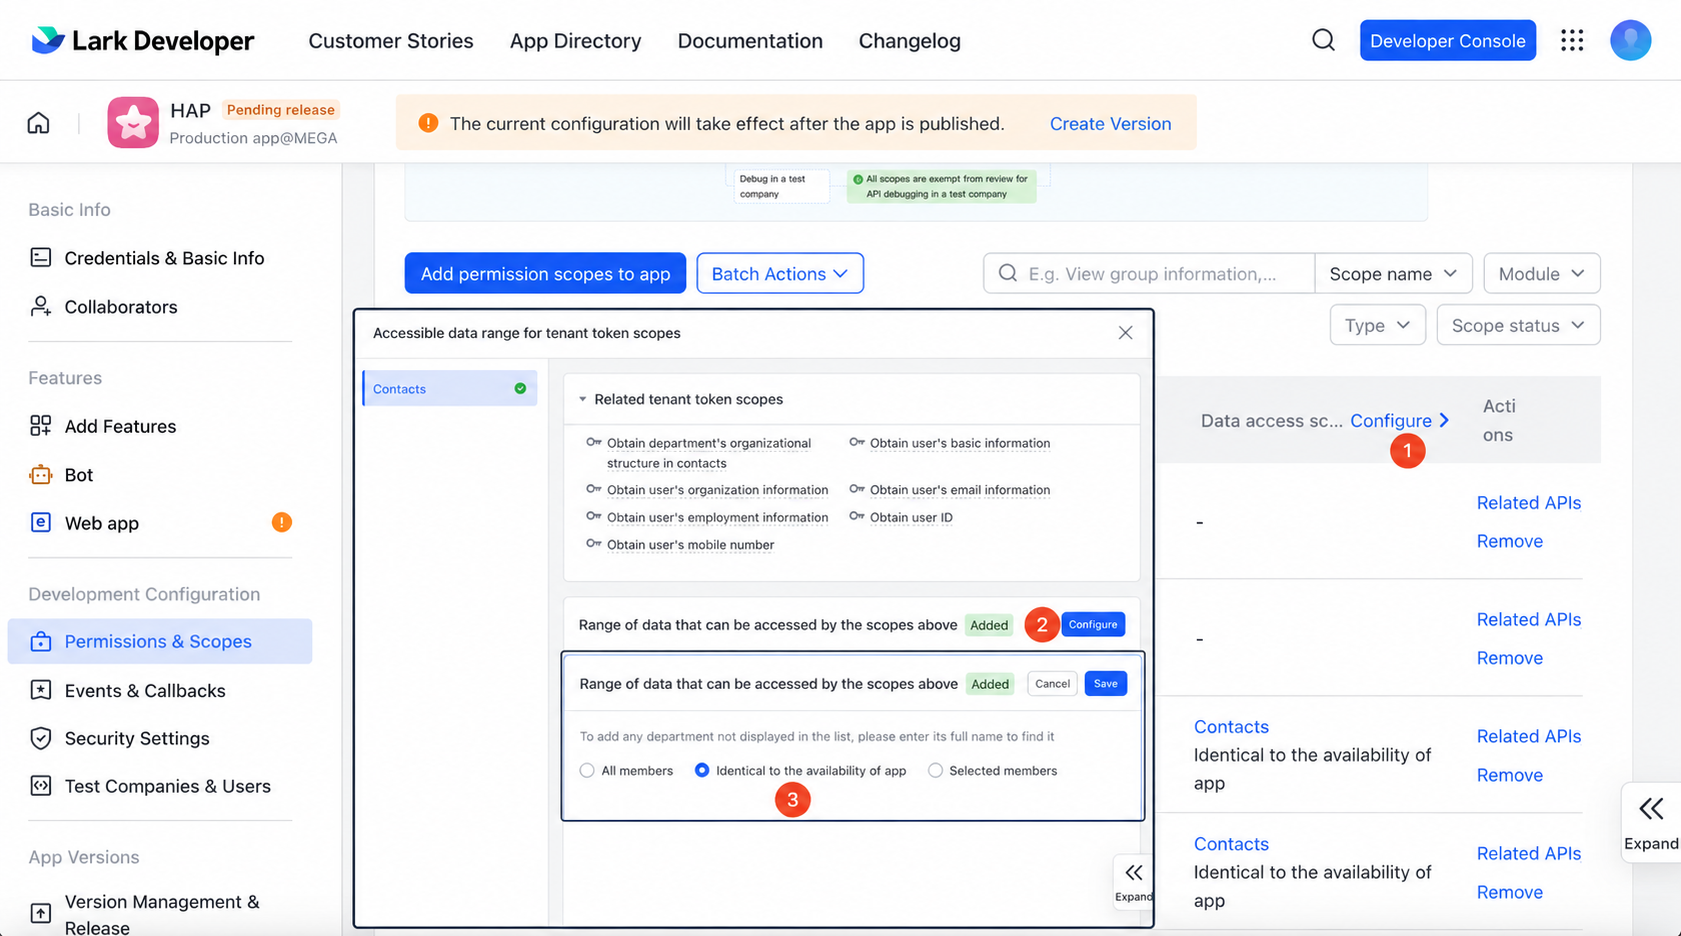
Configure the Data Access Scope
Set the data access scope to match the app's availability scope.
9. Create and Publish an App Version
After configuring the app, create a version, define who can access the app, and publish it.
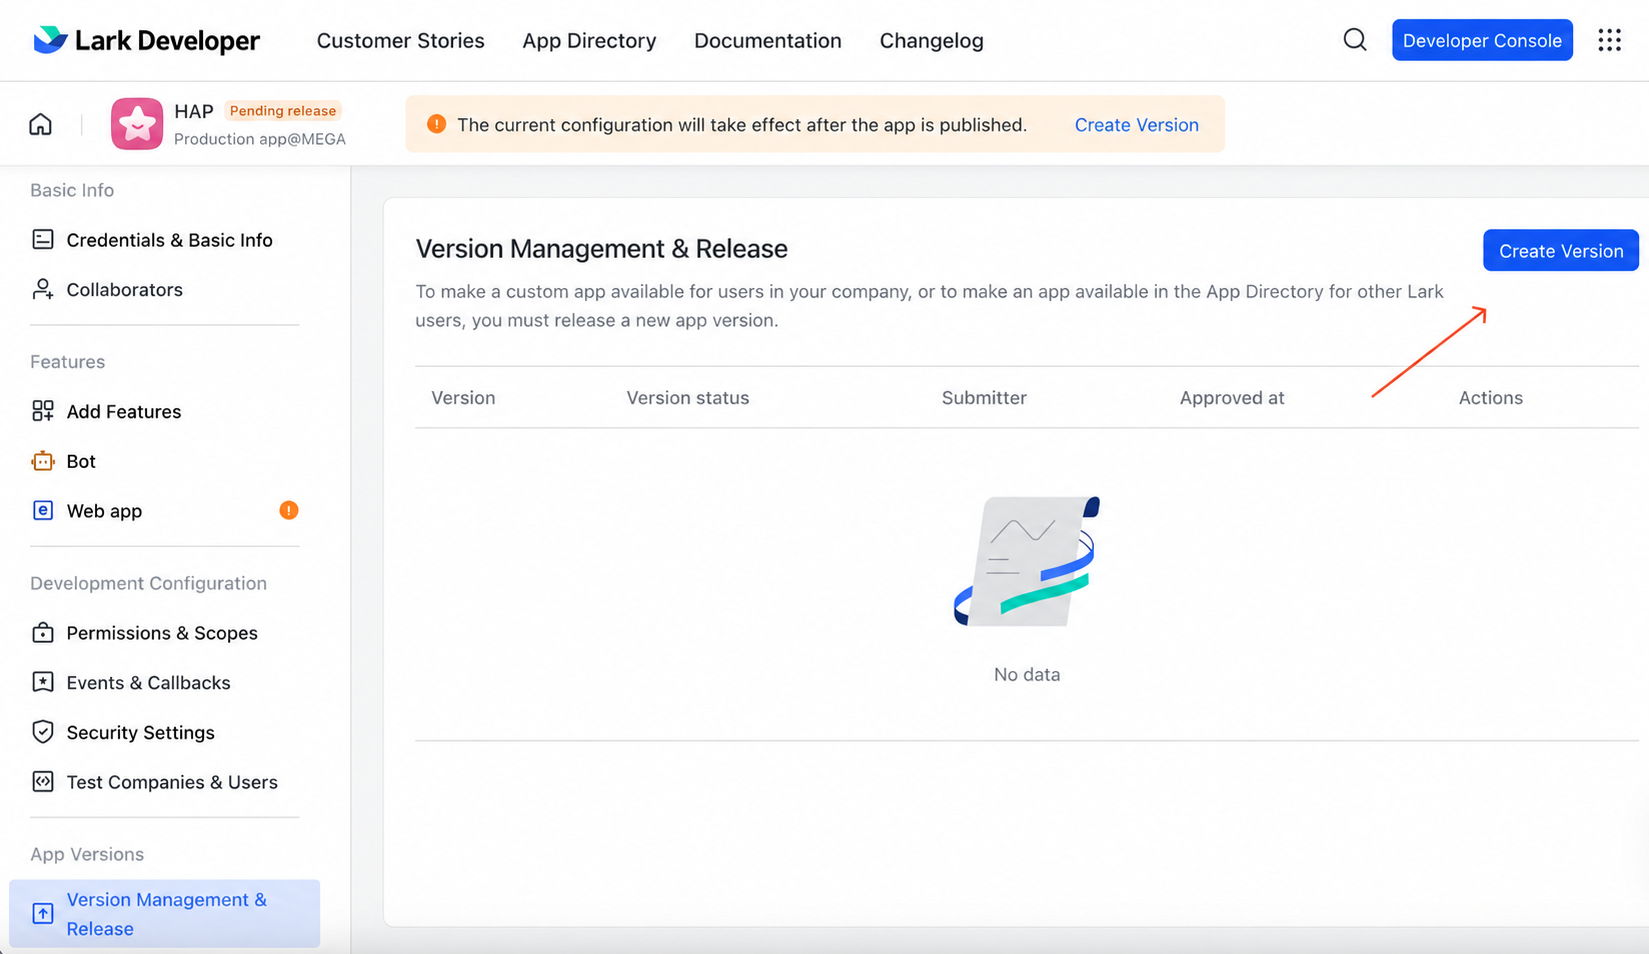
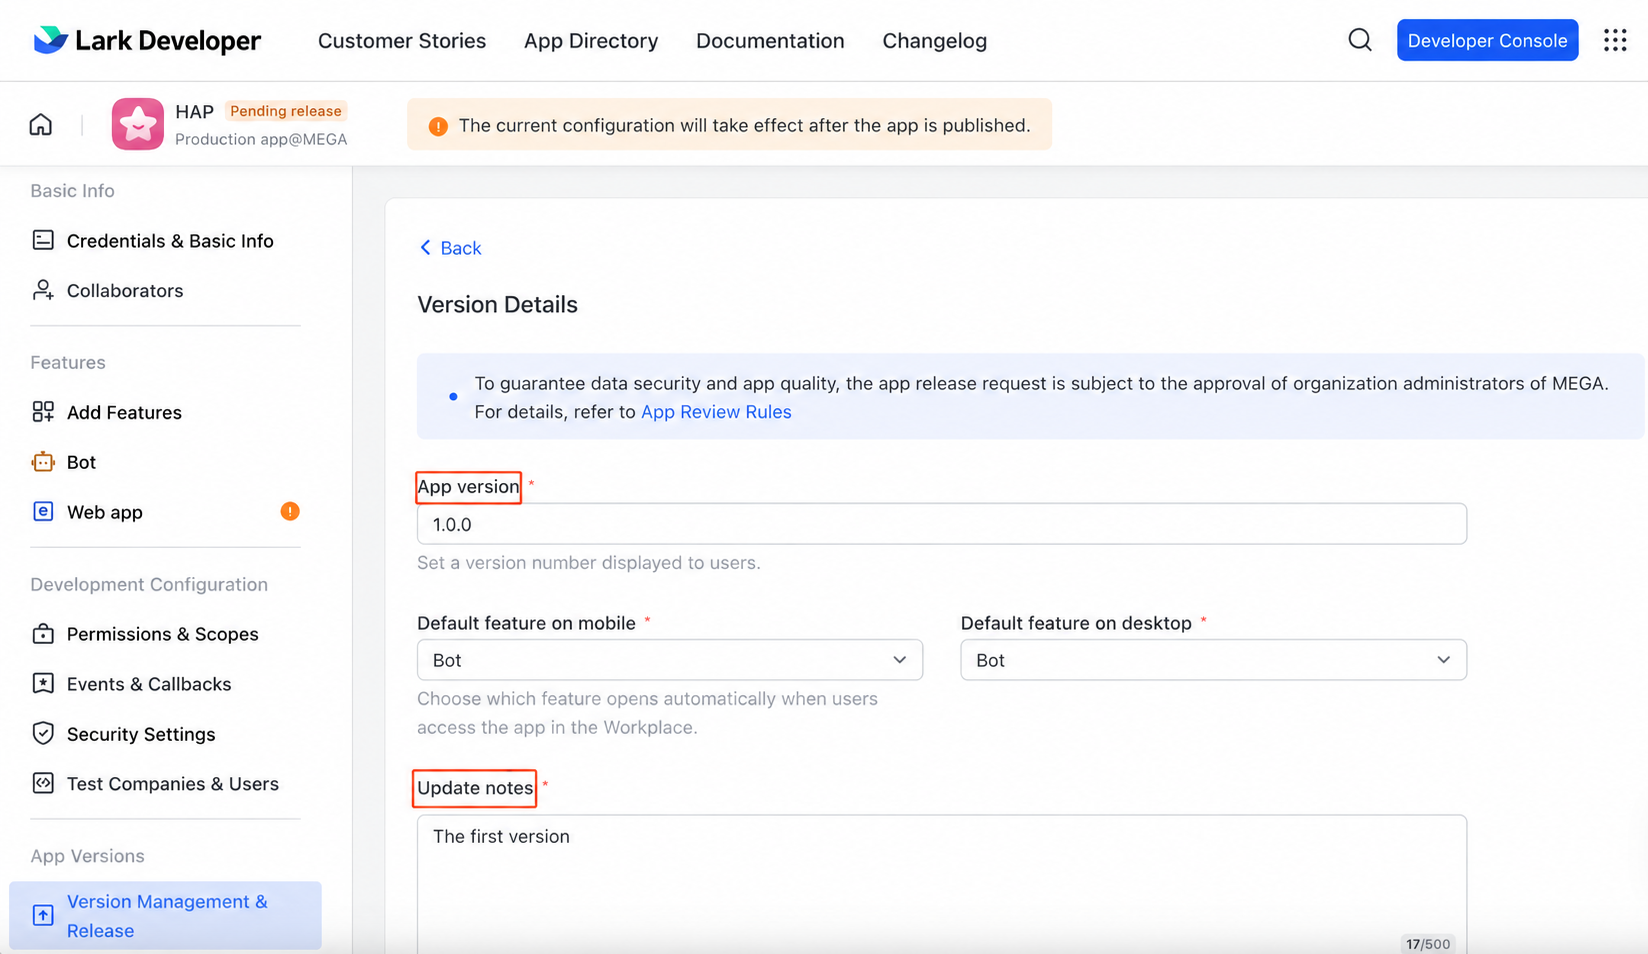
1. Create a Version
In Version Management & Release, click Create Version.
For subsequent updates, increase the version number. For example, change 1.0.0 to 1.0.1.
2. Configure the User Scope
Select the users and departments that should have access to the app.
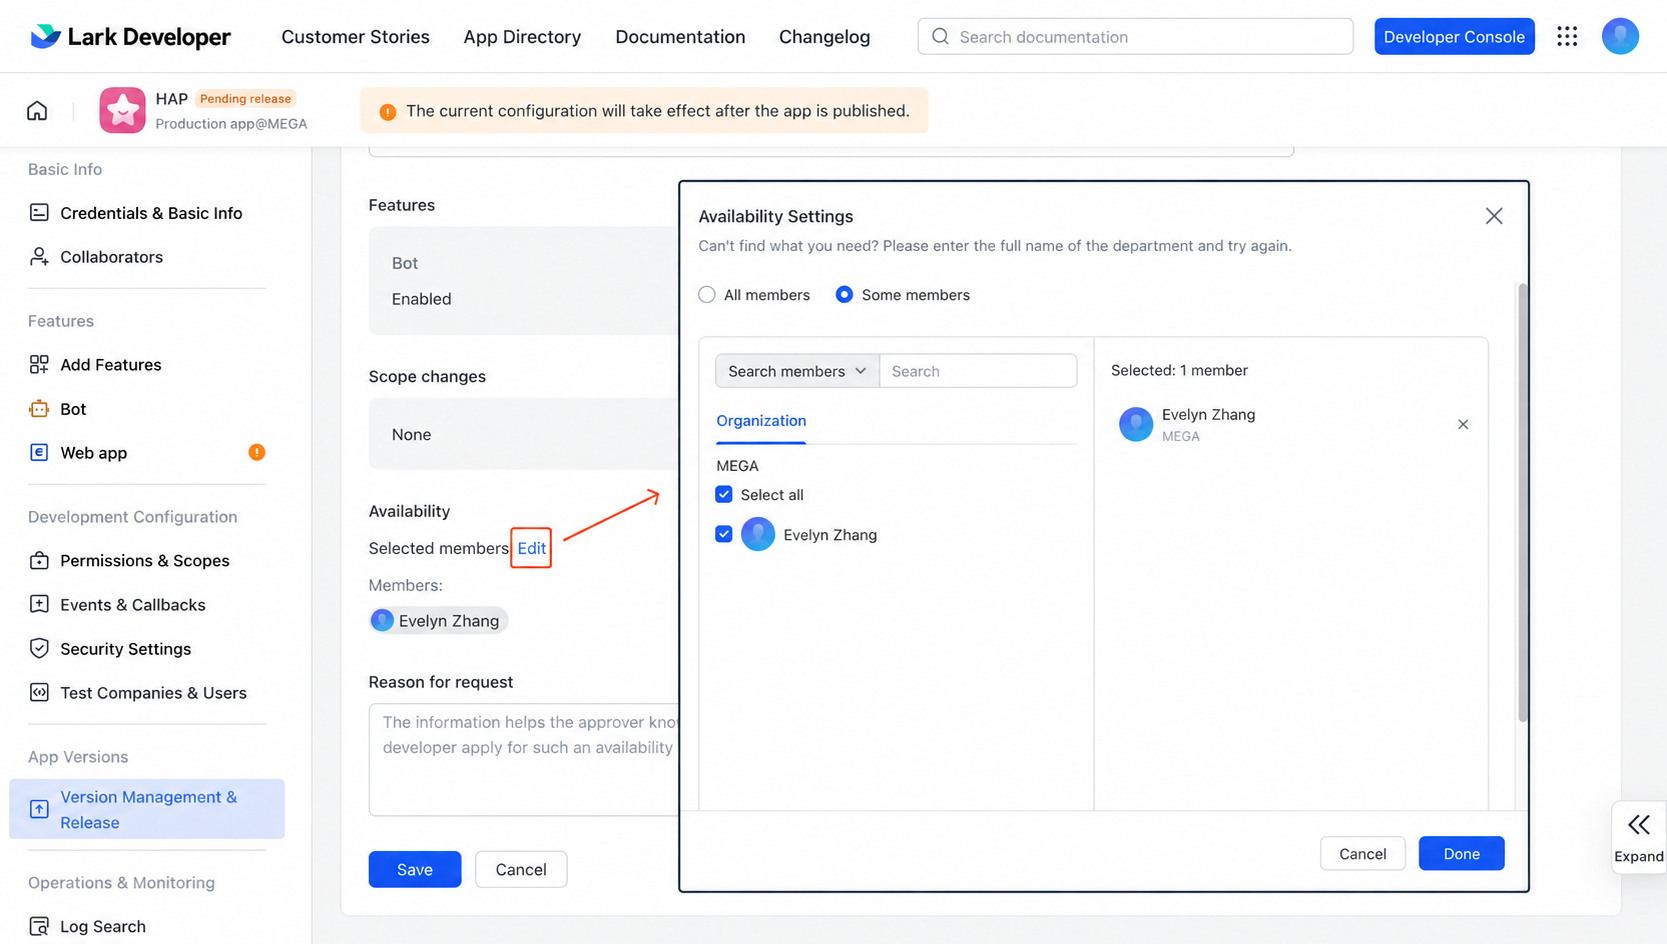
The selected users and departments can access HAP from Lark and are also included when users and departments are synced to HAP.
For example, if your organization has 100 Lark users but only 30 need access to HAP, include only those 30 users in the scope. You can define the scope by department, individual user, or both.
Future syncs follow the same scope. For example, if the Sales department is included:
- When a user leaves the Sales department in Lark, the user is marked as departed in HAP after the next sync.
- When a user joins the Sales department, the next sync creates a HAP account for the user or reactivates their existing account.
3. Publish the App
Submit the app version for release.
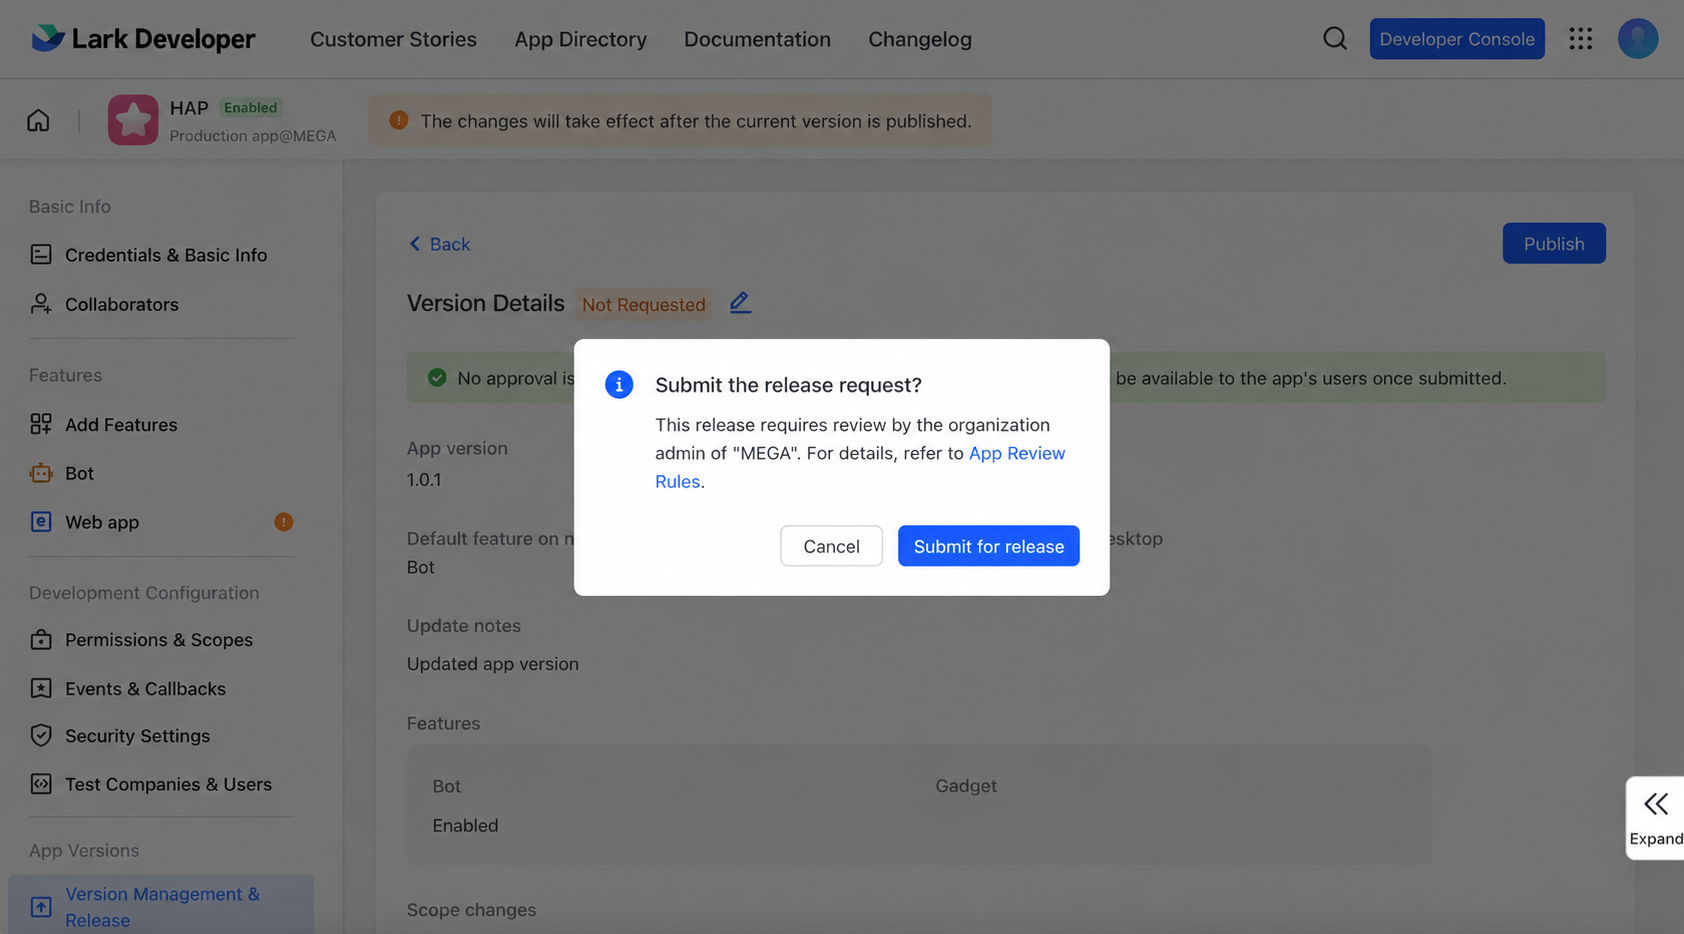
Whenever the app configuration changes, create and publish a new version and submit it for approval by your organization's Lark administrator.
Make sure the latest version is Released before using the updated configuration.
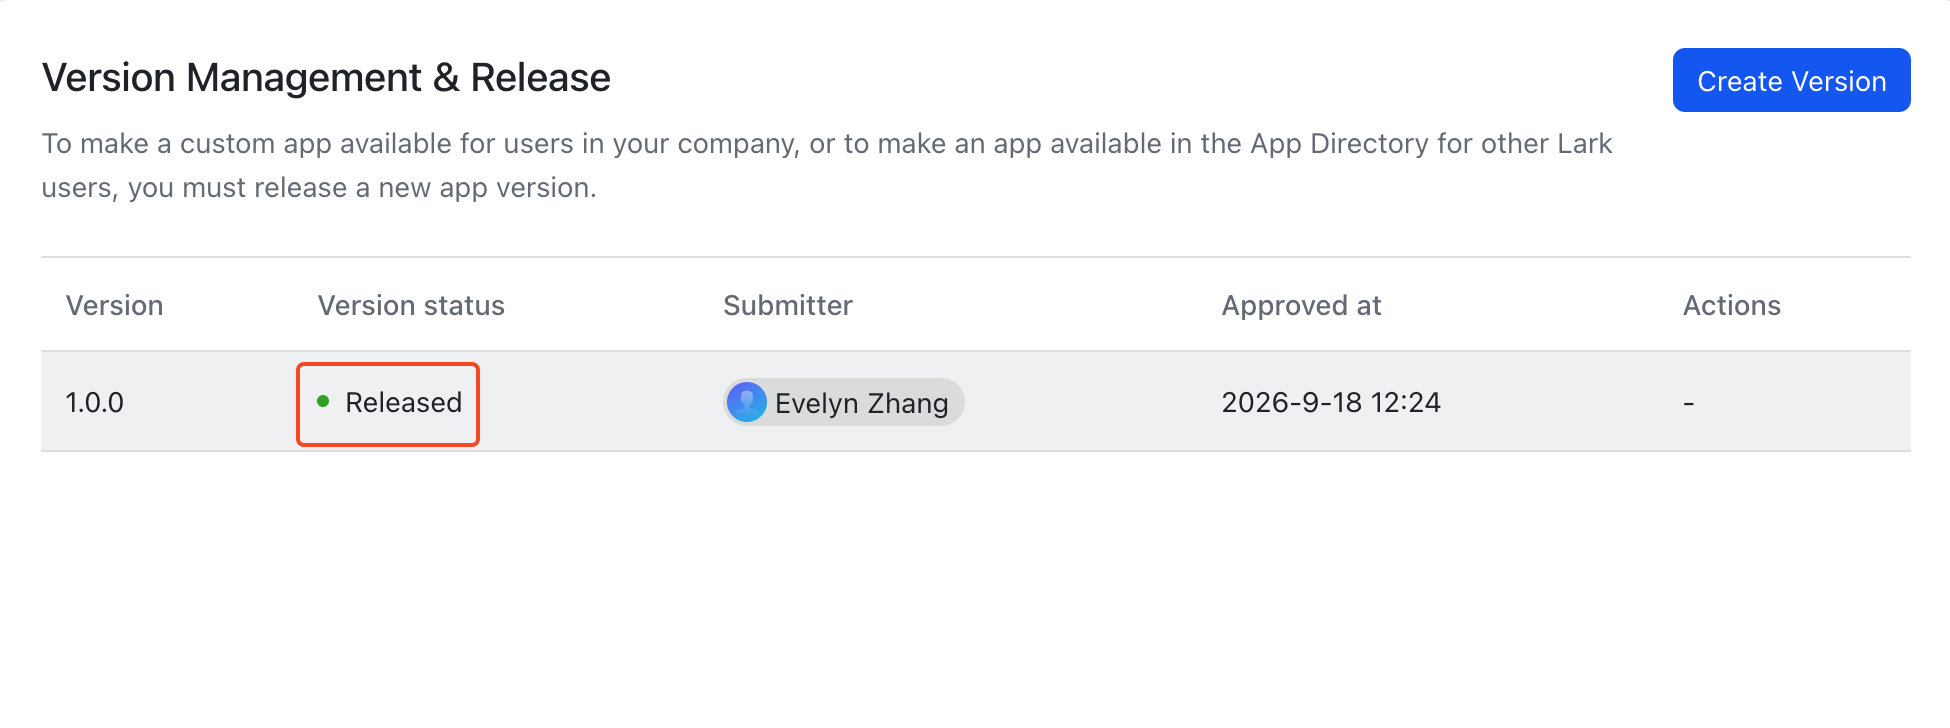
Depending on the changes, the release may be approved automatically or may require manual approval from an administrator.
Administrators can review pending app releases from the following page:
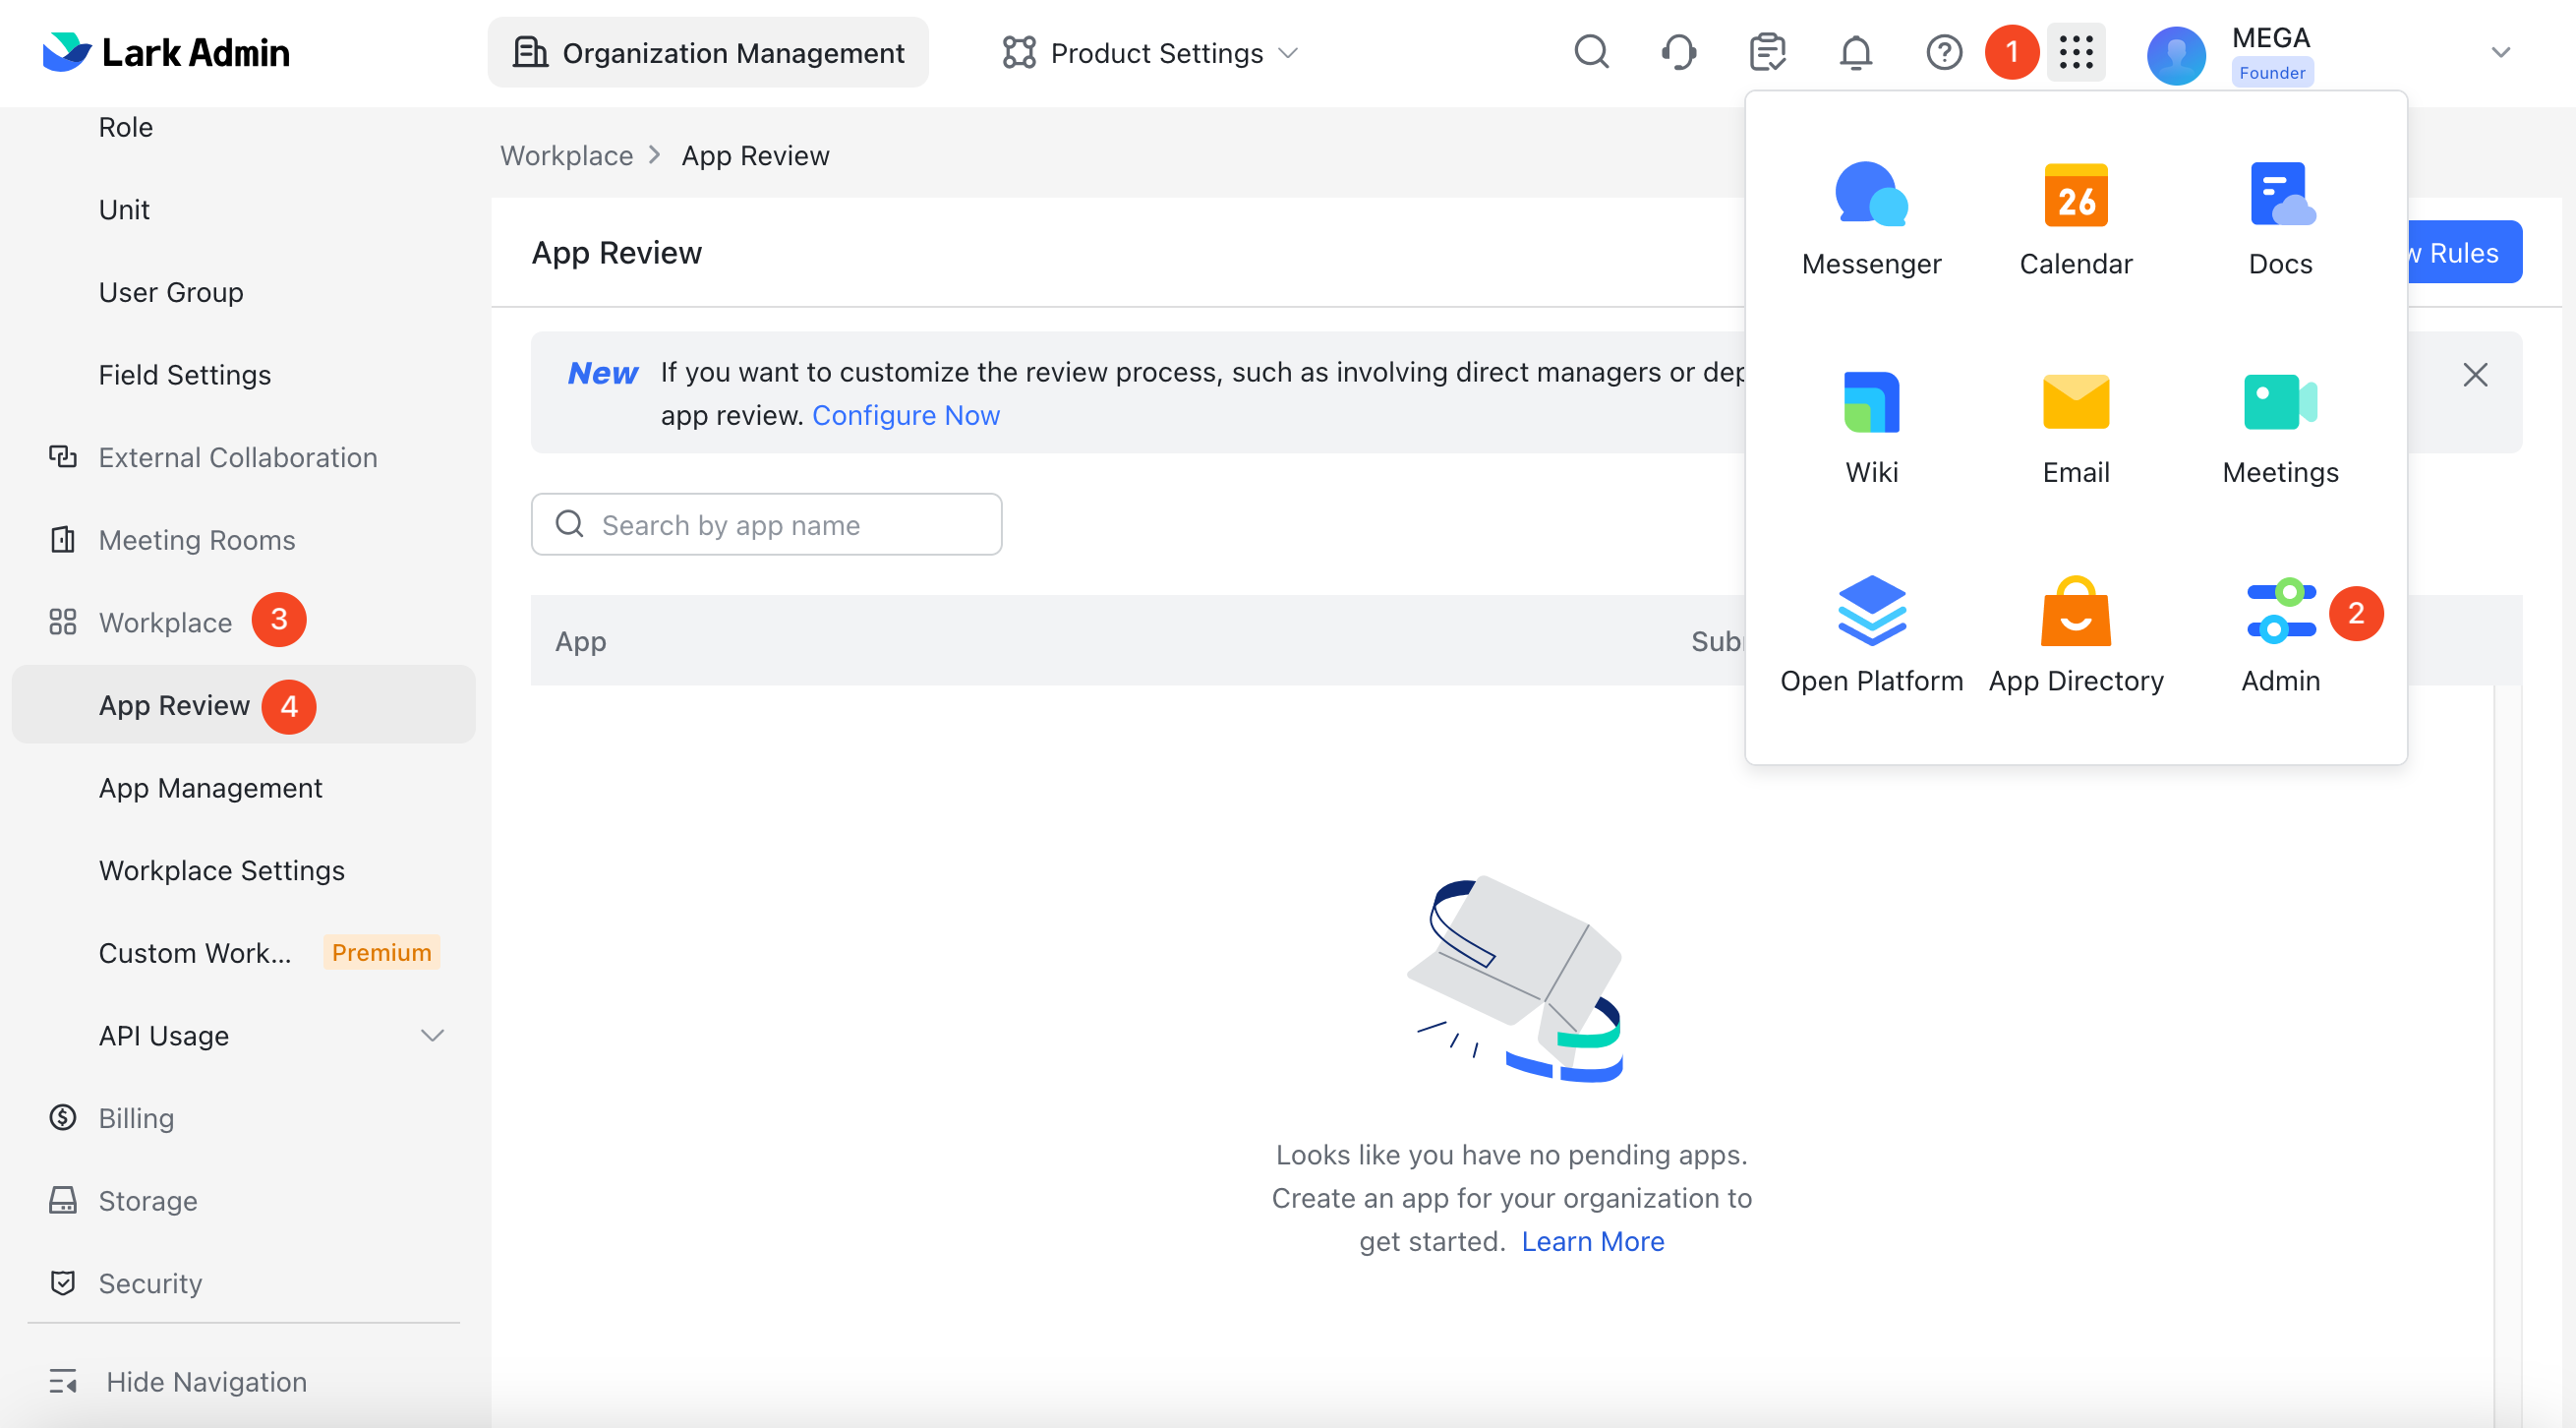
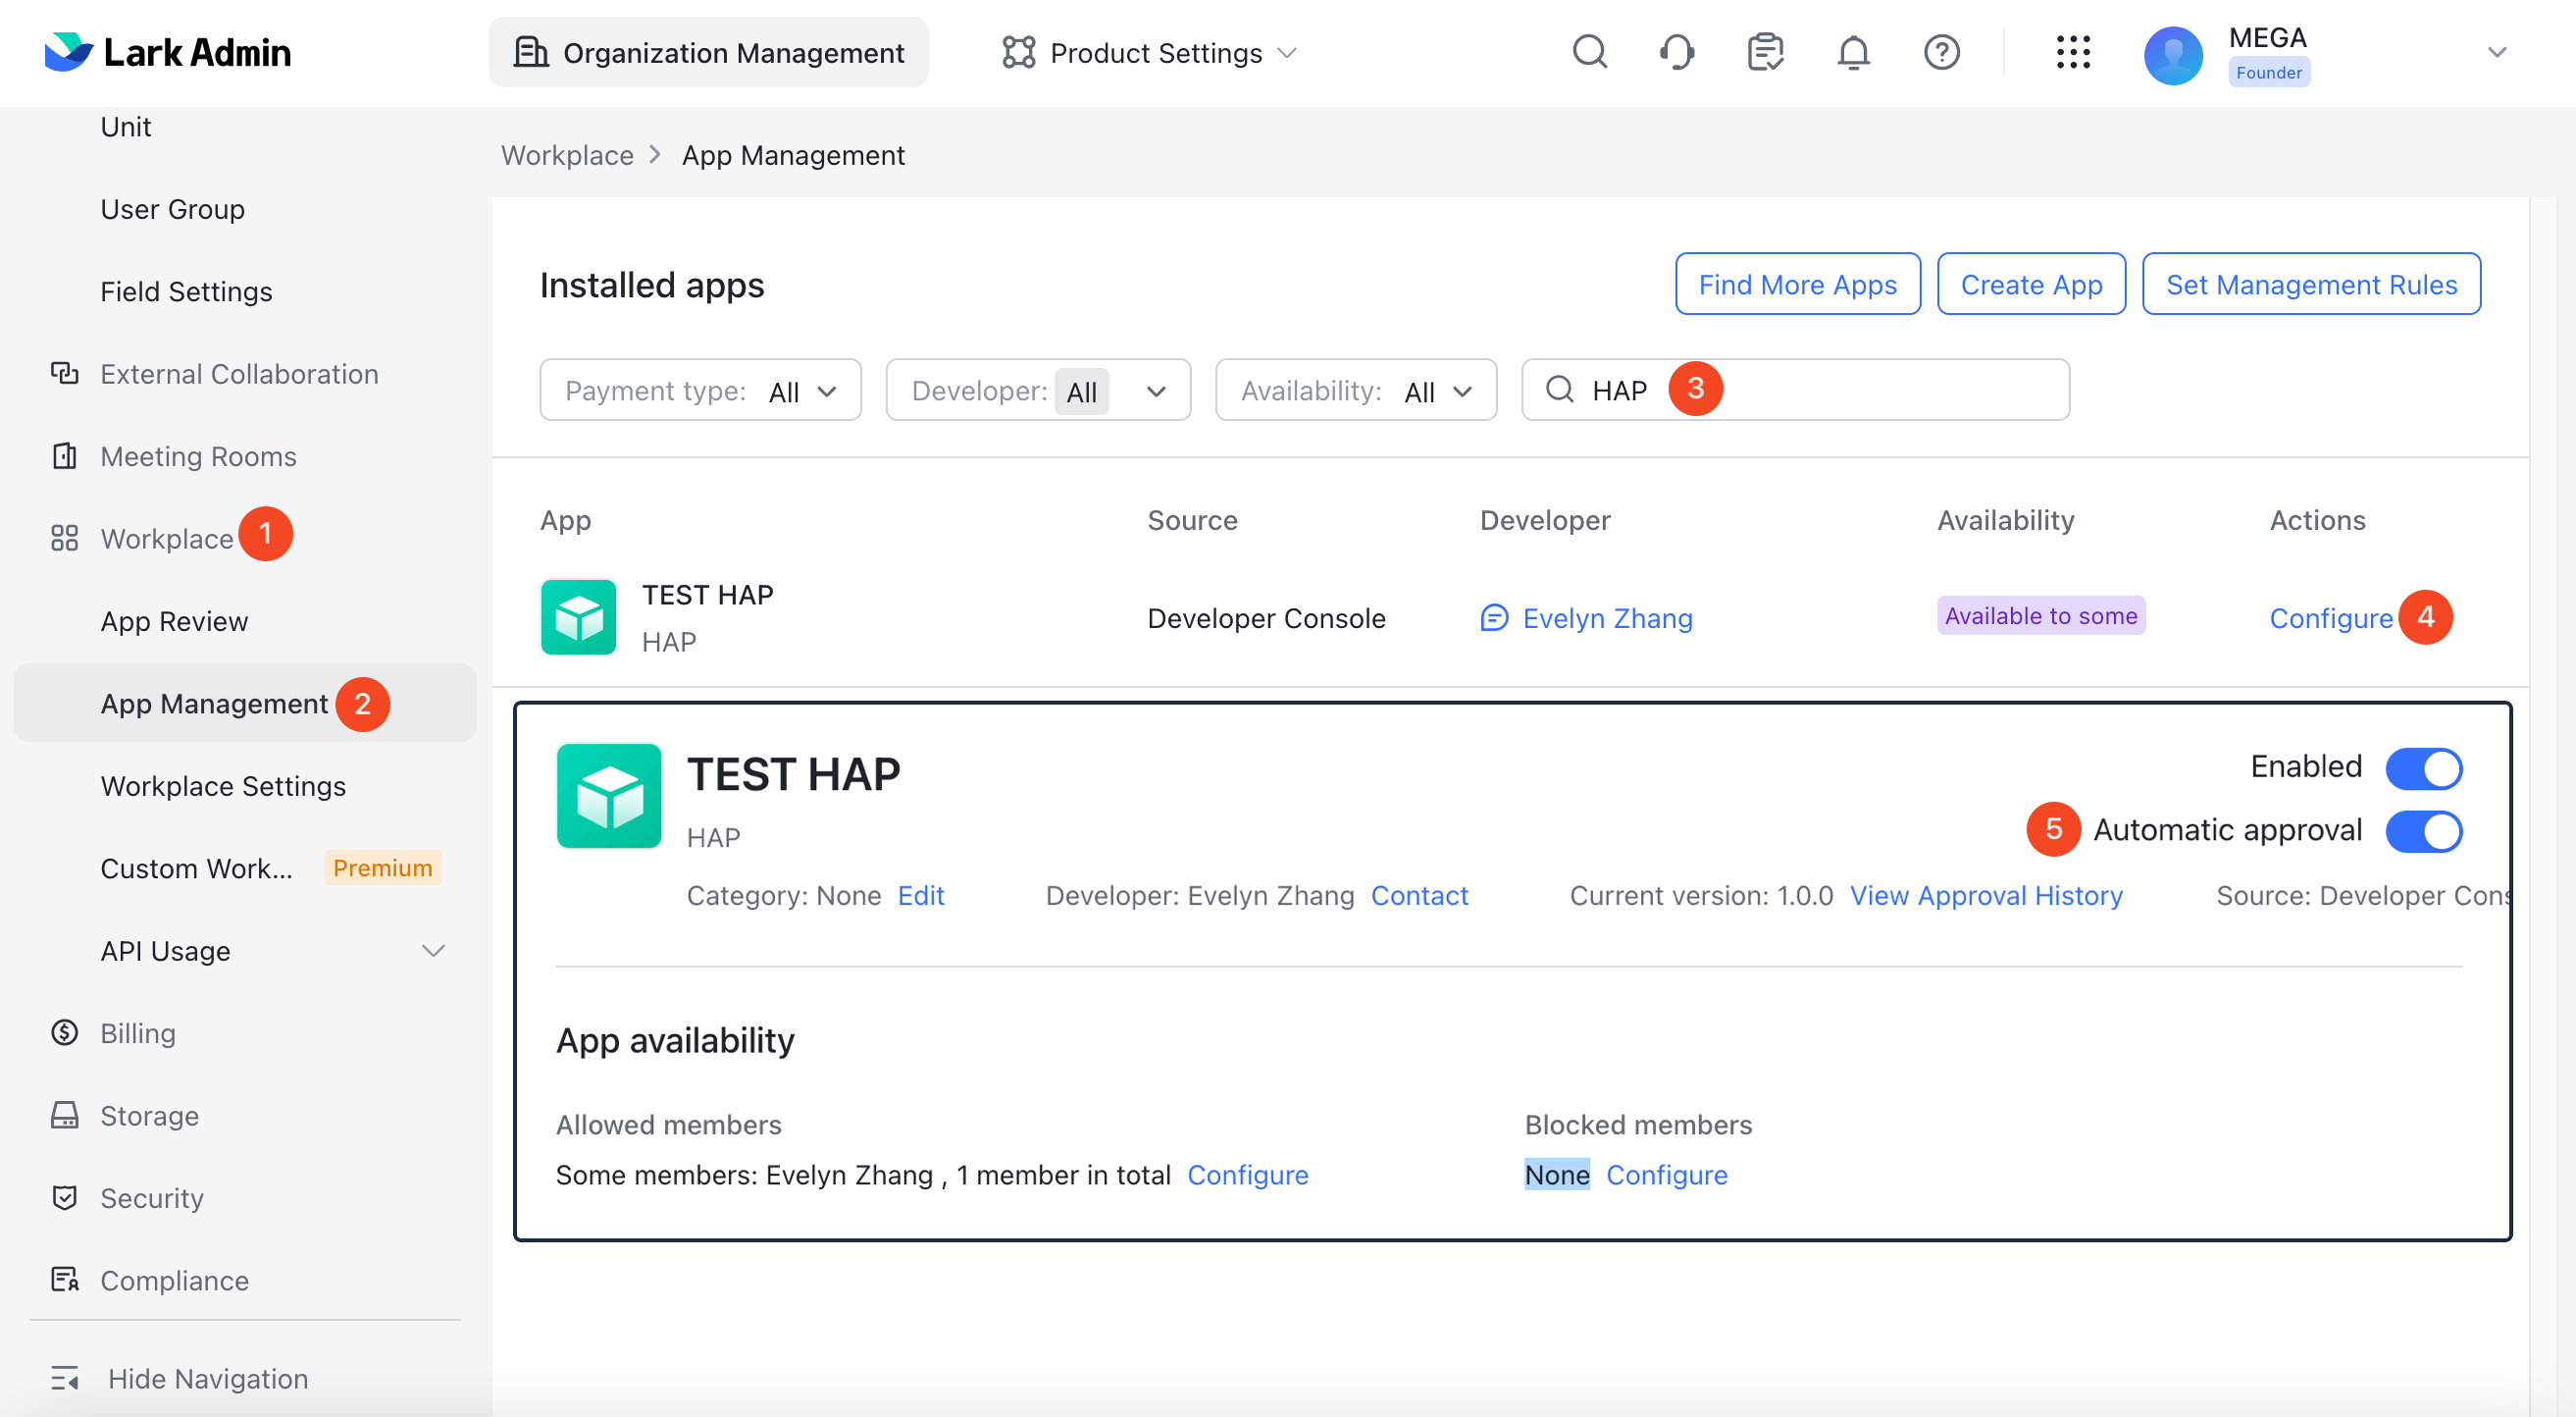
An administrator can exempt the app from approval so that future release requests are approved automatically.
10. Complete the Integration in HAP
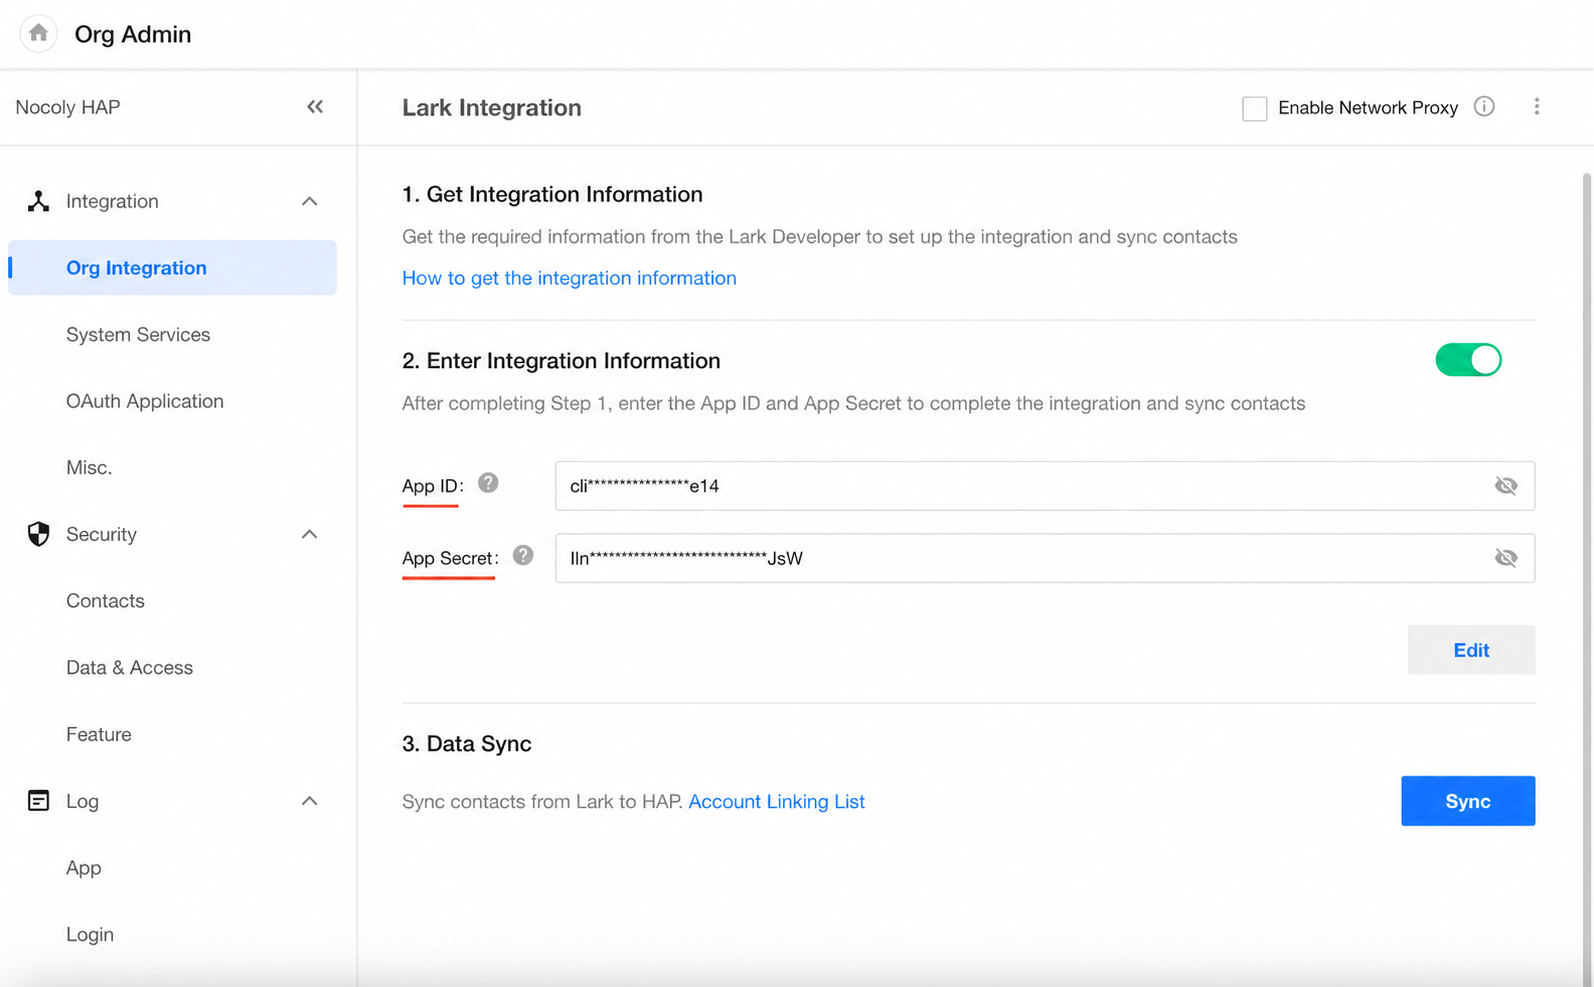
Return to the HAP integration settings and enter the App ID and App Secret for the Lark app.
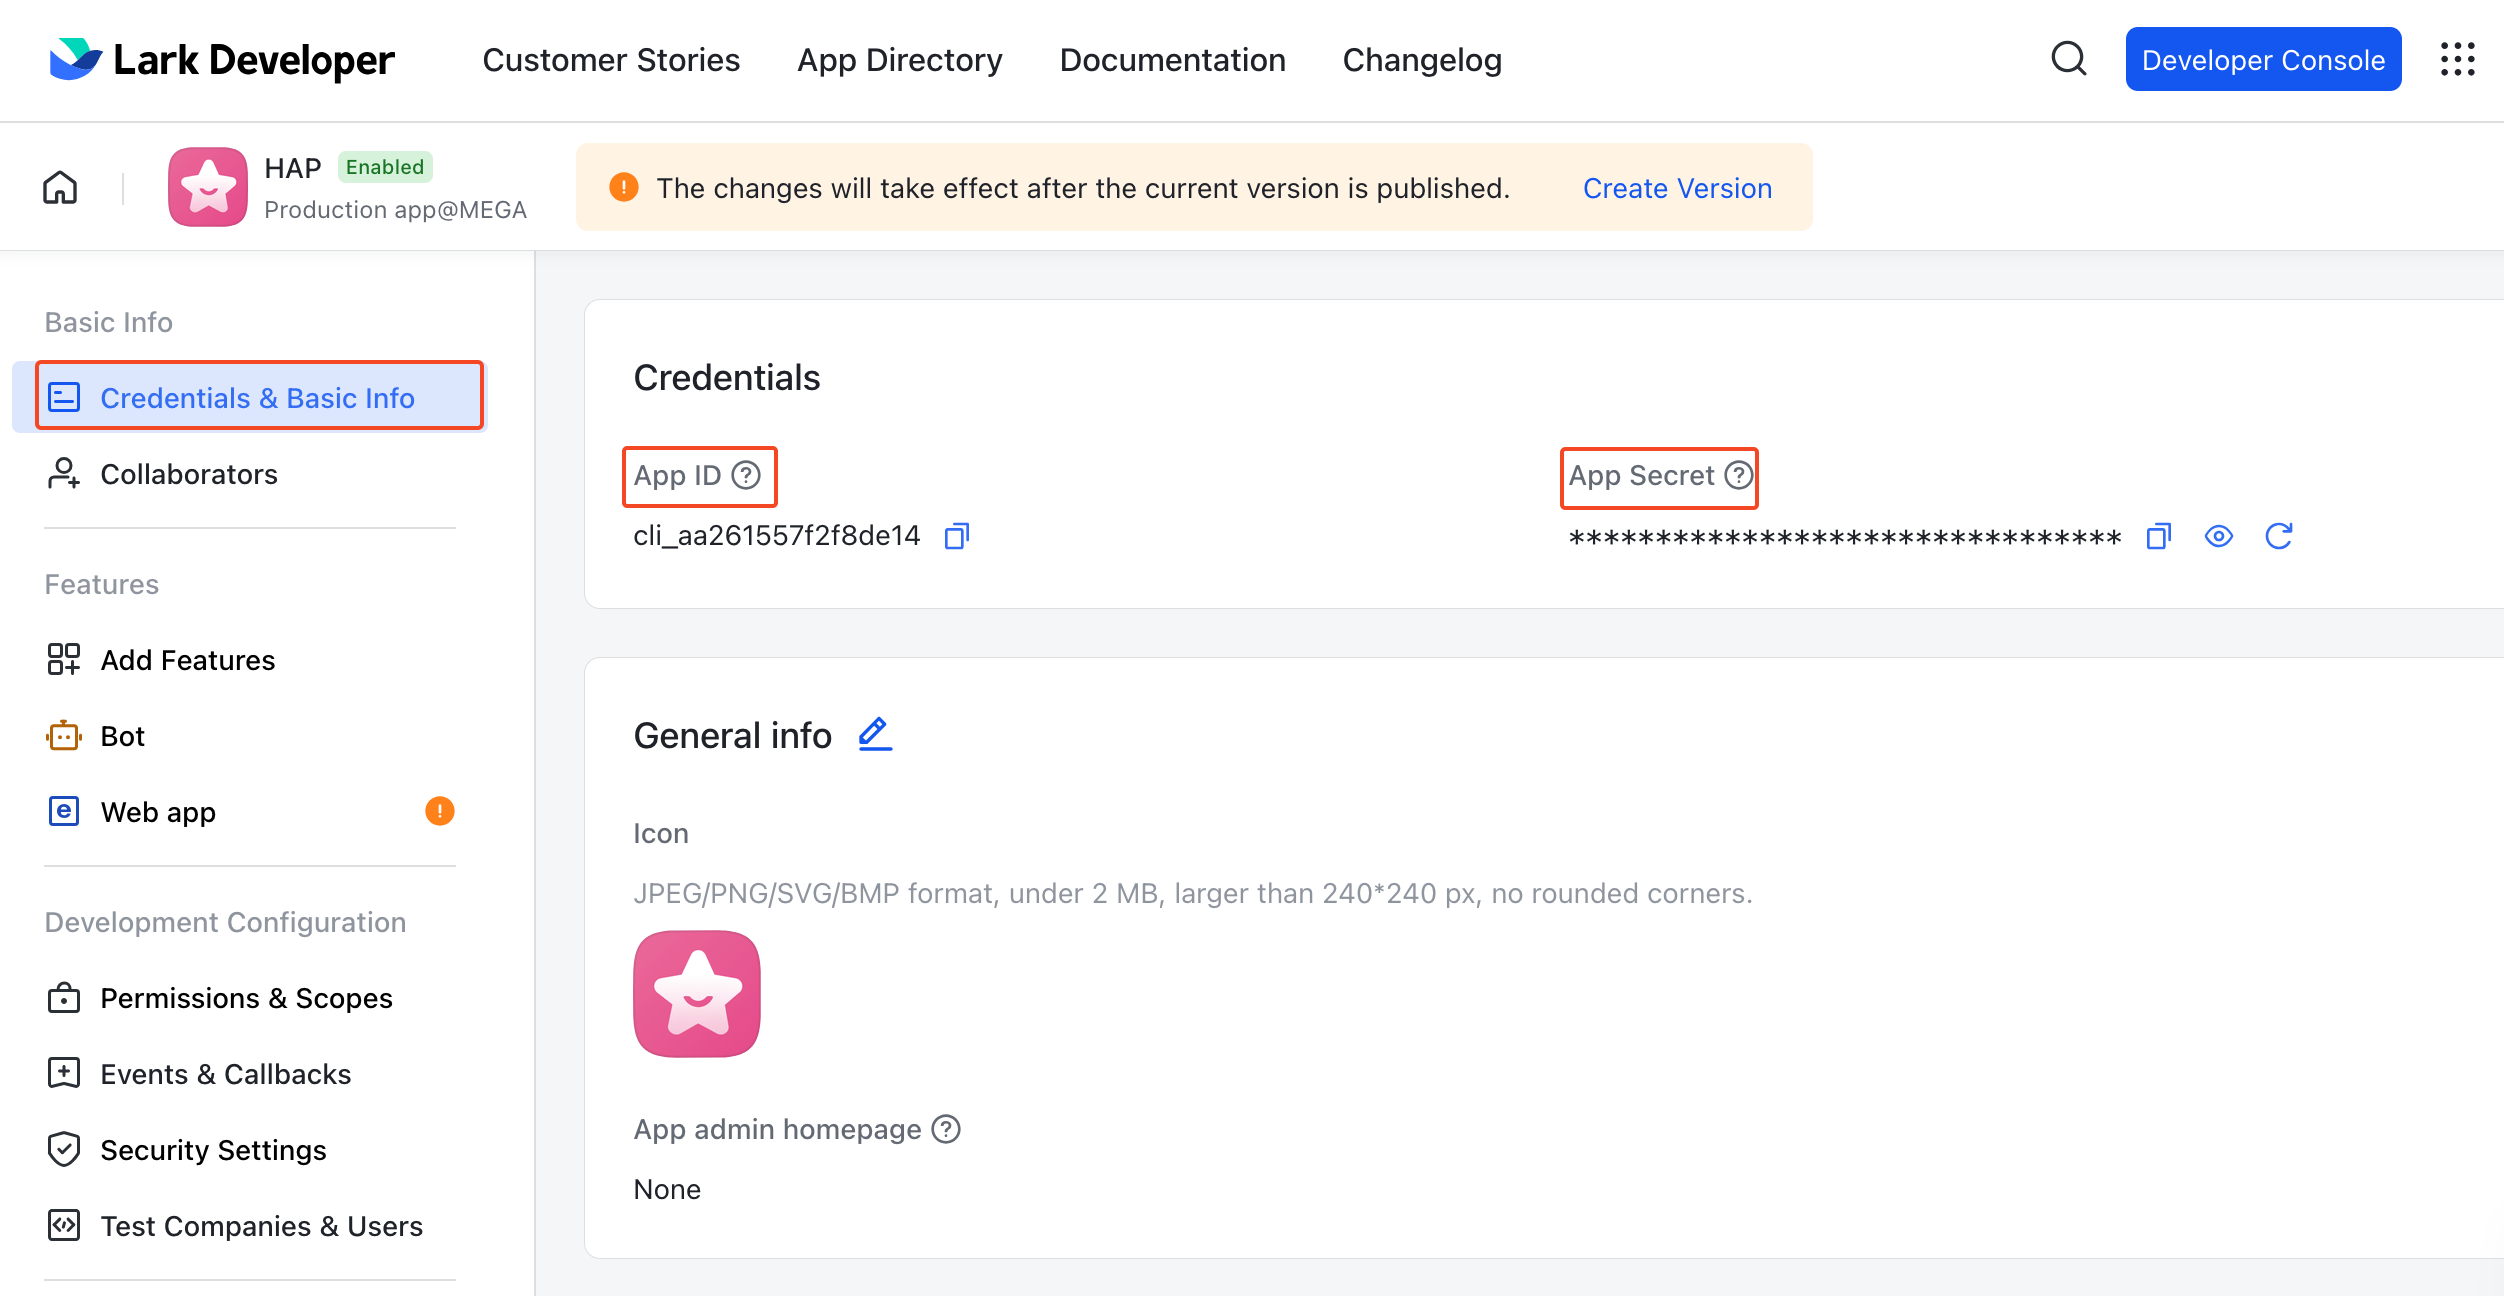
Find the App ID and App Secret
In Lark Developer, open Credentials & Basic Info to find the App ID and App Secret.
11. Sync Contacts
Before You Start
When syncing contacts from Lark to HAP, HAP first matches accounts by mobile number. If no match is found, it then attempts to match accounts by email address.
When contacts are synced from Lark, HAP checks whether an account with the same mobile number already exists in your HAP organization. If a matching account is found, HAP links it to the corresponding Lark account. If no matching account is found, HAP automatically creates a new account.
For an existing HAP account to be linked to a Lark account, both of the following conditions must be met:
- The mobile numbers associated with the two accounts must match.
- The HAP account must already be a member of the organization.
For example, suppose an employee's Lark account is associated with the mobile number 199-9999-9999. When contacts are synced to HAP:
- If an account with the same mobile number exists in your HAP organization, HAP links the two accounts.
- If no matching account exists in the organization, HAP automatically creates a new HAP account and links it to the Lark account.
- If a HAP account with the same mobile number exists but is not a member of your organization, HAP does not link that account. Instead, it creates a new HAP account.
If no match is found by mobile number, HAP then attempts to match the account by email address.
Before starting the sync, organization administrators should complete the following checks:
-
Confirm which Lark users should use HAP. Configure the user scope as described in Step 9.
-
Verify the mobile numbers of existing HAP users. For employees who already have HAP accounts and are members of your organization, make sure the mobile number associated with each HAP account matches the one associated with the corresponding Lark account. If they do not match, the employee should bind or update their mobile number in HAP before the sync.
-
Be aware that HAP accounts are created automatically for new users. If an employee does not already have a HAP account, HAP automatically creates one during the sync and associates it with a randomly generated email address.
Sync Users and Departments
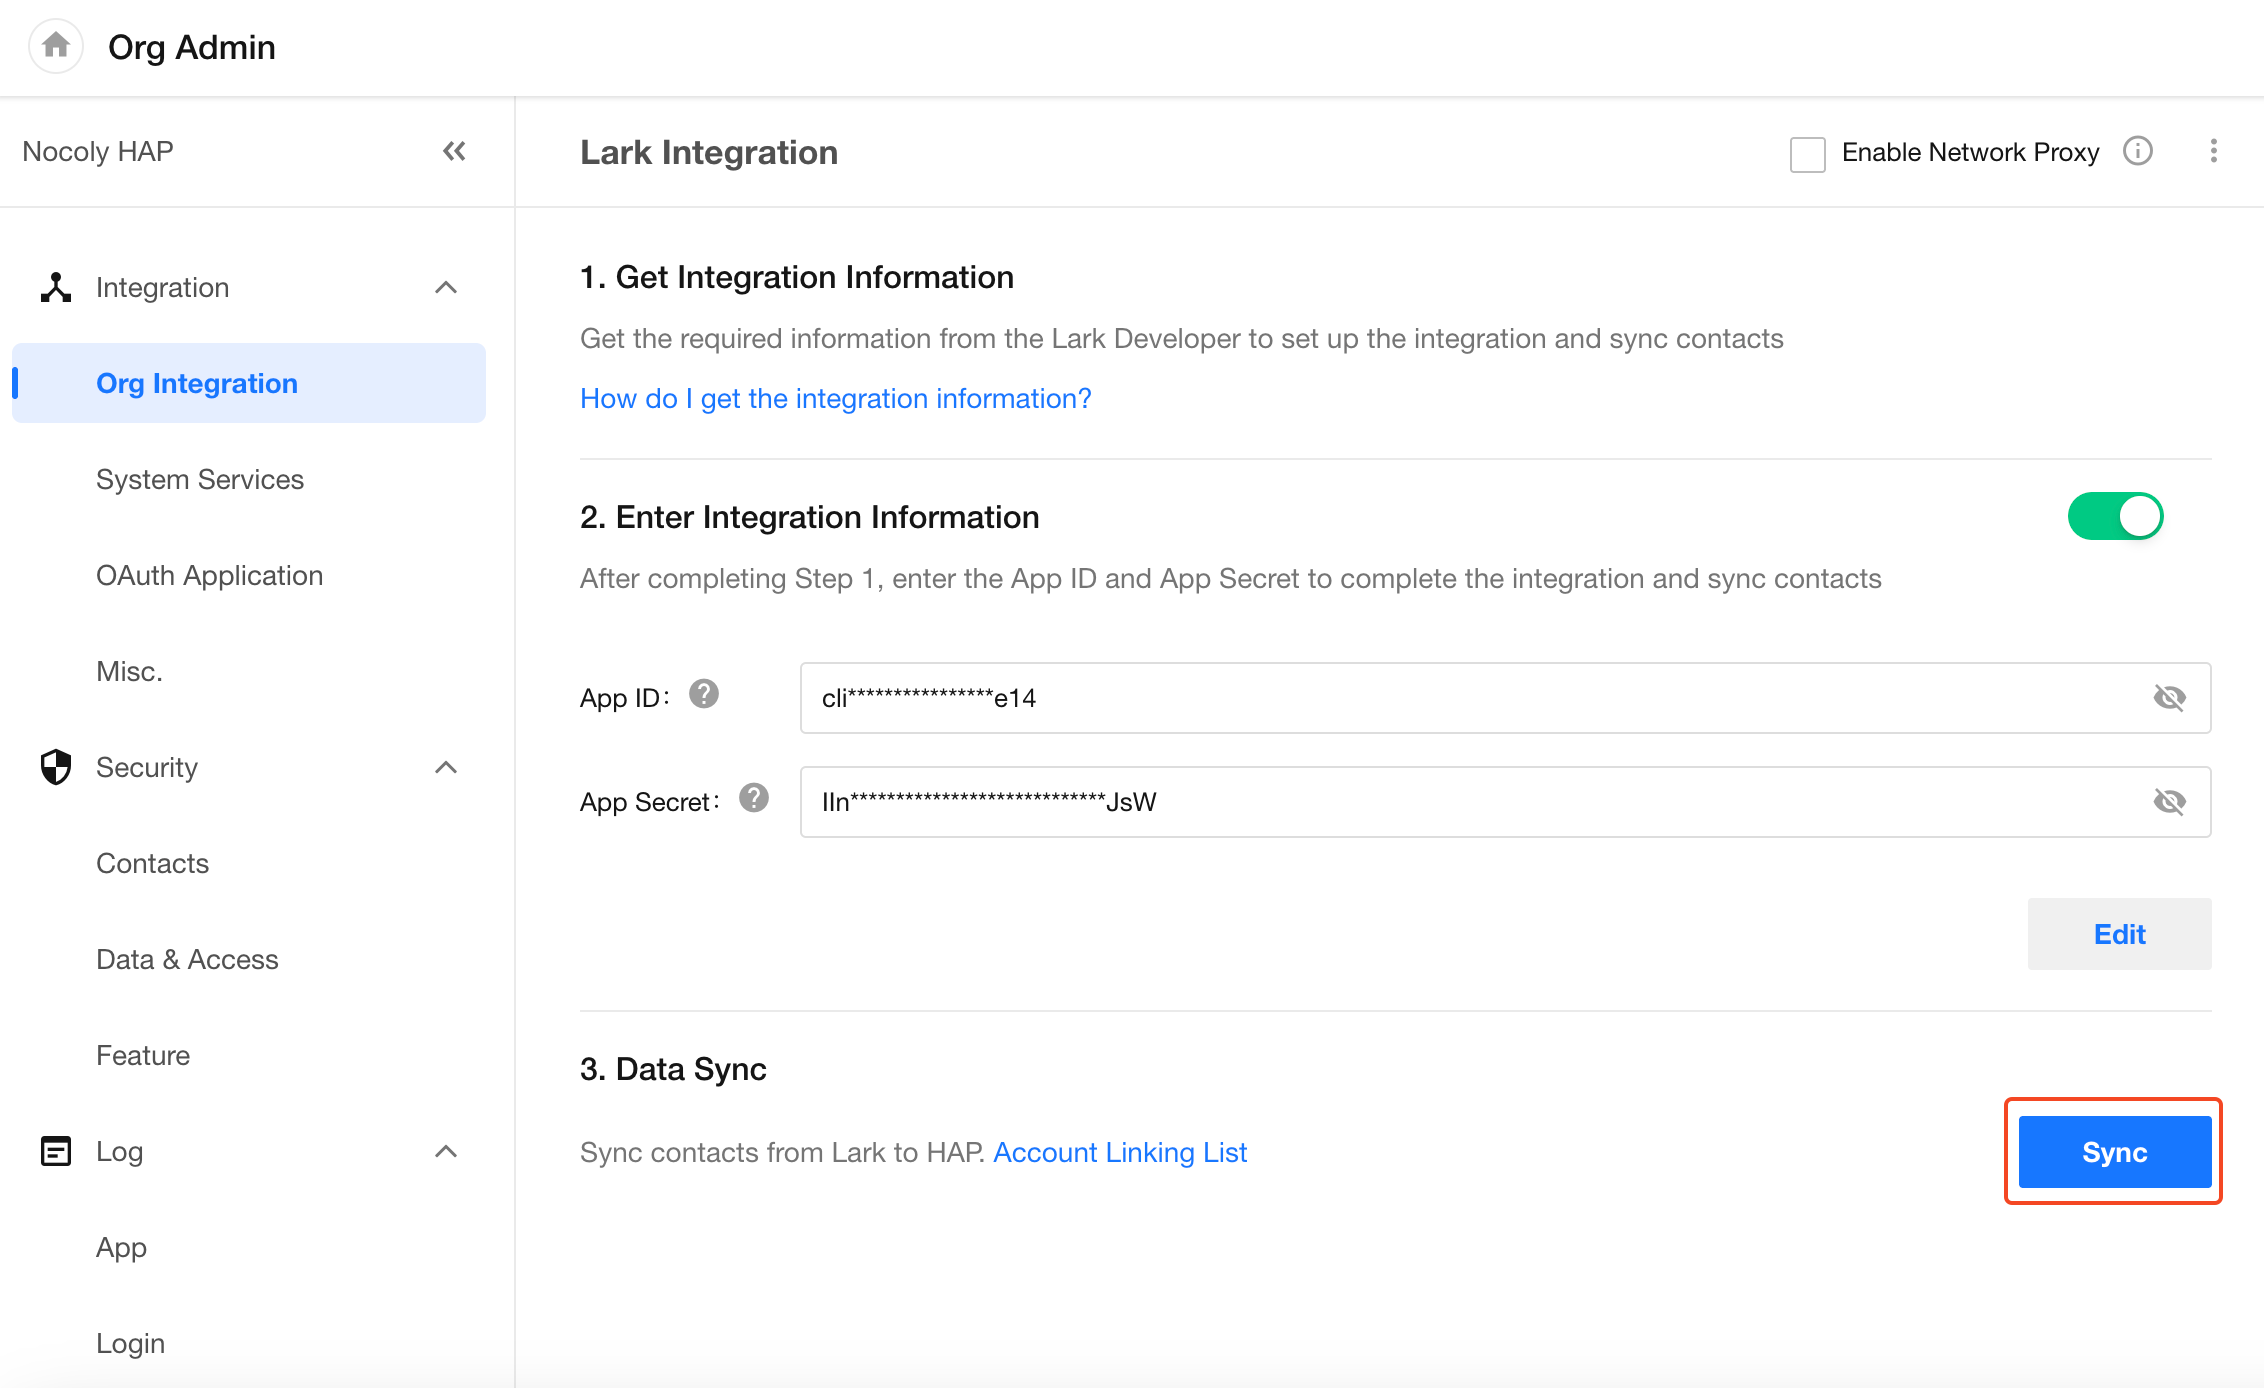
A Super Admin can go to Org Admin > Integration > Org Integration and click Sync.
Exclude Users from Sync
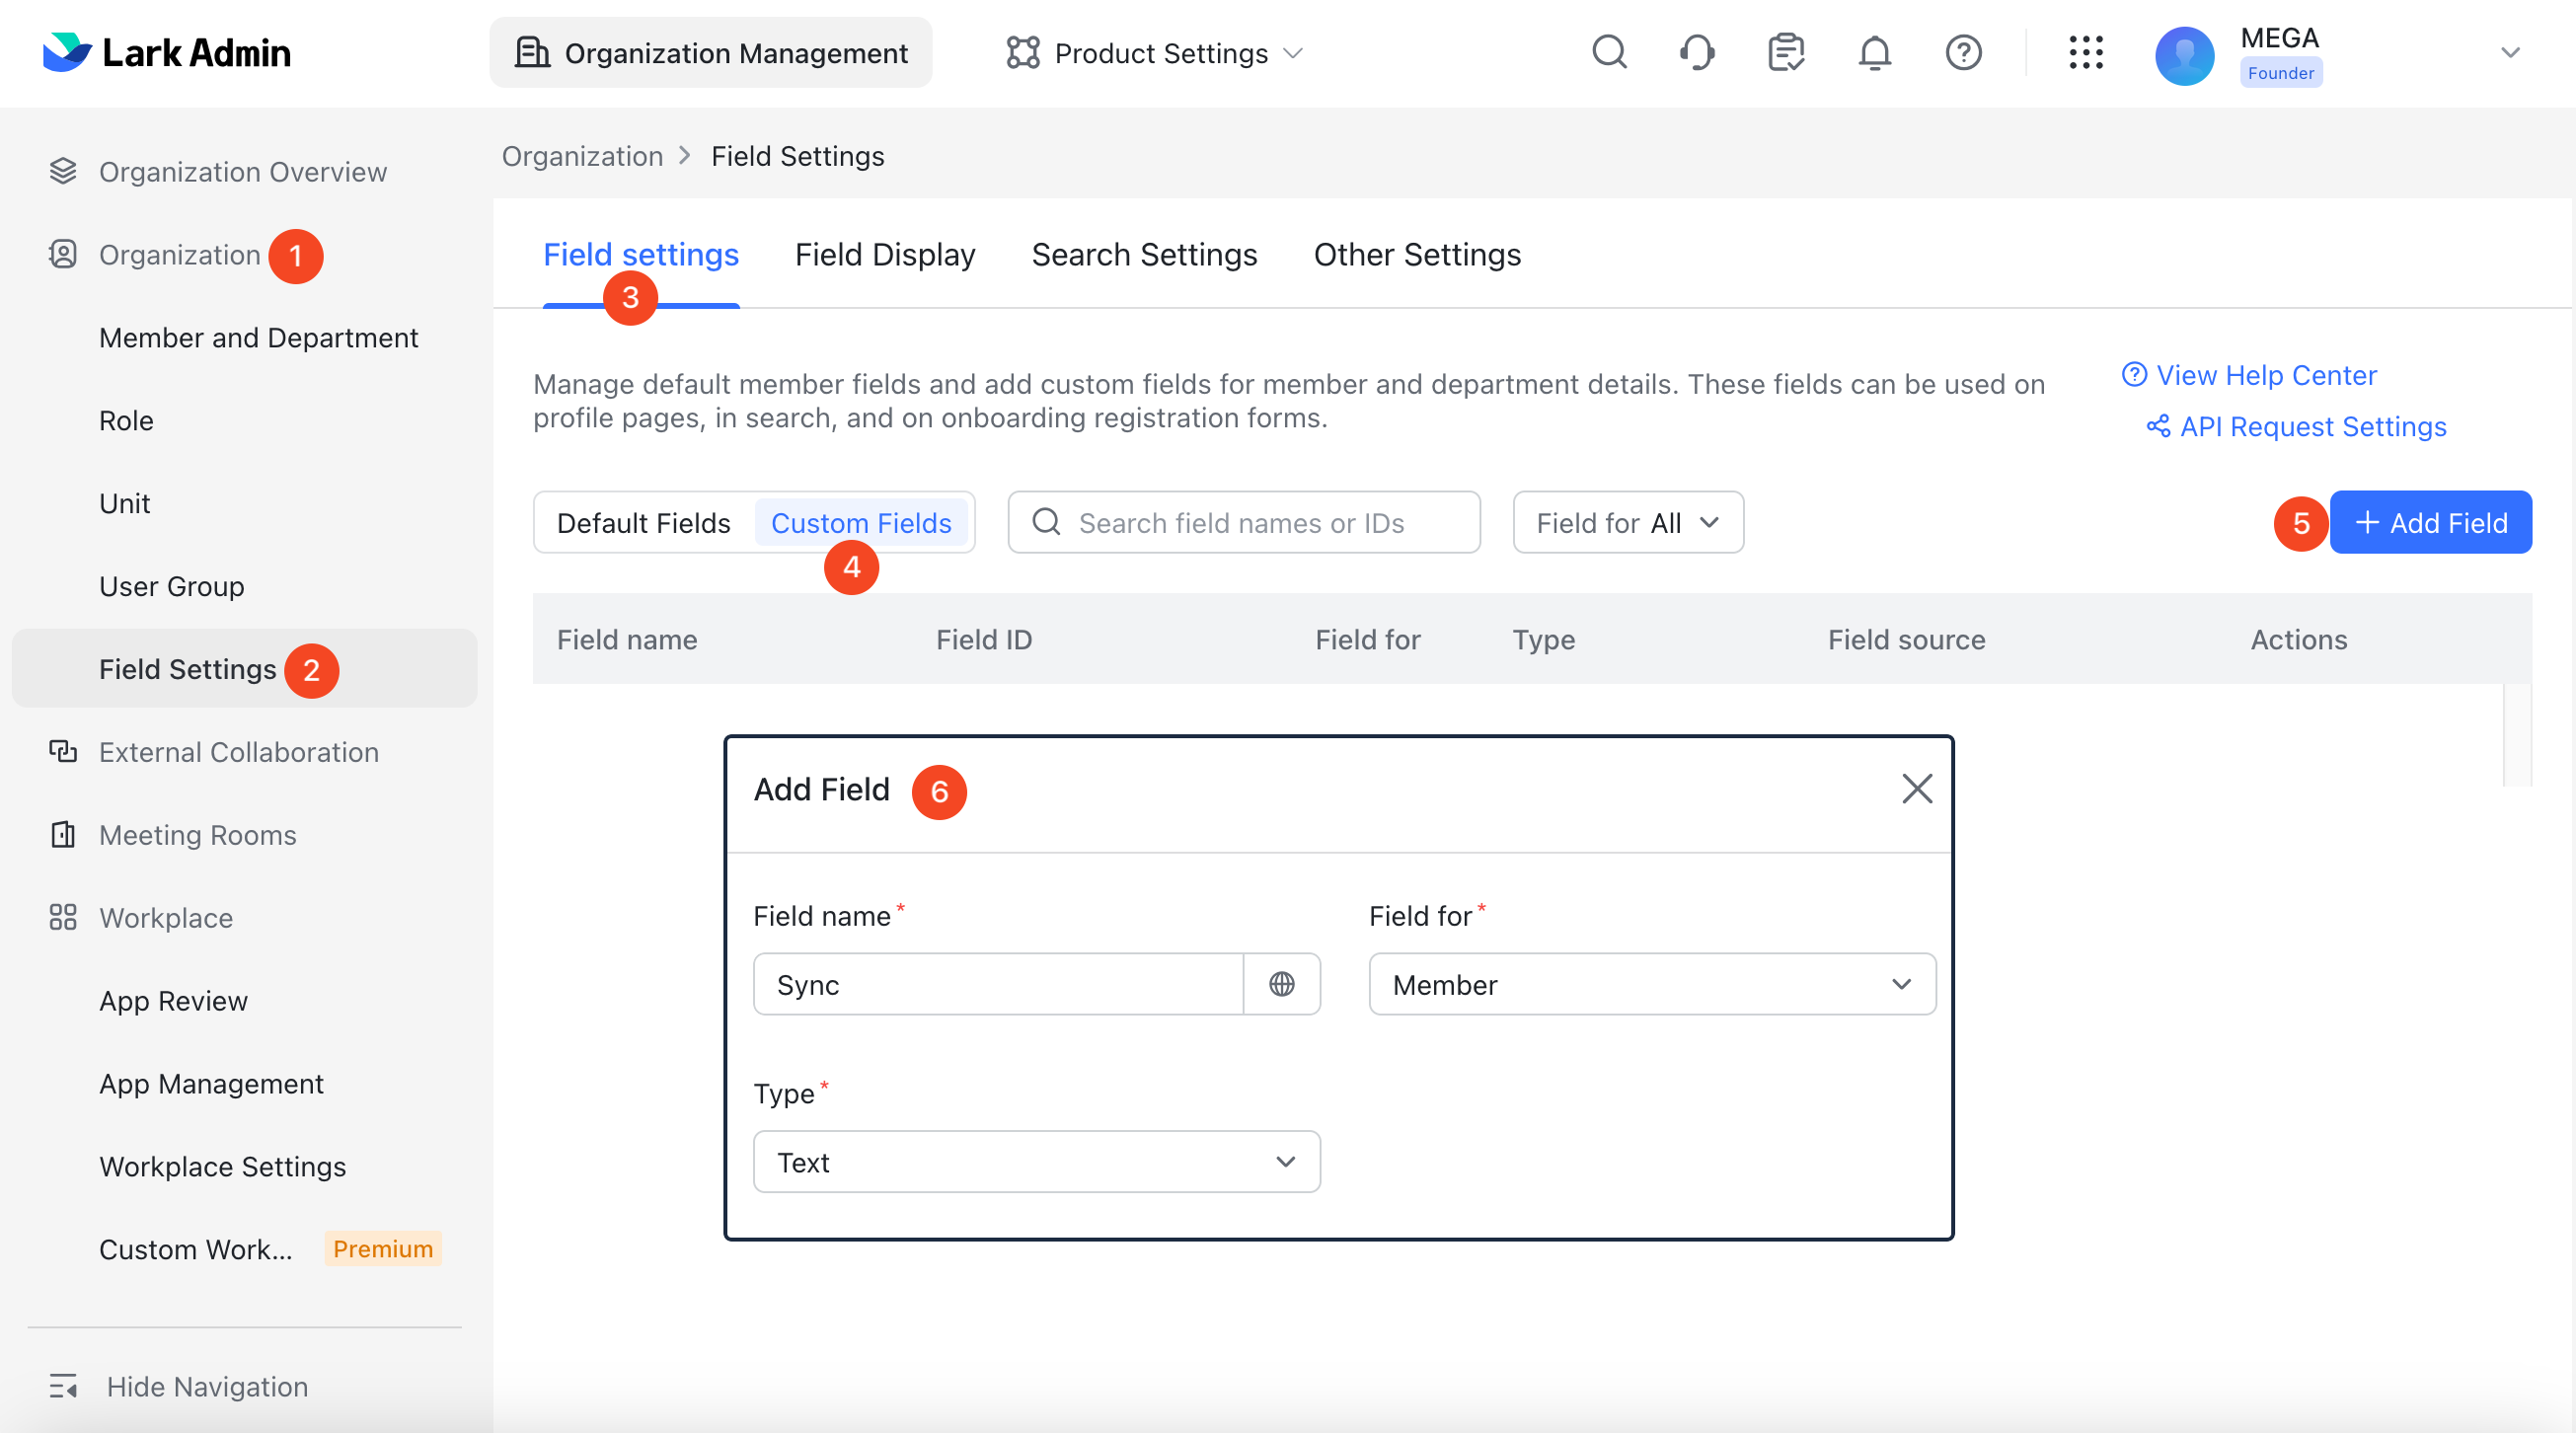
If you want to sync the complete department structure while excluding certain users, such as interns or part-time employees, add a custom text field named Sync in Lark and set it to Do Not Sync for those users.
HAP recognizes this value and excludes the corresponding users from the sync.
-
Add a custom field
In Lark Admin, under Organization Management, go to Organization > Field Settings. Select Custom Fields, then click Add Field.
Configure the field as follows:
- Field name: Sync
- Field for: Member
- Type: Text
-
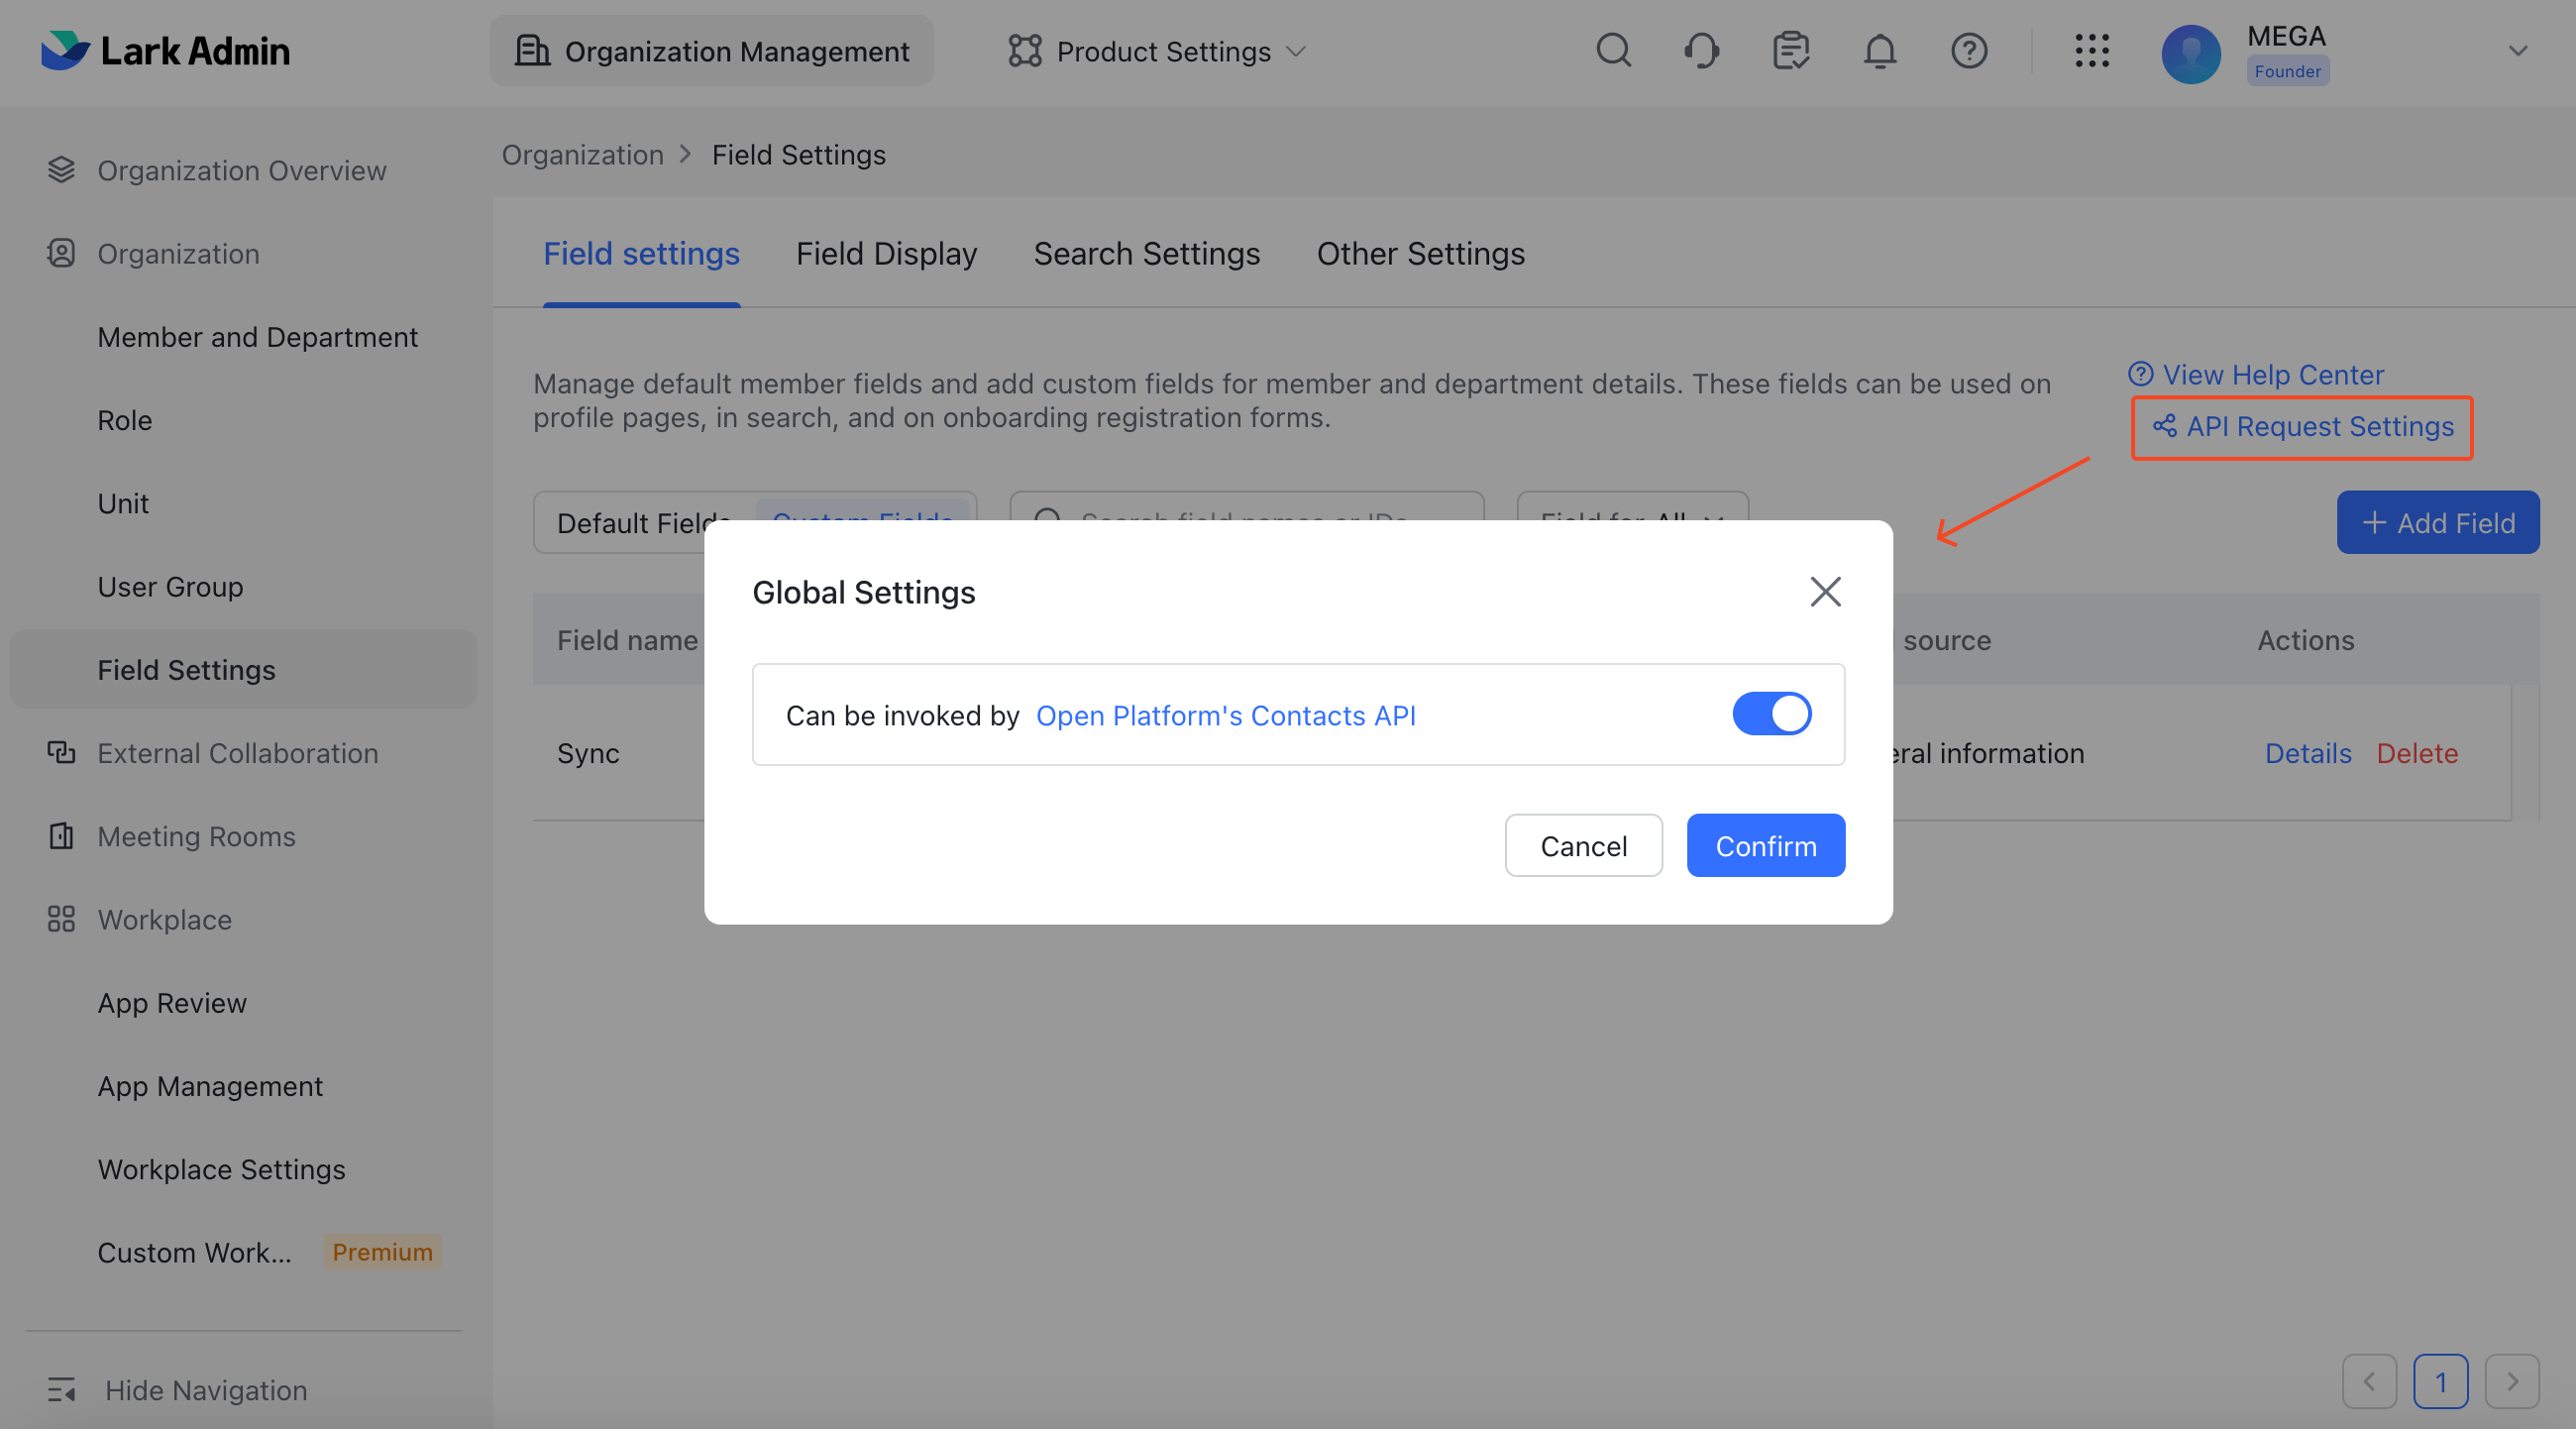
Allow the Contacts API to access the field
Open API Request Settings, enable Can be invoked by Open Platform's Contacts API, and click Confirm.
-
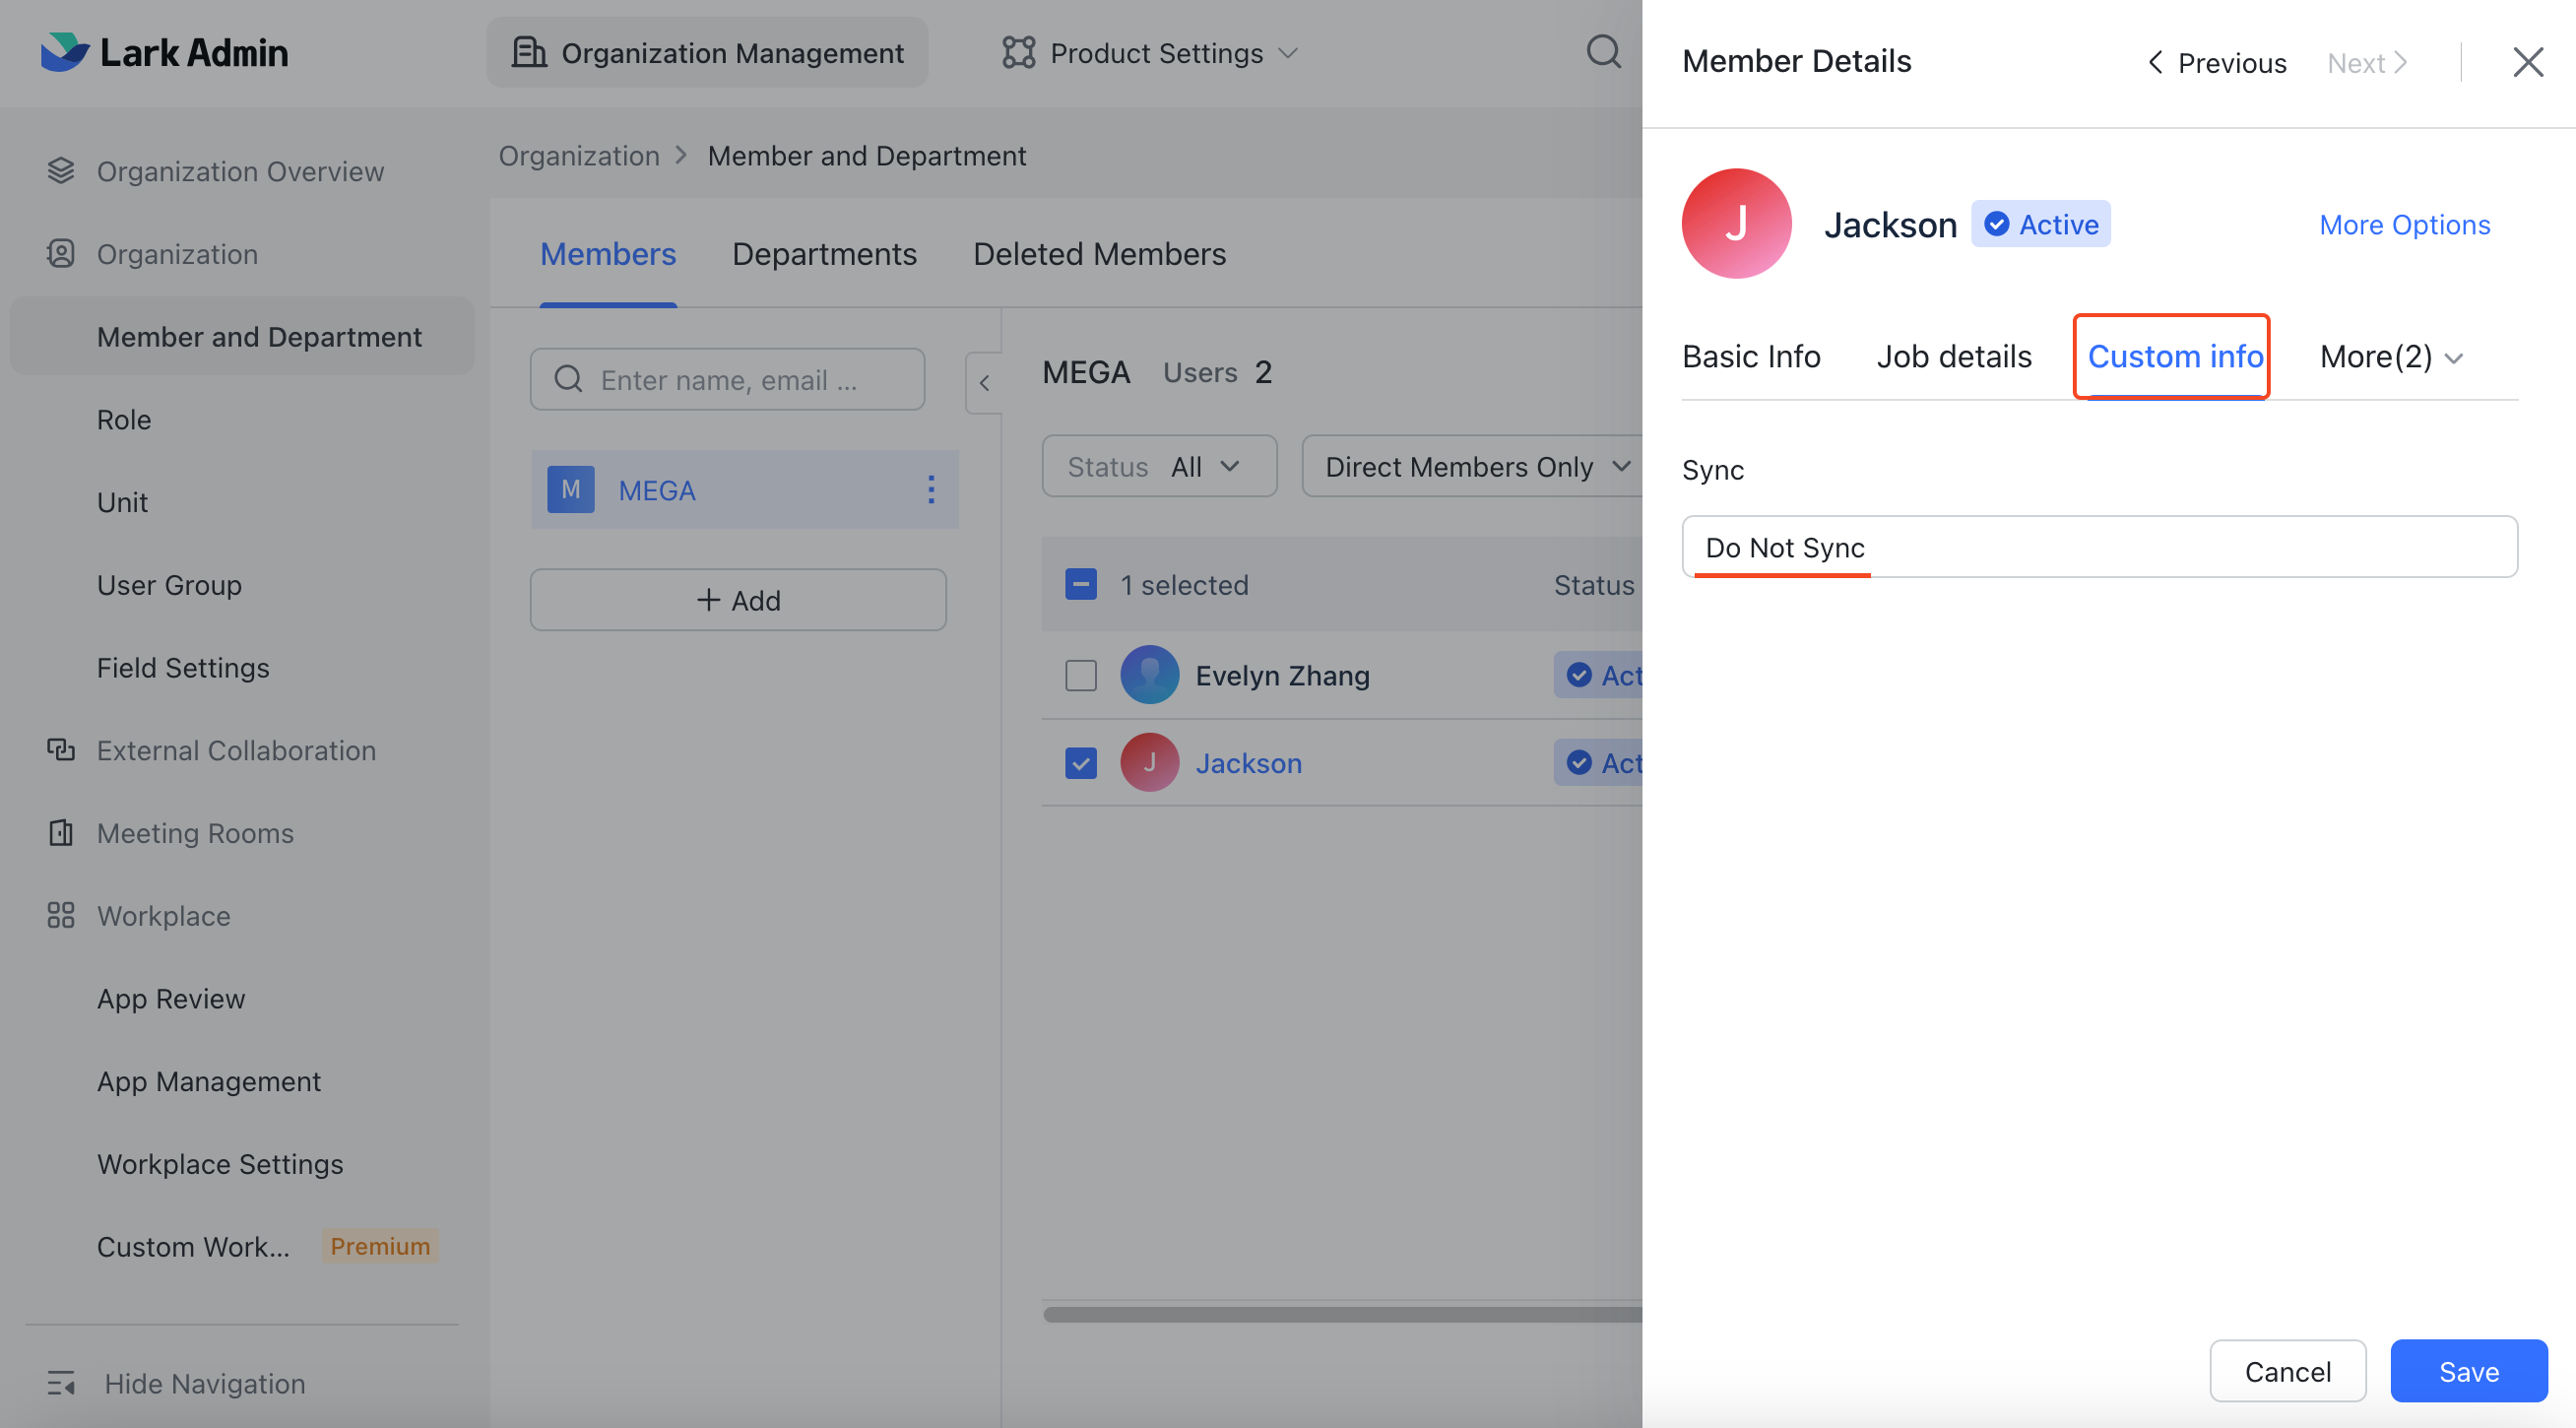
Mark users to exclude from the sync
Set the Sync field to Do Not Sync for each user you want to exclude.
12. Verify the Integration
After completing the integration, open Lark and verify that HAP can be opened directly from the Lark client.
Configure How HAP Messages Open
After the integration is complete, users can receive HAP app notifications in Lark.
HAP messages can be opened in either of the following ways:
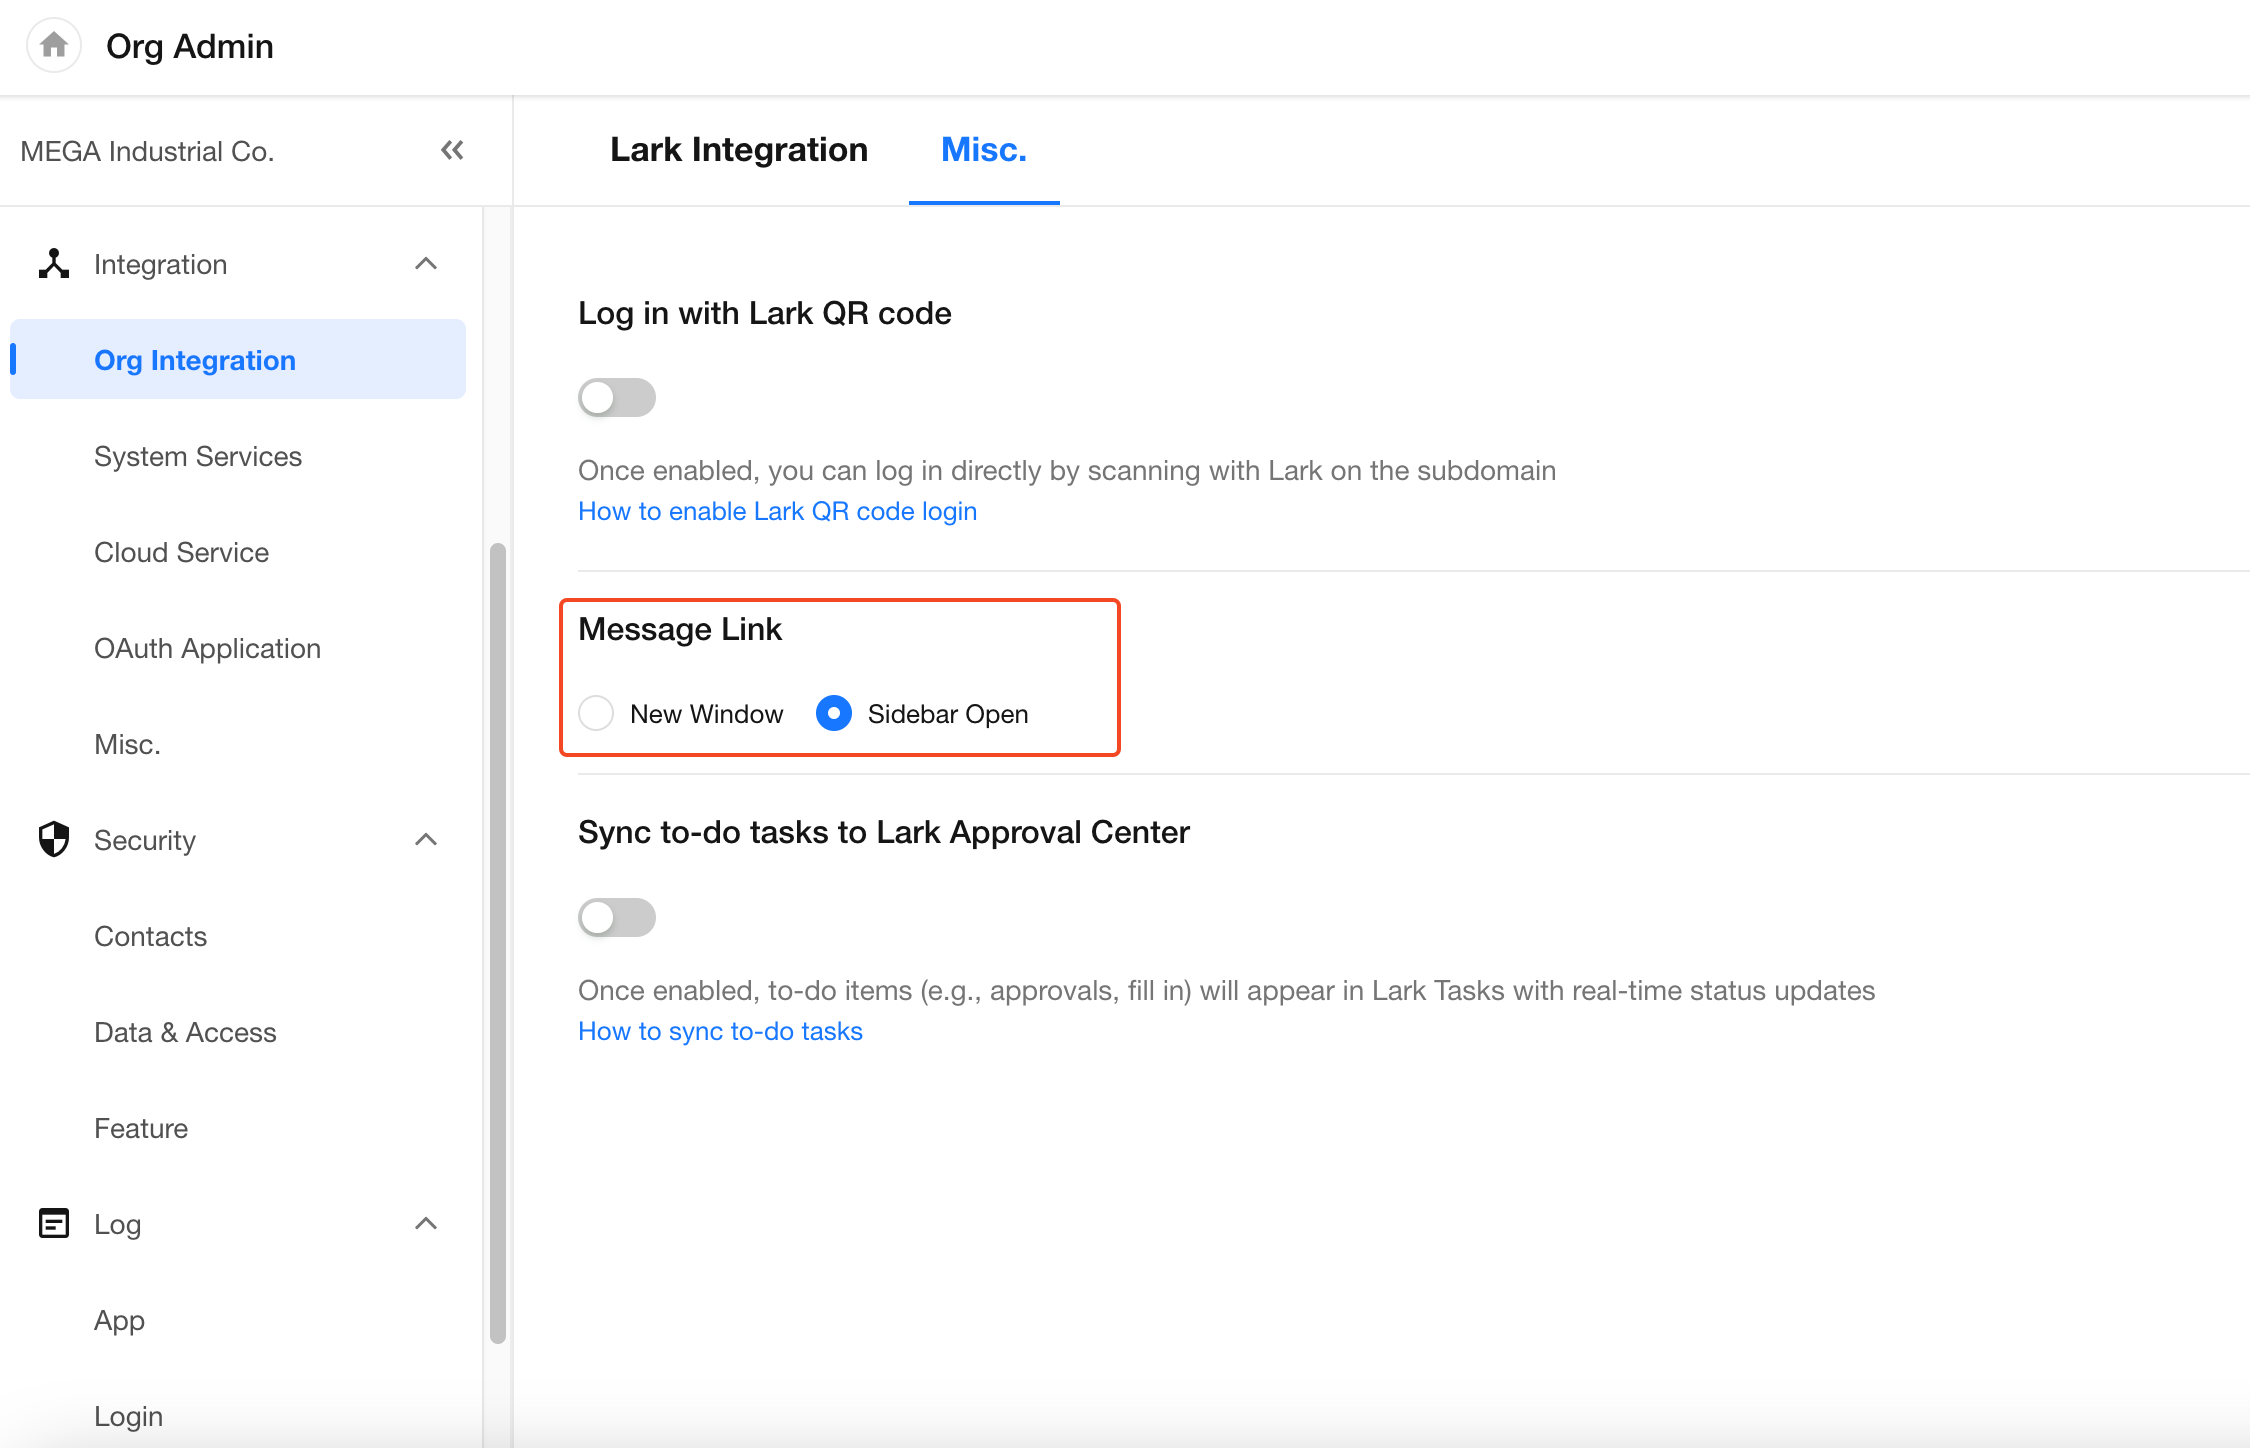
- New Window: Opens the message in a browser.
- Sidebar Open: Opens the message in the right sidebar of Lark.
In HAP, go to Org Admin > Integration > Org Integration > Misc. and select how HAP messages should open.
Other Sign-In Options
Sign In to HAP with Lark
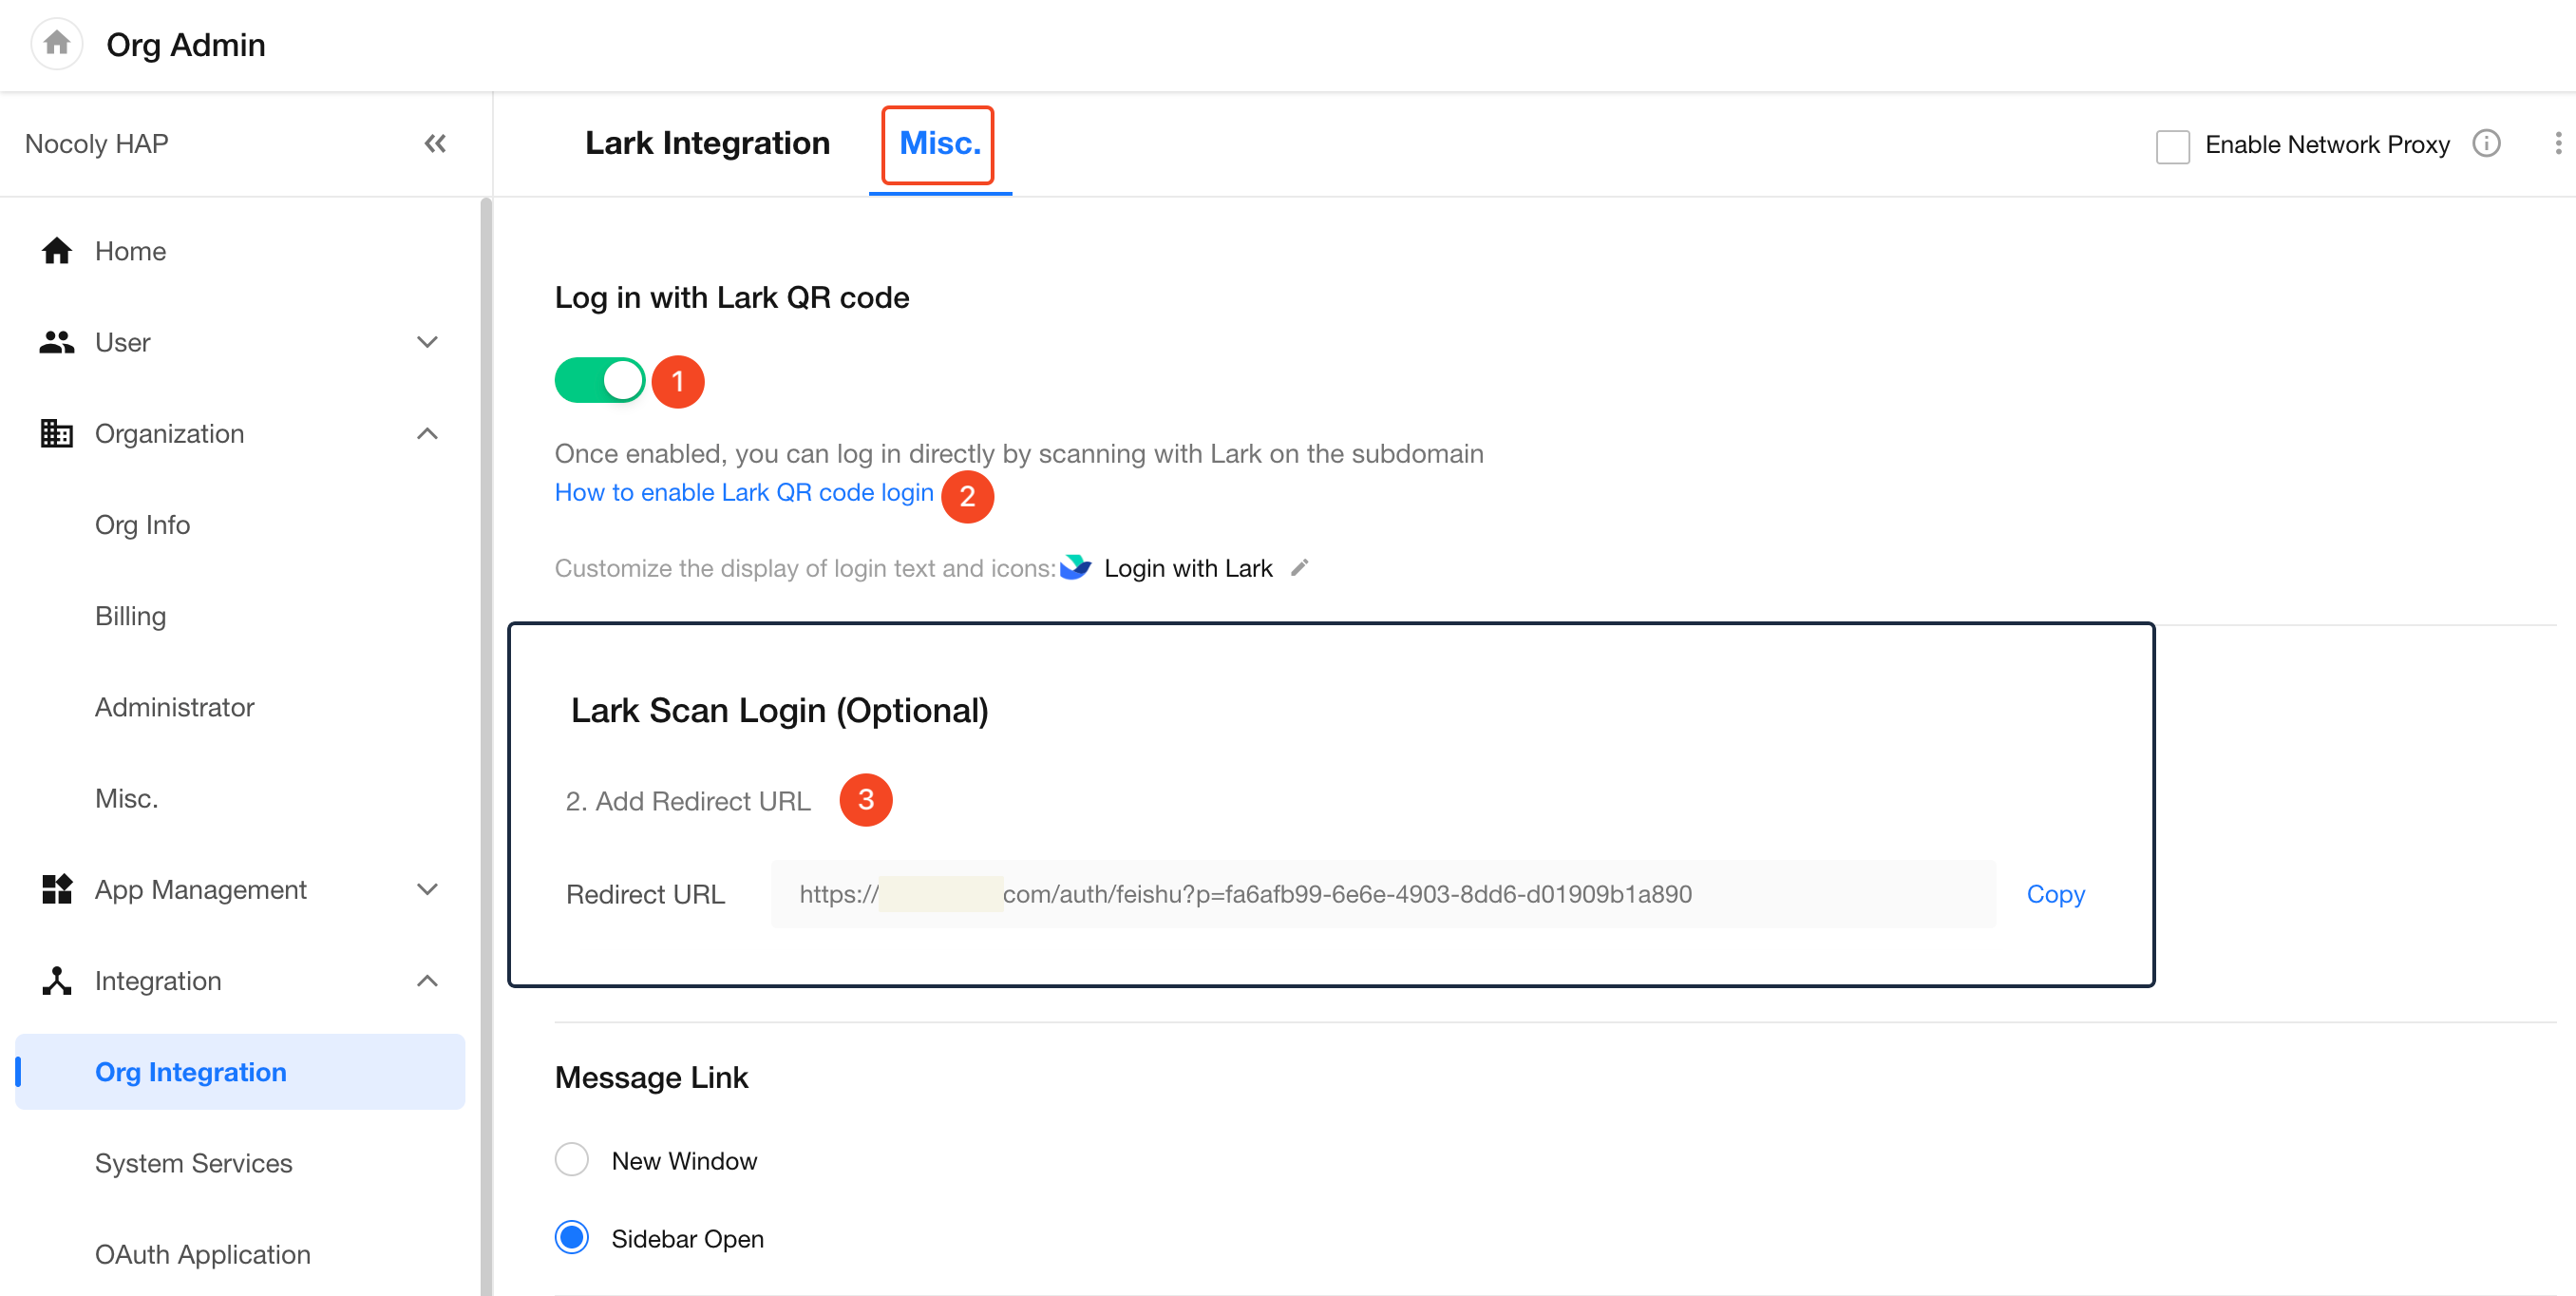
Follow these steps to enable Lark sign-in:
-
Enable Sign in with Lark.
-
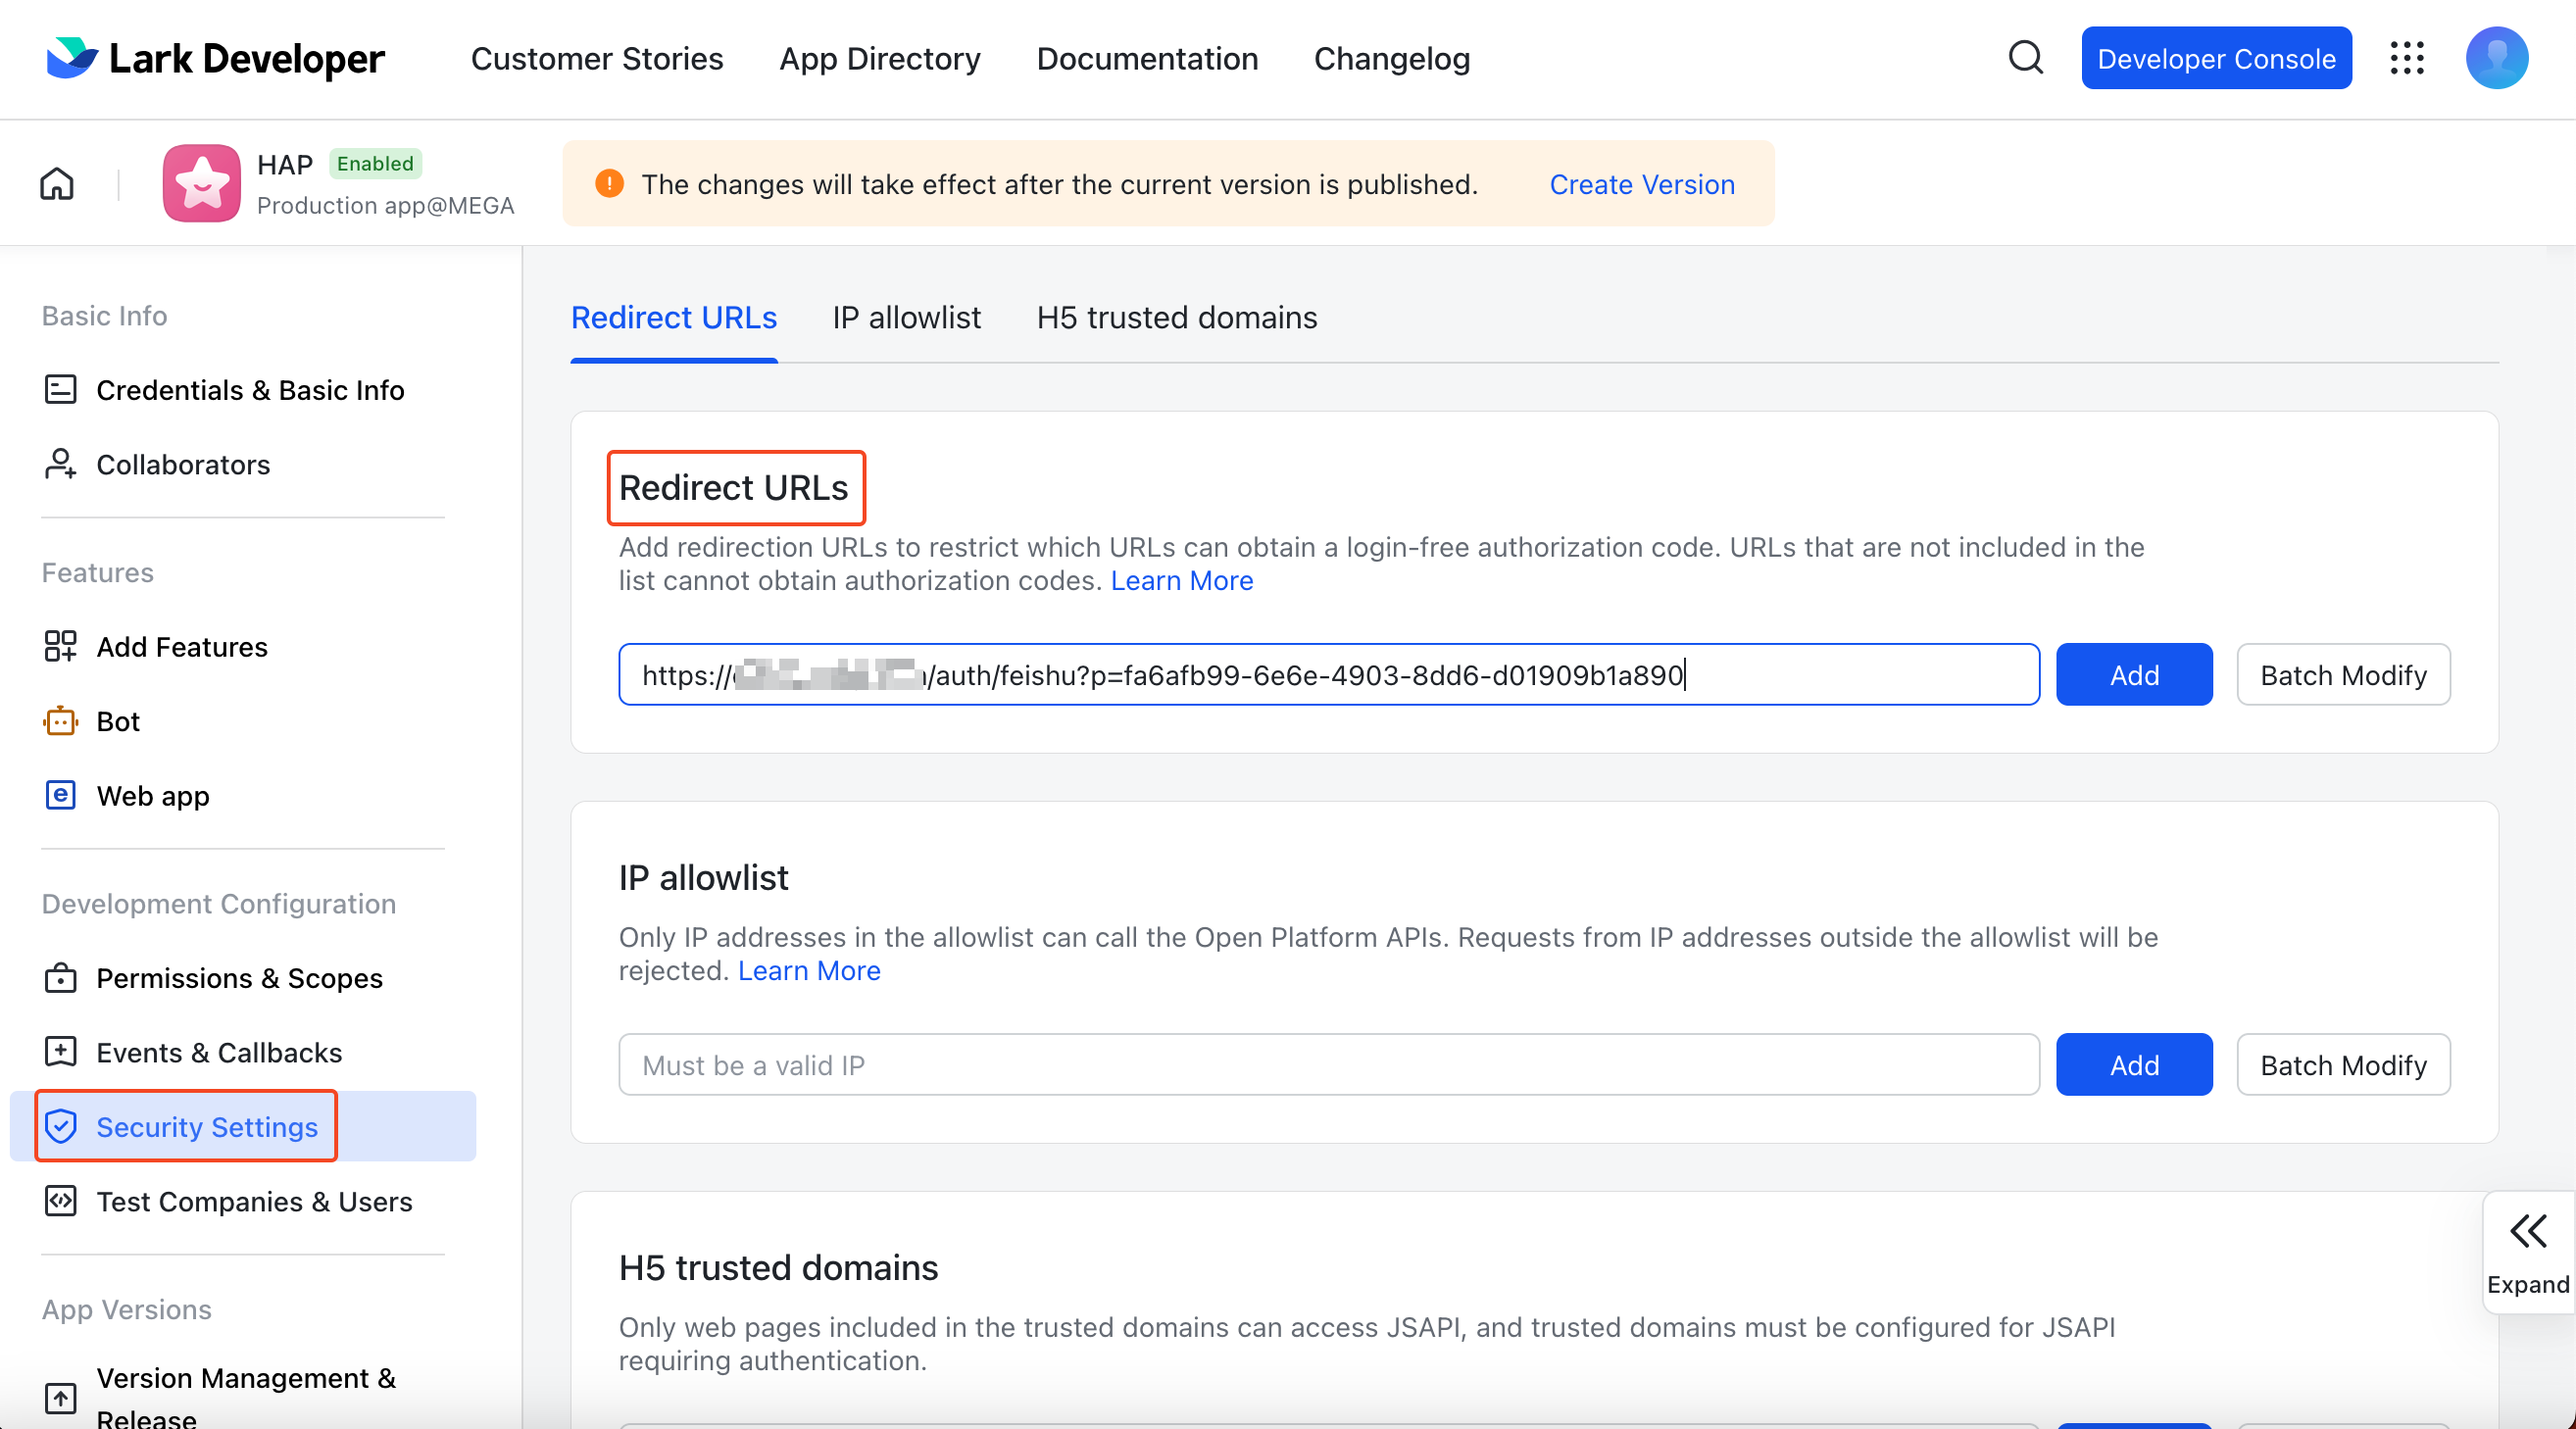
Add the redirect URL in Lark.
In Lark Developer, go to Security Settings and add the URL provided by HAP to Redirect URL.
-
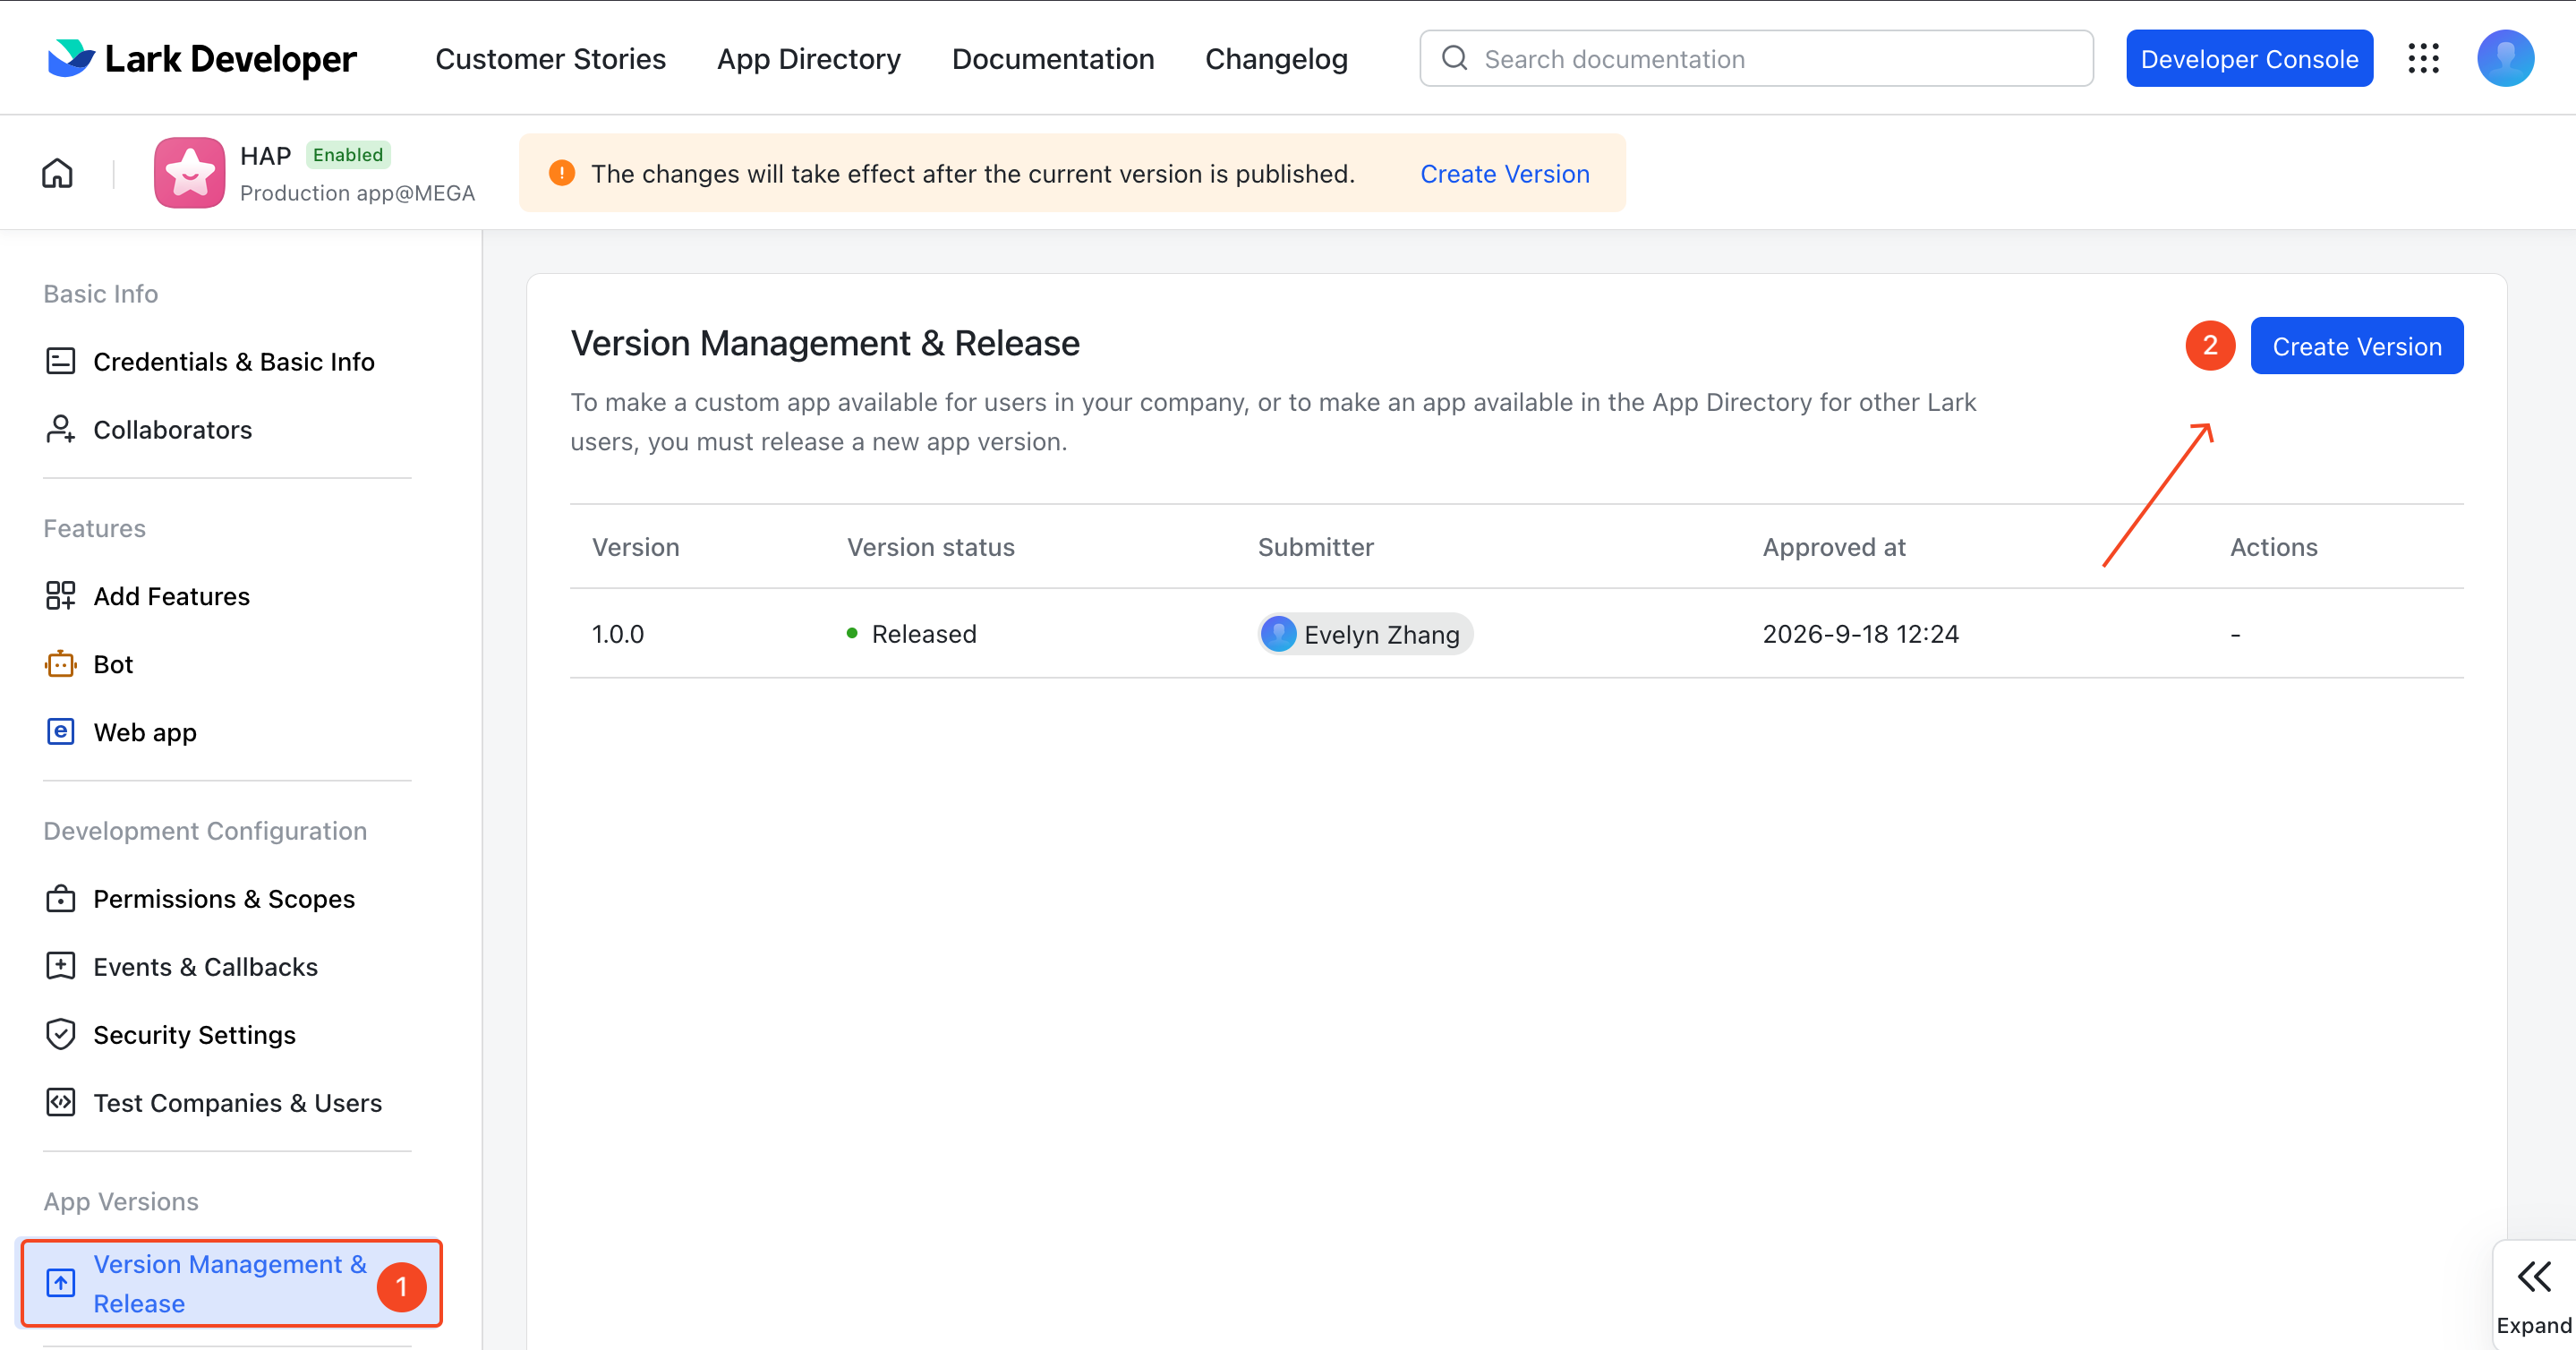
Publish a new version.
Changes to the Lark app take effect only after a new version is published.
-
Access the organization-specific sign-in page.
After completing the configuration, users can sign in to HAP with Lark from the organization-specific sign-in page.

The organization-specific sign-in URL uses the following format:
{primary-domain}/network?projectid={organization-id}For example, if the Nocoly SaaS domain is
https://www.nocoly.comand the Organization ID isfa6afb99-6e6e-4903-8dd6-d01909b1a890, the sign-in URL is:https://www.nocoly.com/network?projectid=fa6afb99-6e6e-4903-8dd6-d01909b1a890
Sign In with a Mobile Number and Password
In addition to accessing HAP directly from Lark, users can sign in to HAP with a mobile number and password.
Before using this sign-in method, users need to:
- Bind a mobile number to their HAP account.
- Set a password.
Set Up Mobile Number and Password Sign-In
-
Open HAP from Lark.
-
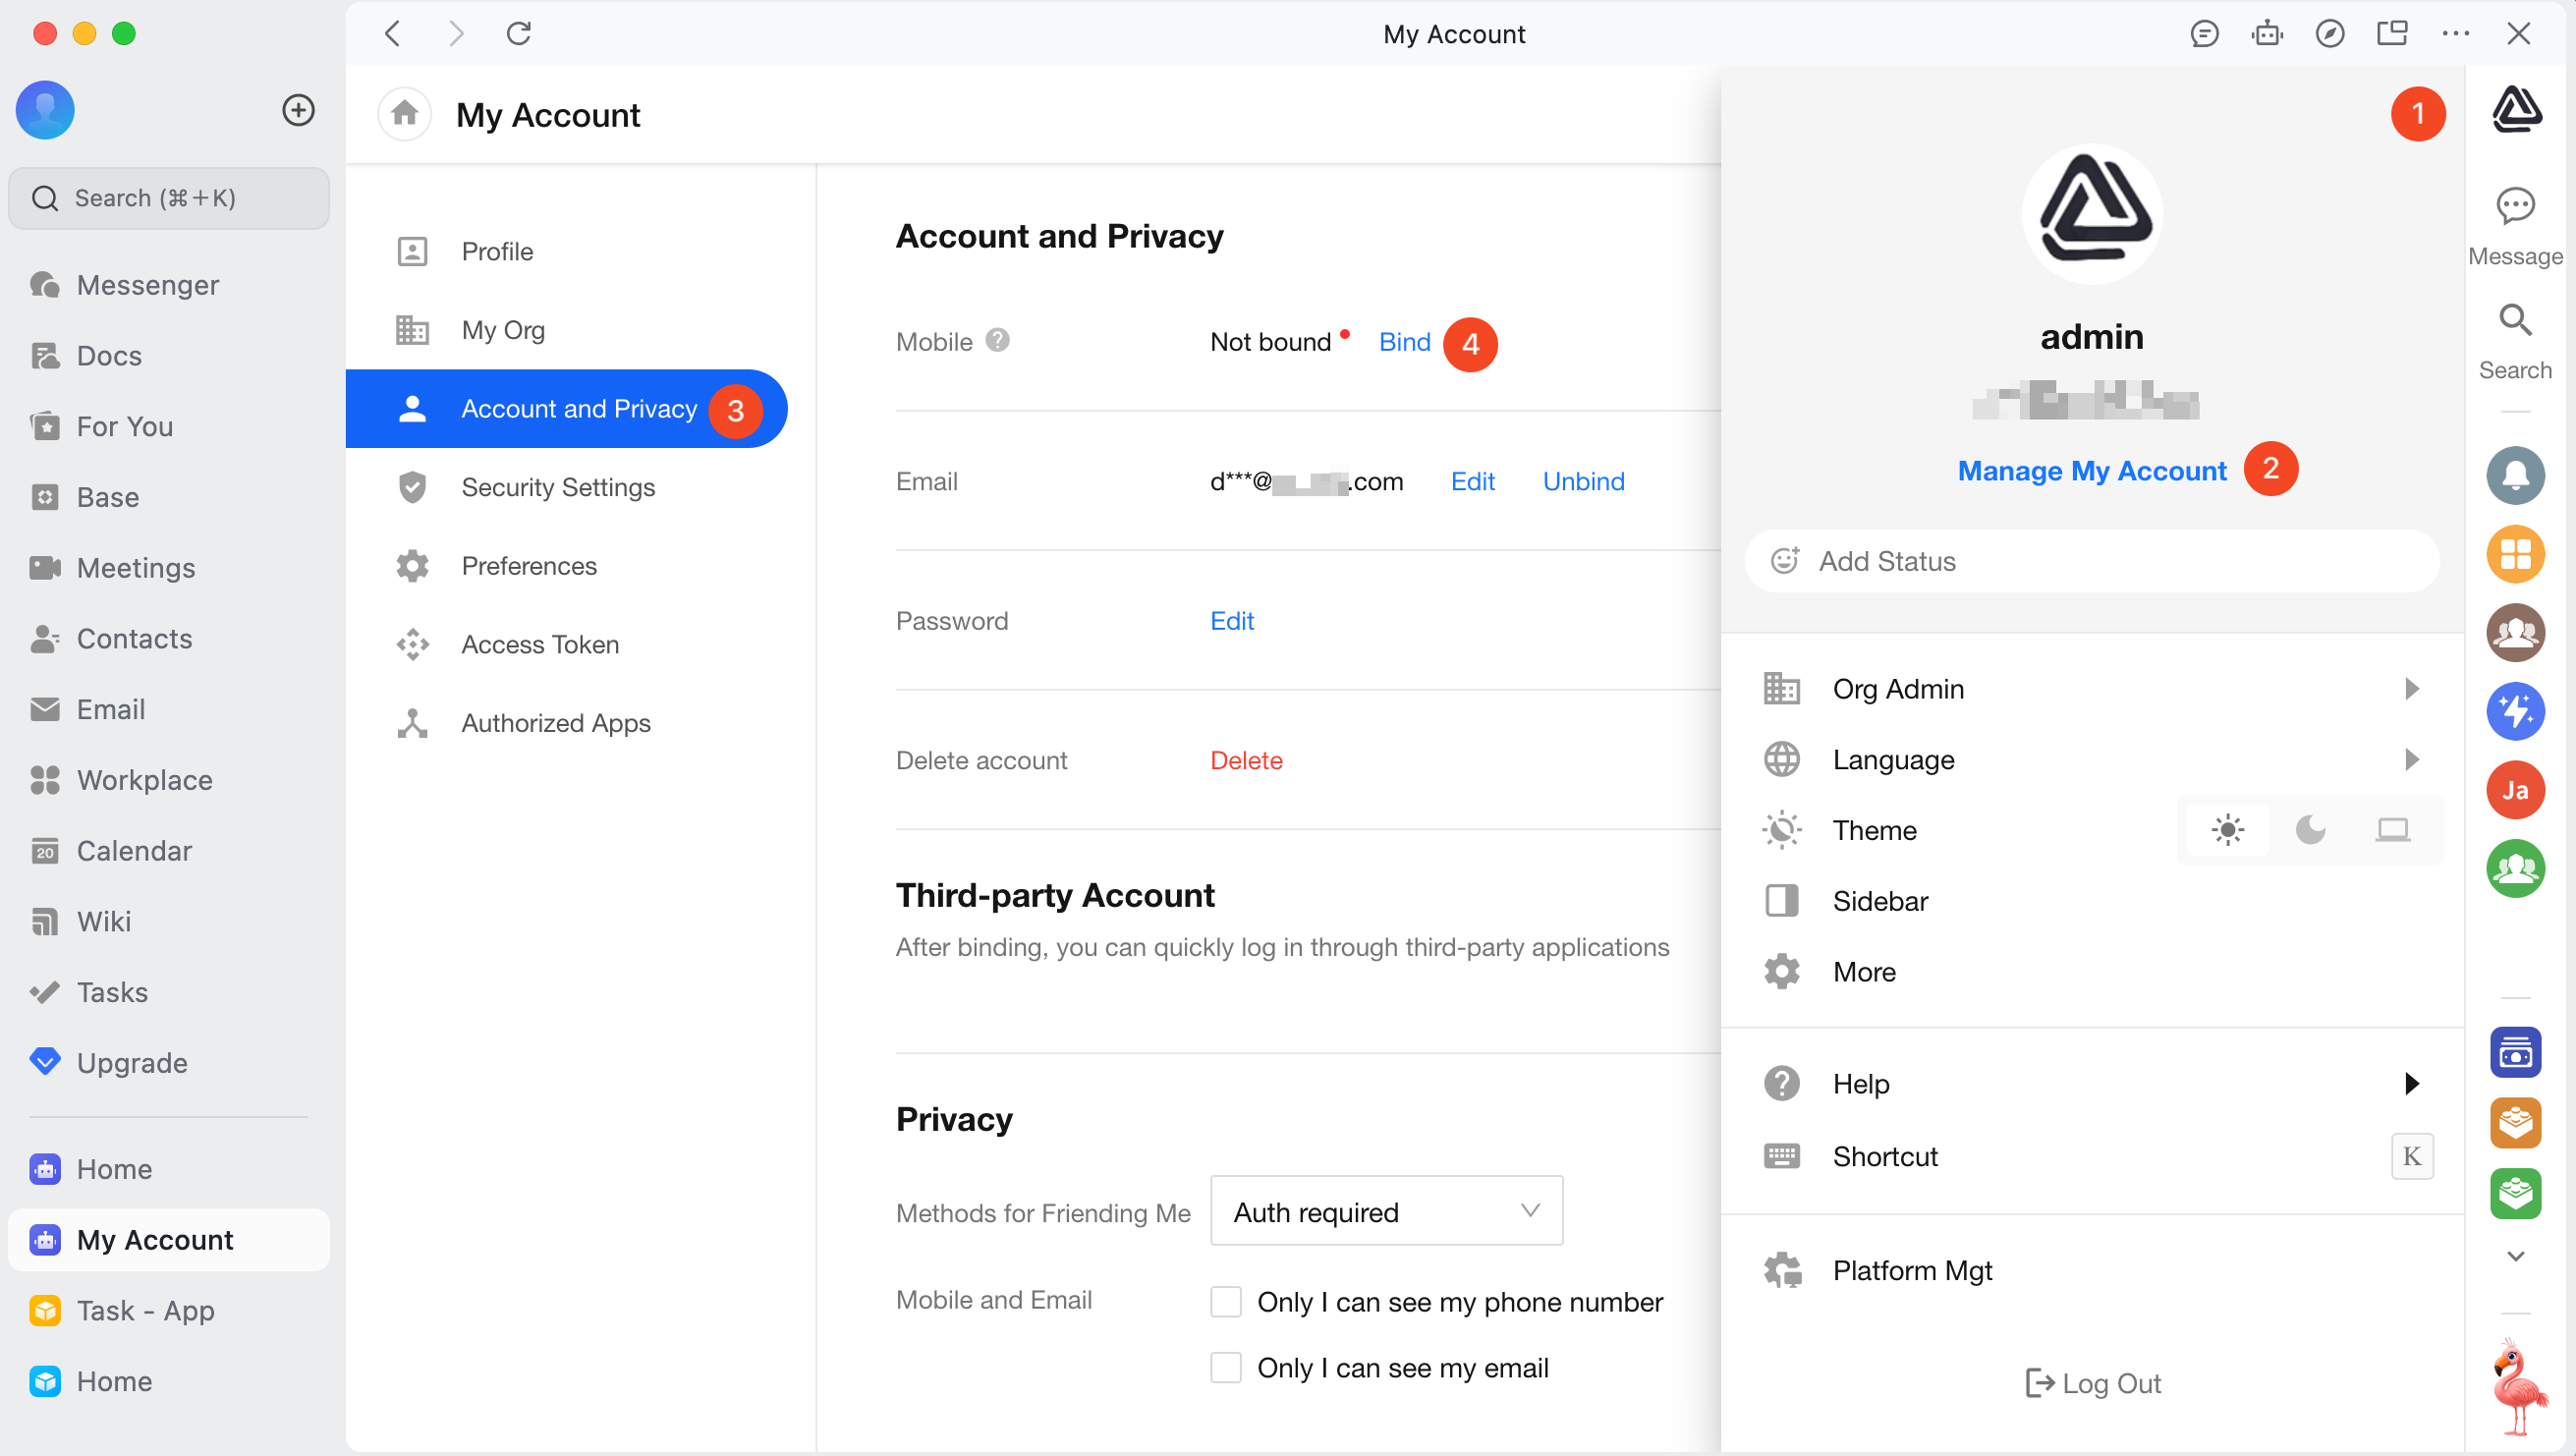
Click your HAP profile picture and open the account binding page.
-
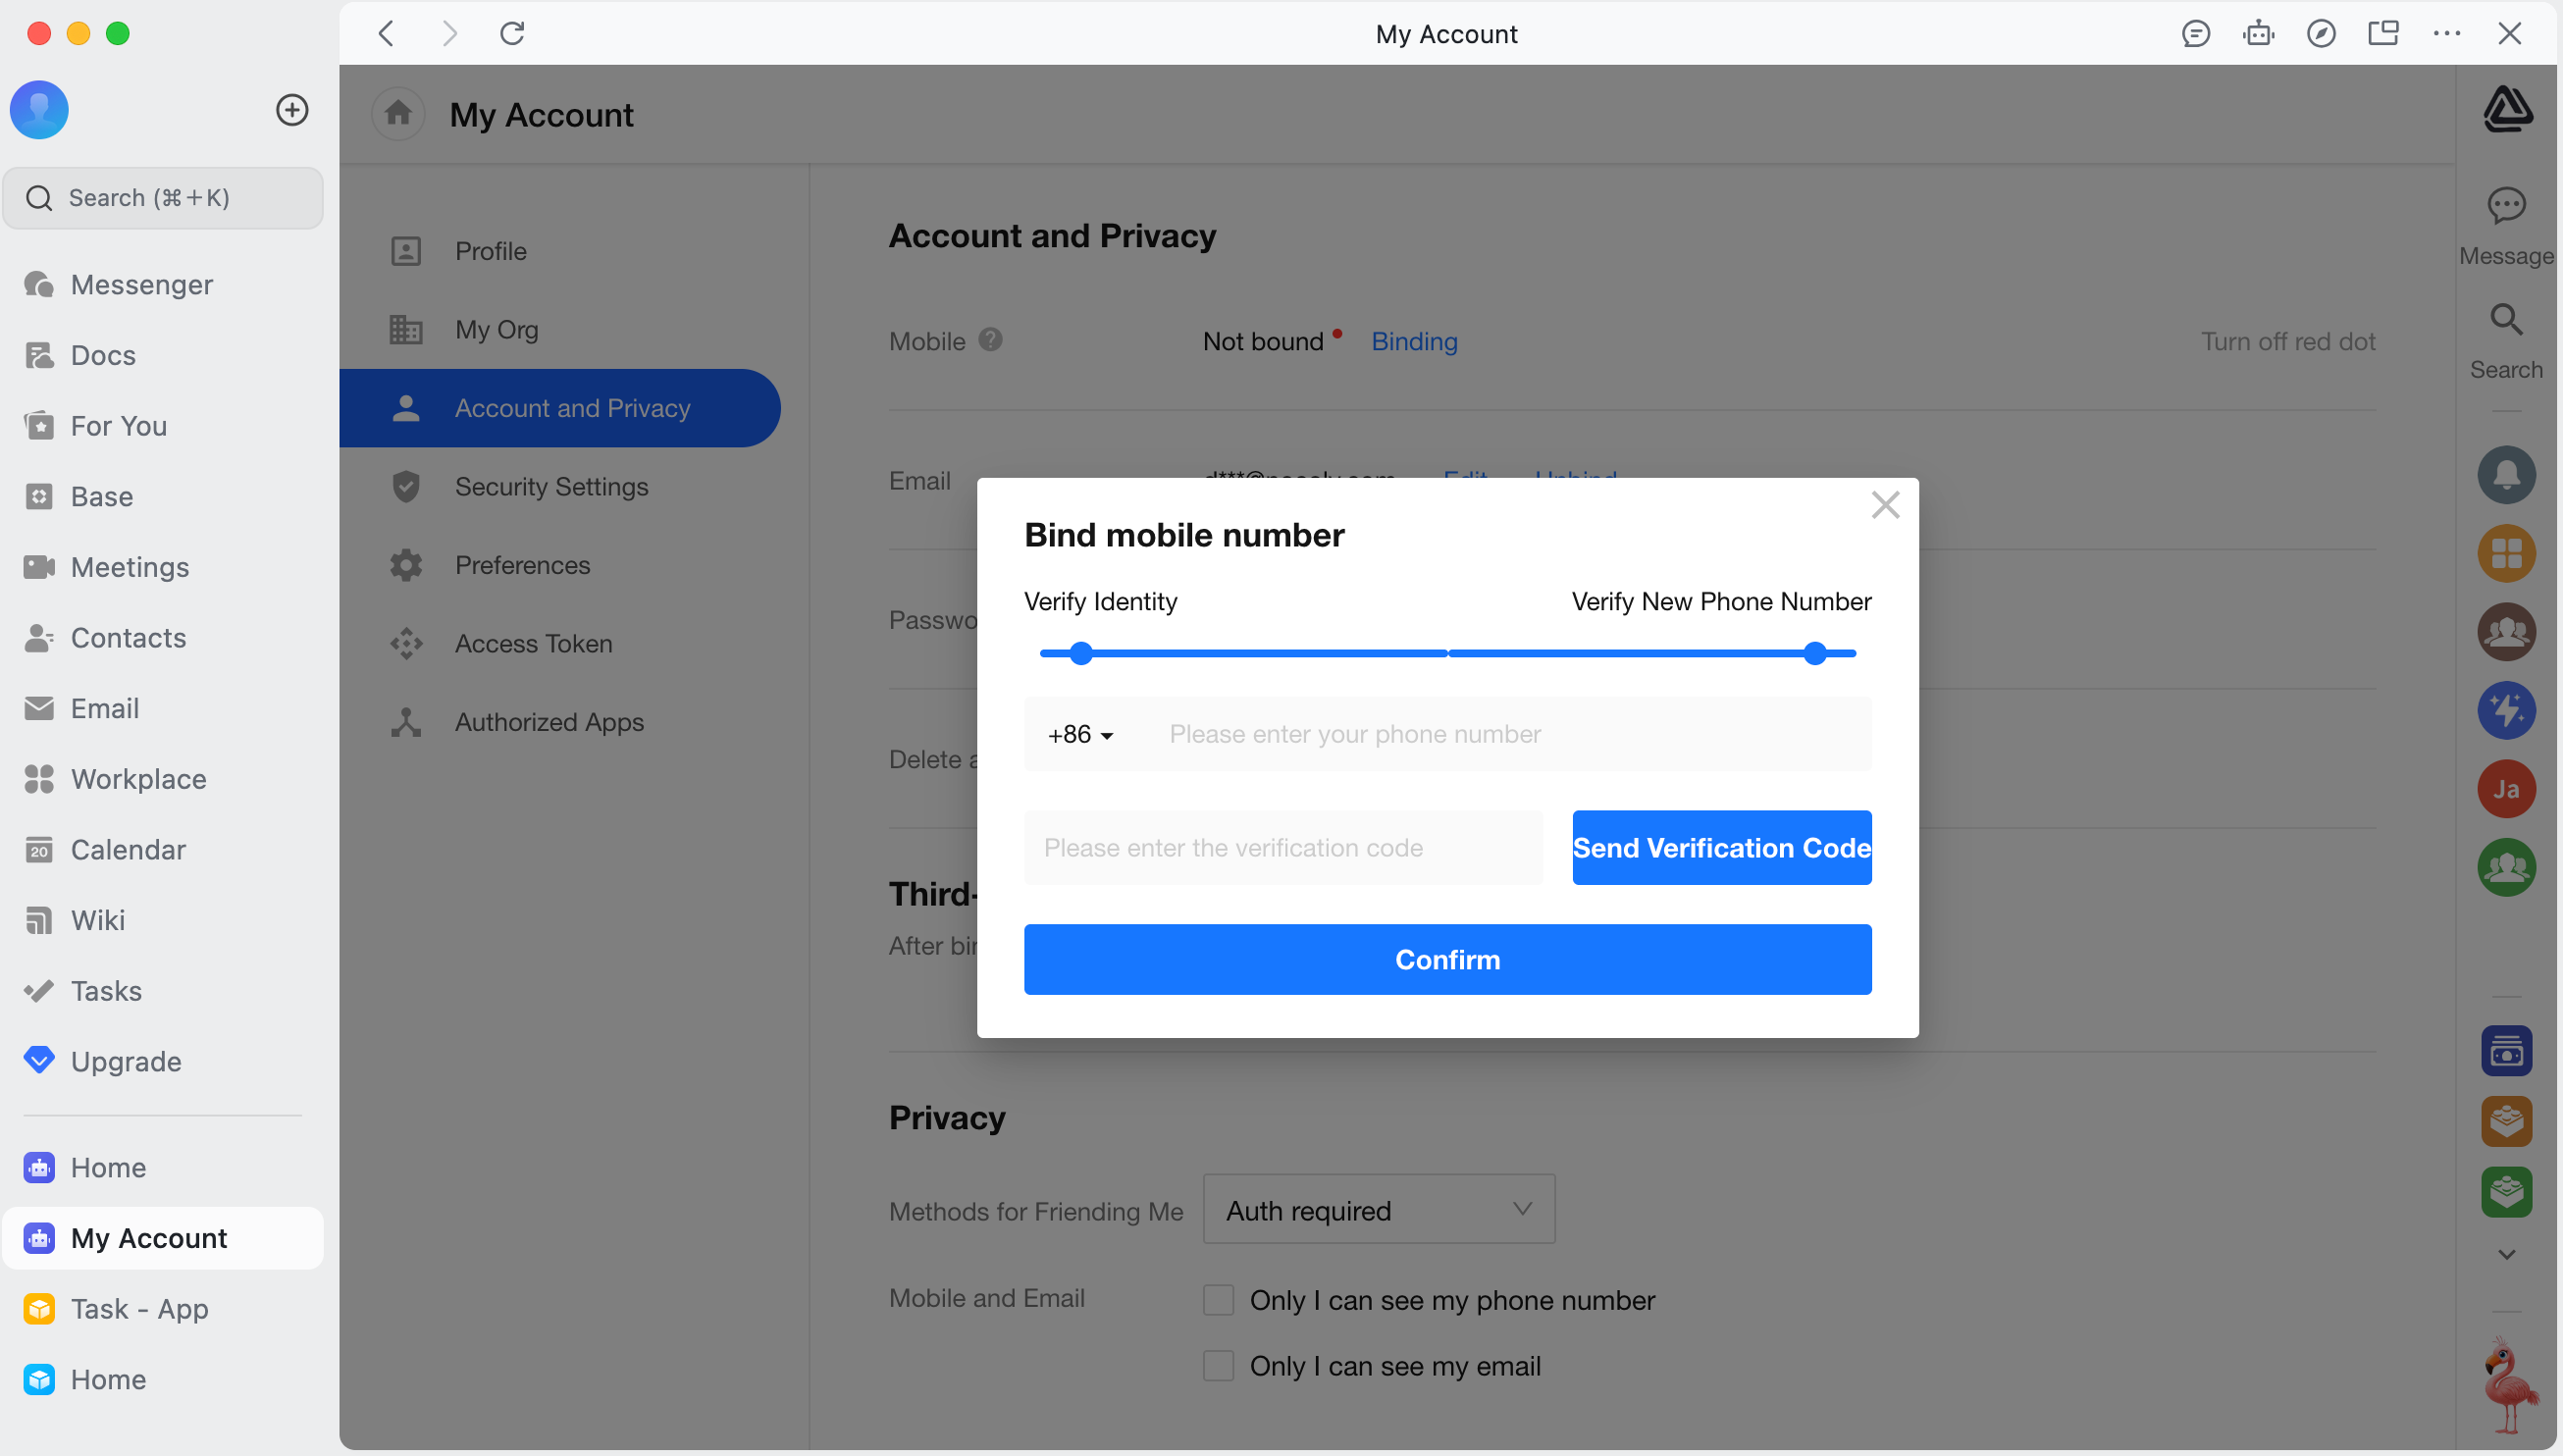
Enter a mobile number and the verification code you receive, then set a password.
Once the password is set, you can sign in to HAP directly using the mobile number associated with your account and the password you created.
Troubleshooting
1. "Invalid request. Contact the app developer."
This error occurs when the redirect URL cannot be found. Follow Step 6 to configure the redirect URL under Security Settings in Lark Developer.
2. Error when syncing contacts
If an API error occurs during contact sync, such as Object reference not set to an instance of an object., one or more required permission scopes are missing or have expired.
Follow Step 8 to add or re-enable the required scopes.
Was this document helpful?