Node - Initiate Approval Flow
I. Configure an approval flow
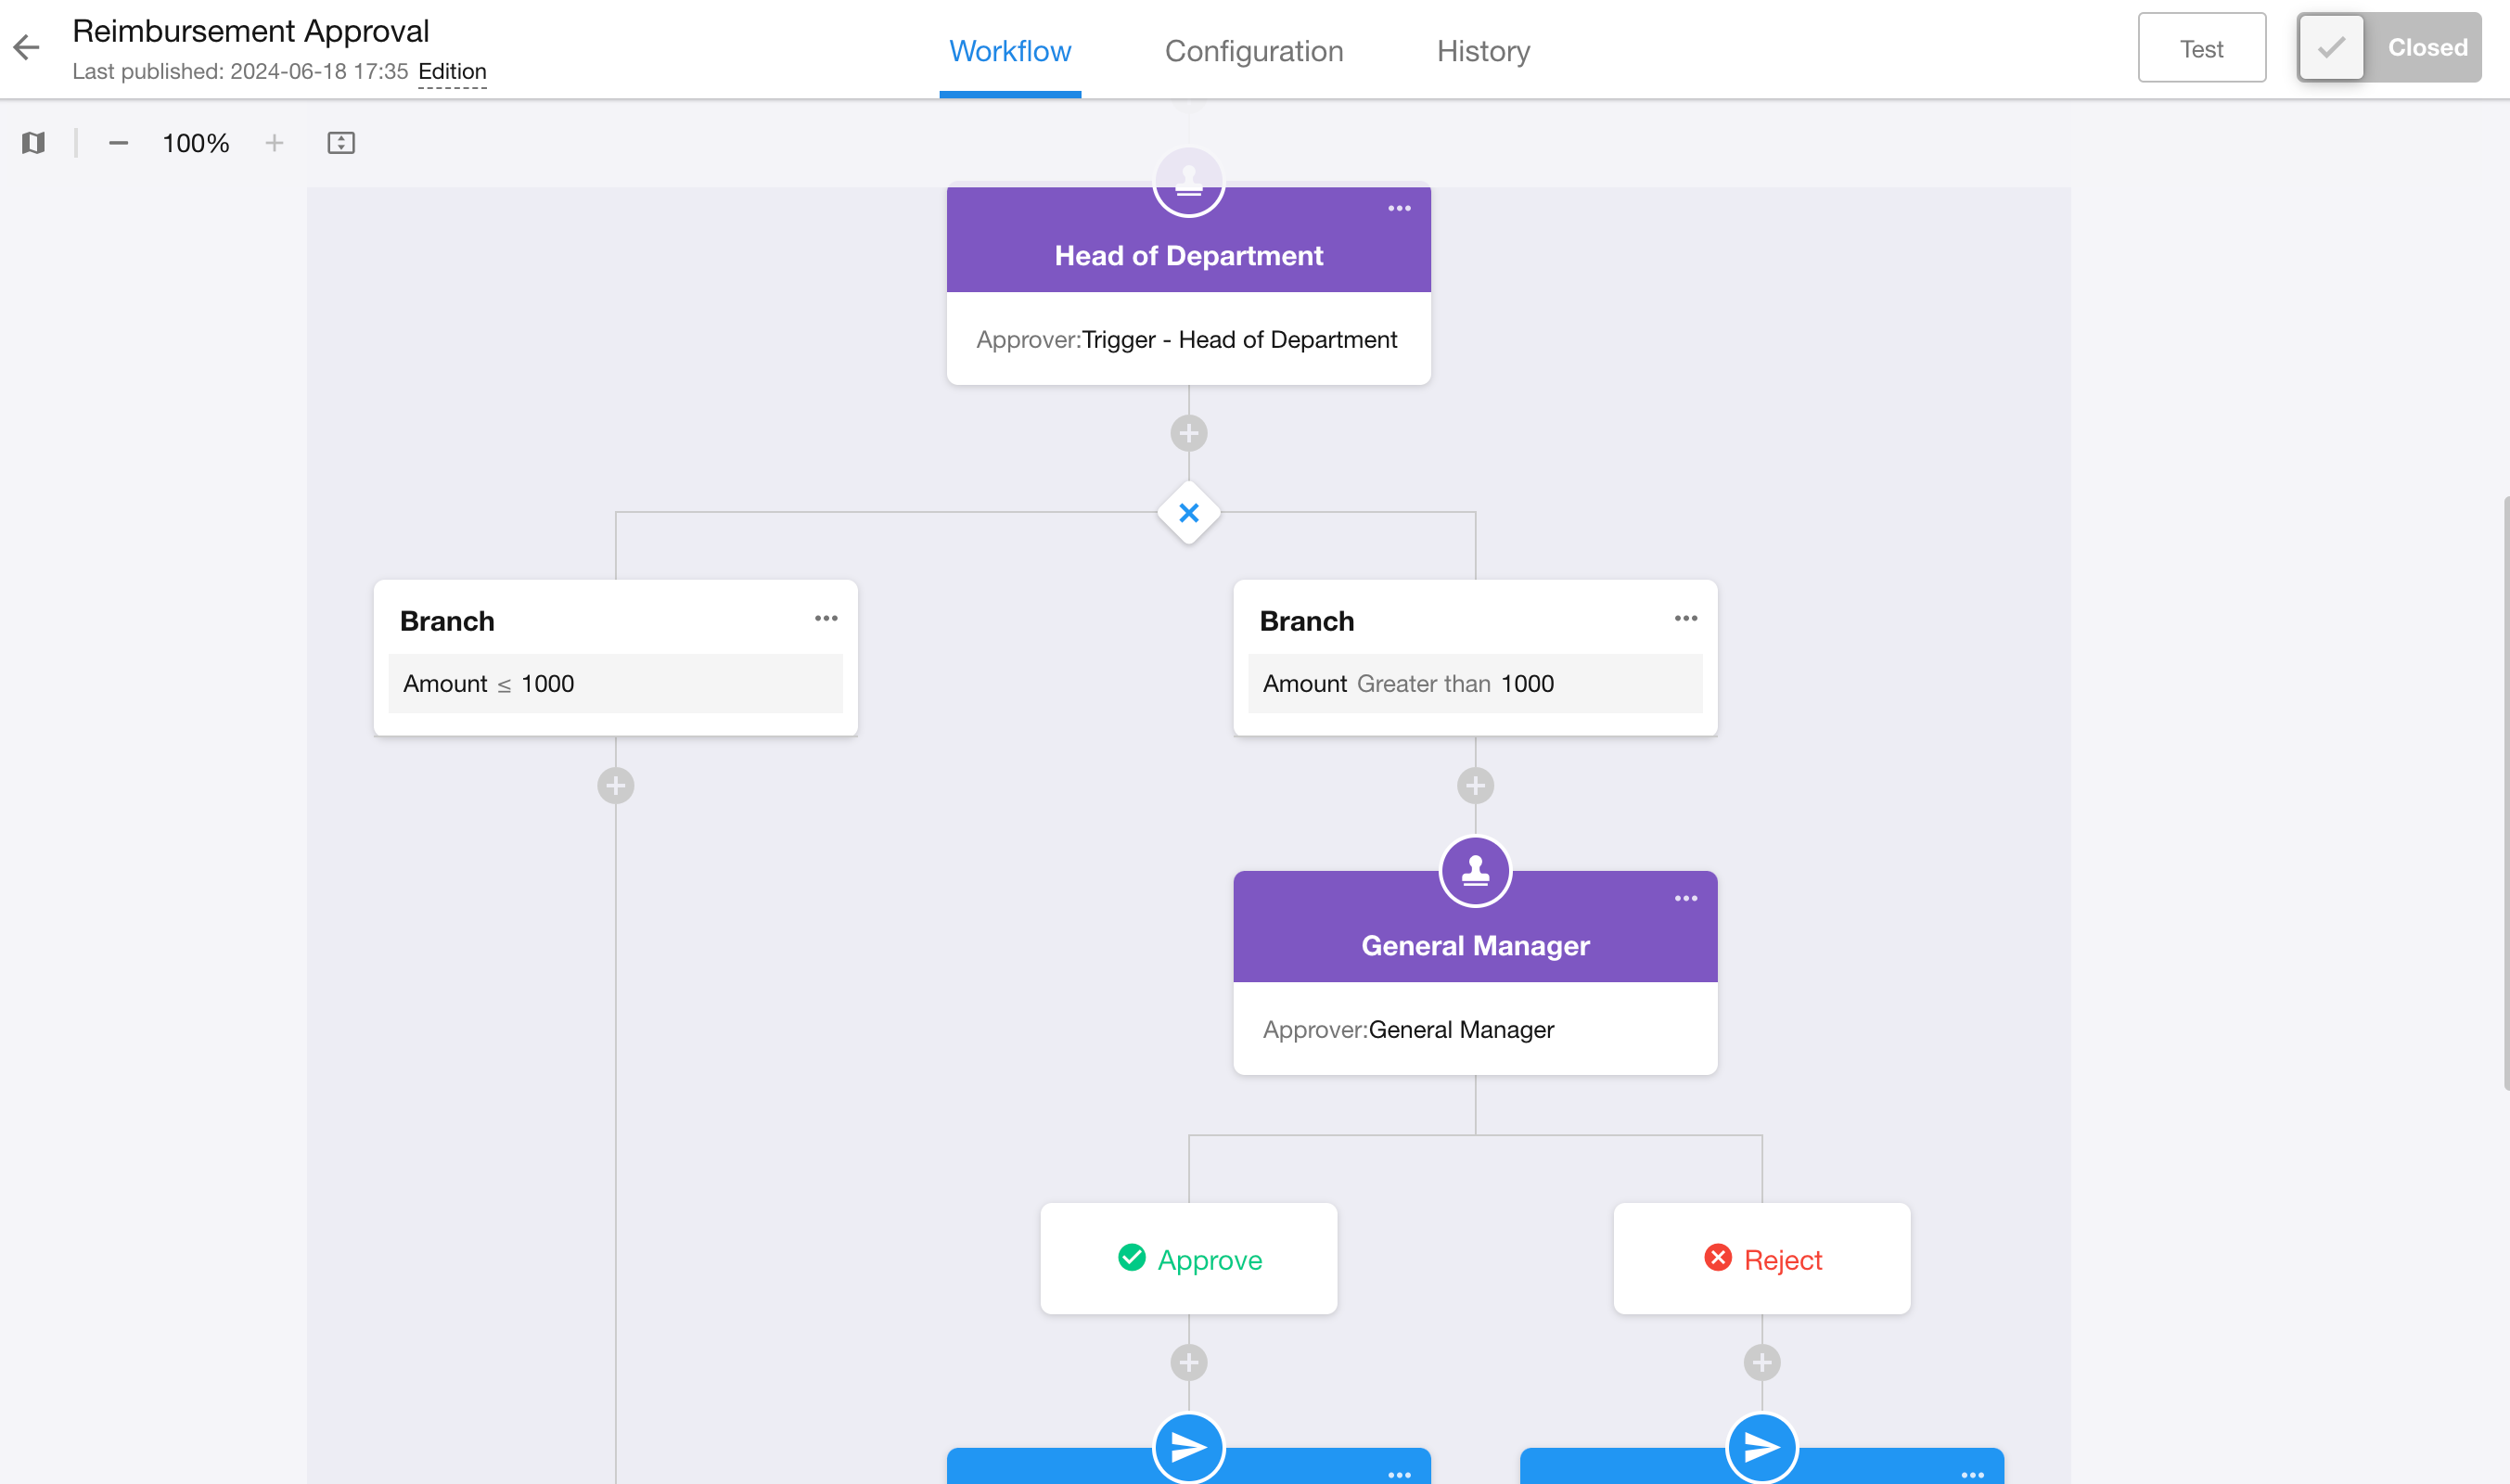
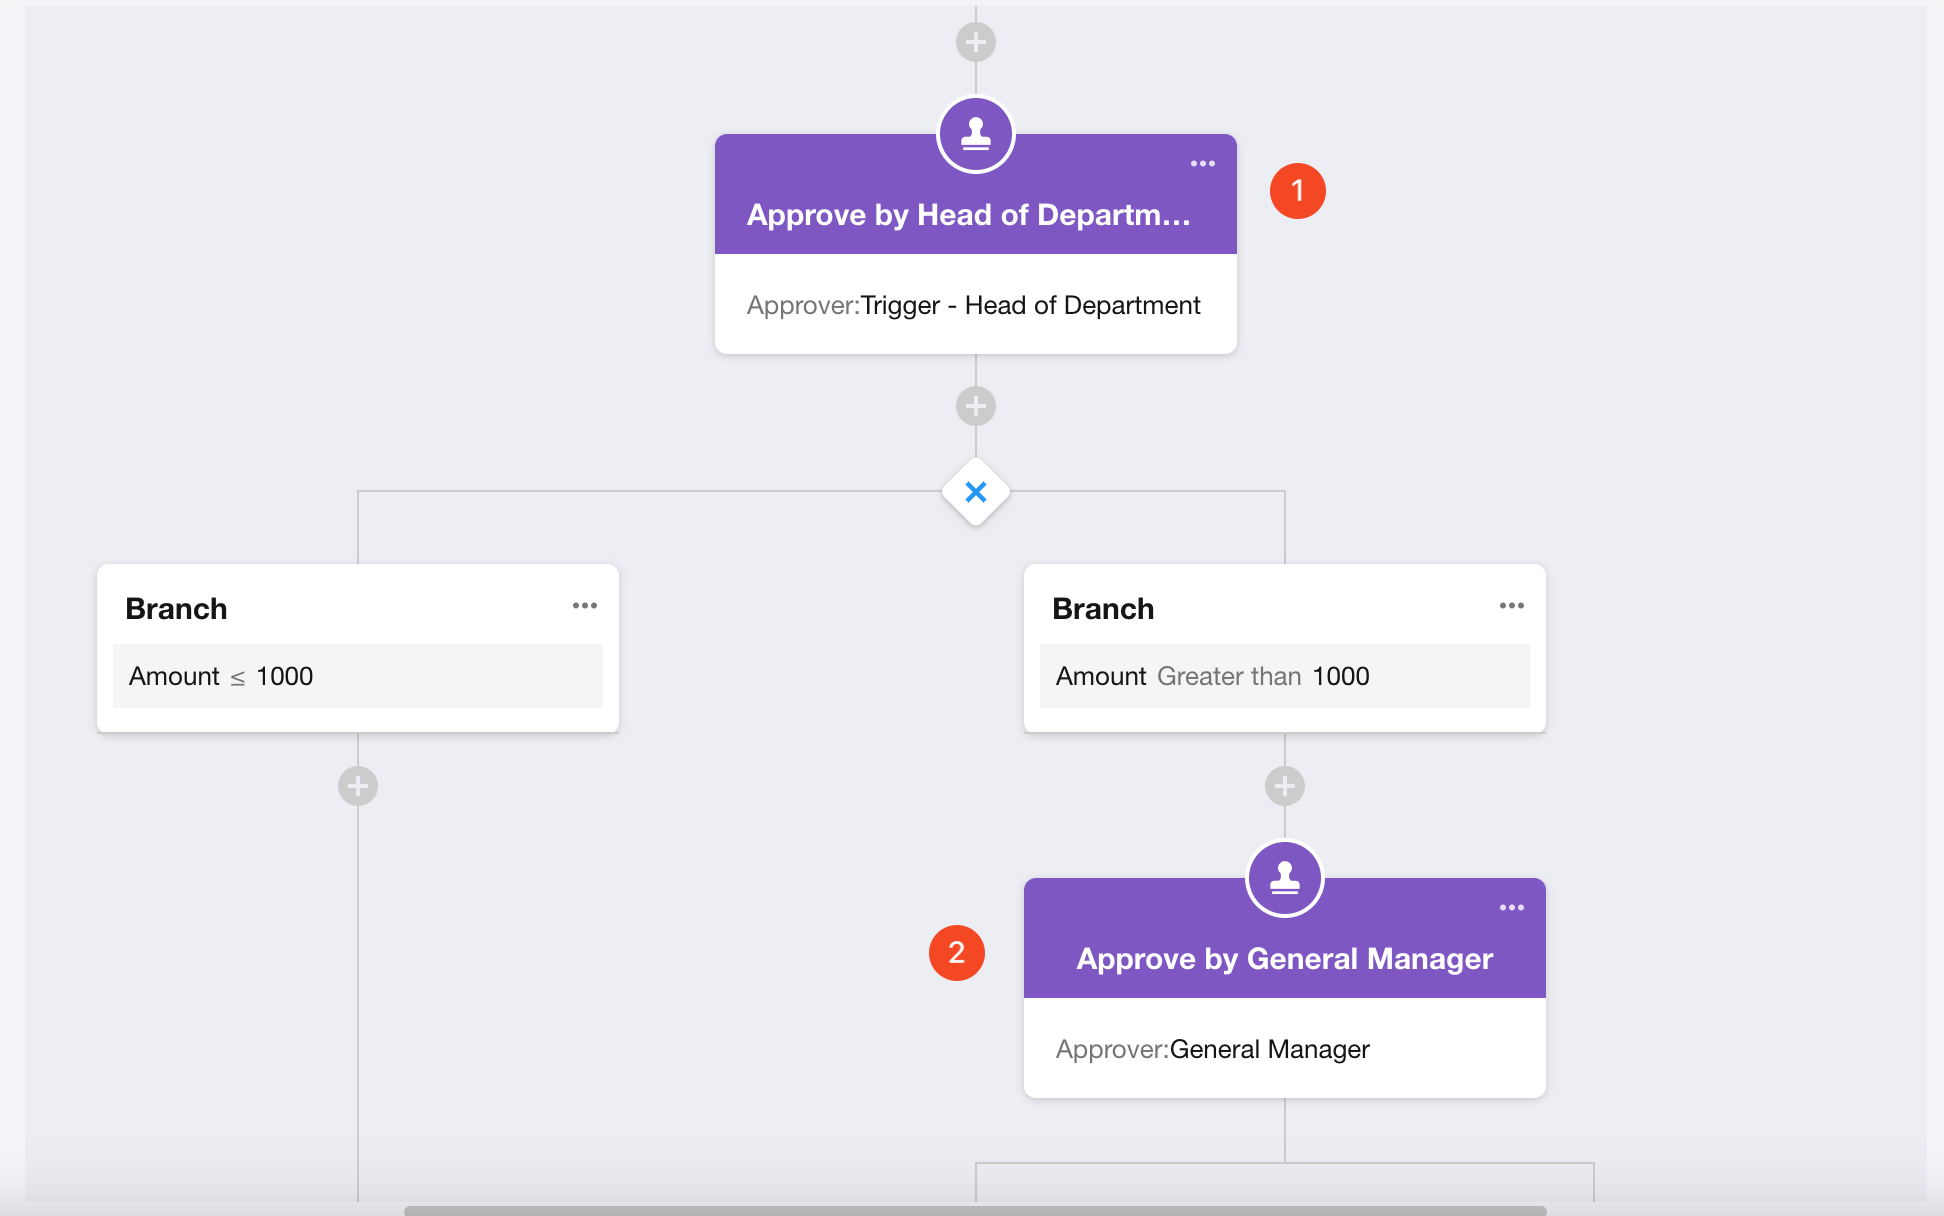
Use Case: When an applicant submits a reimbursement request, for amounts under RMB 1000, only the department head's approval is necessary. However, for amounts equal to or exceeding RMB 1000, the approval of the general manager is also required. Once the request is approved, a notification is sent to the applicant's direct supervisor.
1. Create a workflow triggered by worksheet
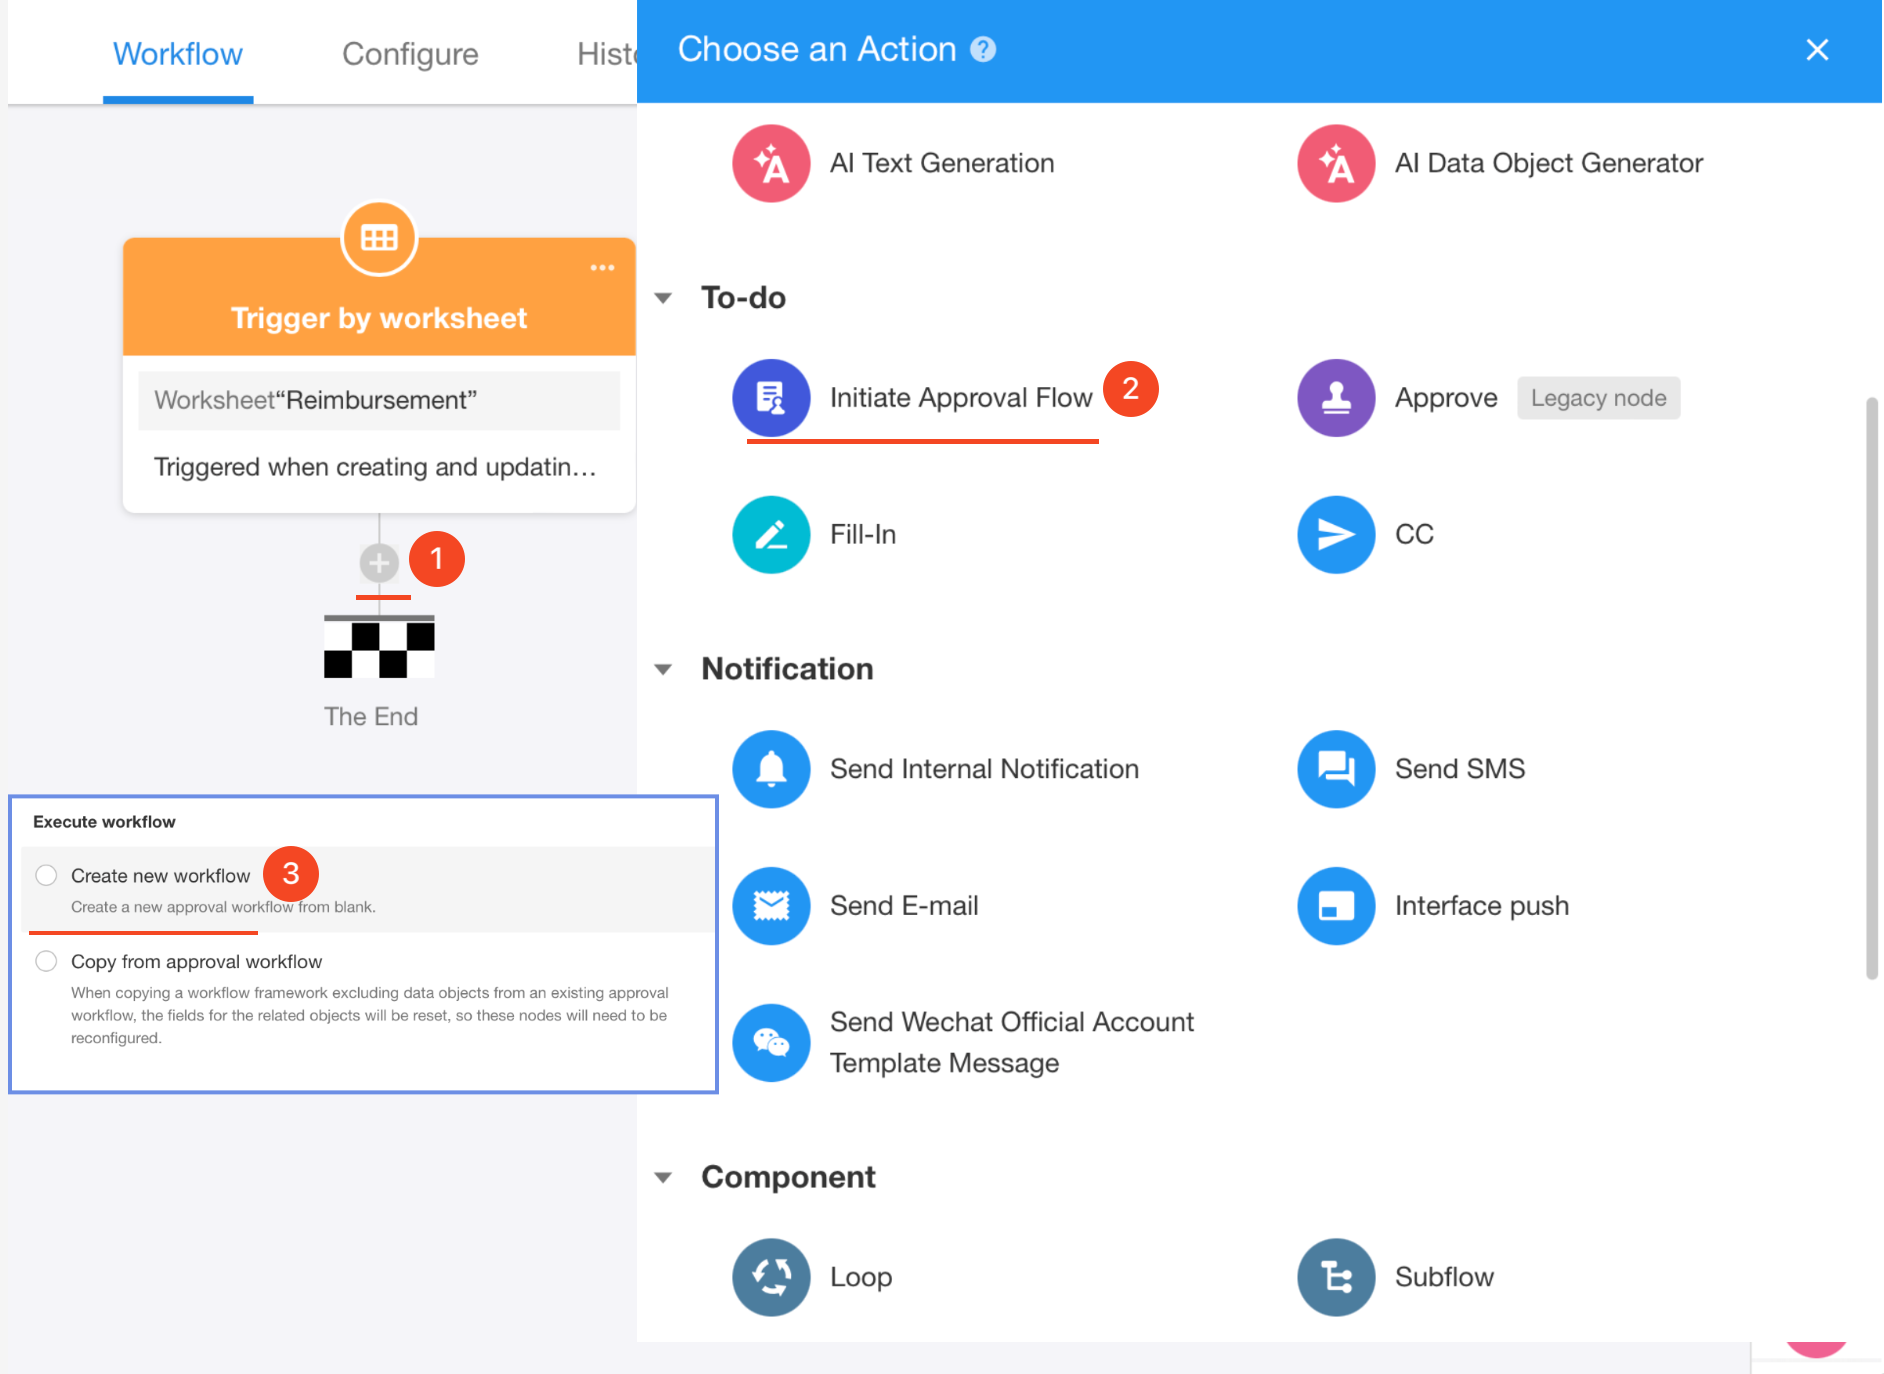
2. Add [Initiate Approval Flow] node
Select [Create new workflow].
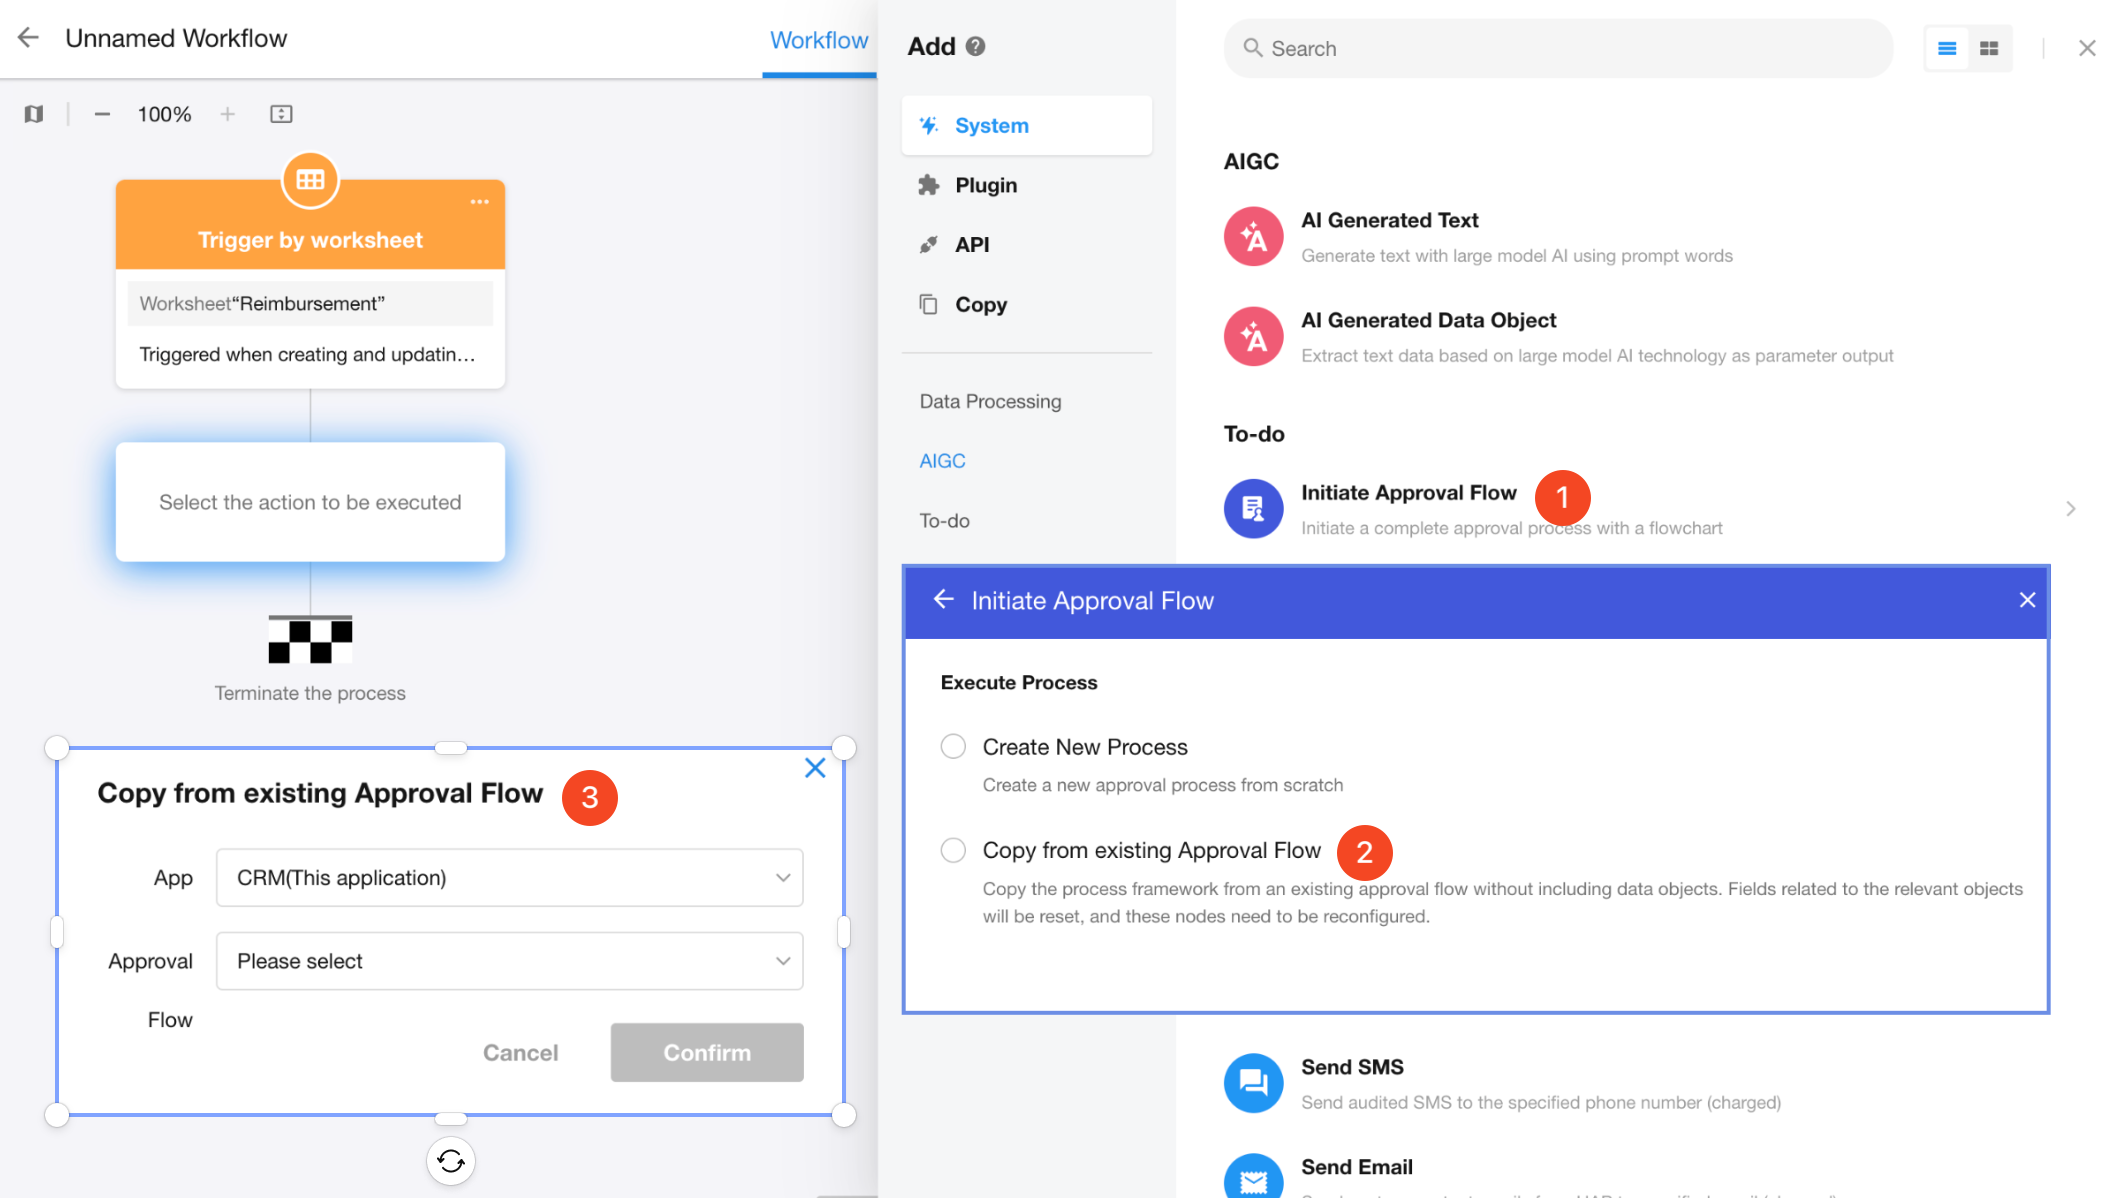
[Copy from approval workflow] means copying the already configured approval structure from another workflow, after which you just need to reselect the approval objects and approvers.
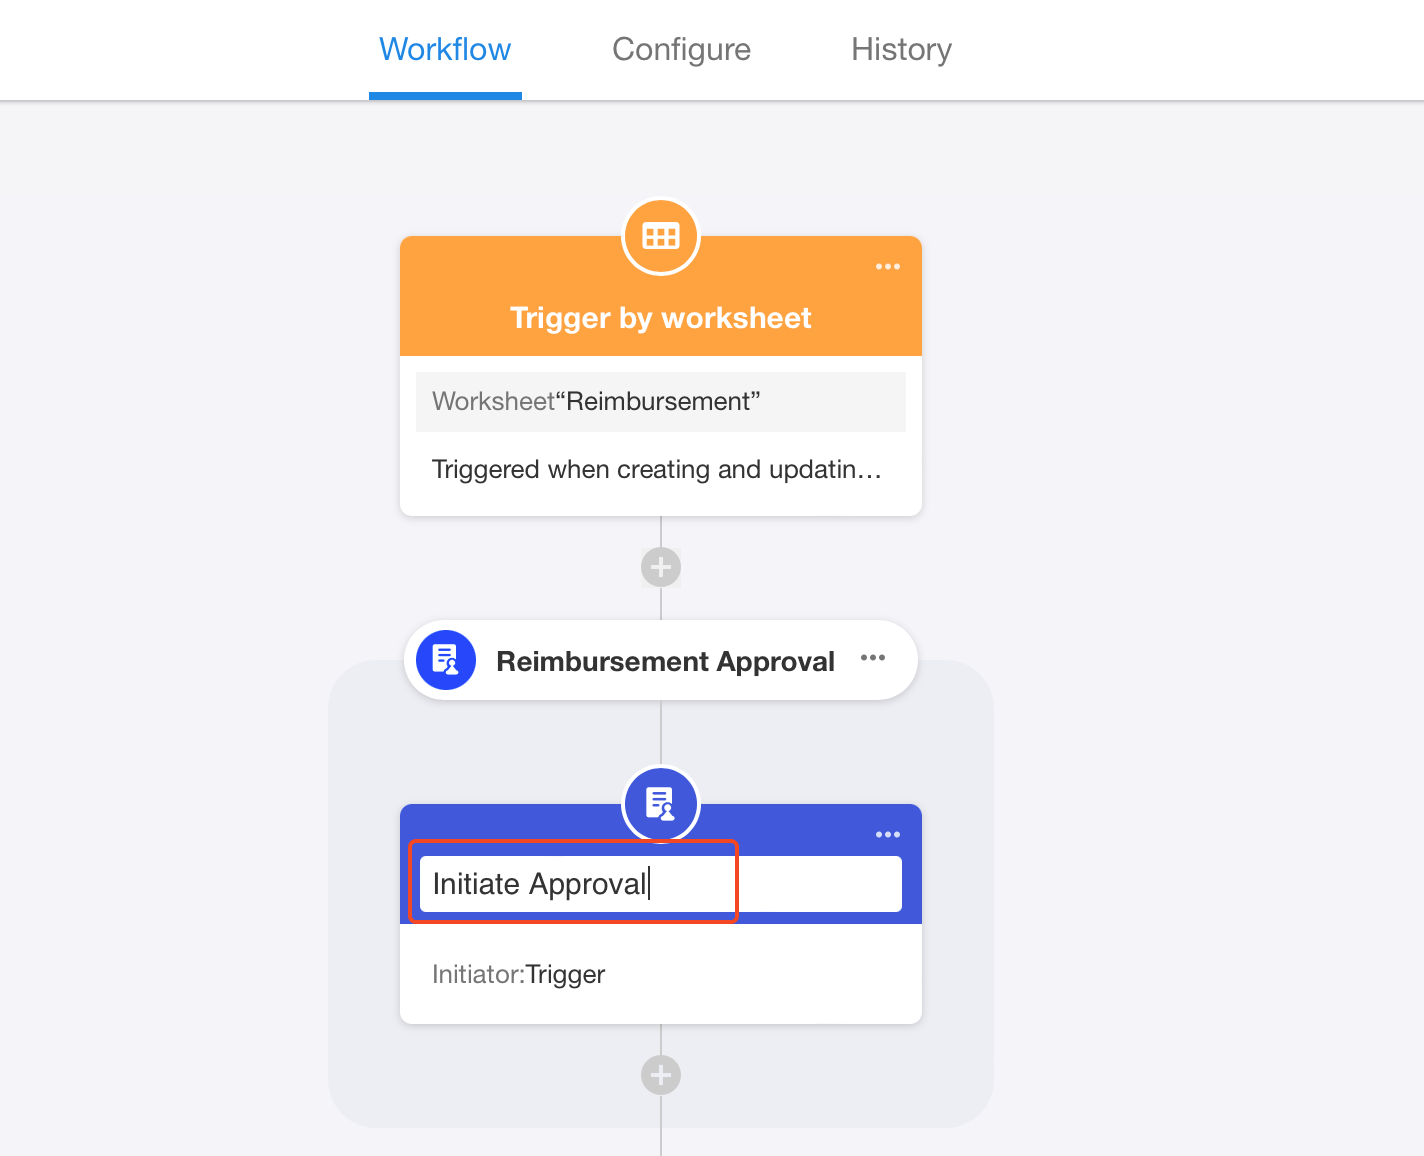
Modify the flow name.
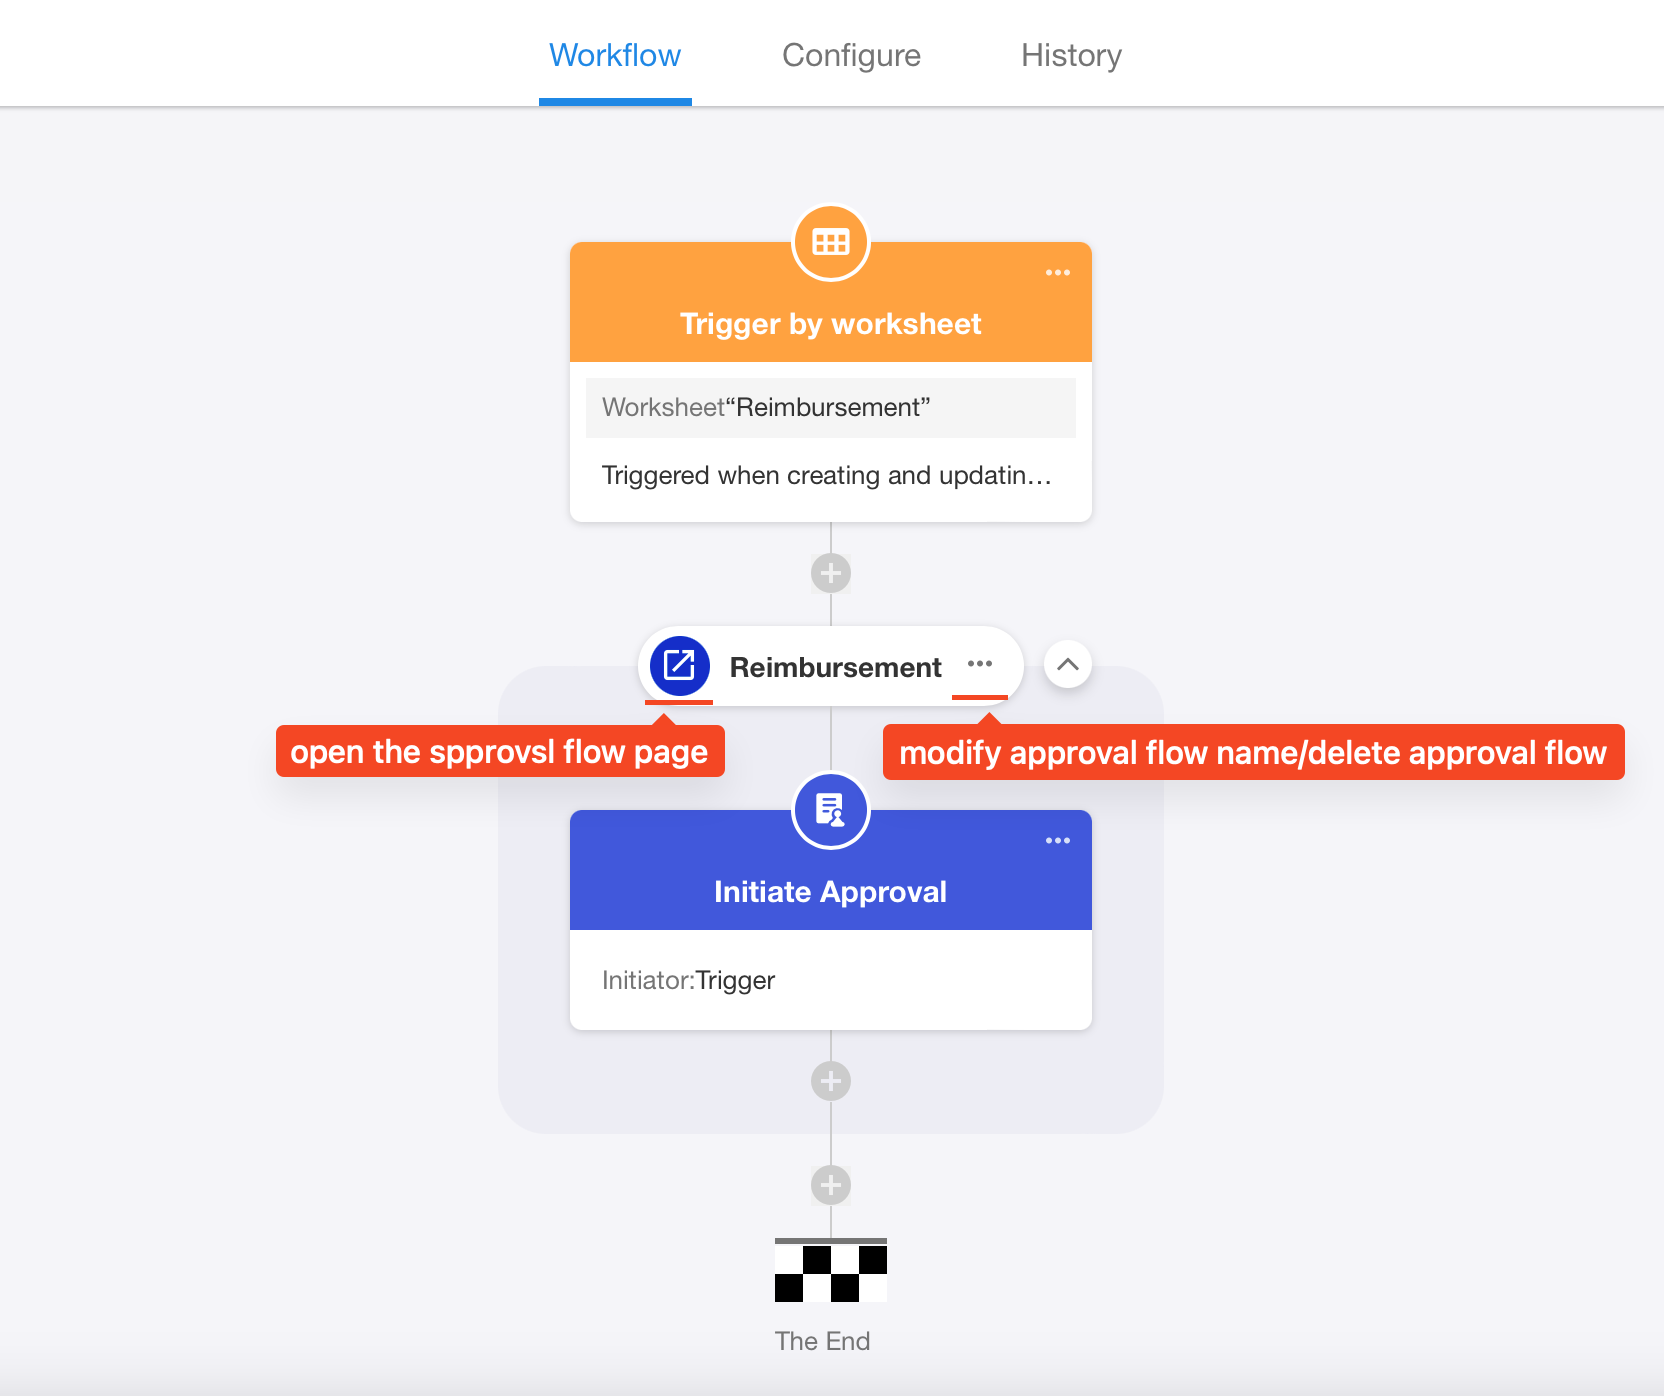
The entire [Initiate Approval Flow] node can be regarded as a subflow, in which you can add other nodes such as [Approval], [Fill in], [CC], etc. They together form the approval flow, and ultimately have an approval result (pass, reject, withdraw, terminate).
3. Basic configuration of the approval flow
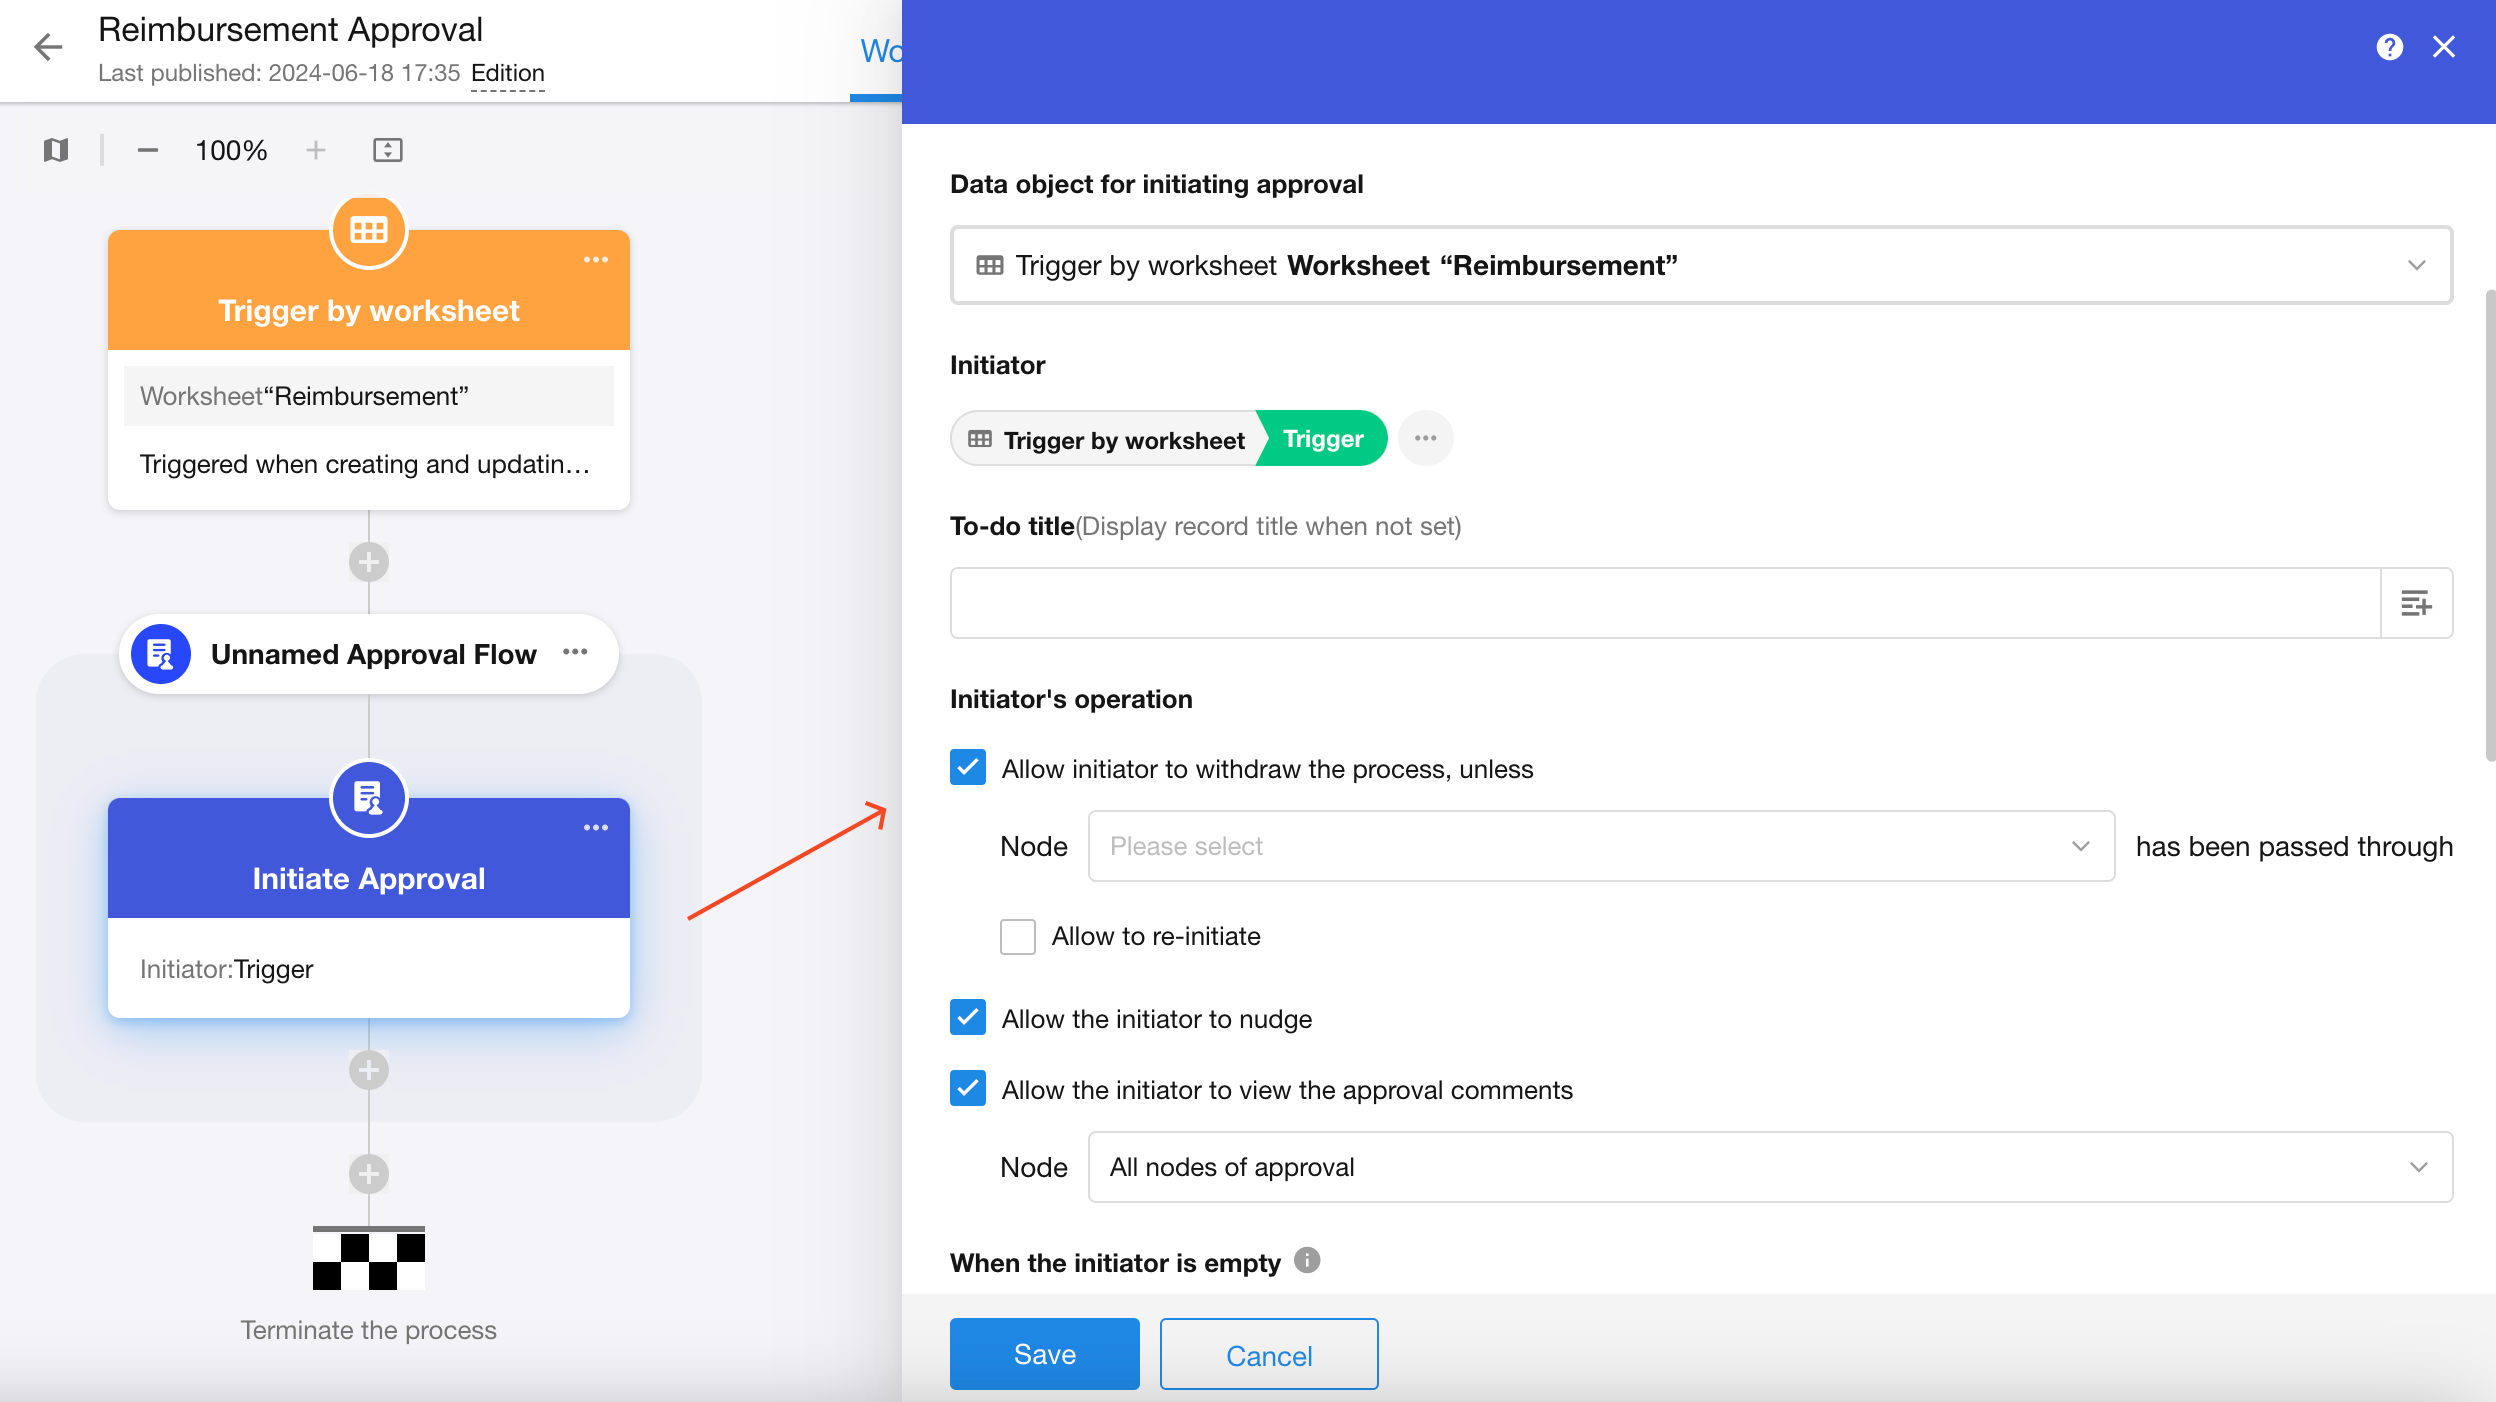
It includes:
-
Name of the approval flow.
-
The data object to be approved, that is, which record is to be approved.
-
Who initiates the approval flow, typically the creator of the record, or the user who triggers the flow.
-
Configure whether to allow the initiator to withdraw the action.
-
3 cases for automatic approval.
4. Add the first approver: the department head
Add an [Approval] node to the flow and configure the approver and relevant settings for approval.
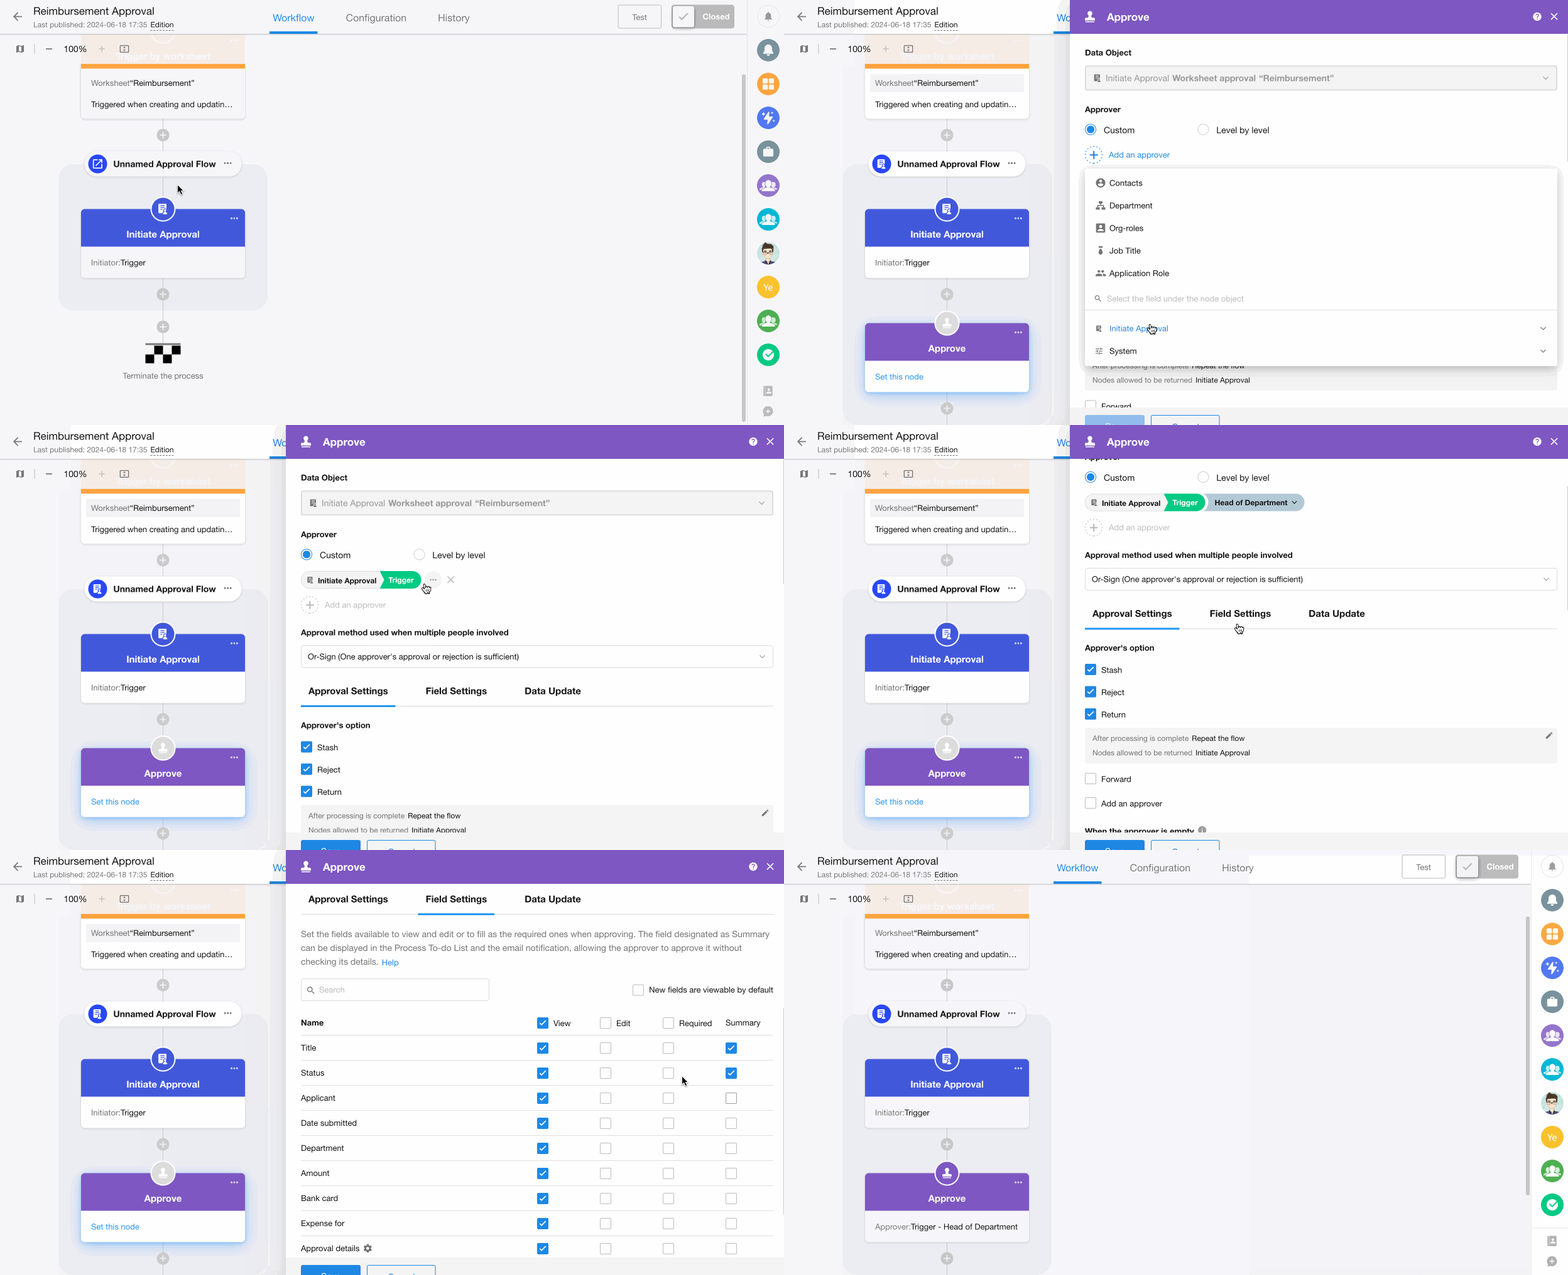
More details about the Approval node.
You can also add other nodes in the approval flow:
-
Manual processing nodes, such as [Approval], [Fill in], [CC]
-
Conditional branches
-
Nodes for data obtaining and processing
5. Add a [Branch] node to allow different approvers for different amounts
You need to add the branches since it requires the approval of the general manager when the amount is greater than RMB 1000.
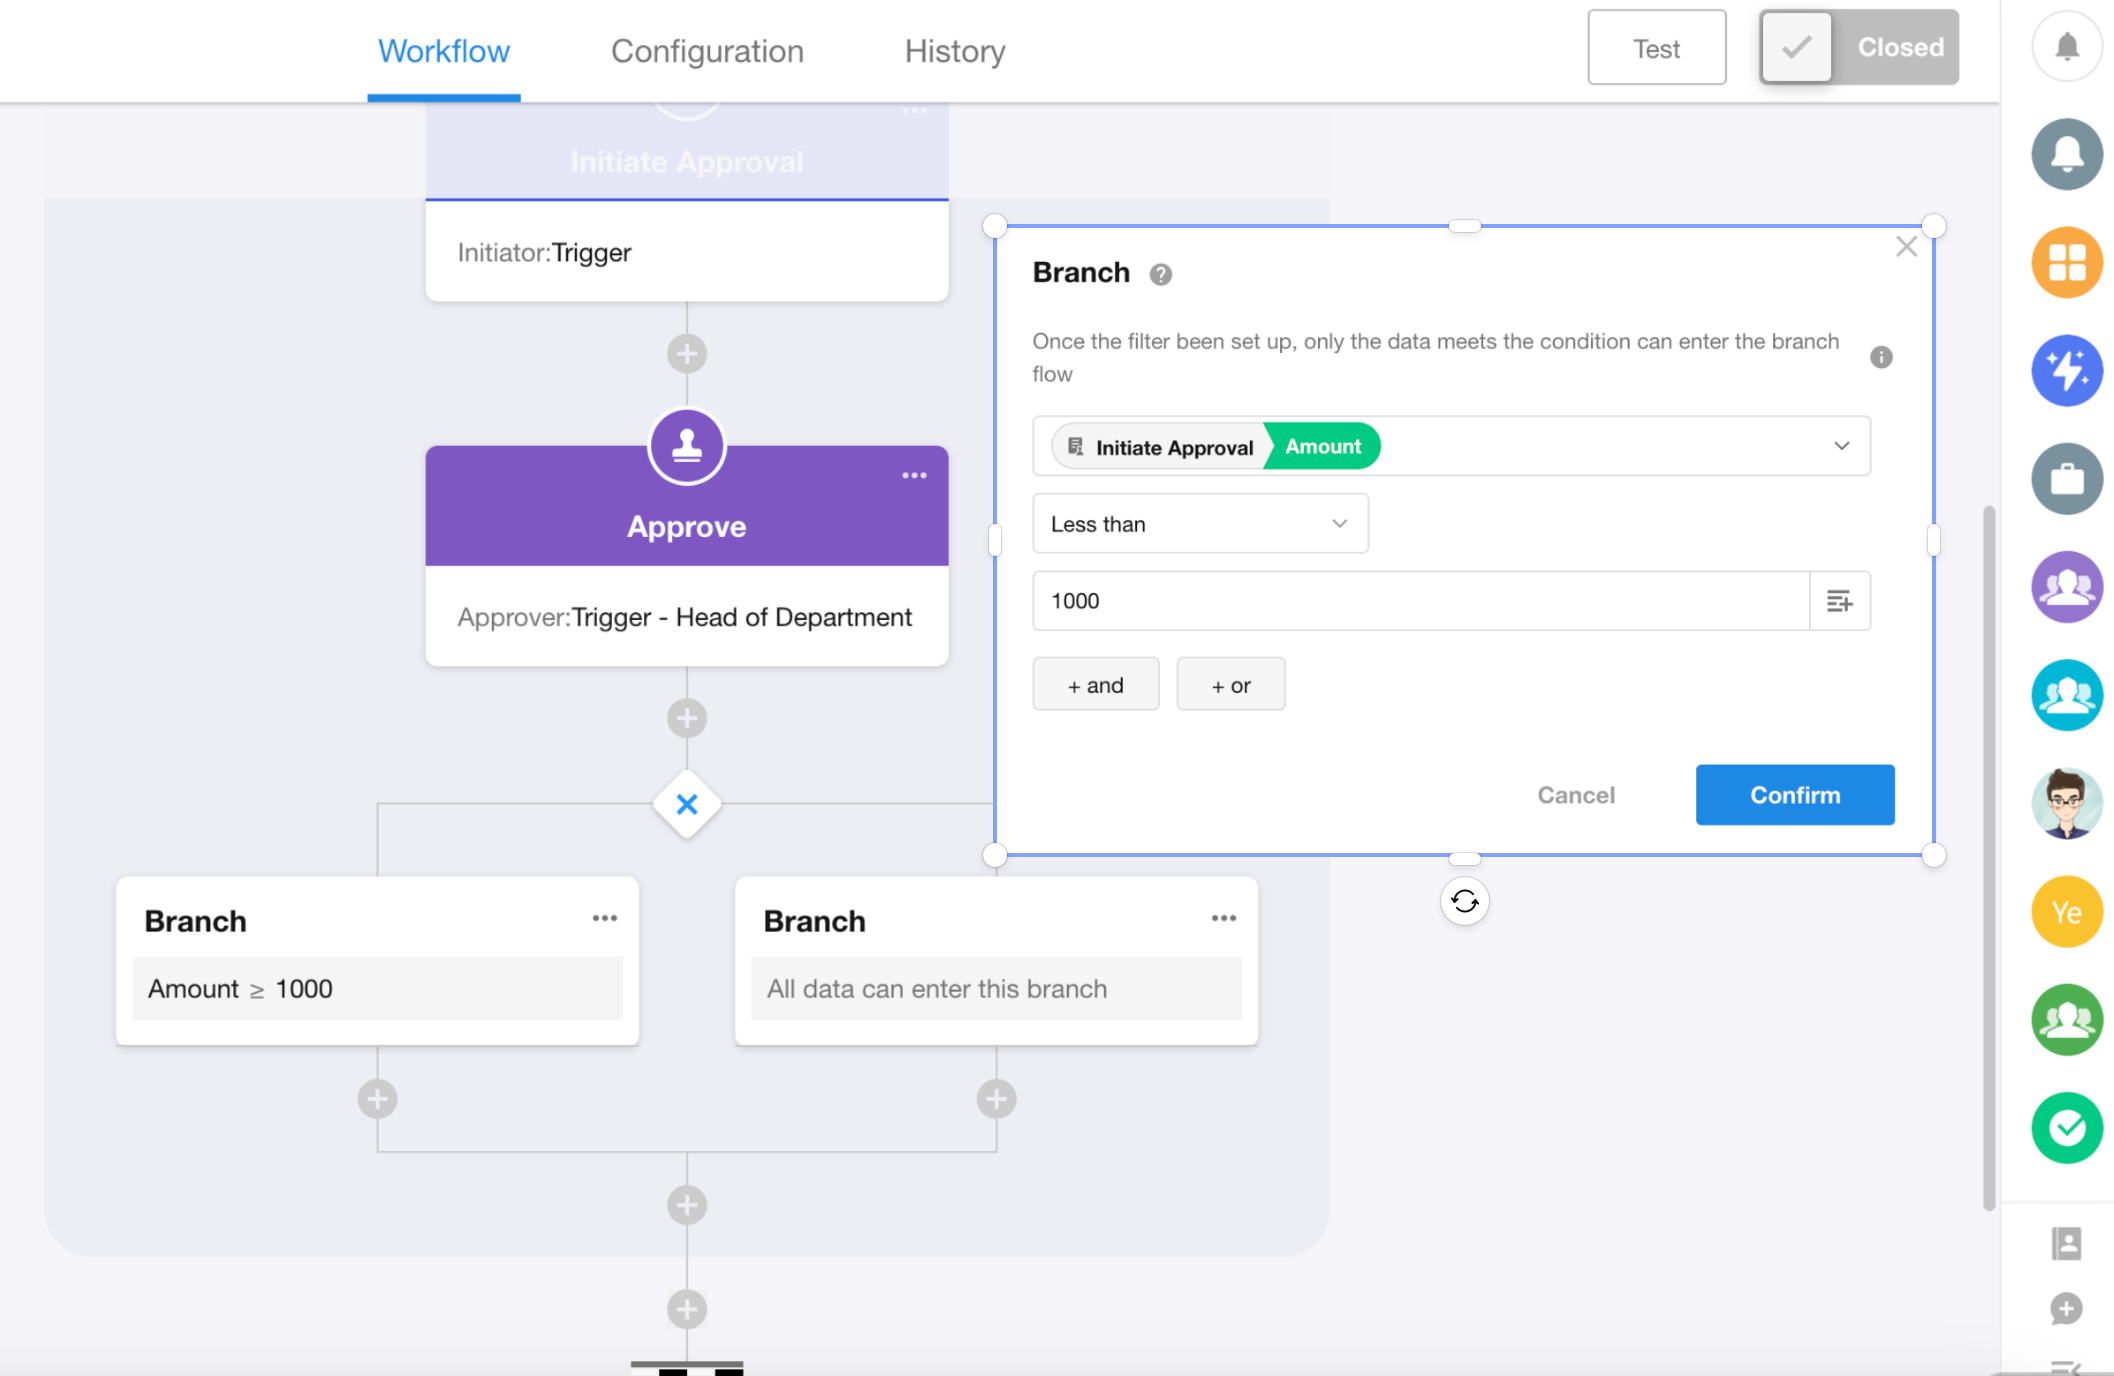
6. Configure the approval of the general manager
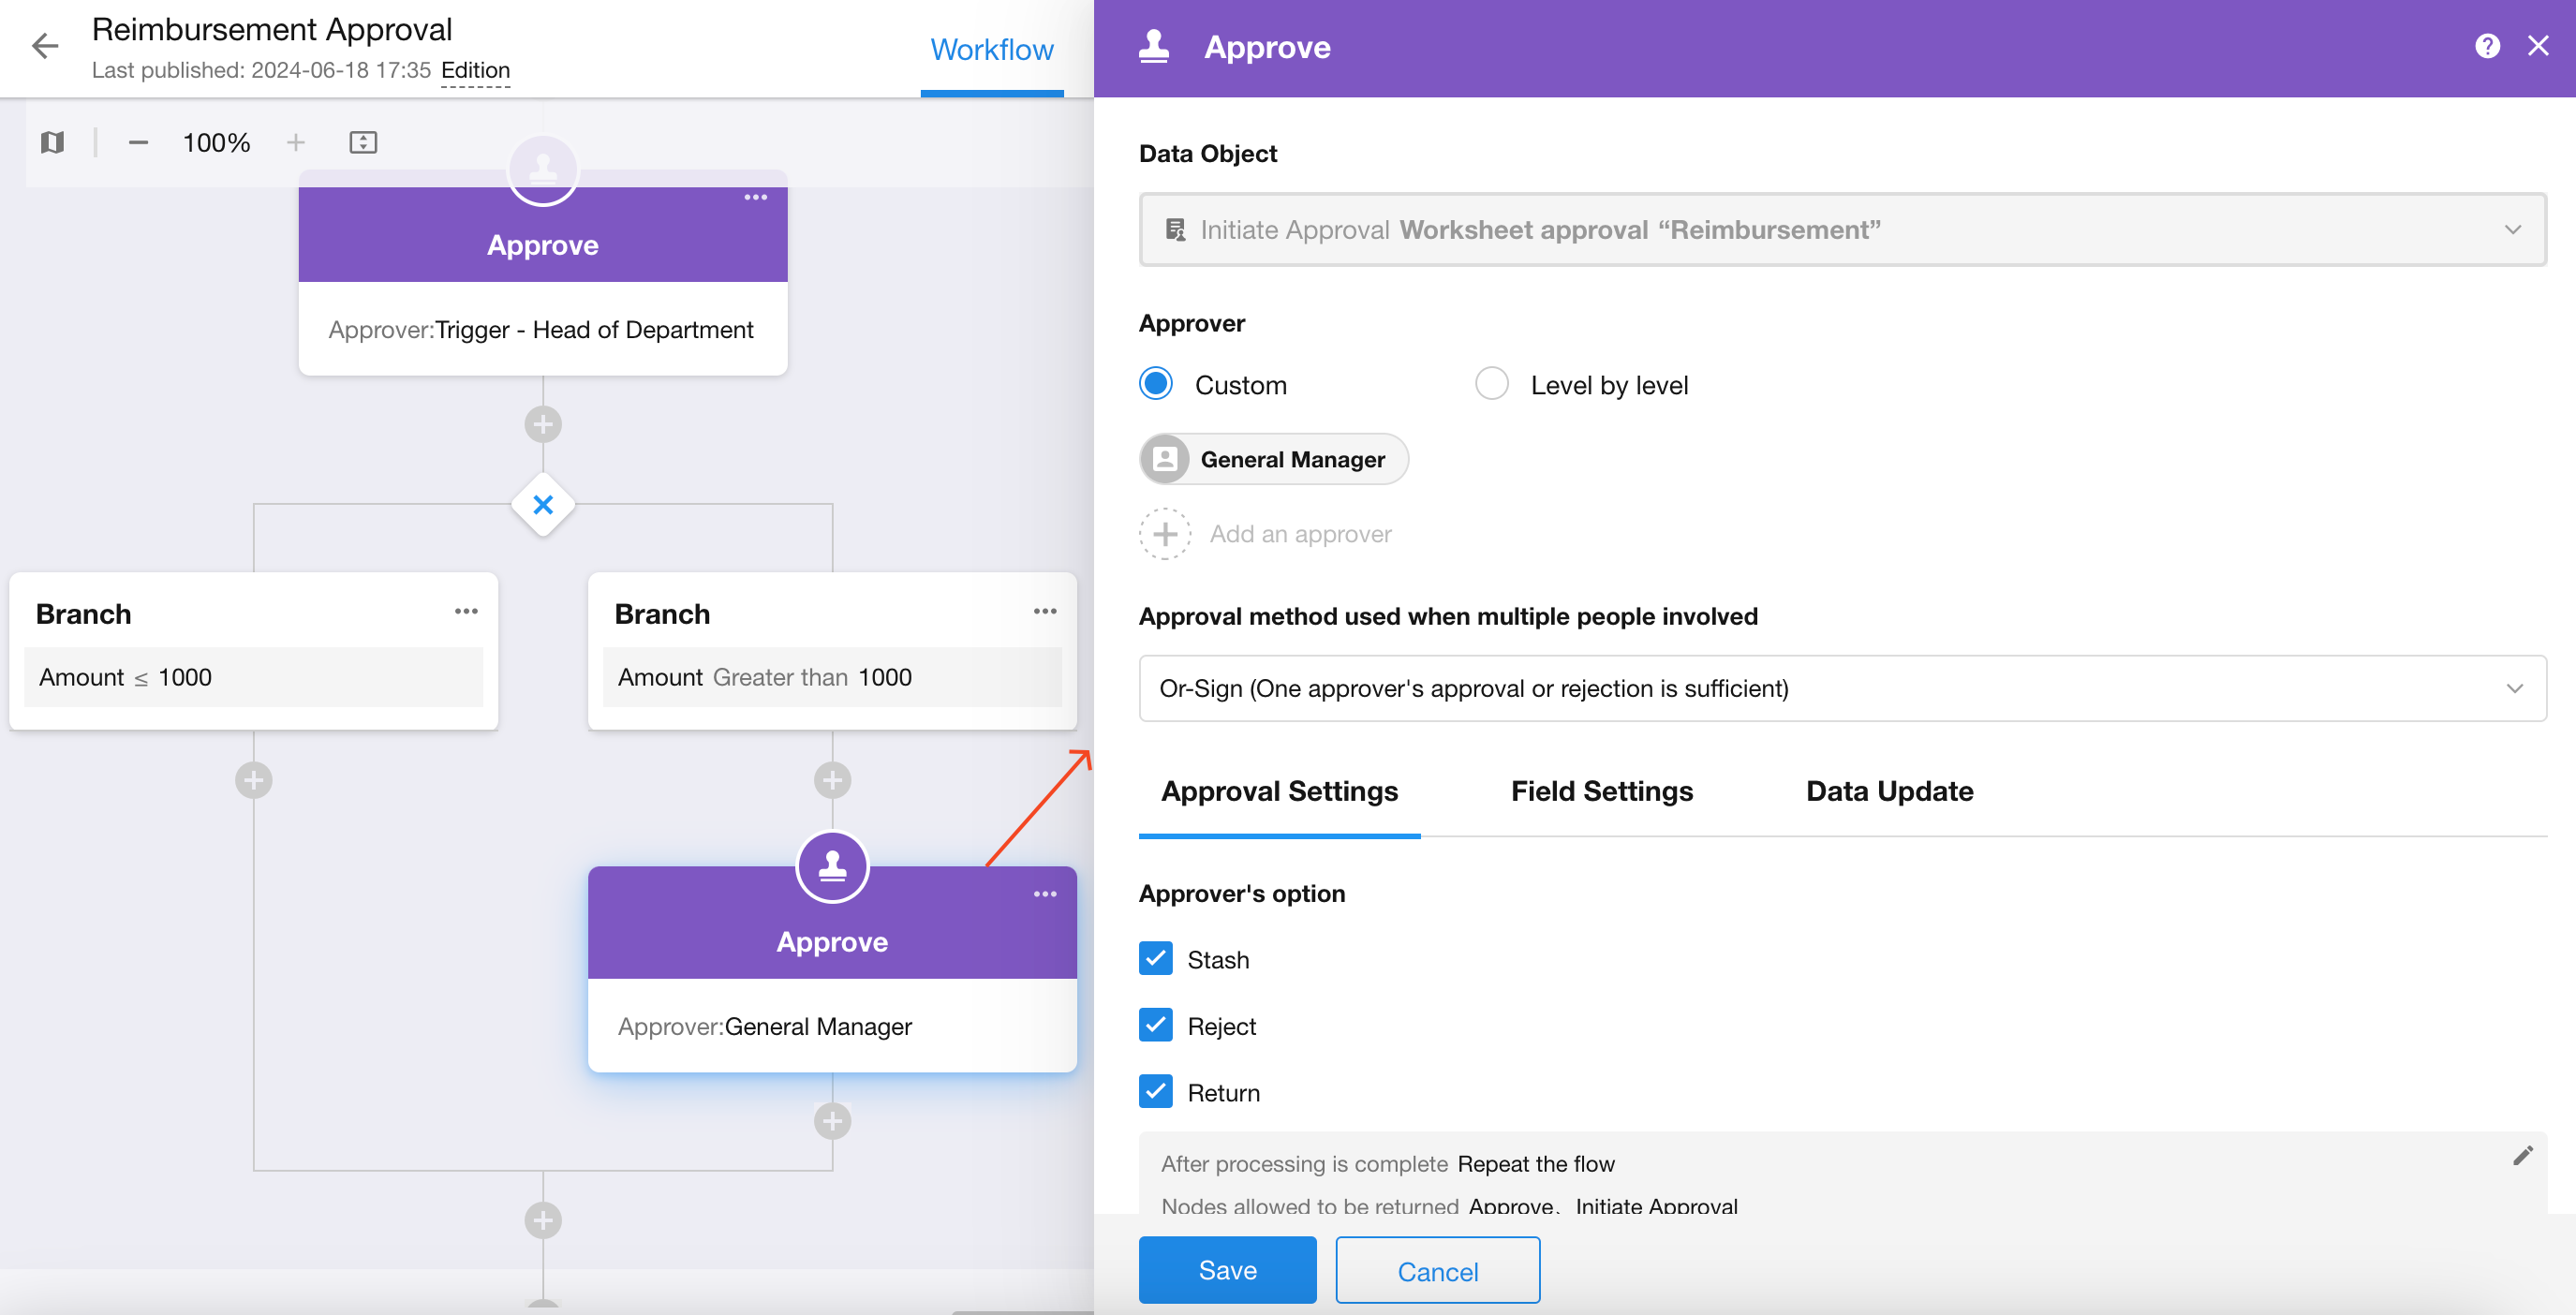
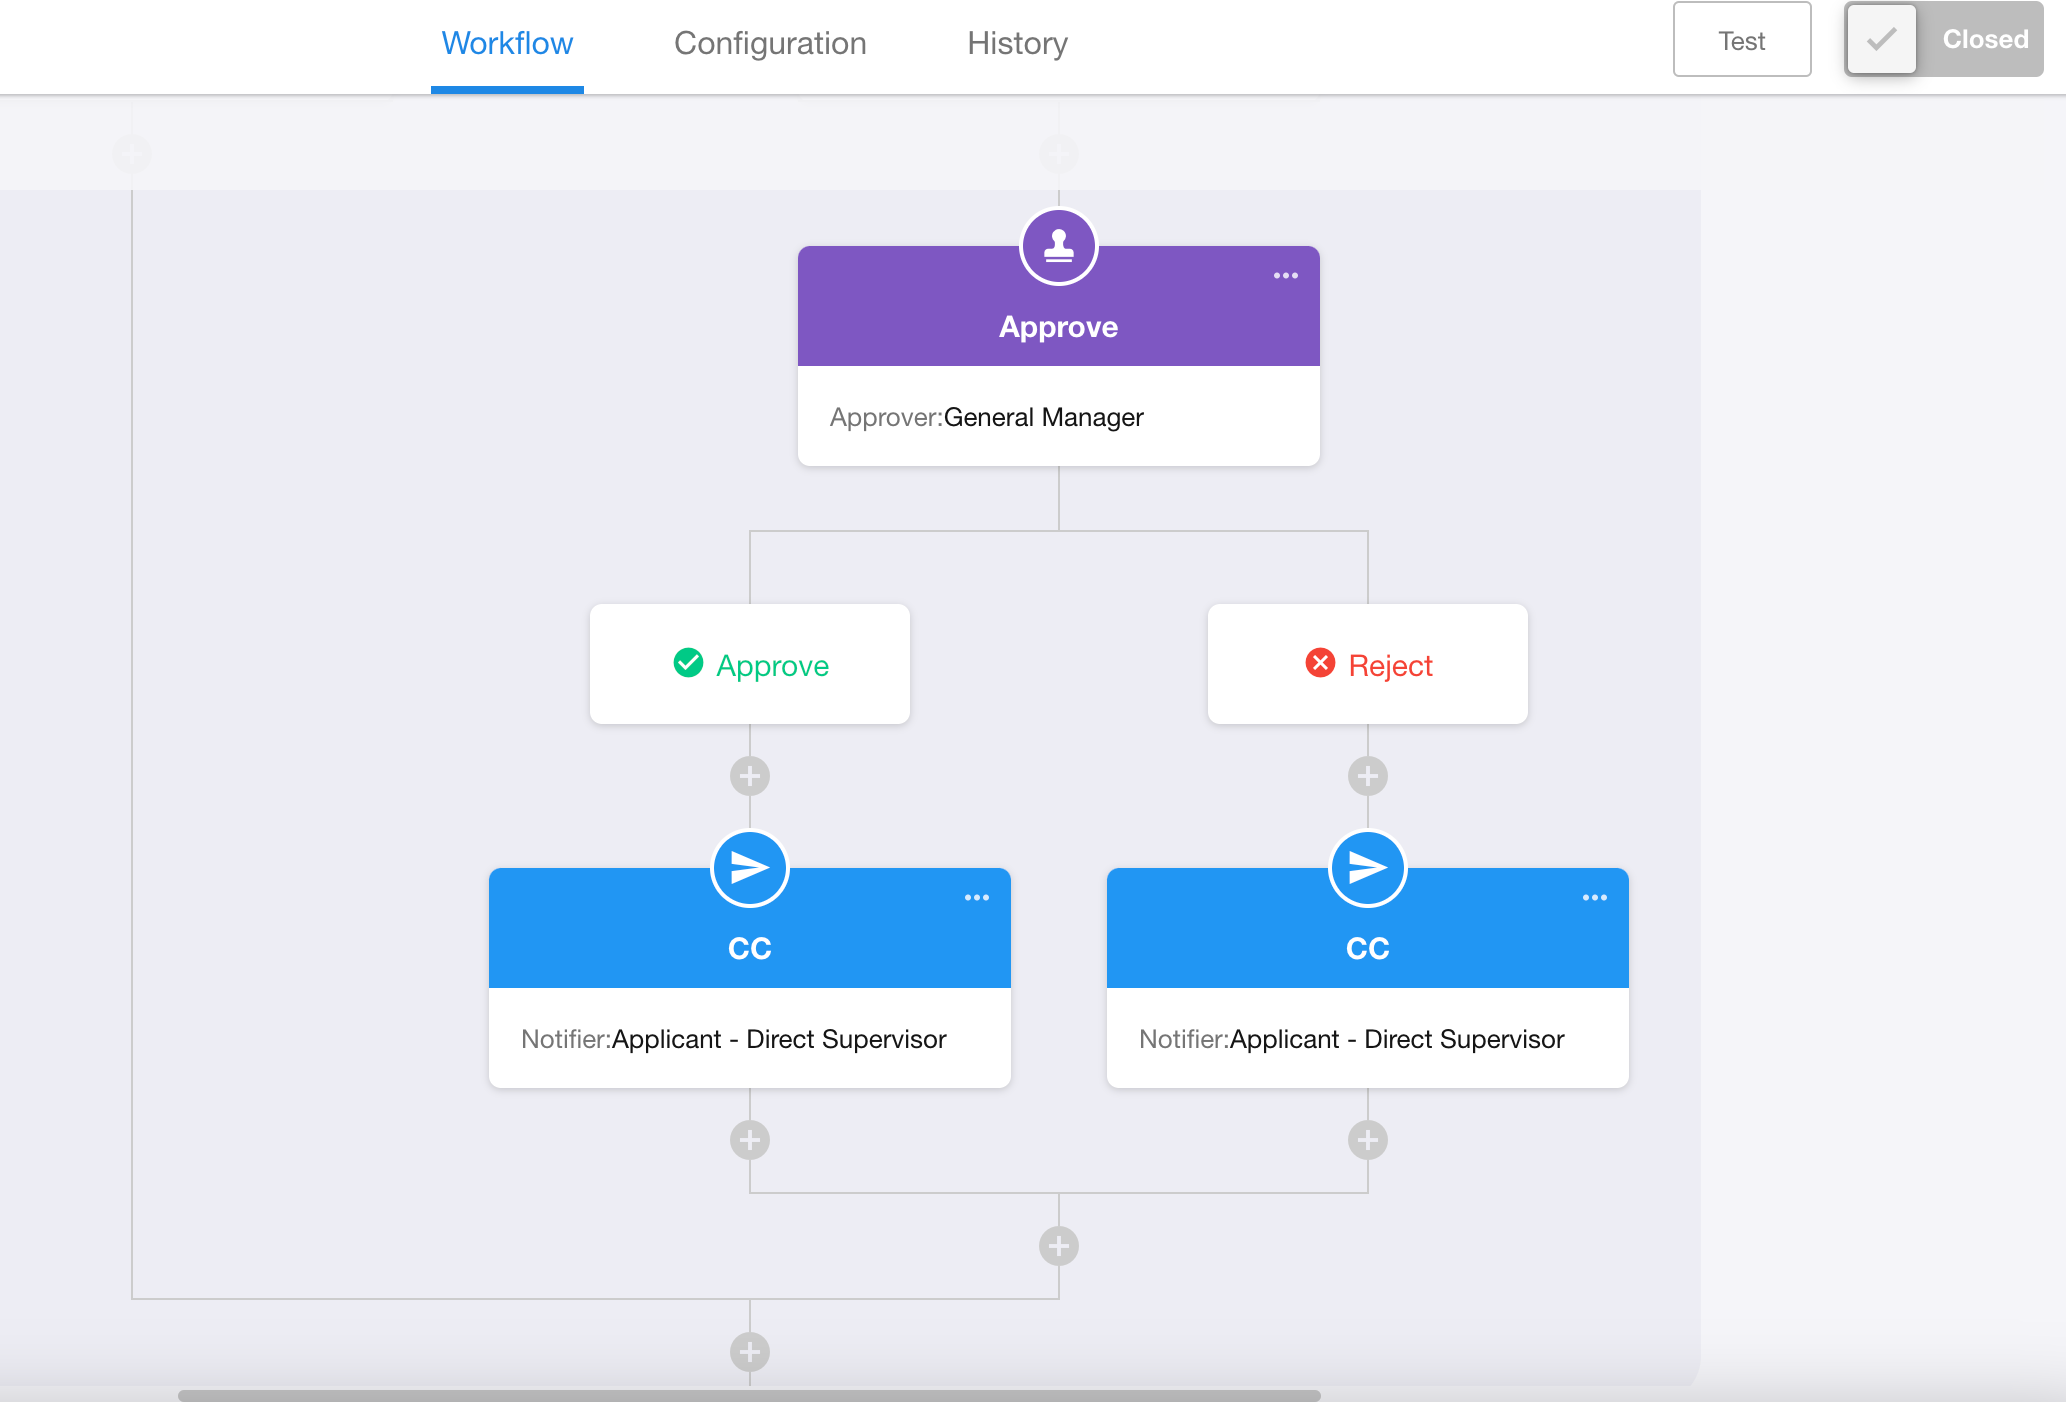
7. Set different actions based on the approval results
Branches for approval results can only be added and displayed after the [Approval] node.
8. Complete the node/workflow name and publish the workflow
9. Submit a reimbursement record to test
II. How to view and process the approval in worksheet
The status of the current approval, the approver, and the flowchart can be displayed directly in the view. You can check the flow status, or process the approval when you view the record. As shown below:
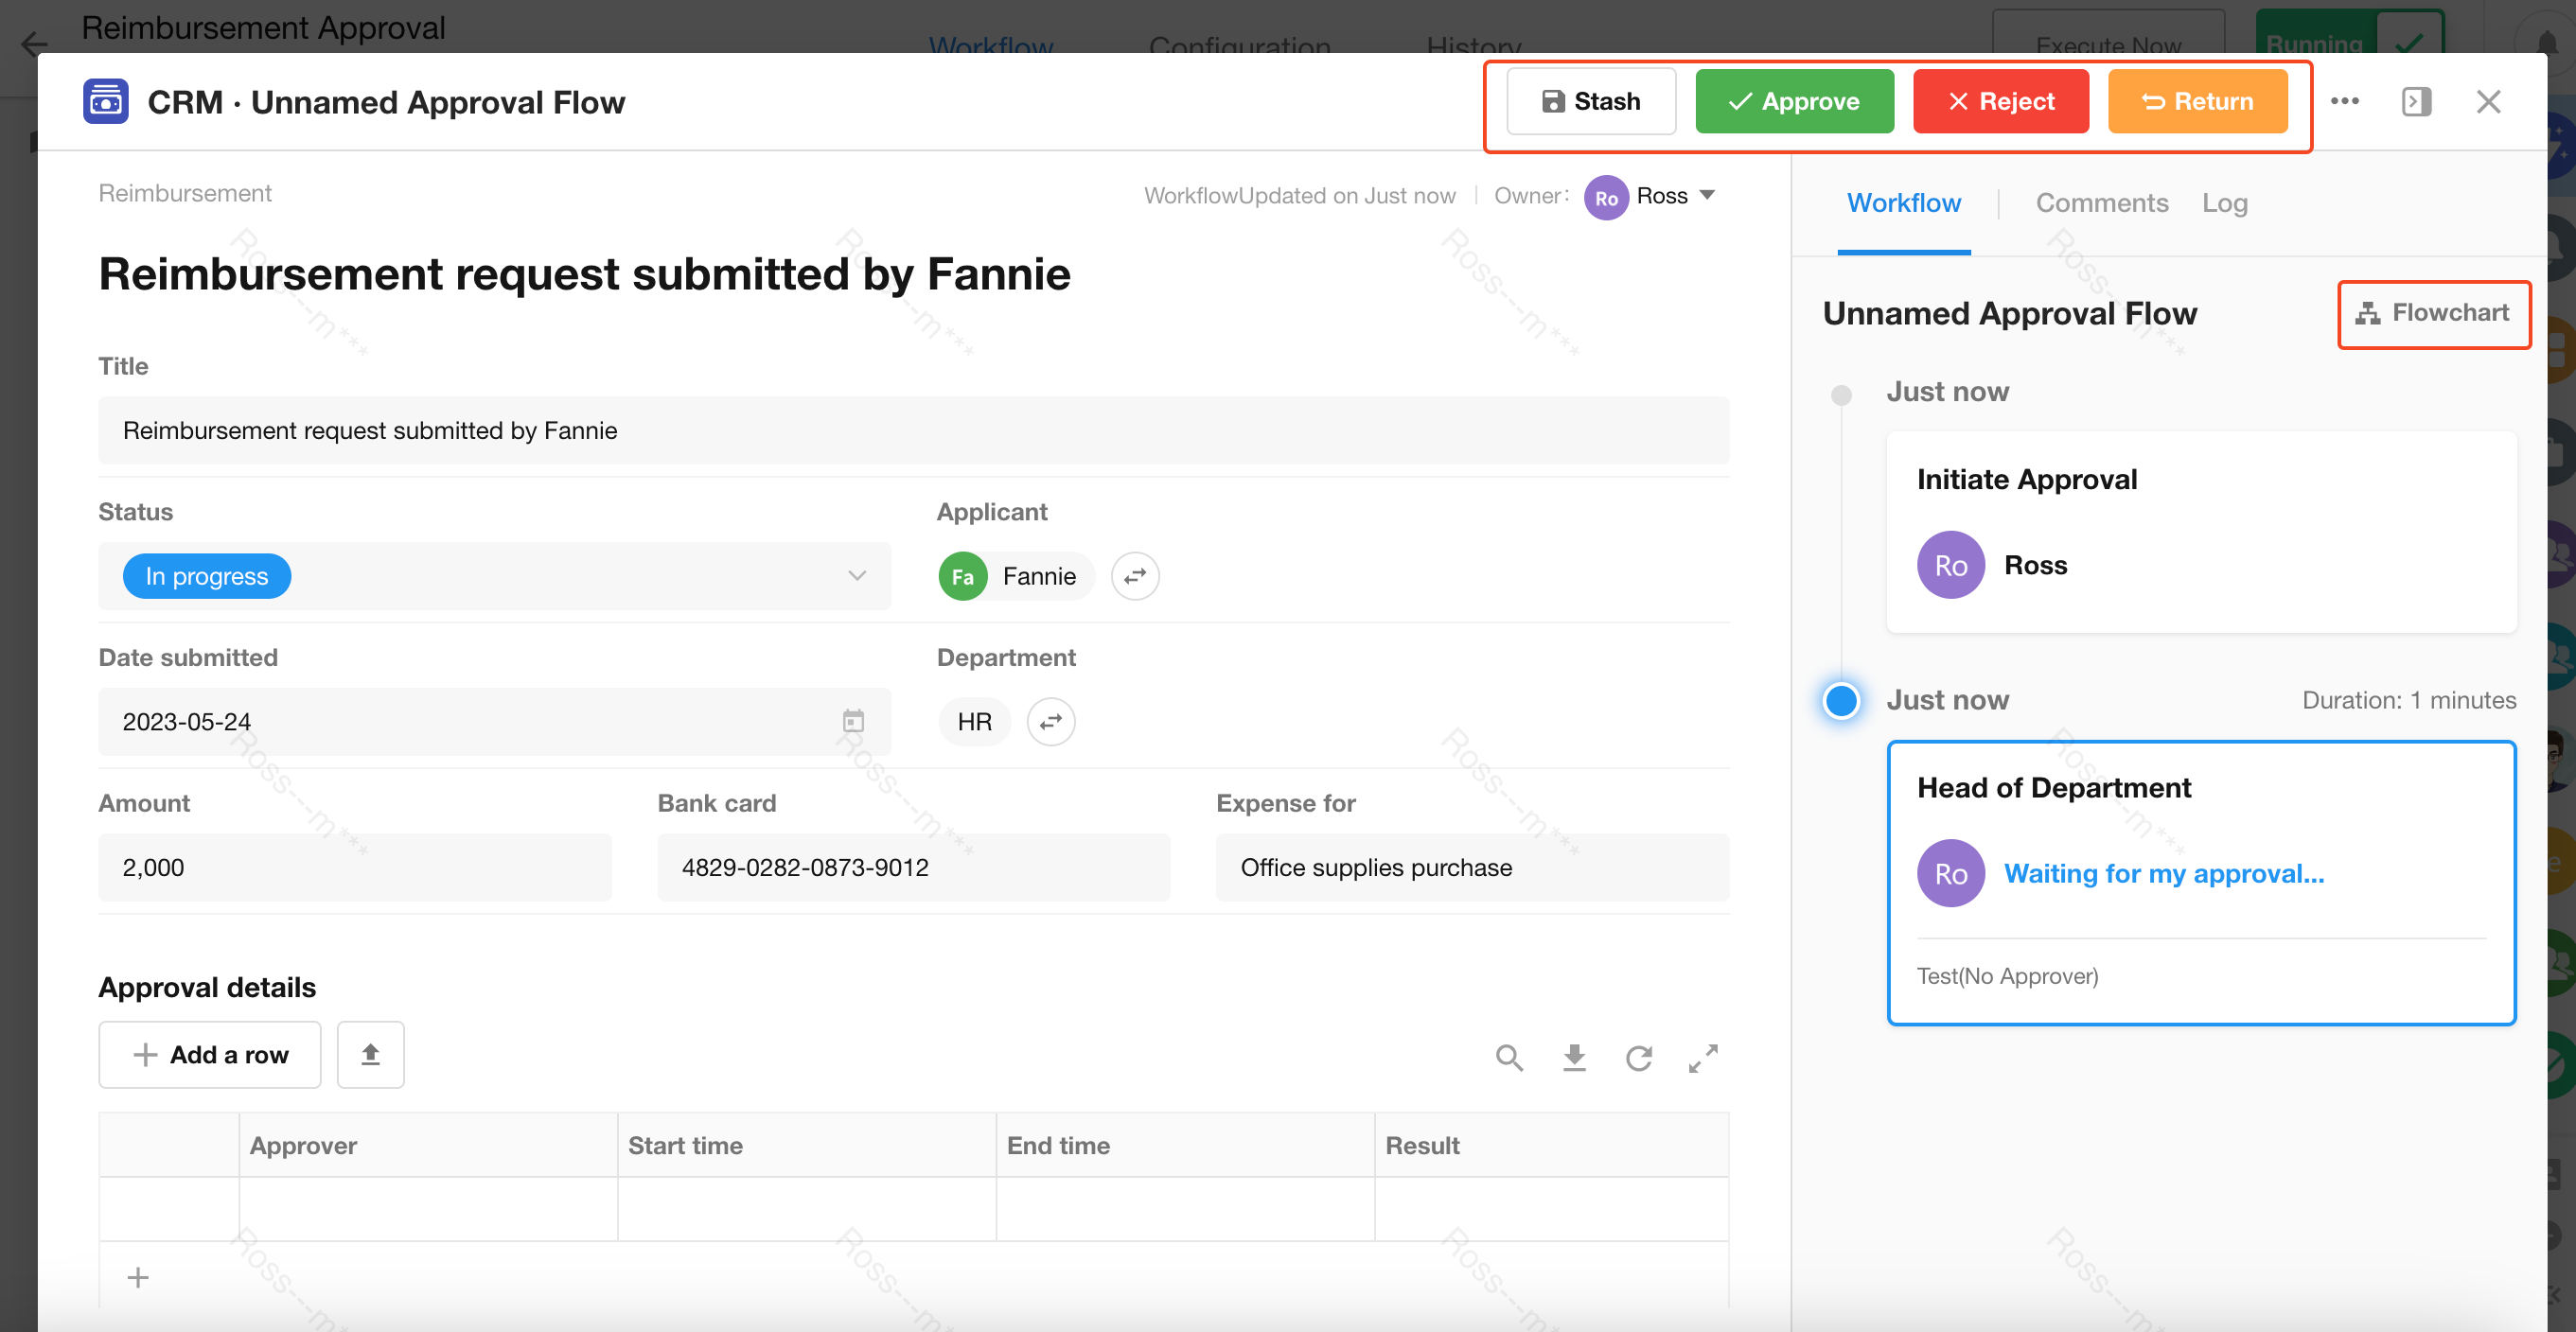
1) Enable Approval System Fields and Flow Chart in the Worksheet
Go to the "Function Switch" page of the worksheet and enable both the approval system fields and the approval details.
The approval system fields include:
- Workflow Name
- Status
- Approval Completion Time
- Node Owner
- Node Start Time
- Node Remaining Time
- Initiator
- Initiation Time
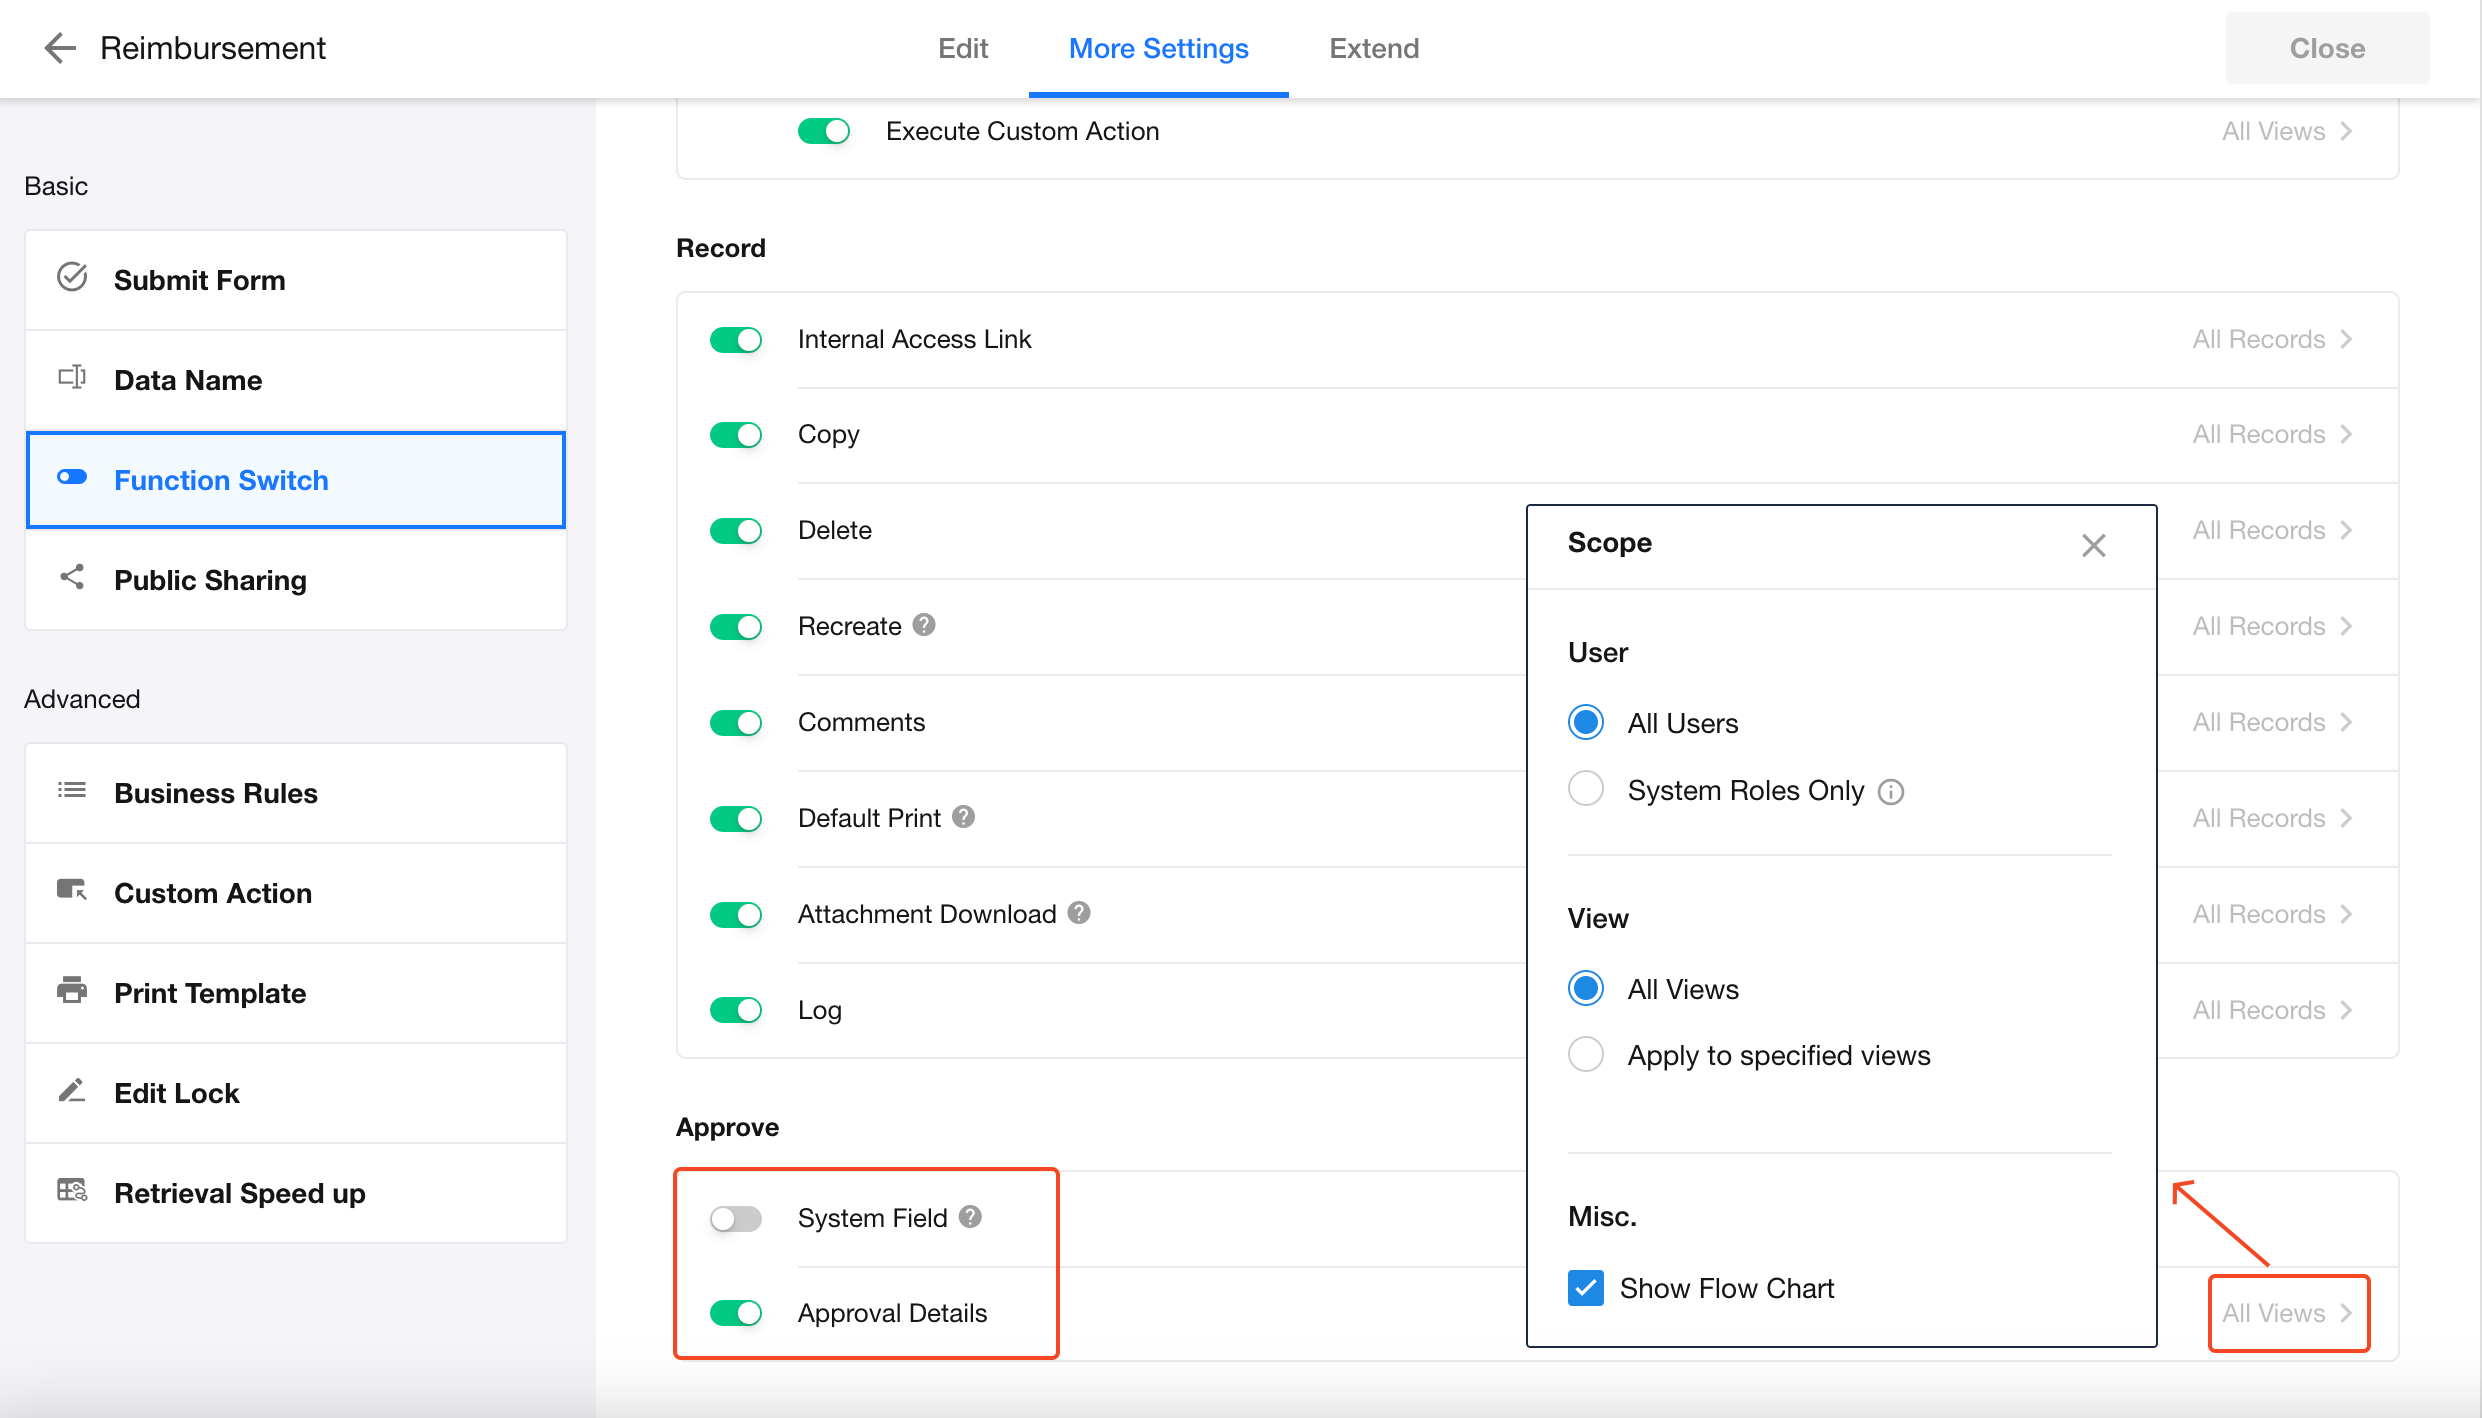
If "Show Flow Chart" is unchecked, the entry point for the flow chart will not be displayed in the approval card within the worksheet.
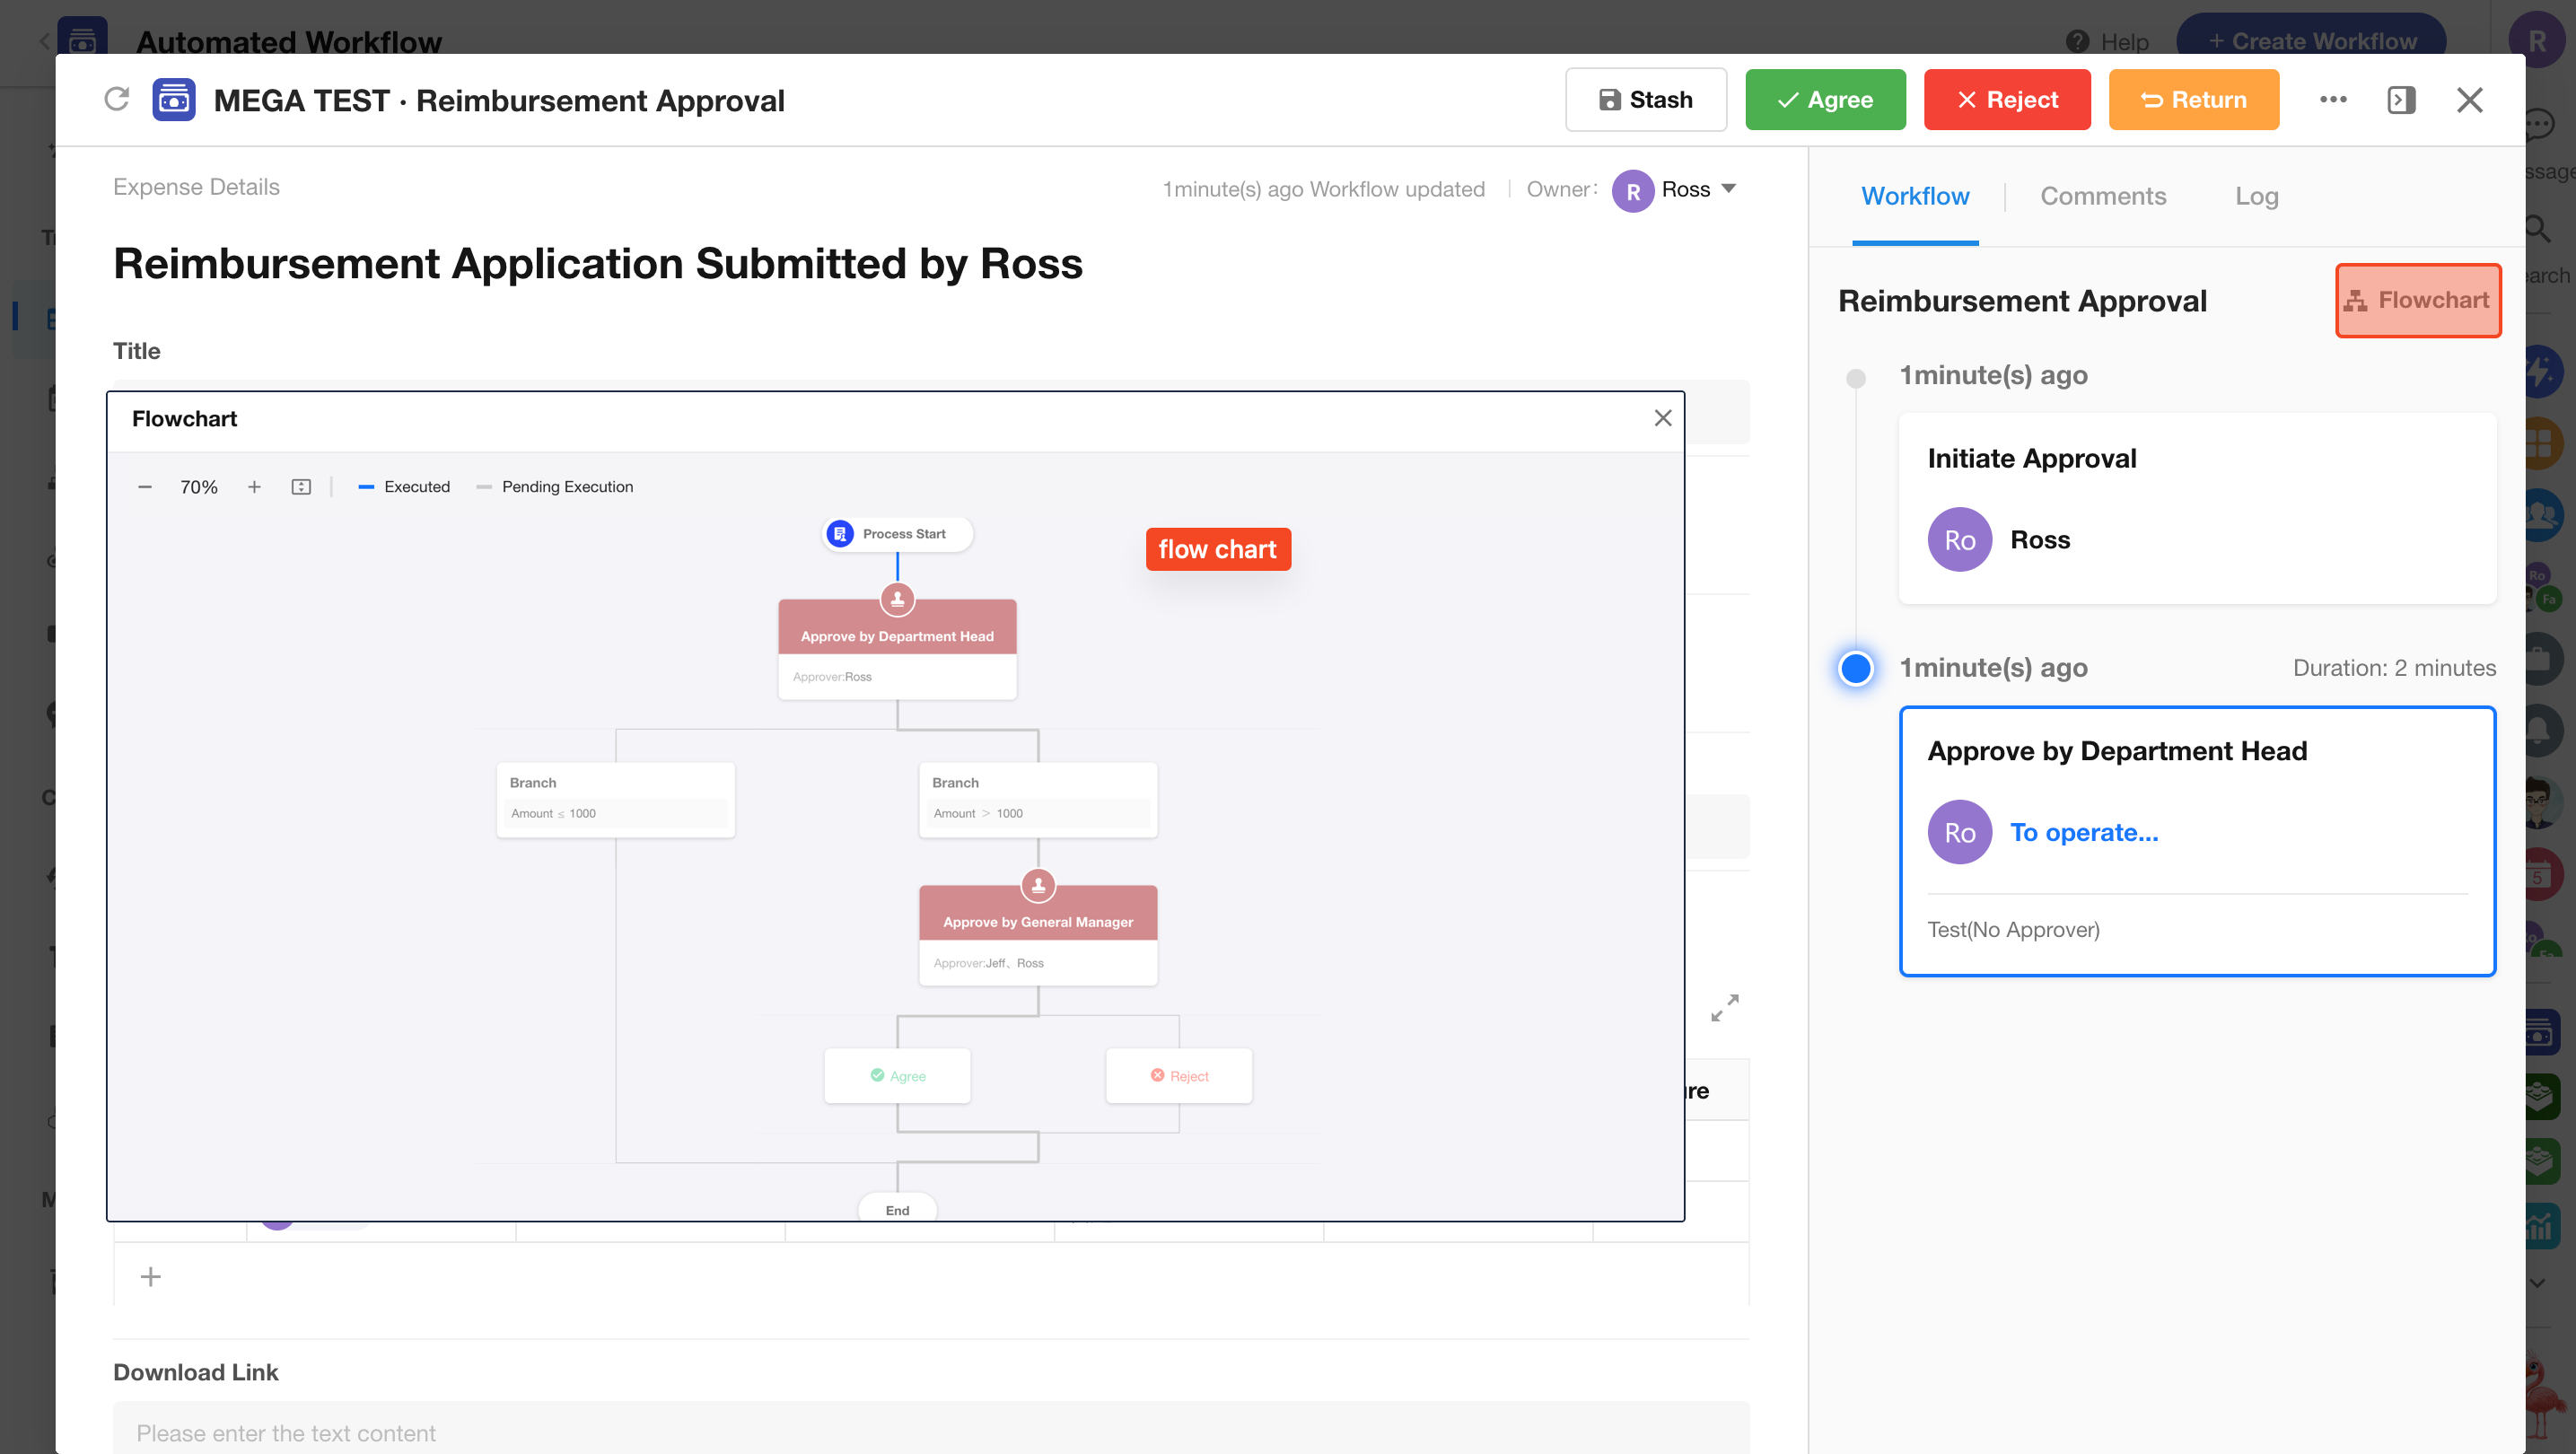
2) Display approval system fields in the table view
On the configuration page of the view, enable the approval system fields.
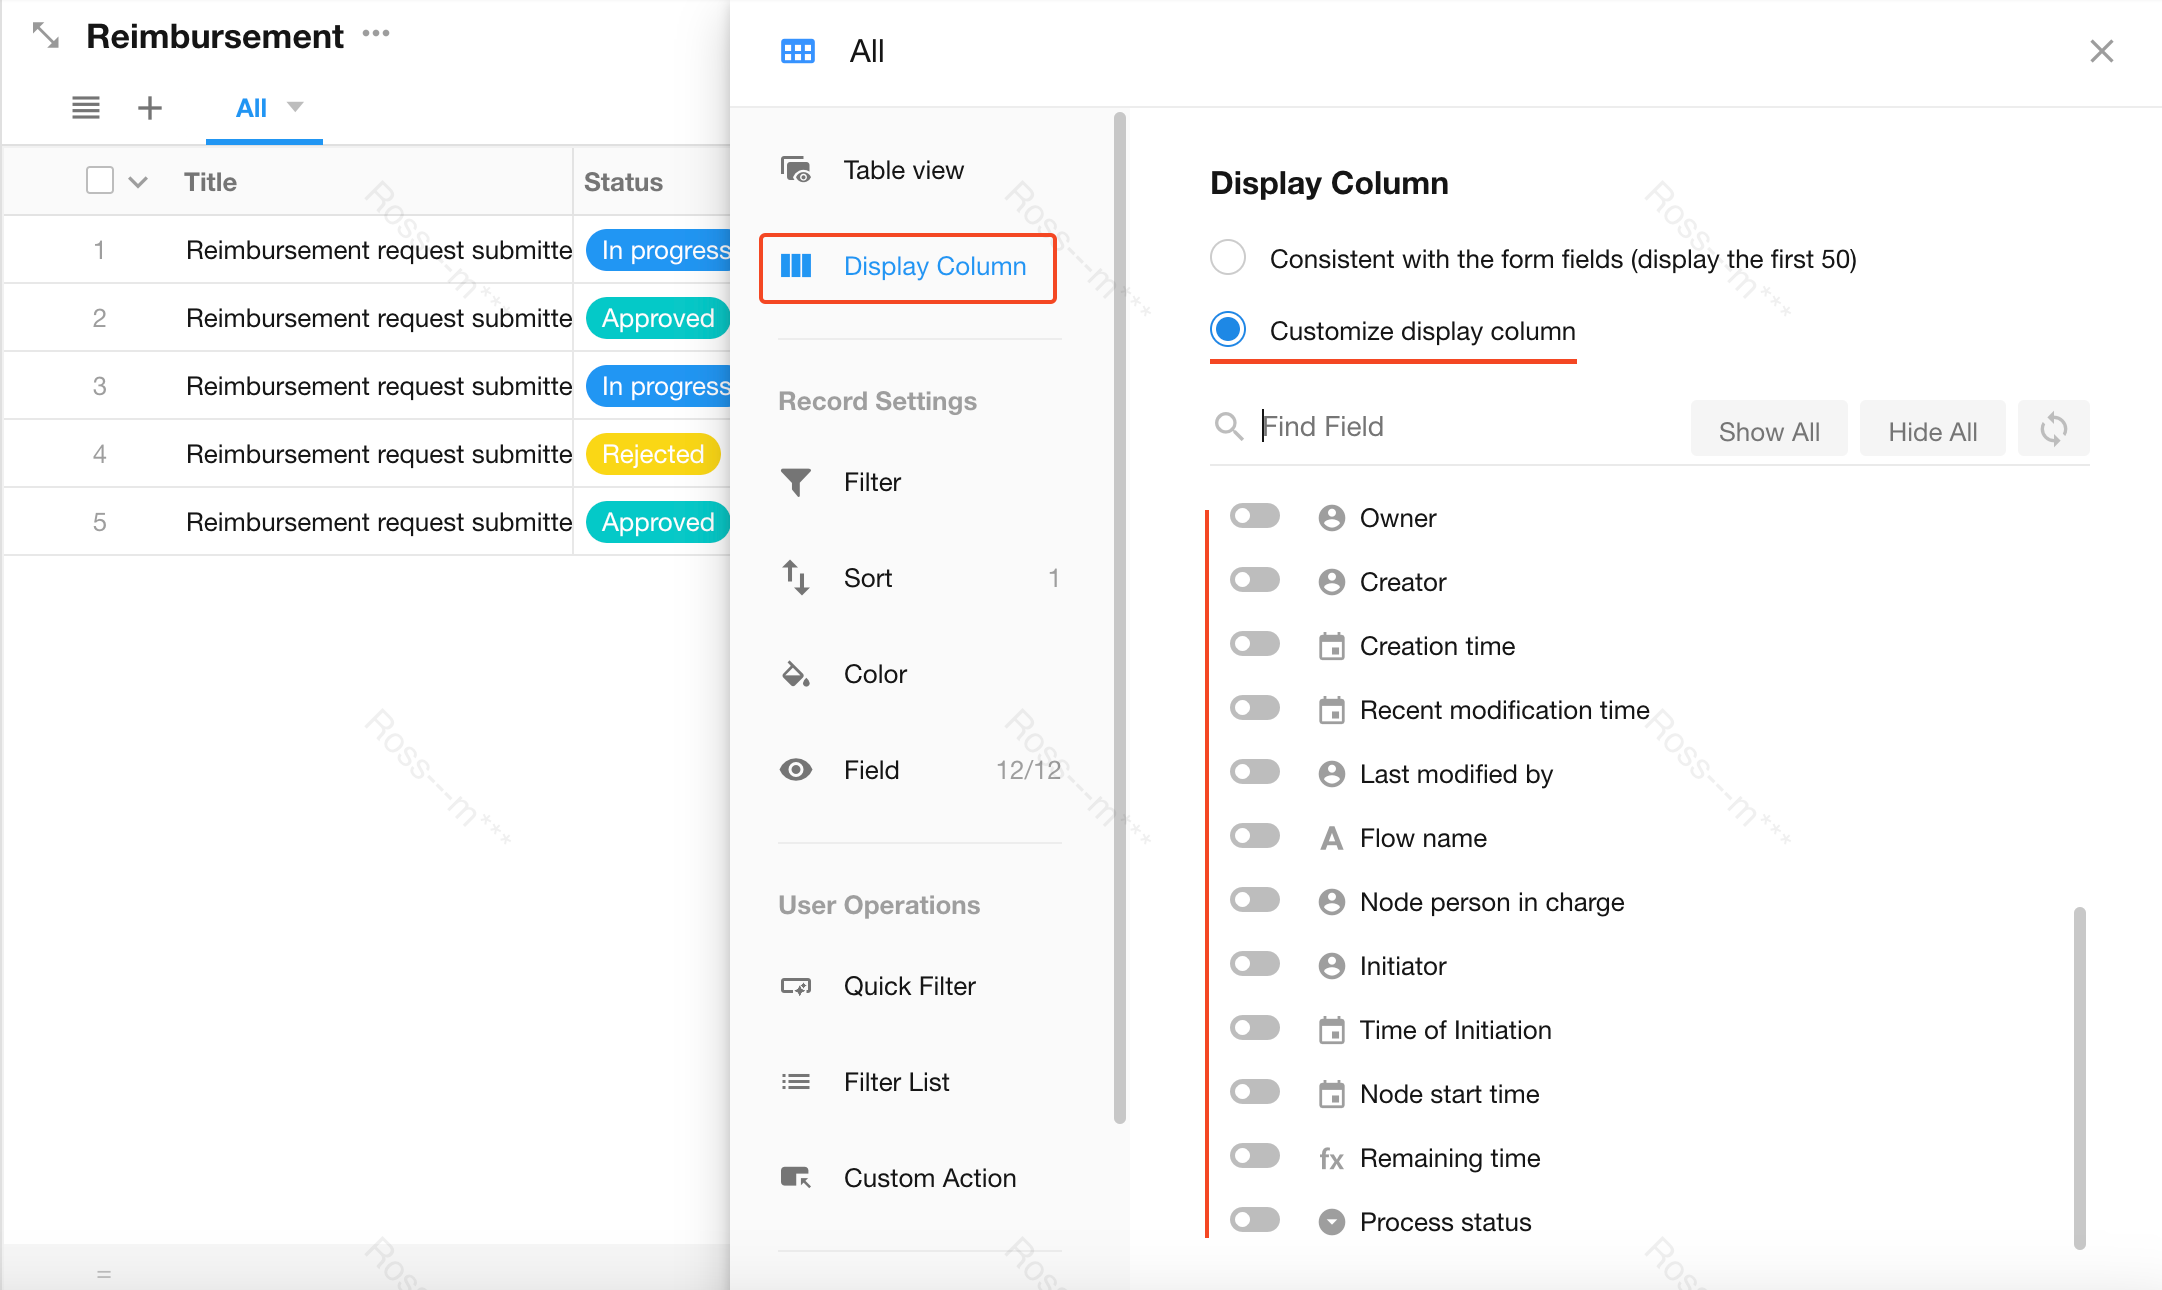
Once configured, approval flows can be viewed and processed in the worksheet.
These system fields cannot be modified by workflows, nor can they be changed manually; they are only changed automatically with approval operations.
3) What are the statuses in the approval flow?
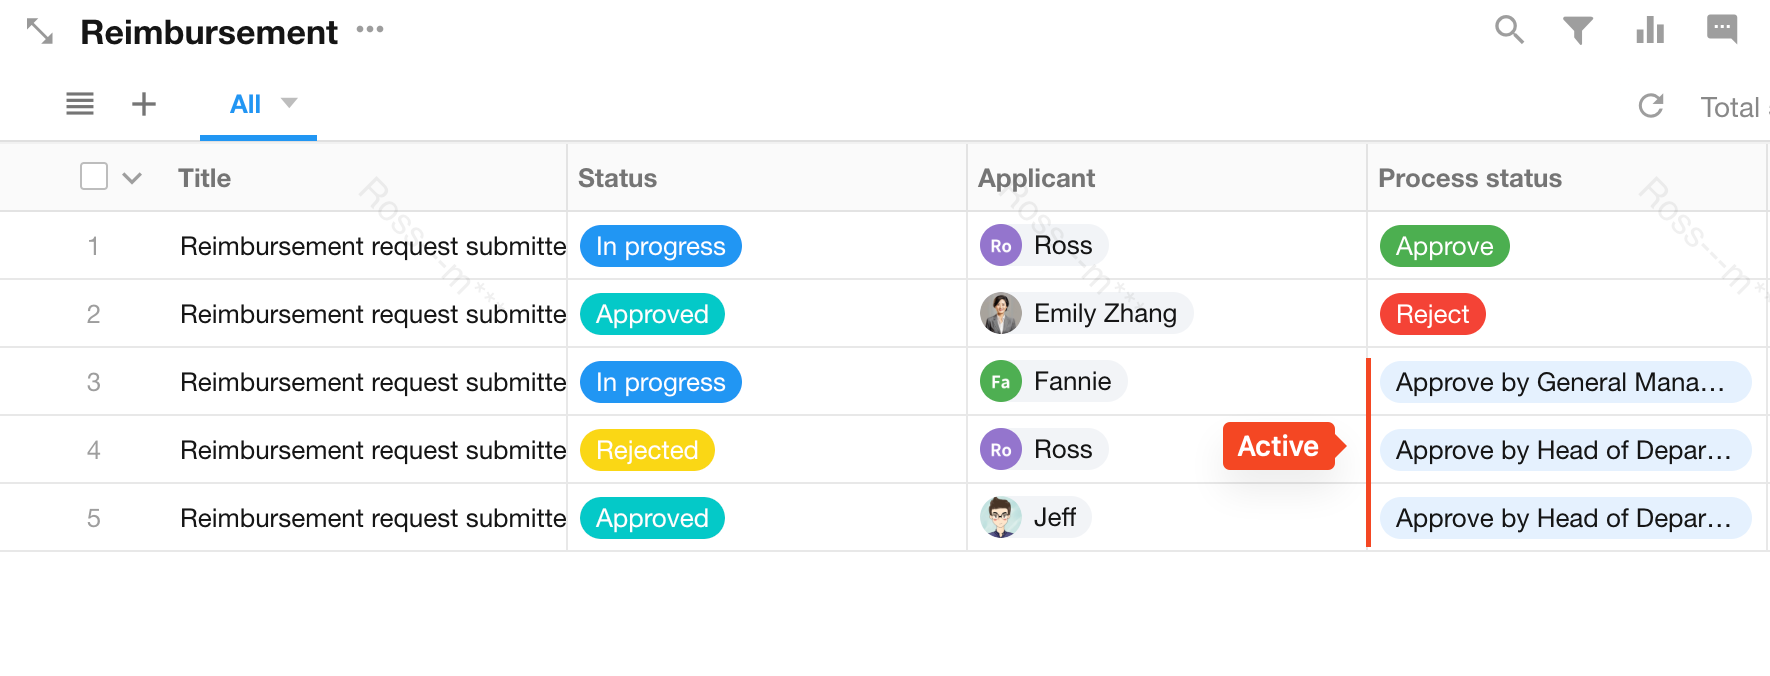
Status includes active, pass, reject and terminate.
However, in the worksheet views, for the active workflow, it displays the name of the current approval node in order to clearly show the progress of workflow.
For example, the name of the first approval node is [Approve by Supervisor], and the name of the second approval node is [Approve by General Manager]. When it is being approved by the supervisor or the general manager, the status field will show as Approve by Supervisor, or Approve by General Manager, and will not show as Active.
Configure the approval flow:
Workflow status:
III. Configure the [Initiate Approval Flow] node

1. Modify the node name
This name is displayed in the approval flow list, notification messages, printing, etc.
2. Set up data objects
Select the record to be approved. You can select the previous node that represents a record.

3. To-do title
After setting the to-do title, it will be displayed in the workflow to-do list, the details page of the approval record, and the notification messages of the approval. If no to-do title is set, it will be displayed as the record title.
When setting the to-do title, users can concatenate fixed content and fields.
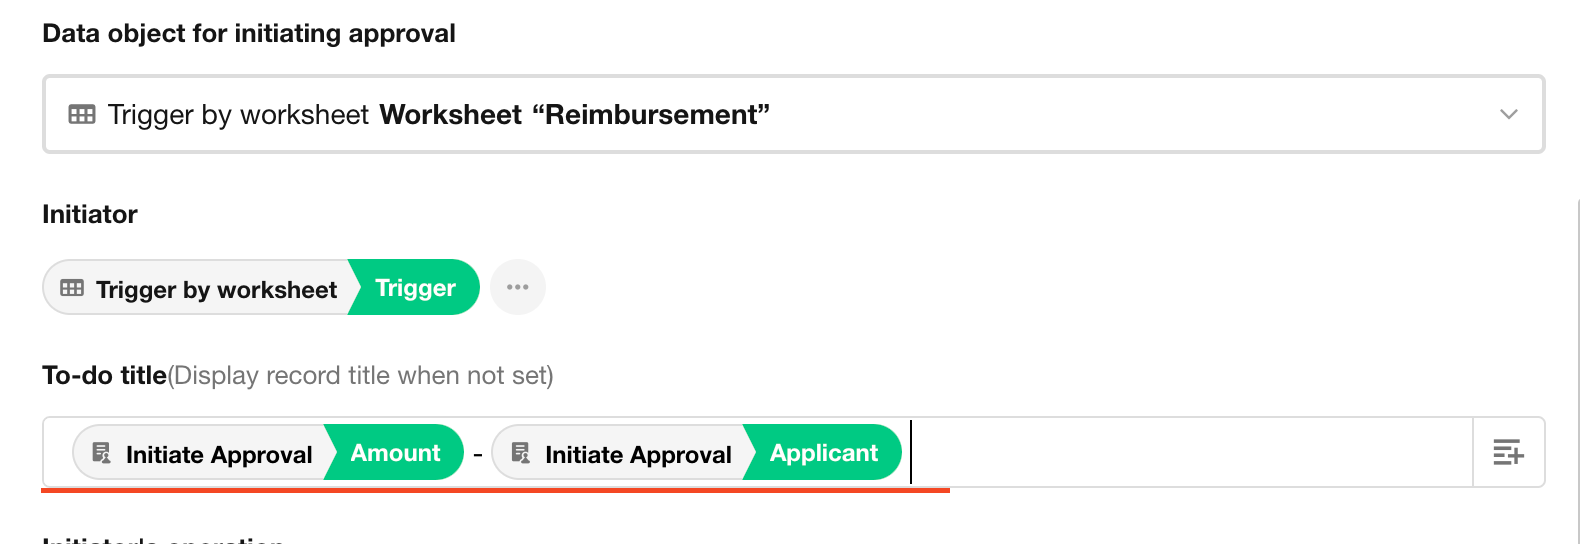
Example:

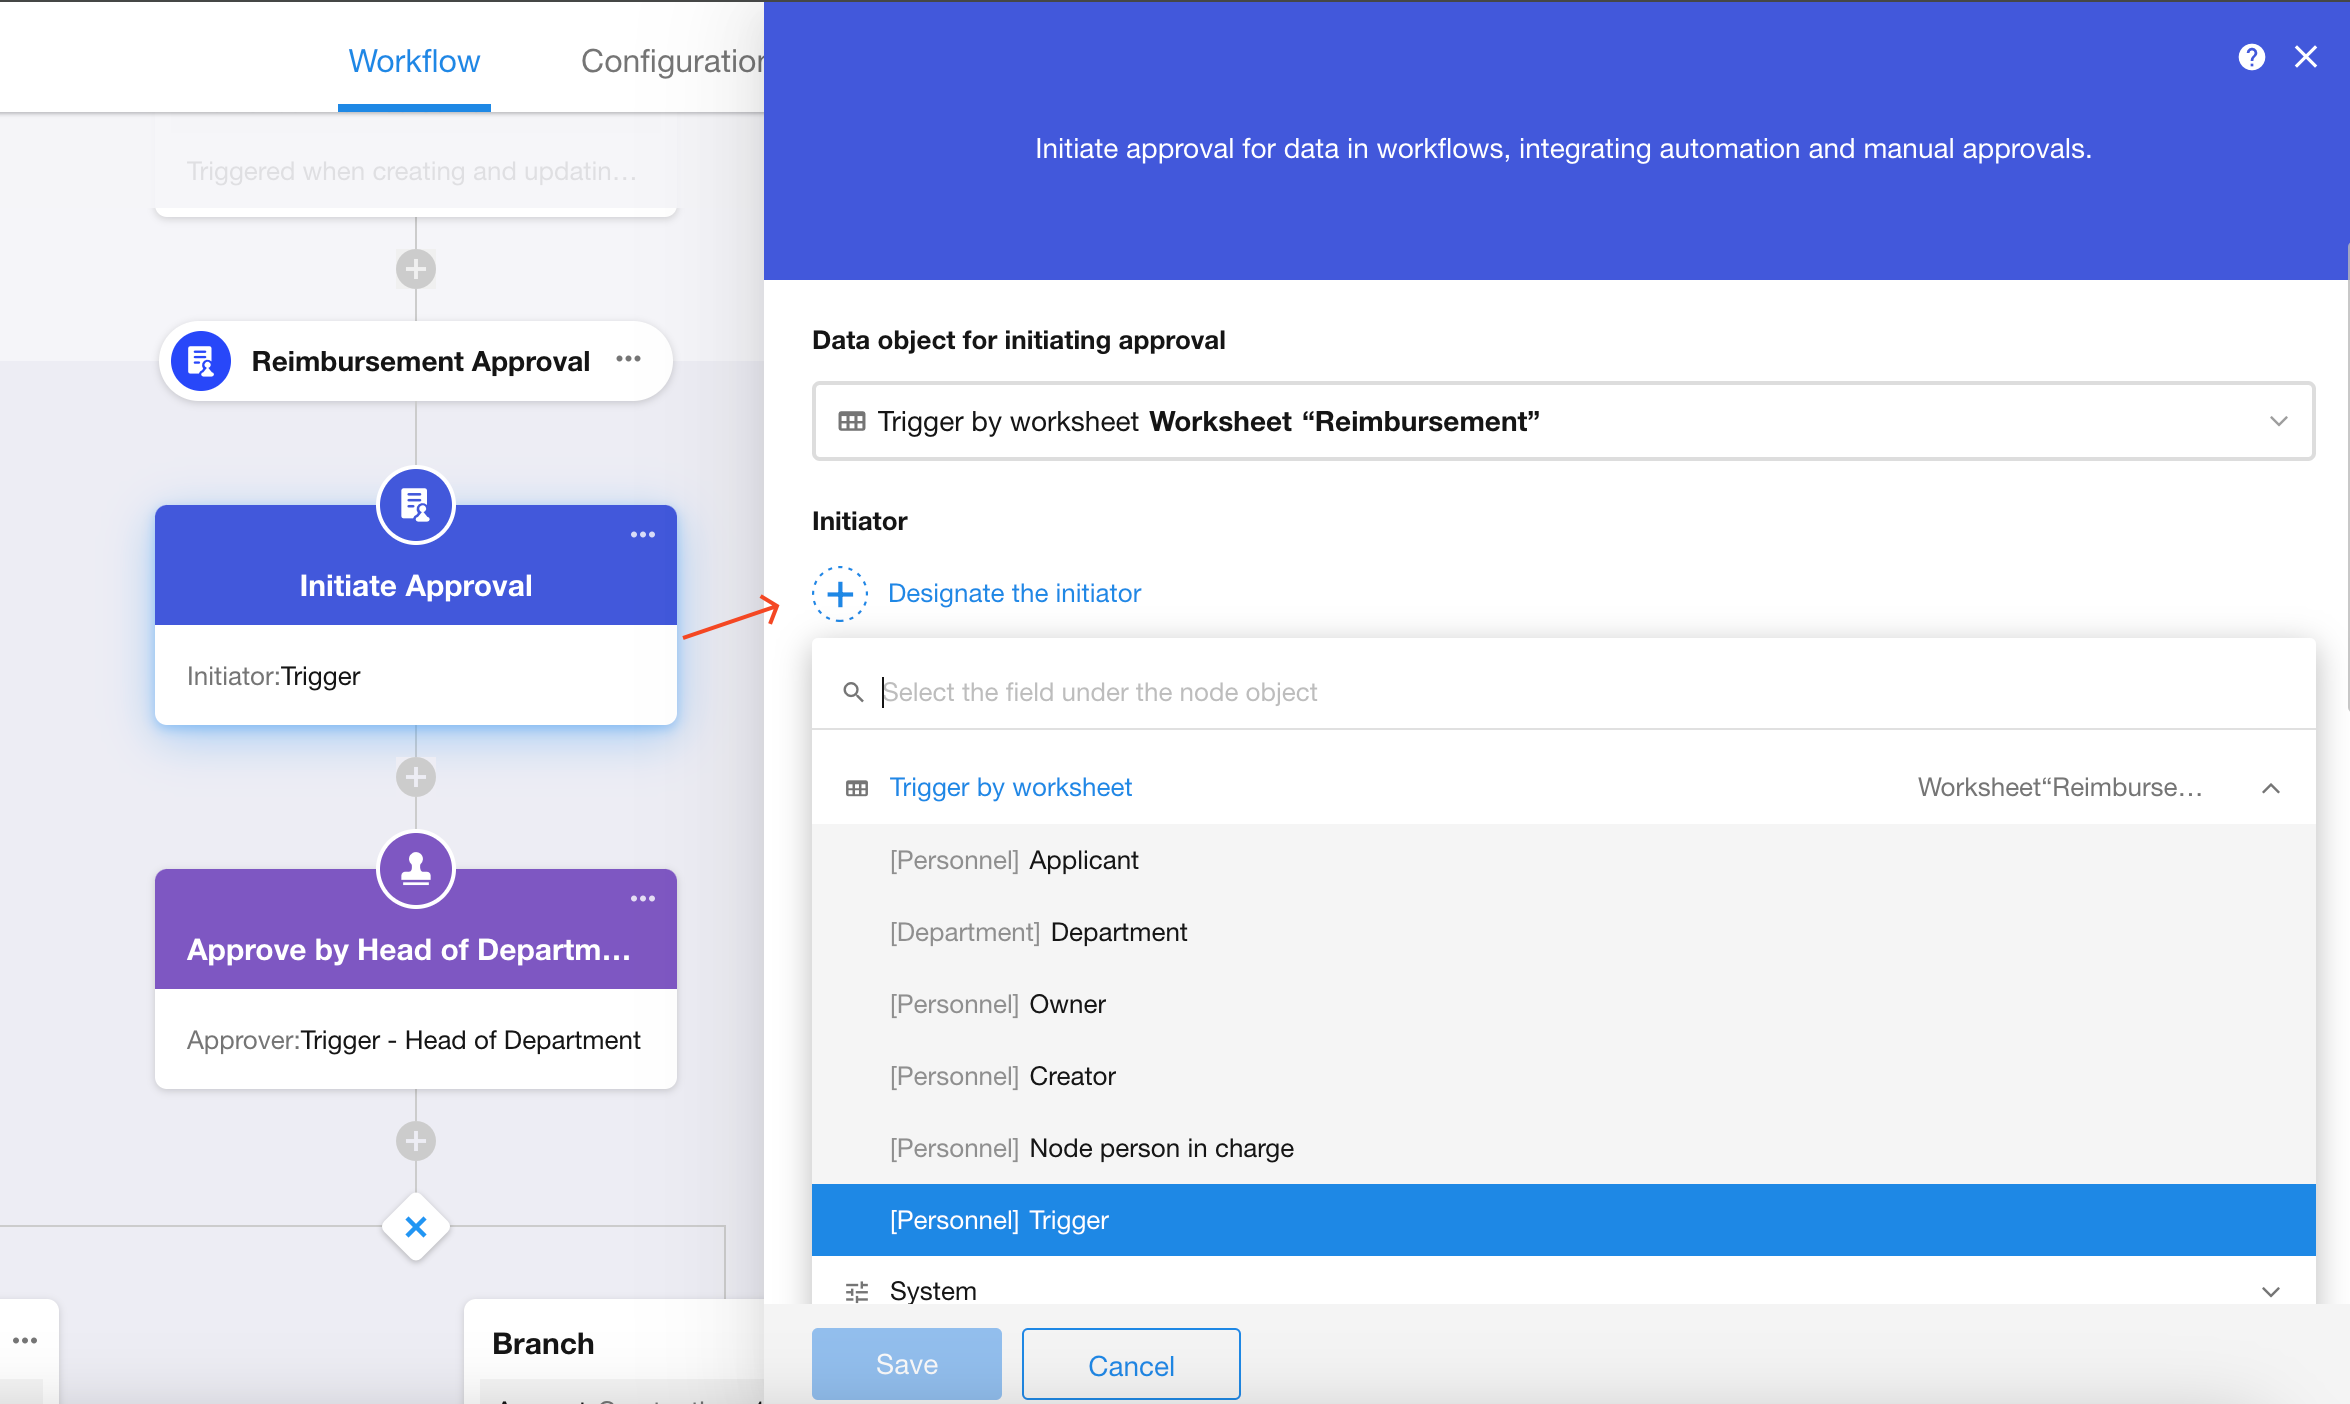
4. Set up the initiator
As shown below, the initiator of the approval flow is not necessarily the trigger of the main record, as mentioned earlier, [Initiate Approval Flow] can be considered a subflow, so the initiator is the user who triggers the subflow.
You can select one person from the record for approval as the initiator.
5. Initiator's operation
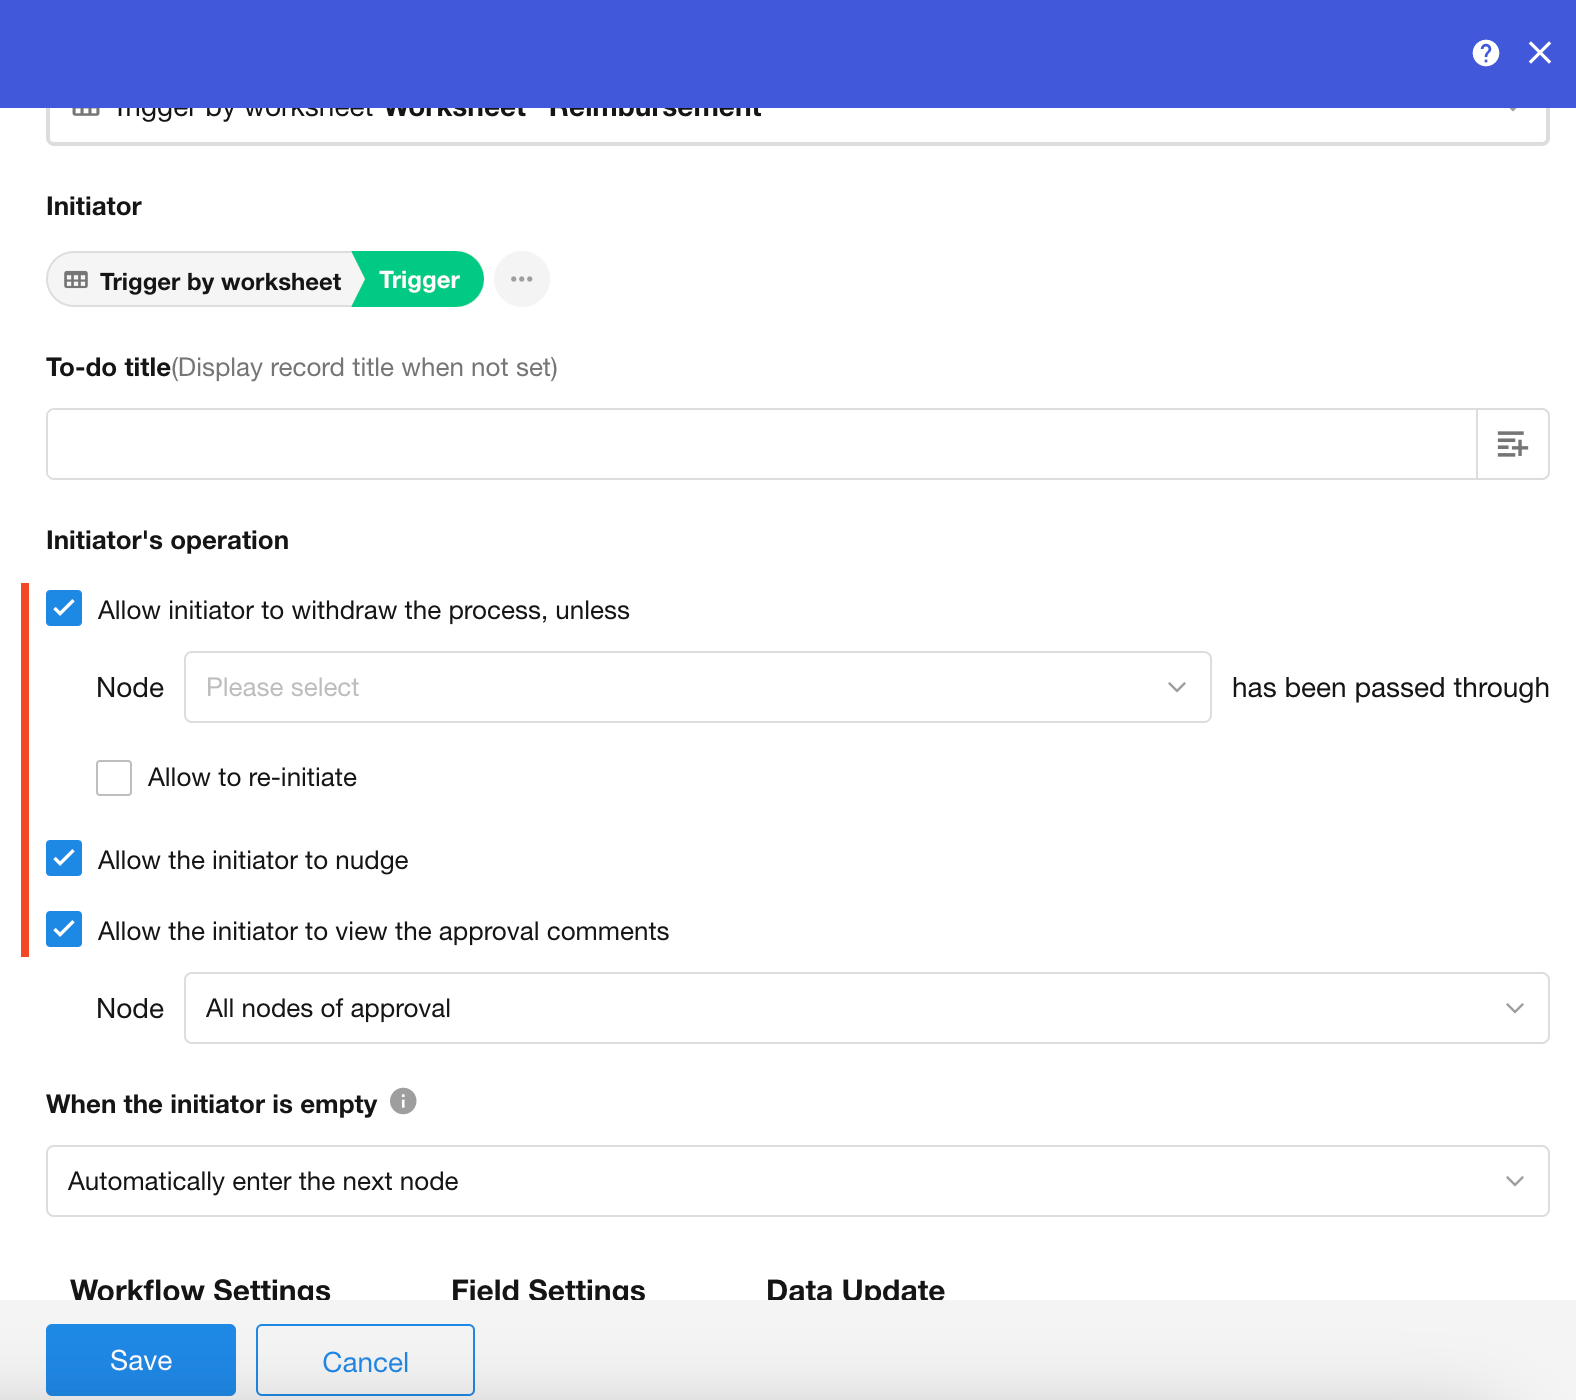
After the initiator submits the approval request, they can perform operations such as withdraw, nudging, and viewing approval comments. The initiator can be granted the necessary permissions through node configuration.
-
1) Allow the initiator to withdraw the process
After checking "Allow the initiator to withdraw the process", before the approval process is completed, the initiator can withdraw the submitted approval request. Additionally, the system also supports setting specific conditions, such as not allowing the initiator to withdraw the approval after a certain approval node is completed. If this condition is not set, as long as the approval process is not completed, the initiator can withdraw the approval at any time.
After the initiator withdraws the approval, if they need to re-initiate the approval, the system provides two ways to choose from: "repeat the flow", which means going through the original flow again; "back to the time of the withdrawal of the node", which means starting the approval flow again directly at the time of the withdrawal of the node. These two methods can be flexibly configured according to actual needs.
-
2) Allow the initiator to nudge
After selecting the "Allow initiator to nudge" option, the initiator can click the nudge button to remind the current approver to process as soon as possible.
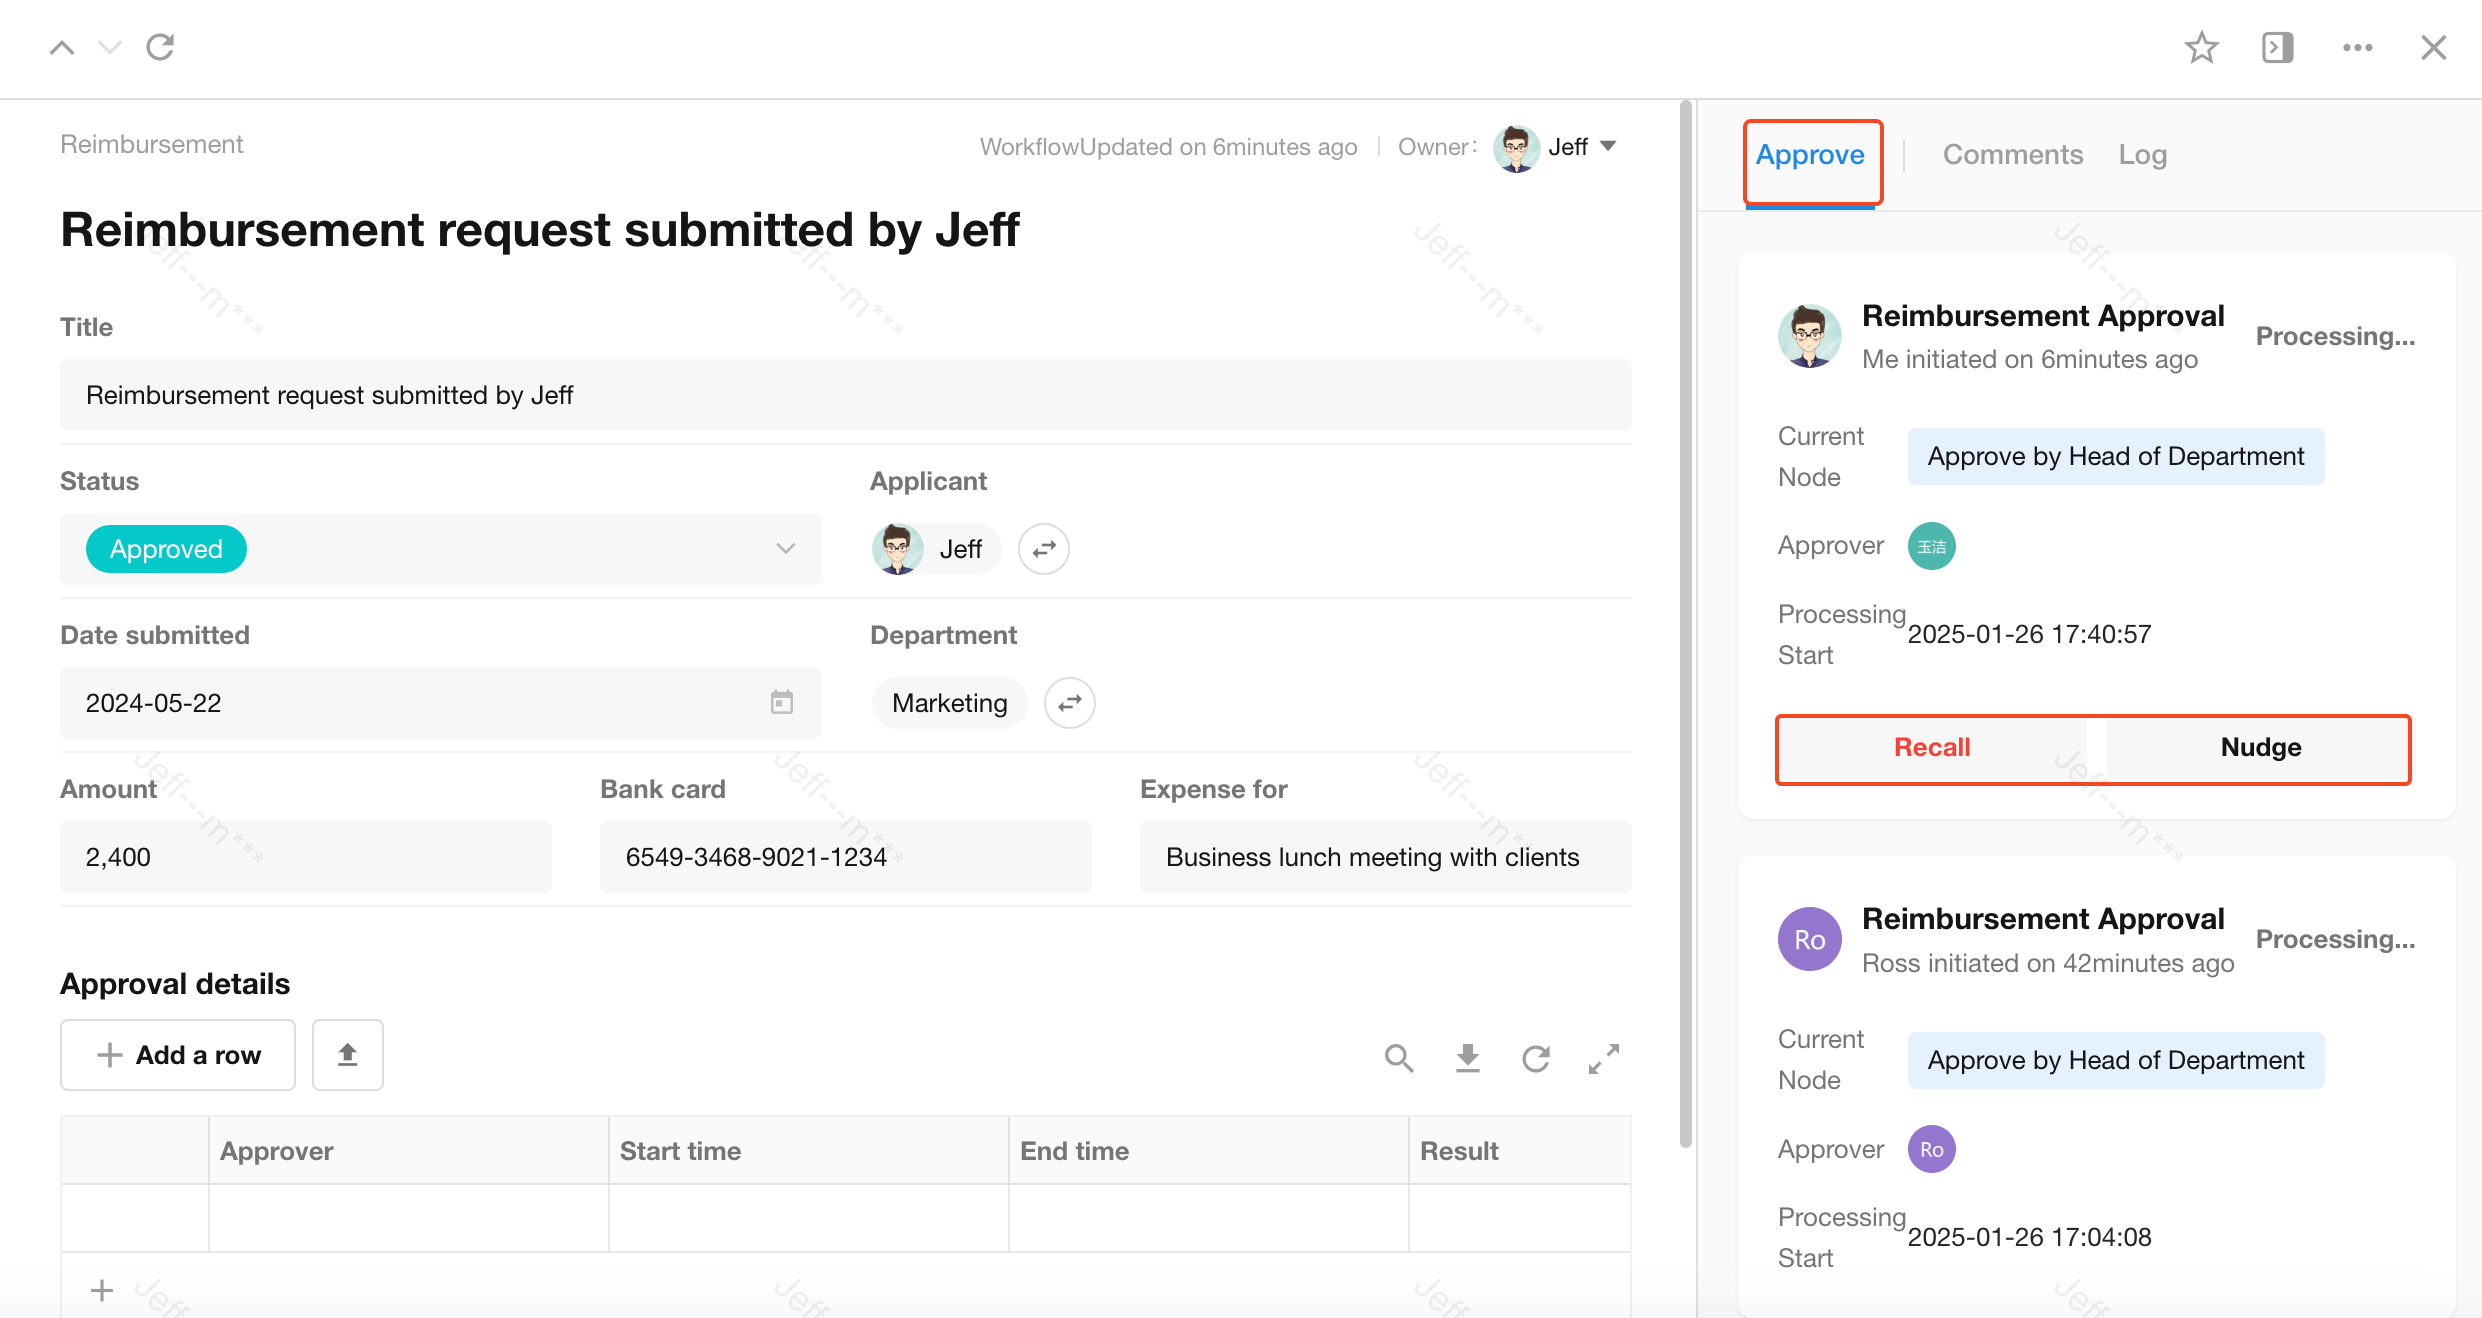
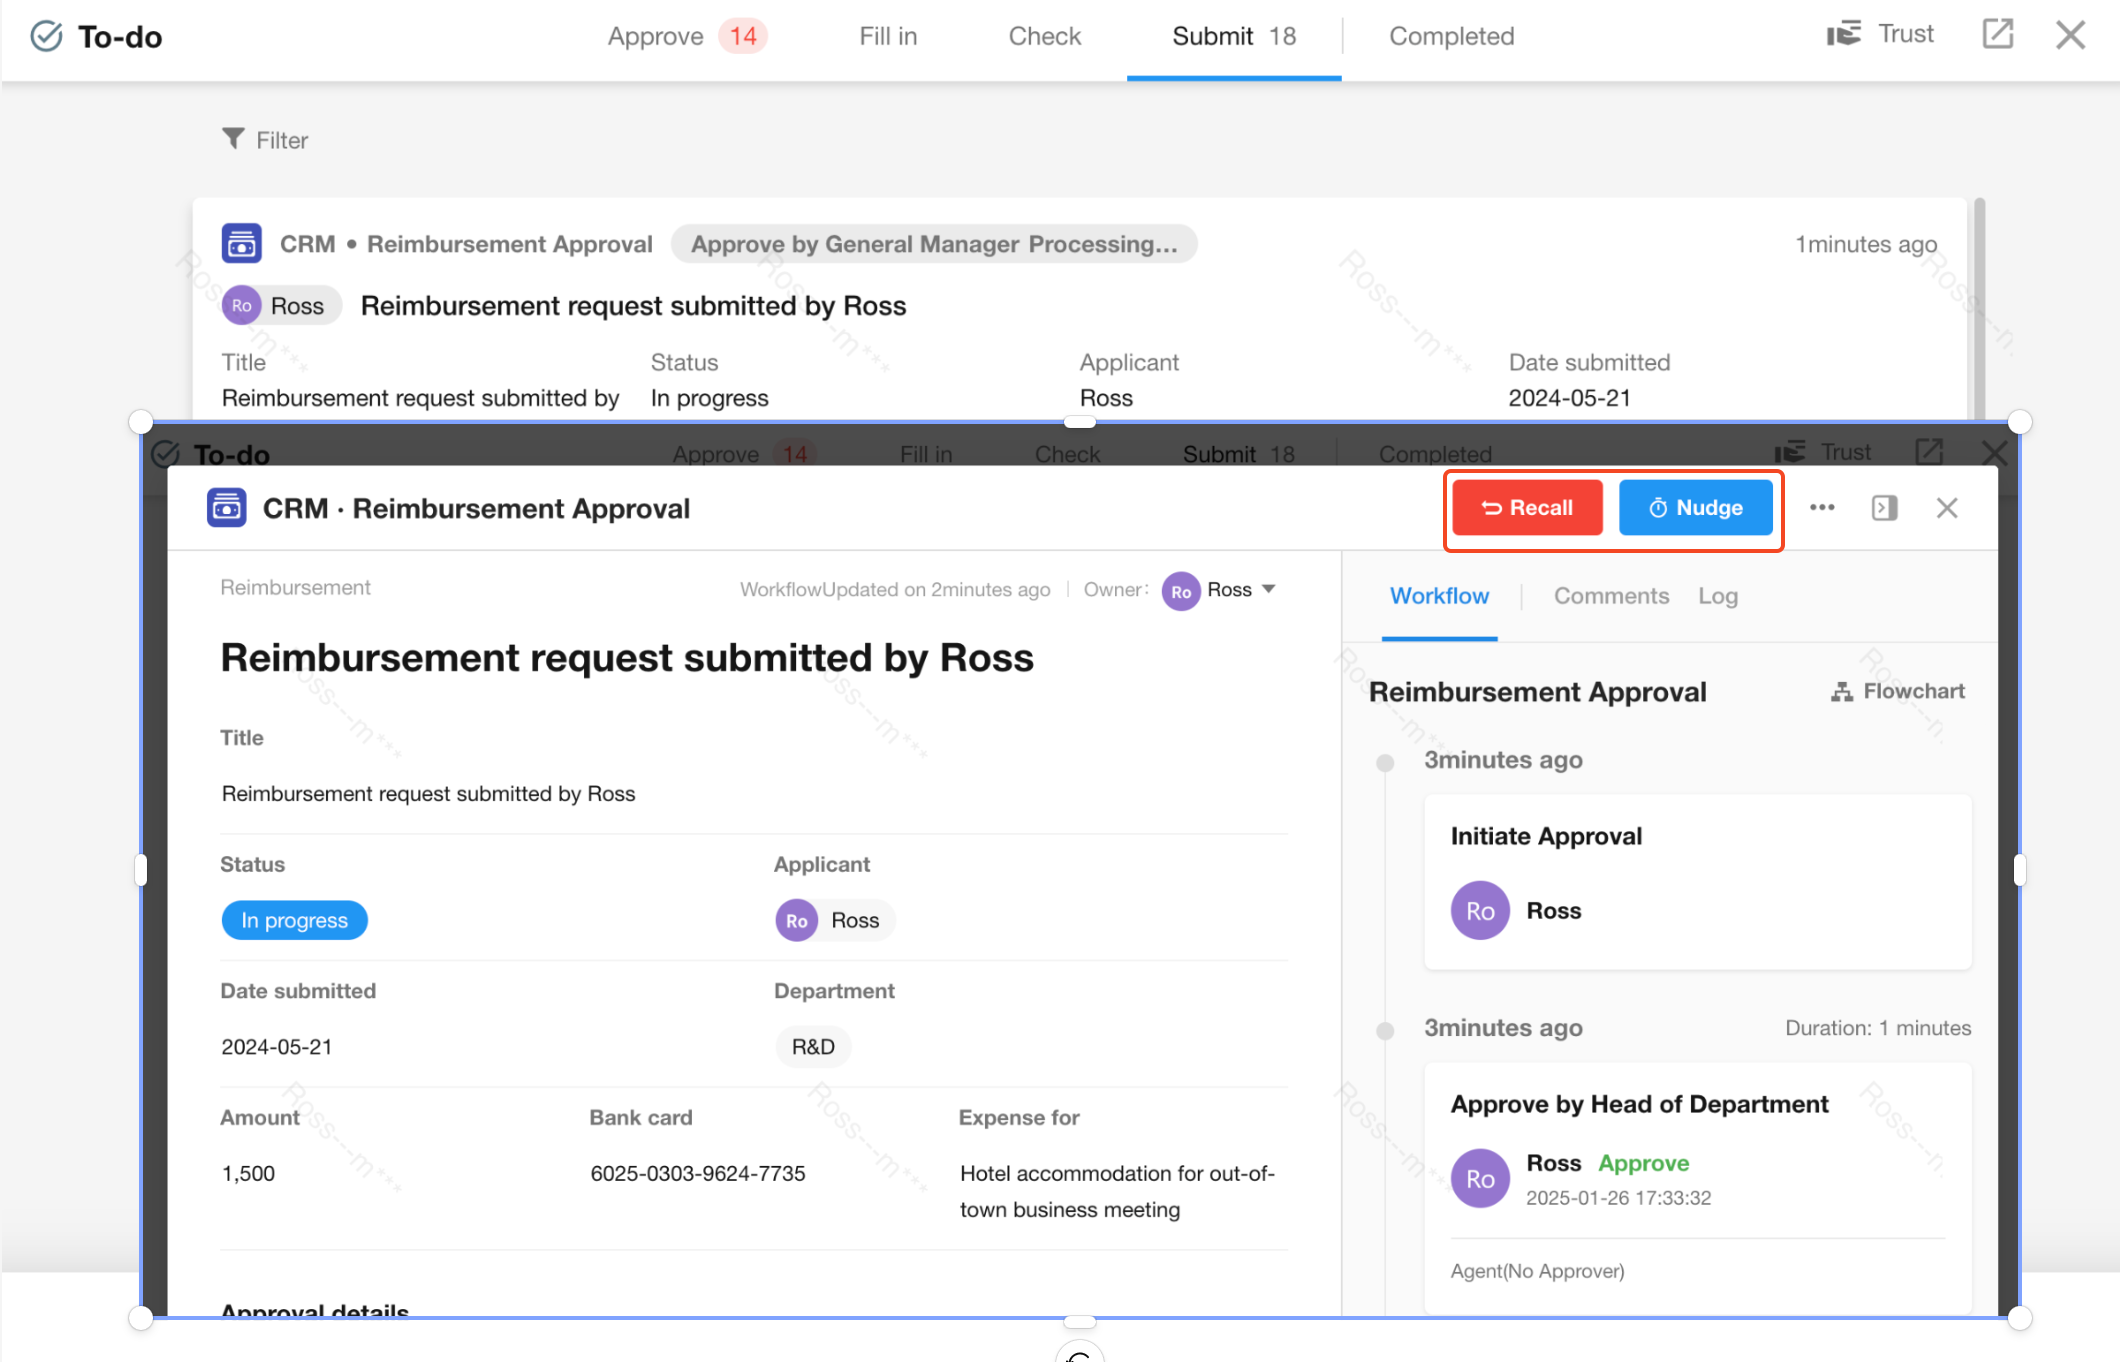
How to Nudge/Withdraw/Re-initiate:
-
Open the record and operate on the approval card
-
Go to [To-do] > [Submit]
-
-
3) Allow the initiator to view the approval comments
It is possible to set which approval node's approval comments the initiator can view.
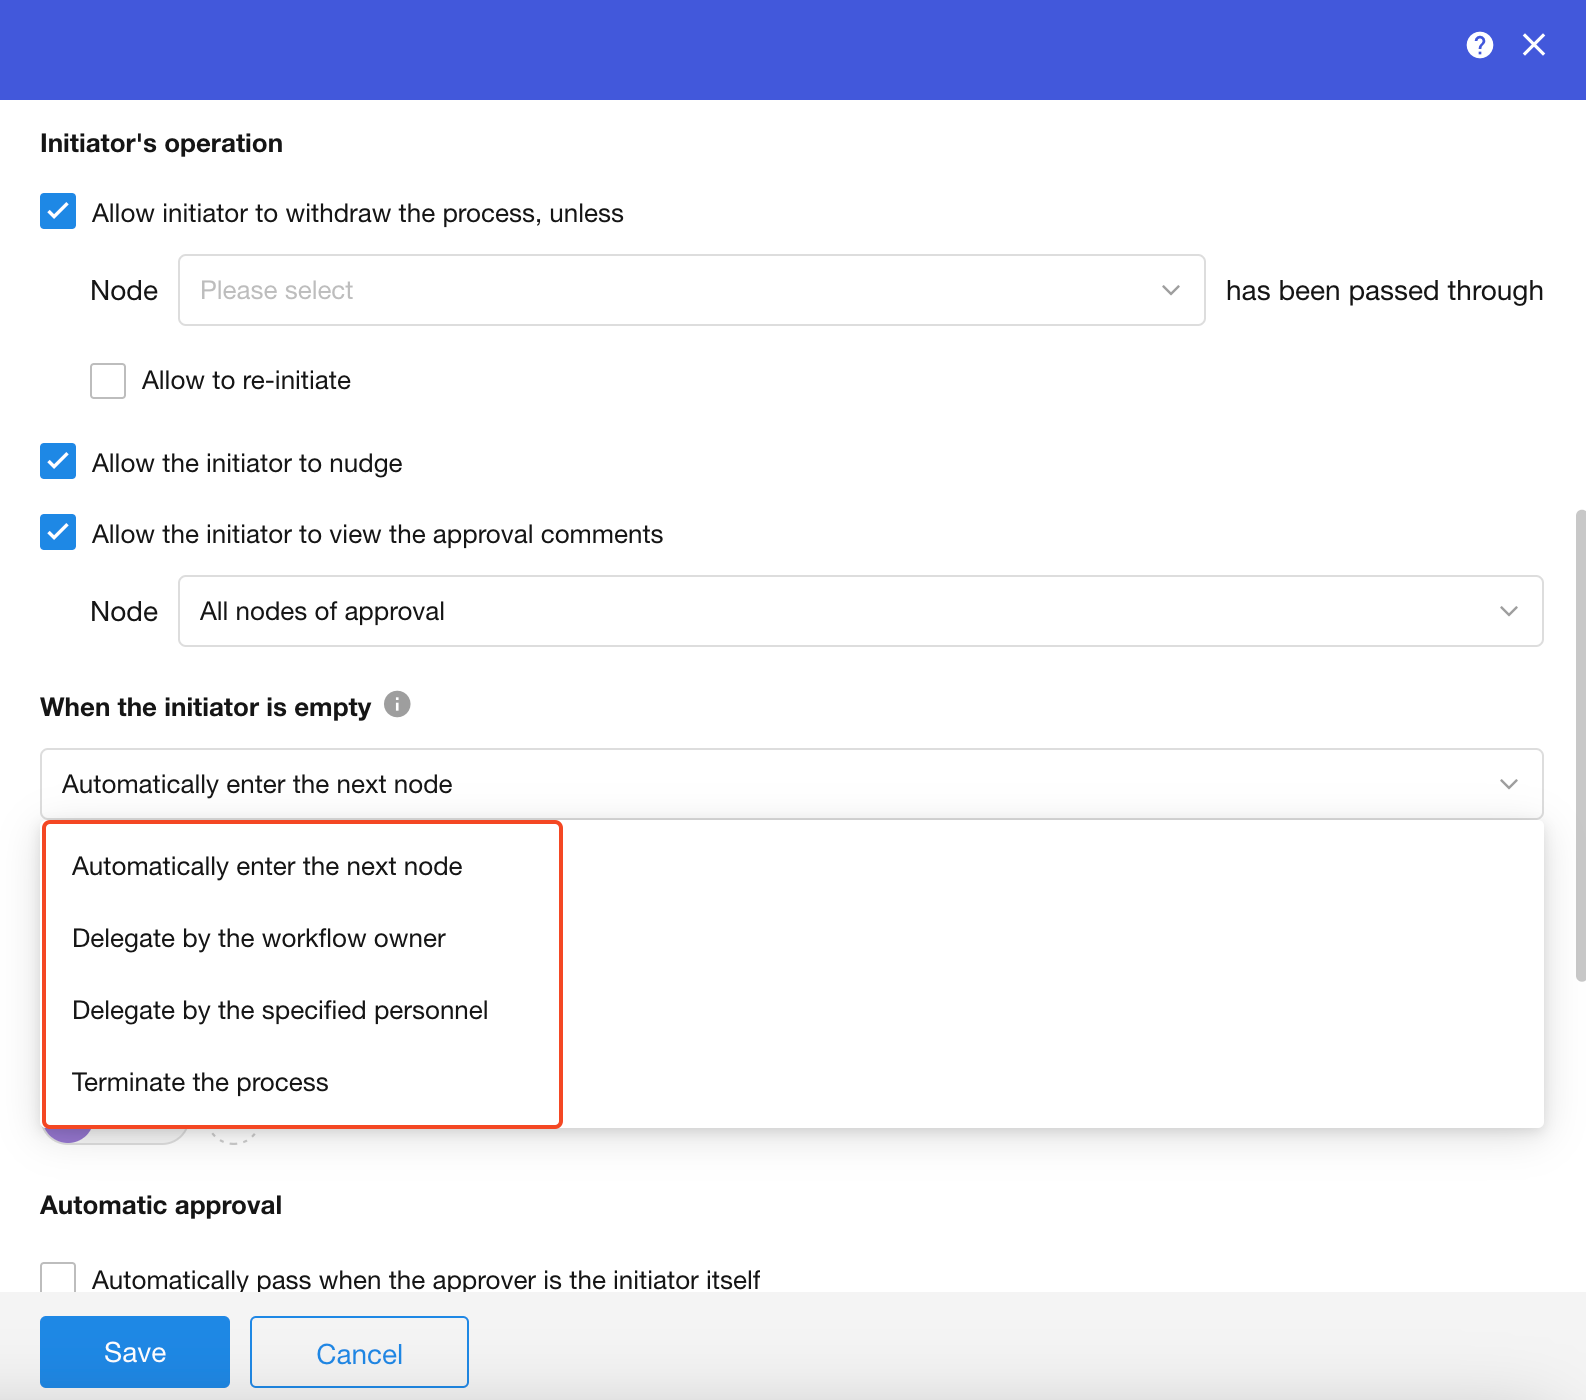
6. When the initiator is empty
Since users choose a members field as the initiator, the initiator may be empty, in which case you can set up a way for the flow to continue or terminate.
-
Automatically enter the next node
-
Delegate by the workflow owner
-
Delegate by the specified personnel
-
Terminate the process
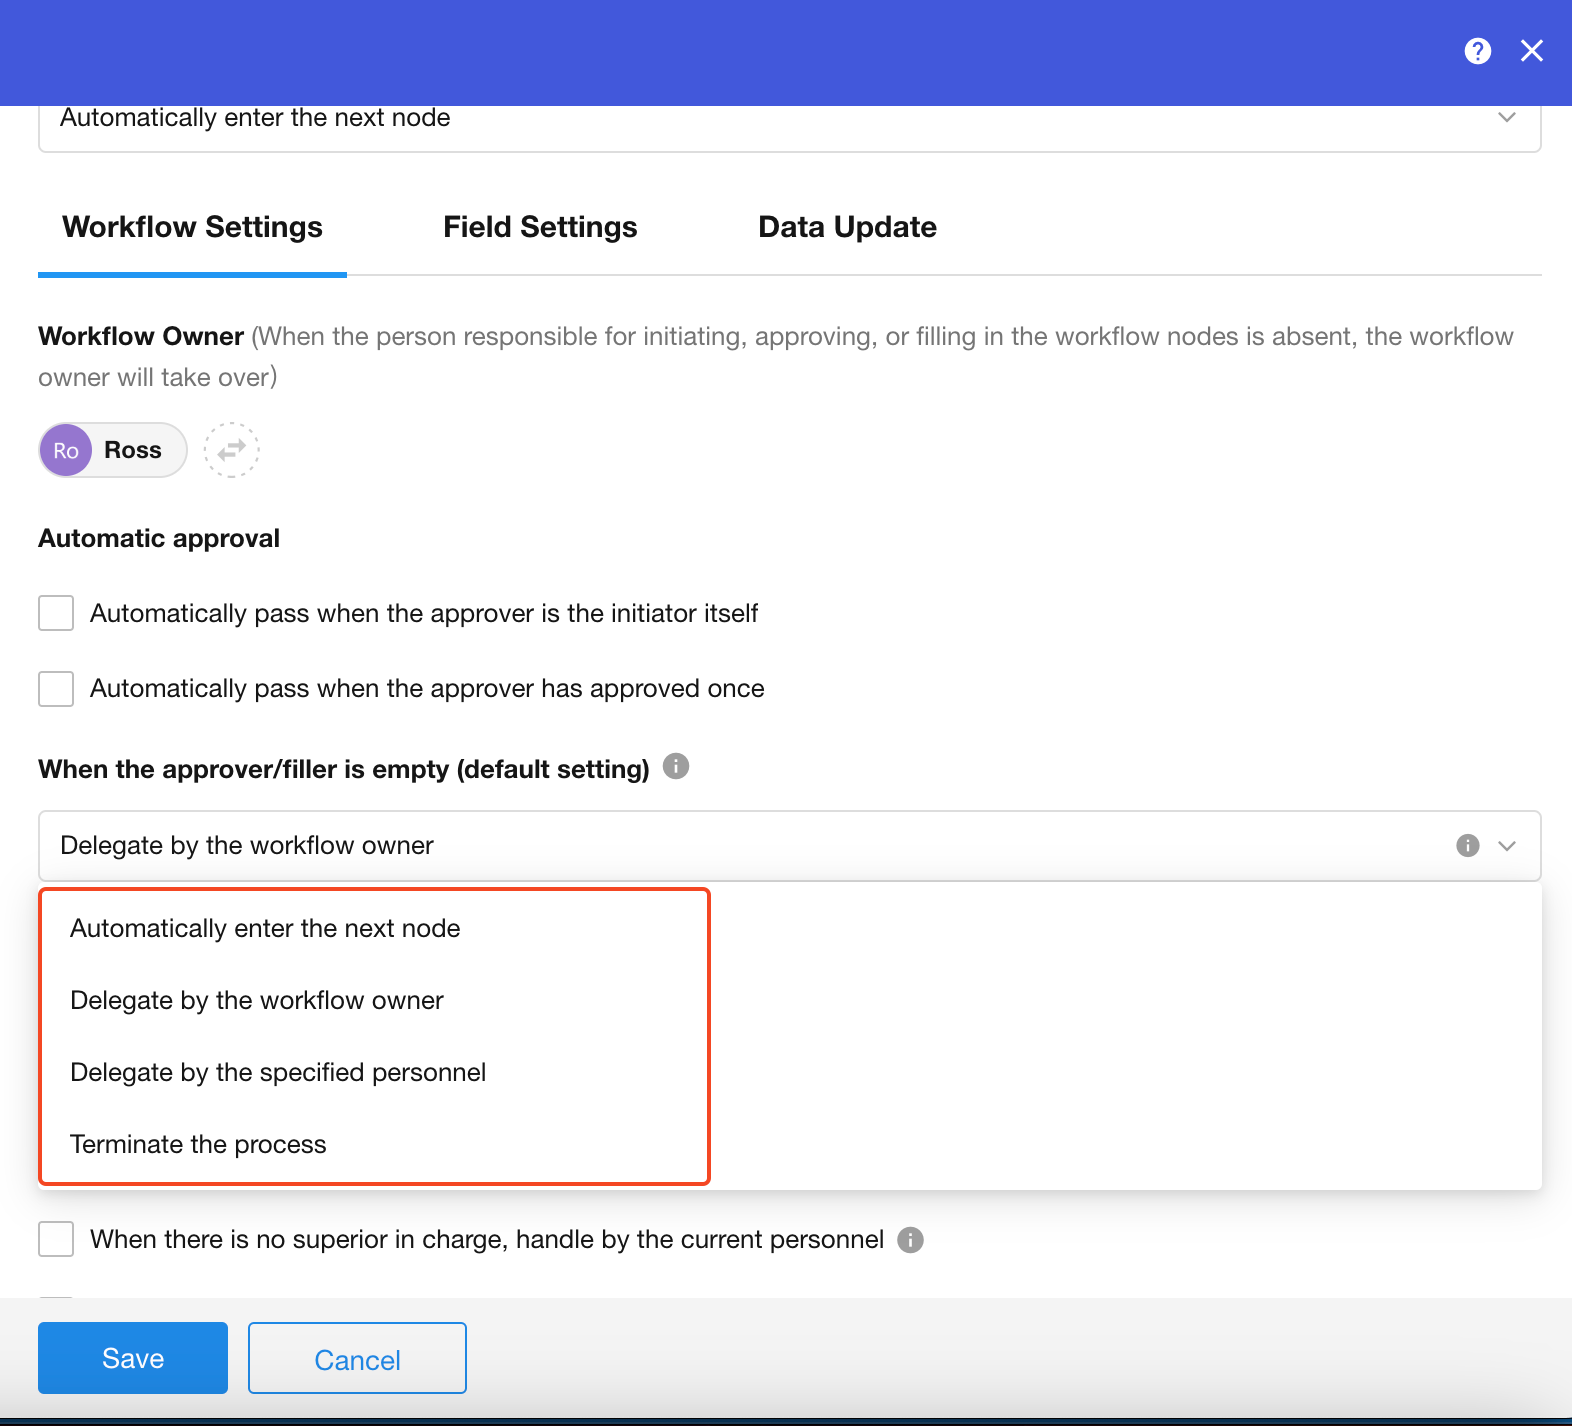
5. When the approver/filler is empty
Here, set a default processing method for the [Approval] node or [Fill in] node in the approval flow. If in the [Approval] or [Fill in] node, you set the processing method for when the approver or filler is empty, the setting in these two nodes will prevail, and if it is not set in the node, the setting here will prevail.
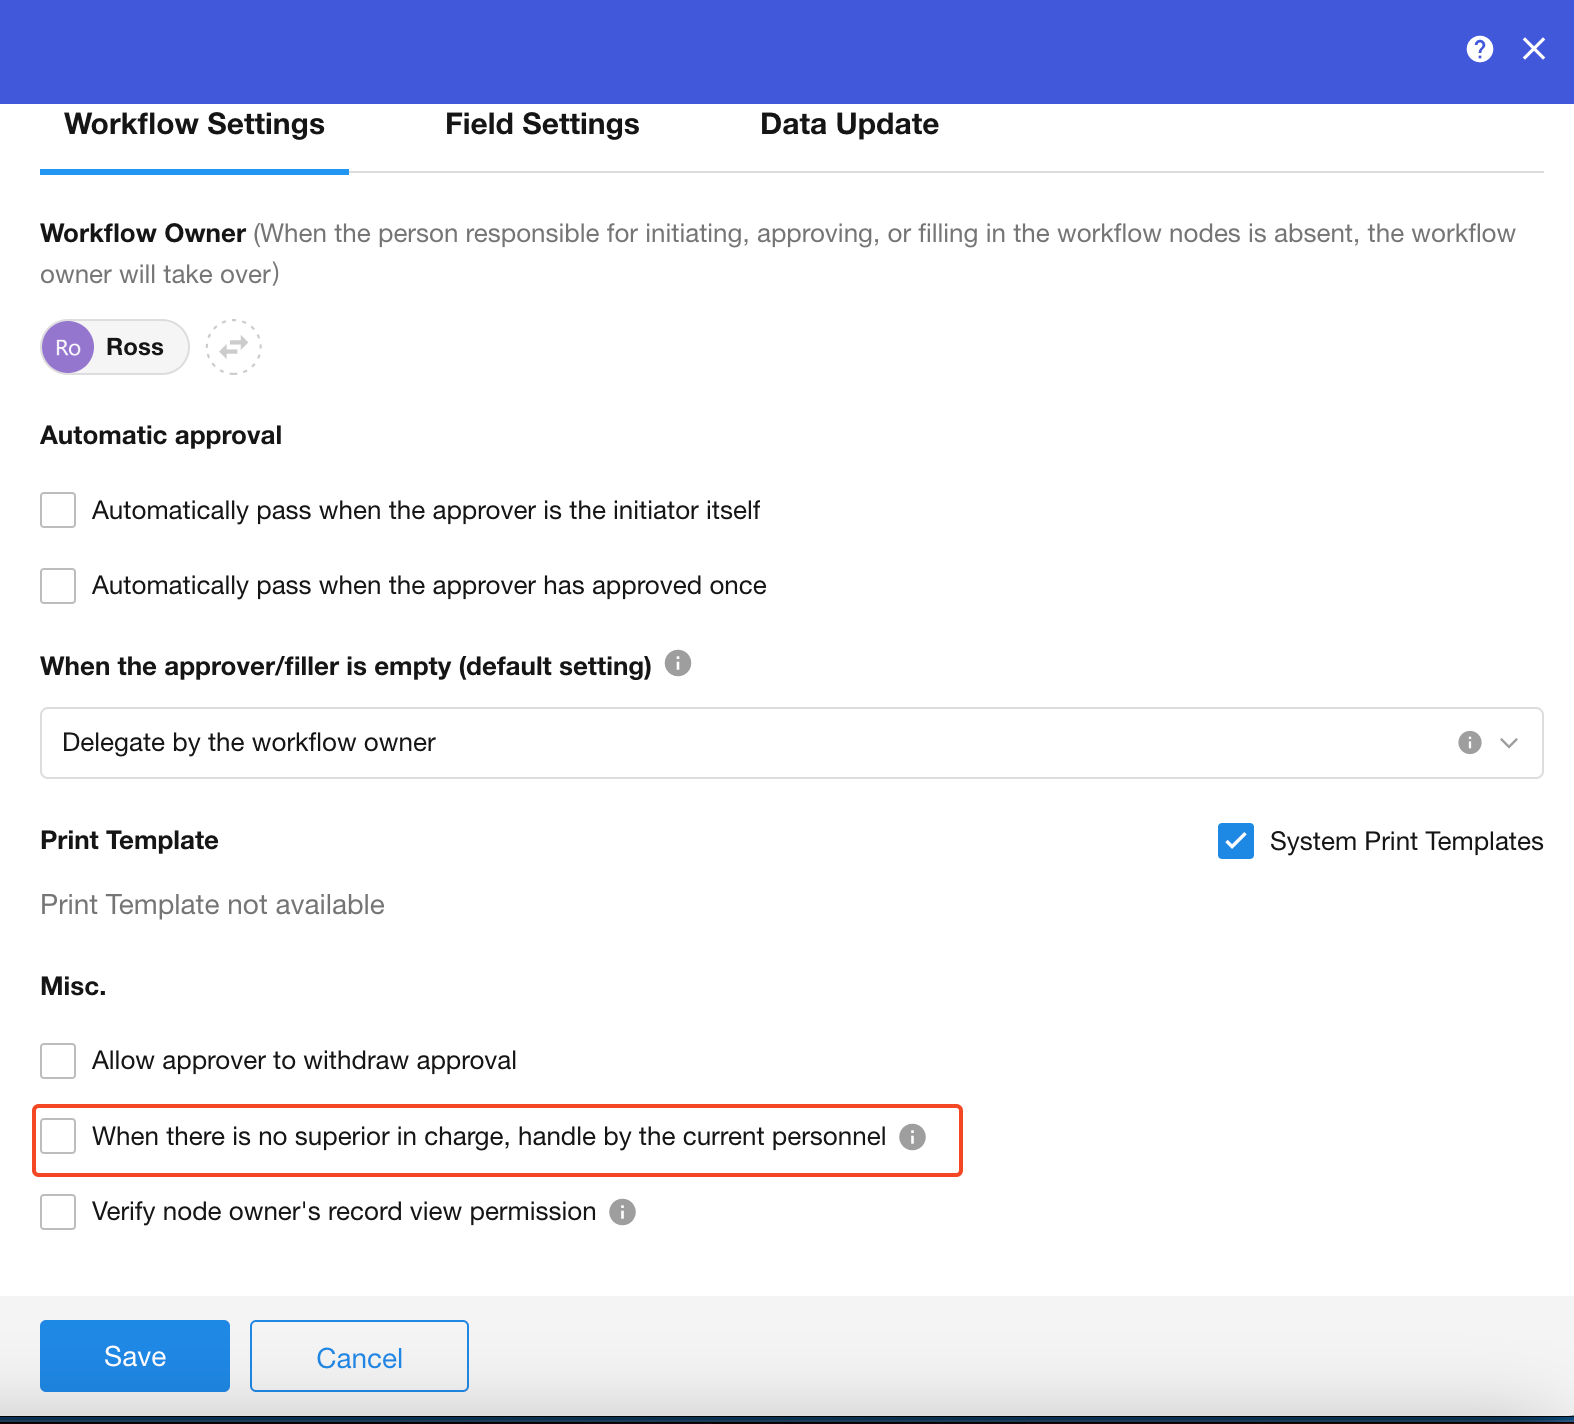
When there is no superior in charge, handle by the current personnel
If this option is checked, in the approval flow, when the approver is the superior or the head of the superior department, and the initiator does not have a superior or superior department, it will be handled by the current personnel.
-
If the current personnel do not have a superior, they will handle it themselves.
-
If the current personnel or department do not have a superior department, it will be handled by the current department head.
If the option "When there is no superior in charge, handle by the current personnel" is not checked, it will be handled as "when the approver is empty".
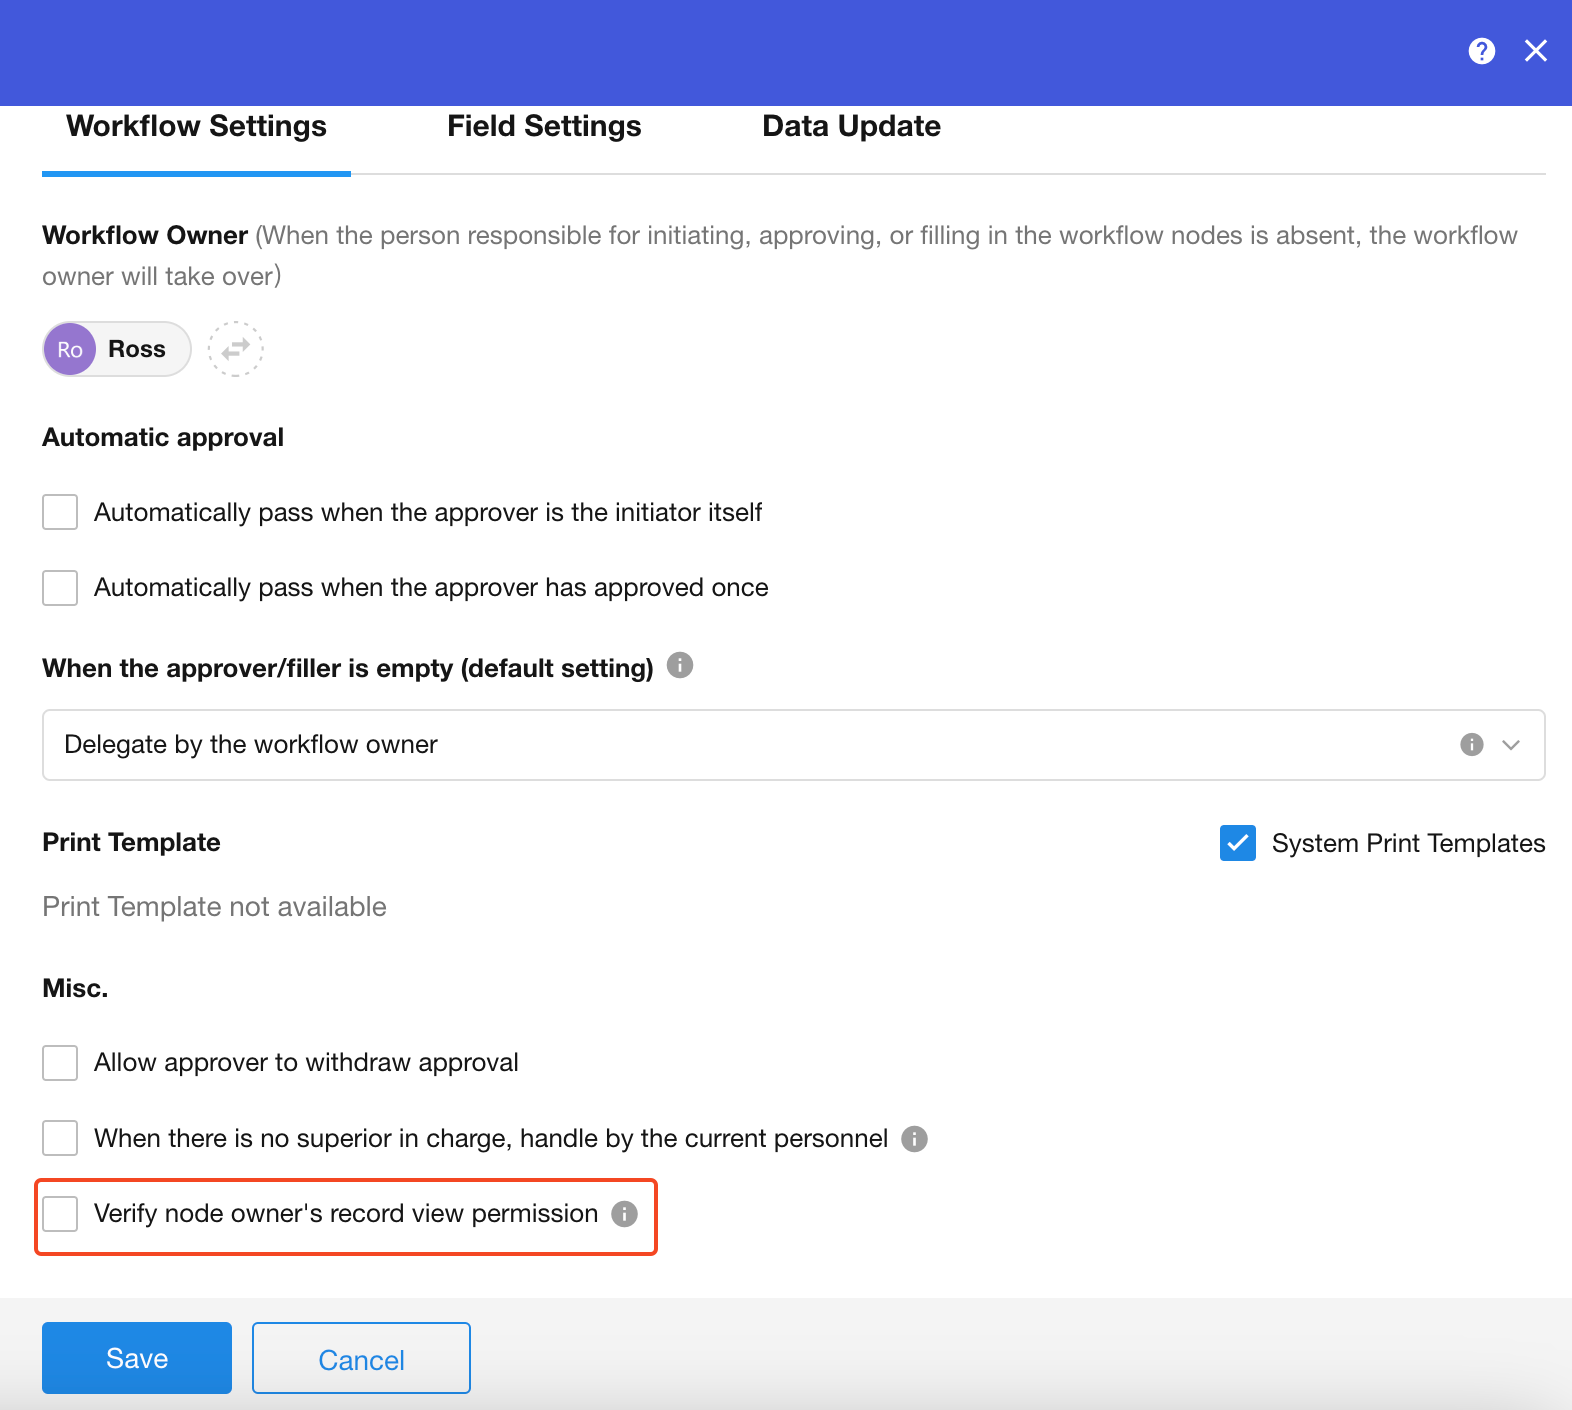
8. Verify node owner's record view permission
-
If checked
Verify if the node owner has permission to view the worksheet. If they do not have permission, they cannot view the records, cannot approve them, but can "forward to the process owner".
Batch operations are not affected by this configuration, and approvers can always perform approval operations.
-
If not checked
Based on the field configuration in the approval node, approvers can view and approve.
9. Owner of the approval flow
As mentioned earlier, [Initiate Approval Flow] can be regarded as a subflow, and users can configure the flow owner.
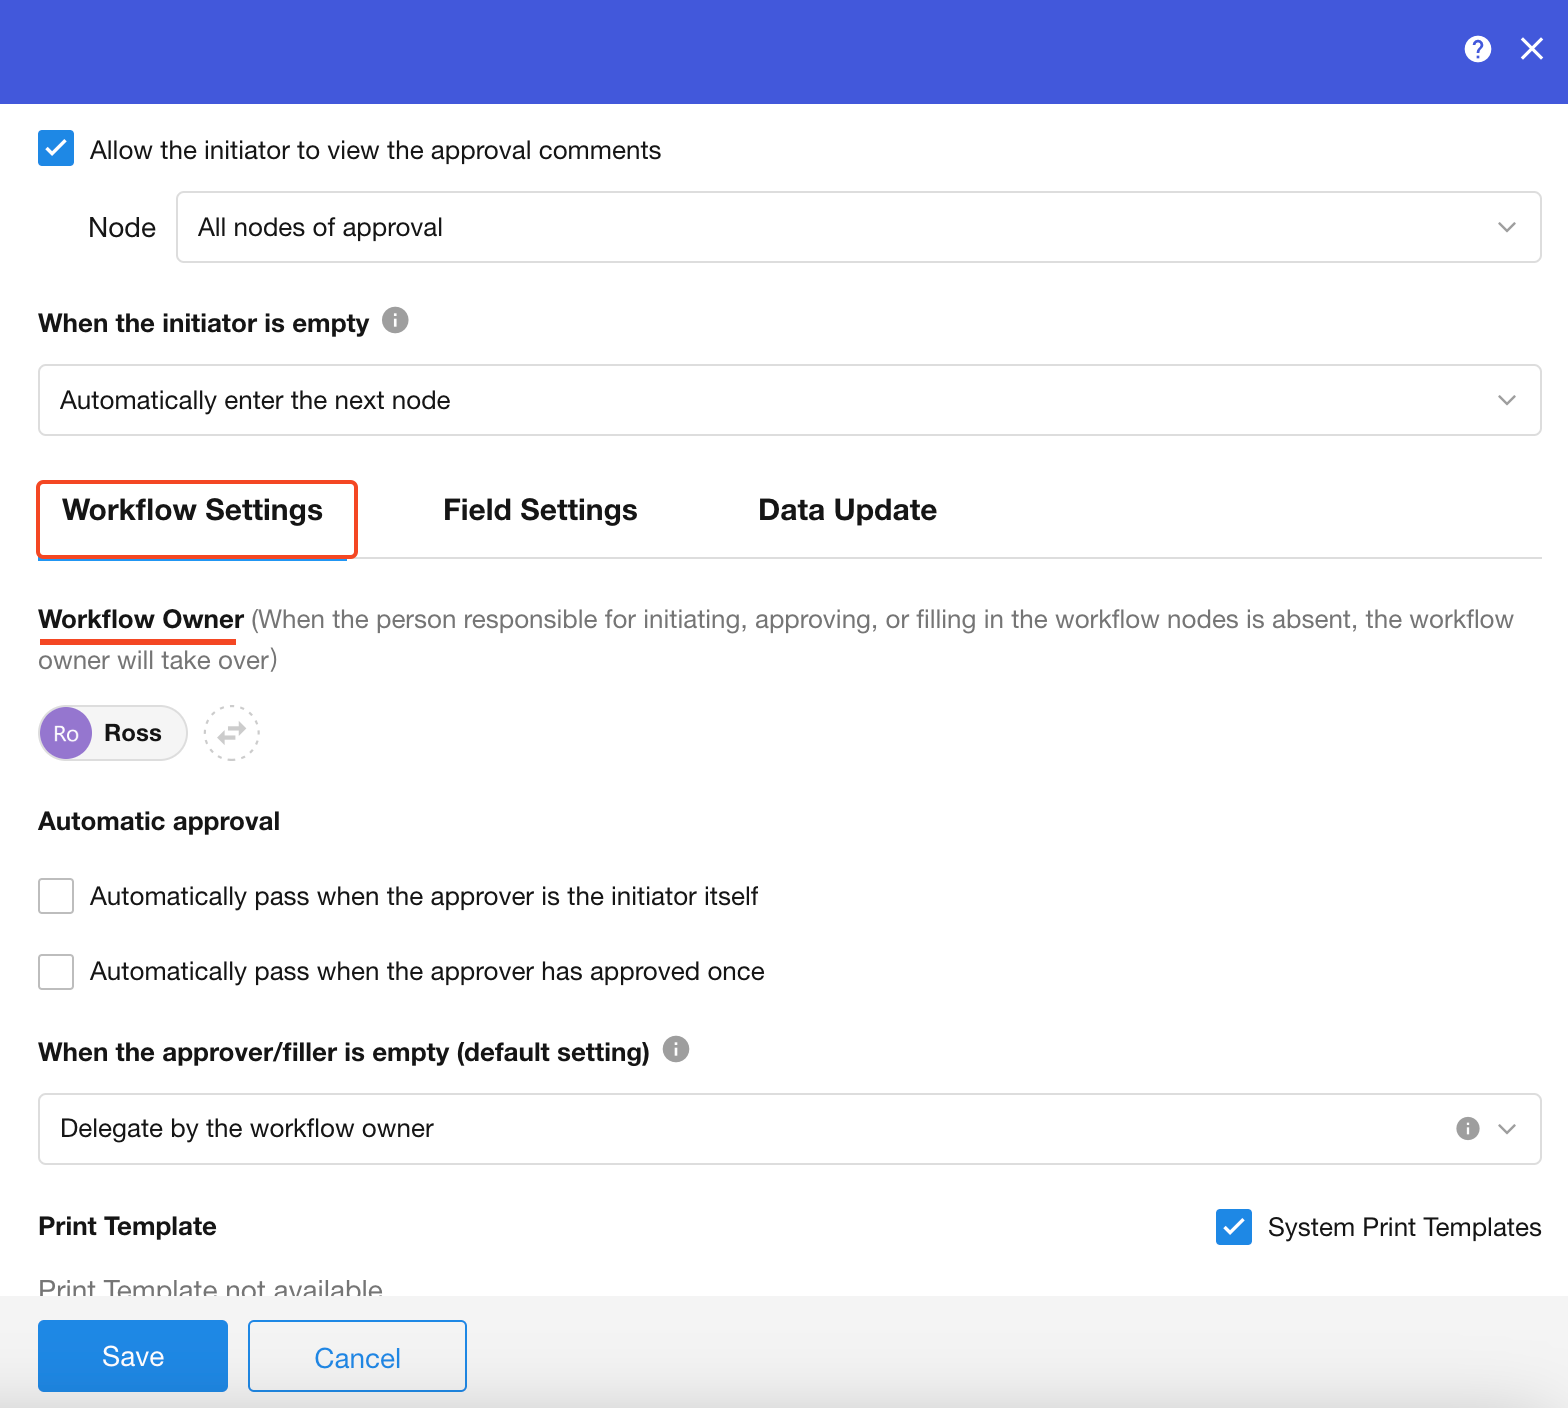
When the initiator, approver, or filler is empty, it can be delegated to the flow owner to operate.
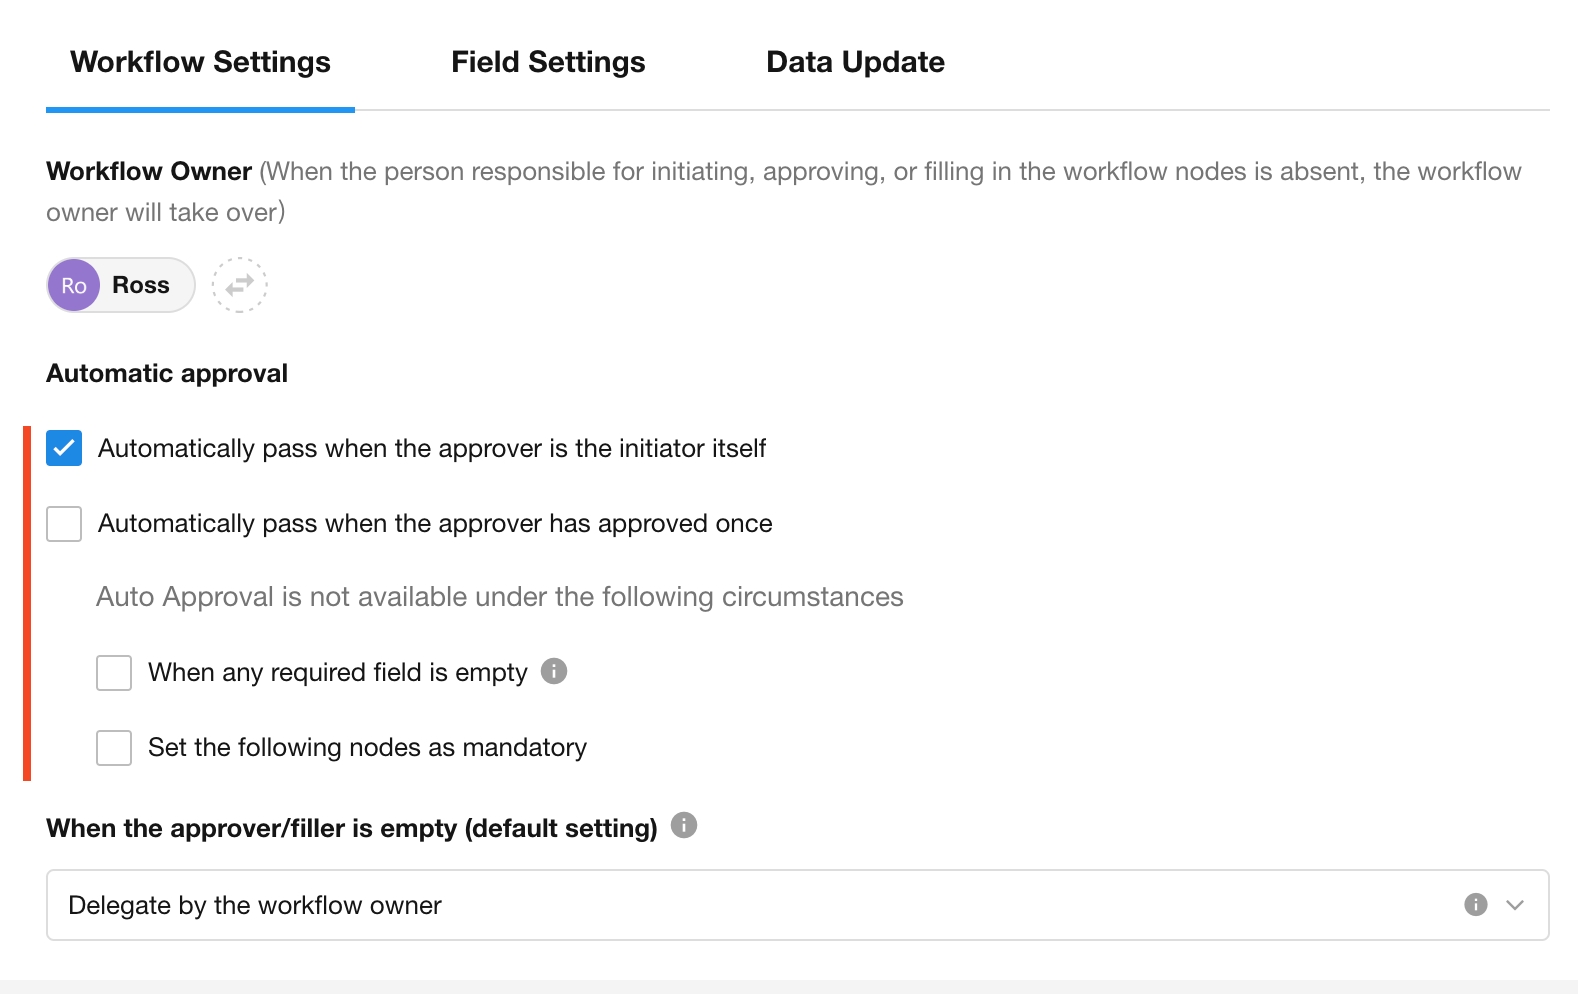
10. Automatic approval
-
Automatically pass when the approver is the initiator itself
It can be automatically passed if the initiator and approver are the same user. If this is not checked, it needs to be approved by the initiator.
-
Automatically pass when the approver has approved once
If there are multiple nodes in the process, and the approver in approval node 1 and approval node 4 is the same user, after it is passed in approval node 3, it can be automatically approved in approval node 4, since it has been approved in approval node 1.
The following cases will not be automatically approved:
If automatic approval is checked earlier, it cannot be automatically approved when the following situations occur:
-
When any required field is empty
For the current approver, if any required field is empty, automatic approval is not possible.
-
Set the following nodes as mandatory
If the current approval node is chosen as a mandatory approval node, even if the approver has already approved earlier, they still need to approve again.
11. Field settings
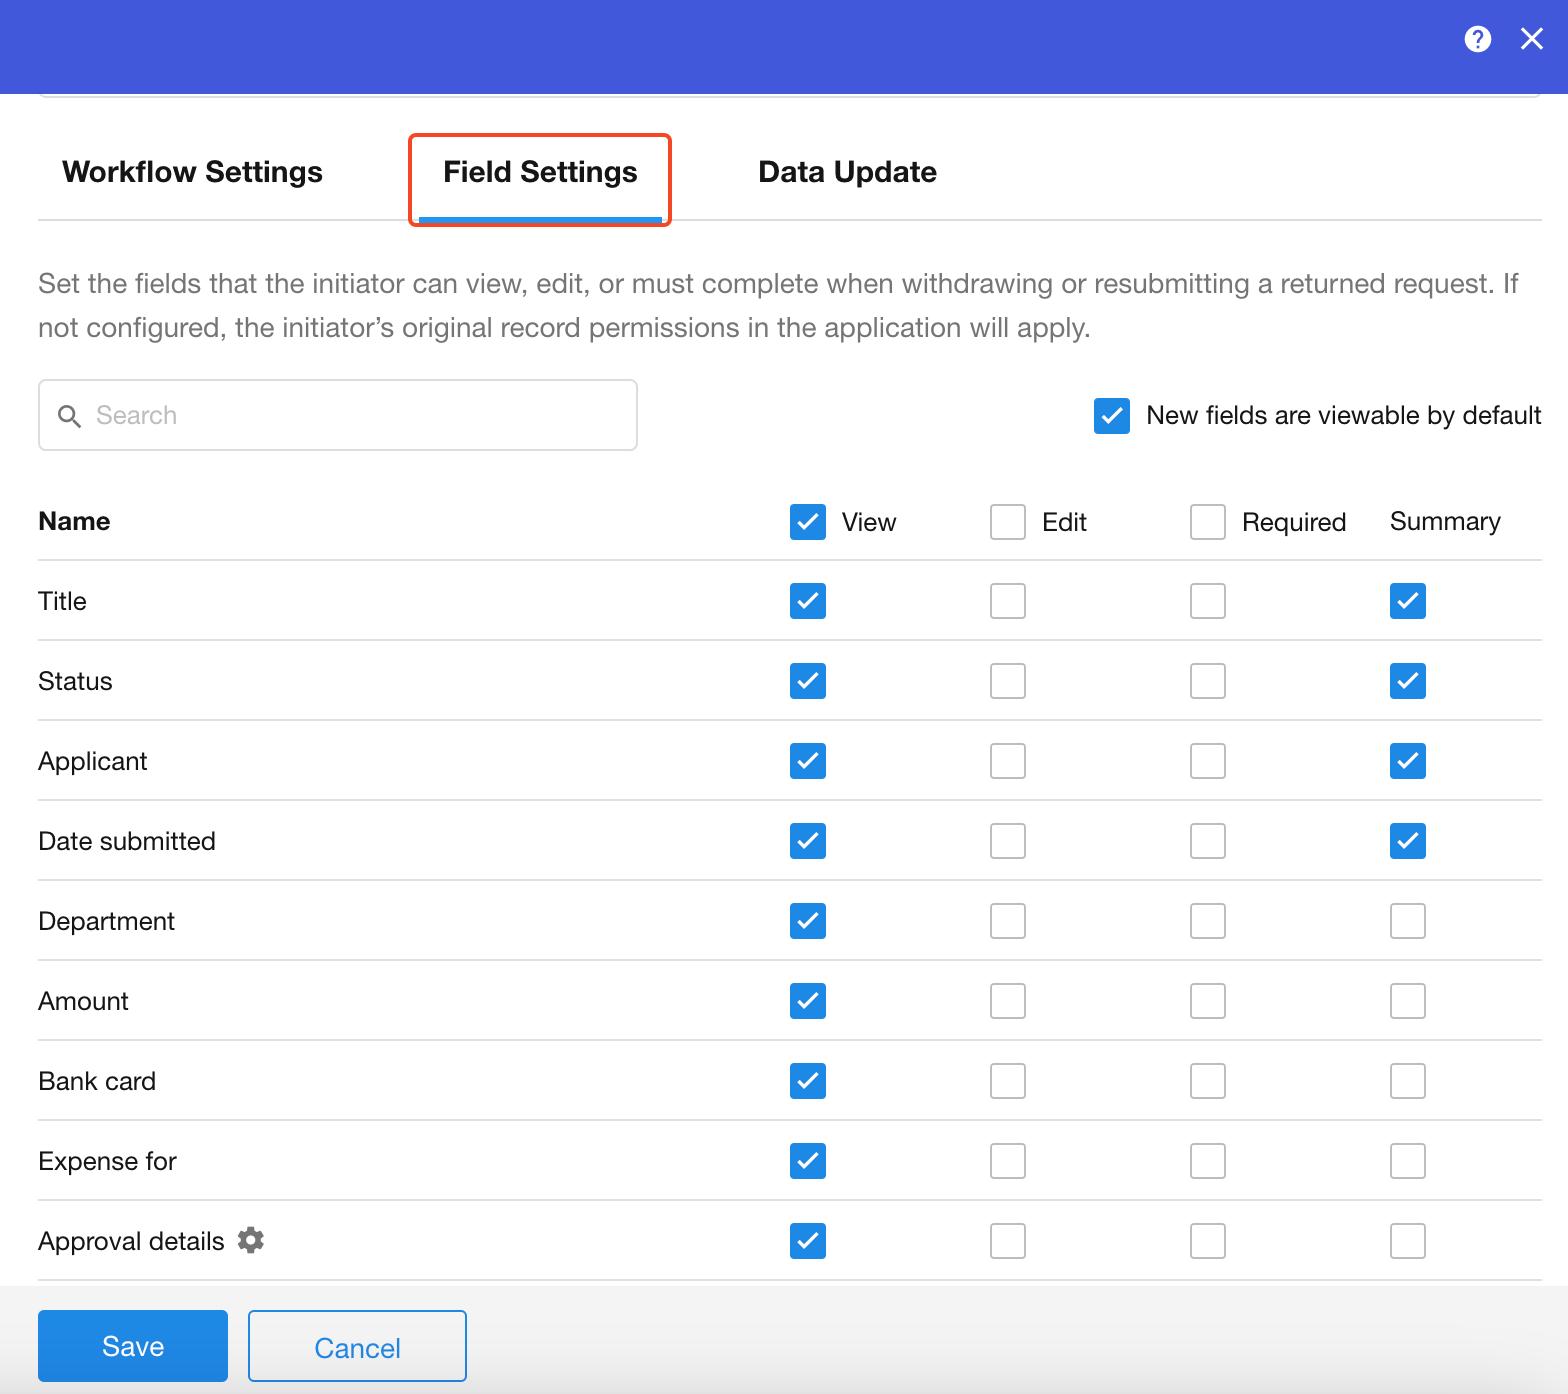
In the field settings section, users can configure the display of fields for the initiator and the approver.
-
When the approval is withdrawn by the initiator or returned to the initiator, and the initiator resubmits the approval request, set the fields that the initiator can view, edit, and required or not.
If not set here, the records will be displayed based on the initiator's permissions for the worksheet. If the initiator directly opens the record through the worksheet, the fields will be displayed based on role and permission configurations.
Field visibility, editability, and required field settings only apply to the initiator.
-
Summary fields
The selected summary fields will be displayed in the approval to-do list and approval notification emails, allowing approvers to quickly grasp key information. Users can individually configure summary fields in the approval node, and this configuration will be the default when adding new approval nodes.
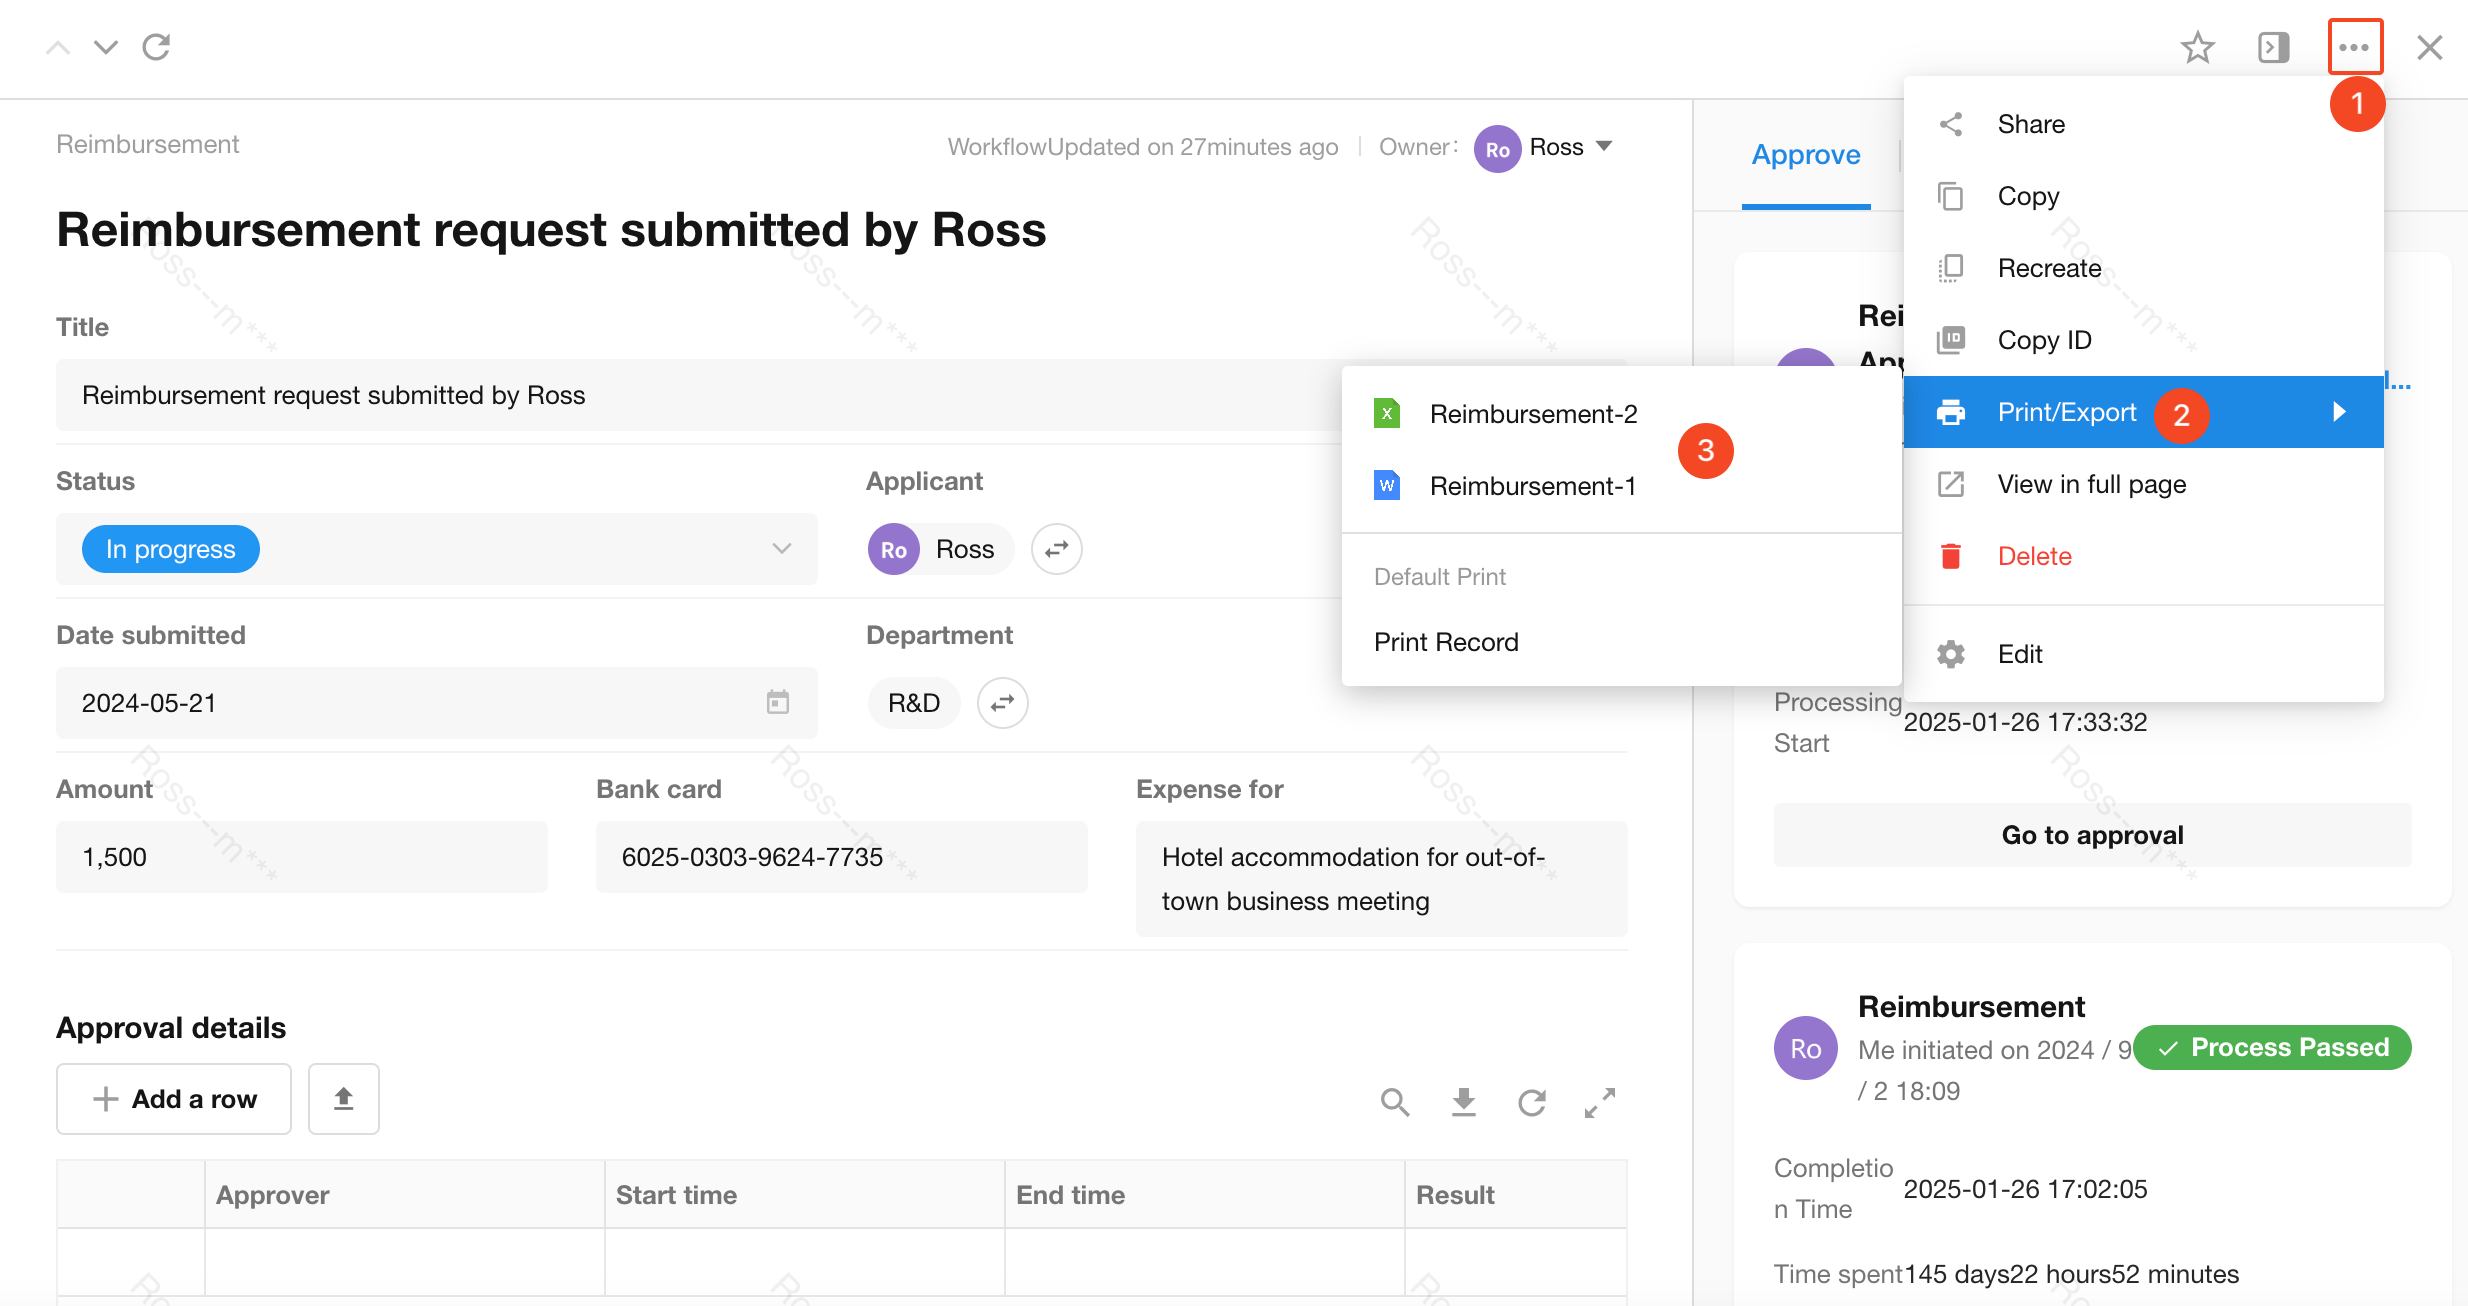
12. Print template
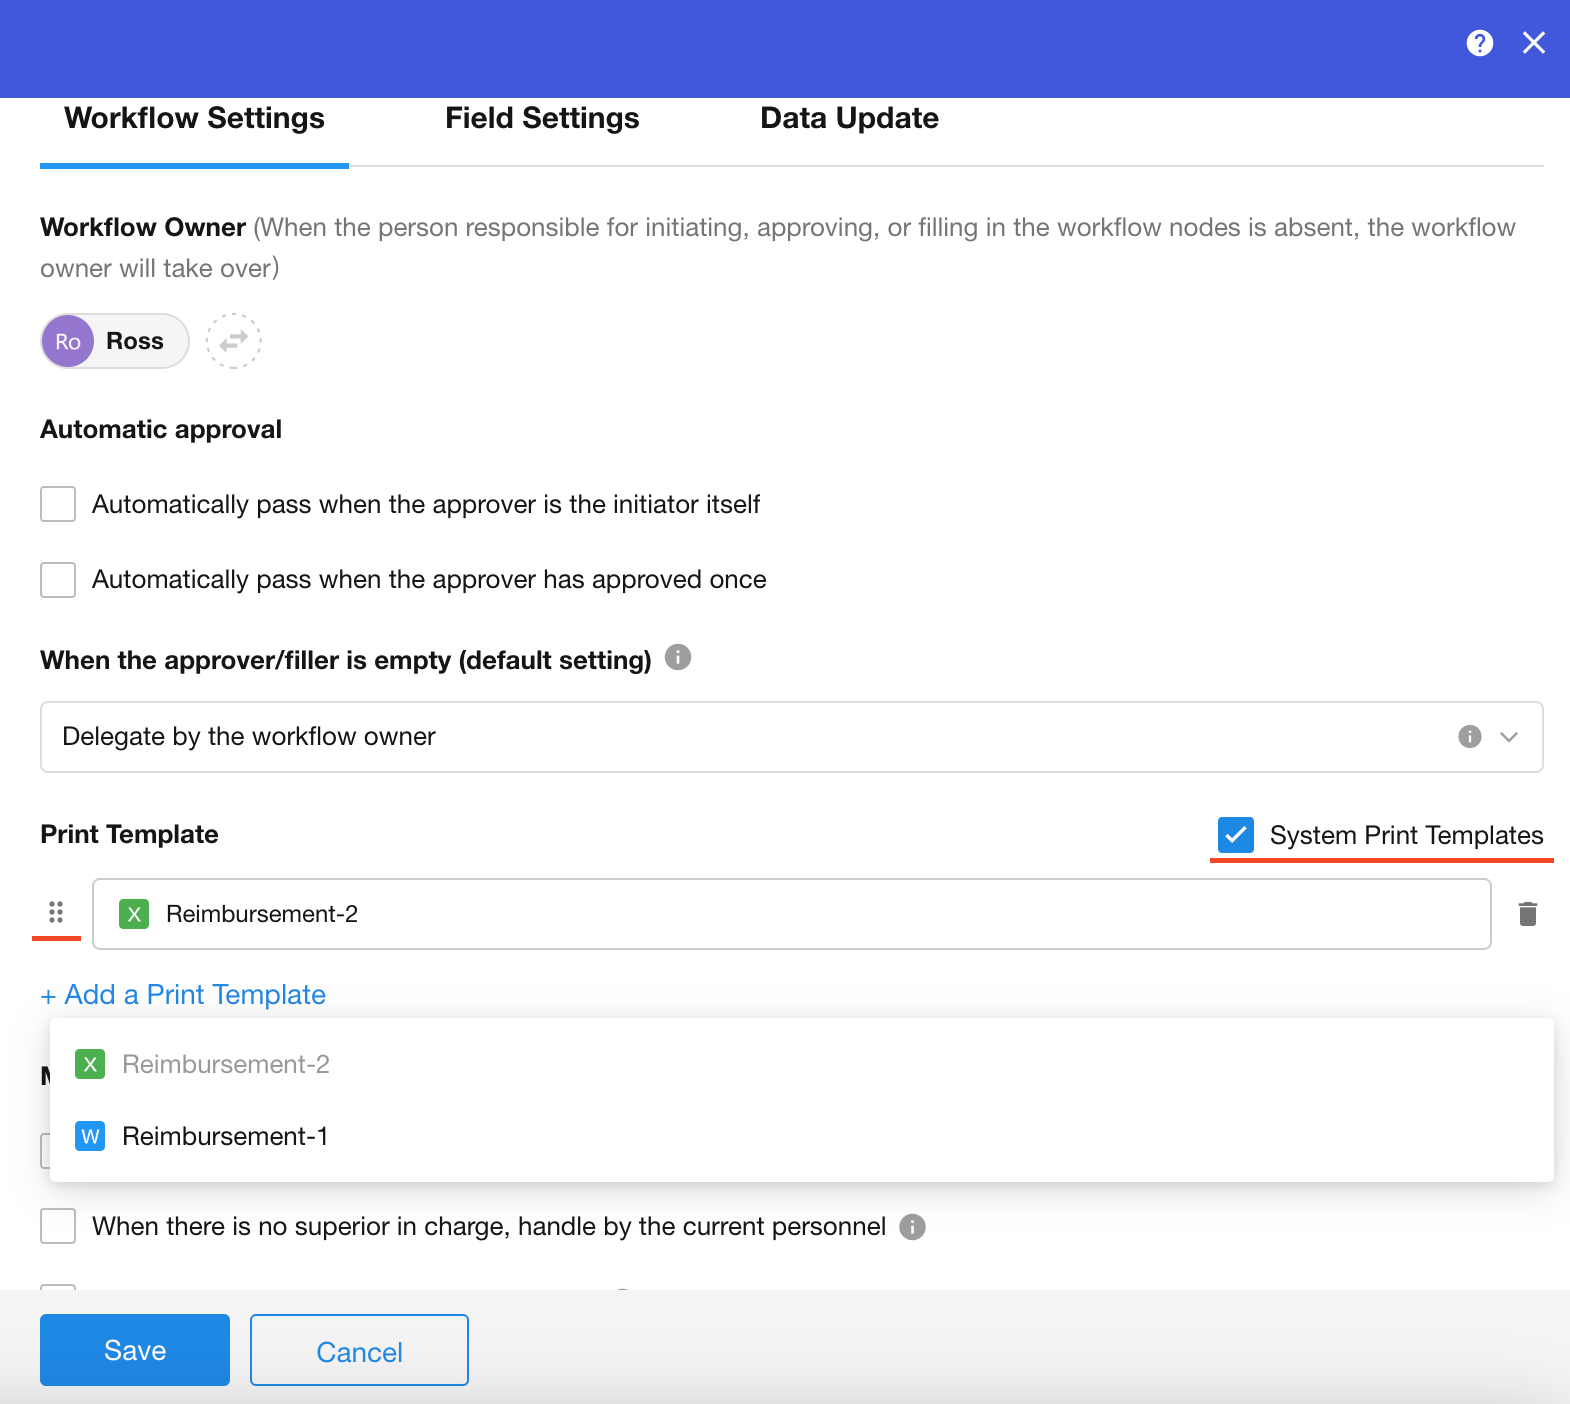
When viewing records through approval, it supports printing according to a specified template.
-
Select a template designed in the worksheet, supporting Word templates, Excel templates, and system templates, but not supporting printing templates with QR codes and barcodes.
-
Drag and drop the selected print templates to adjust the order, and the templates will be displayed in the order set by the user when printing.
-
After checking "System Print Template", the chosen system print template can be used.
IV. Automatic status update when returned to the initiator
When approving, the approver can return it to the initiator or to one of the previous approvers, and if it is returned to the initiator, the content of some fields can be automatically modified, such as changing the status to "Returned".
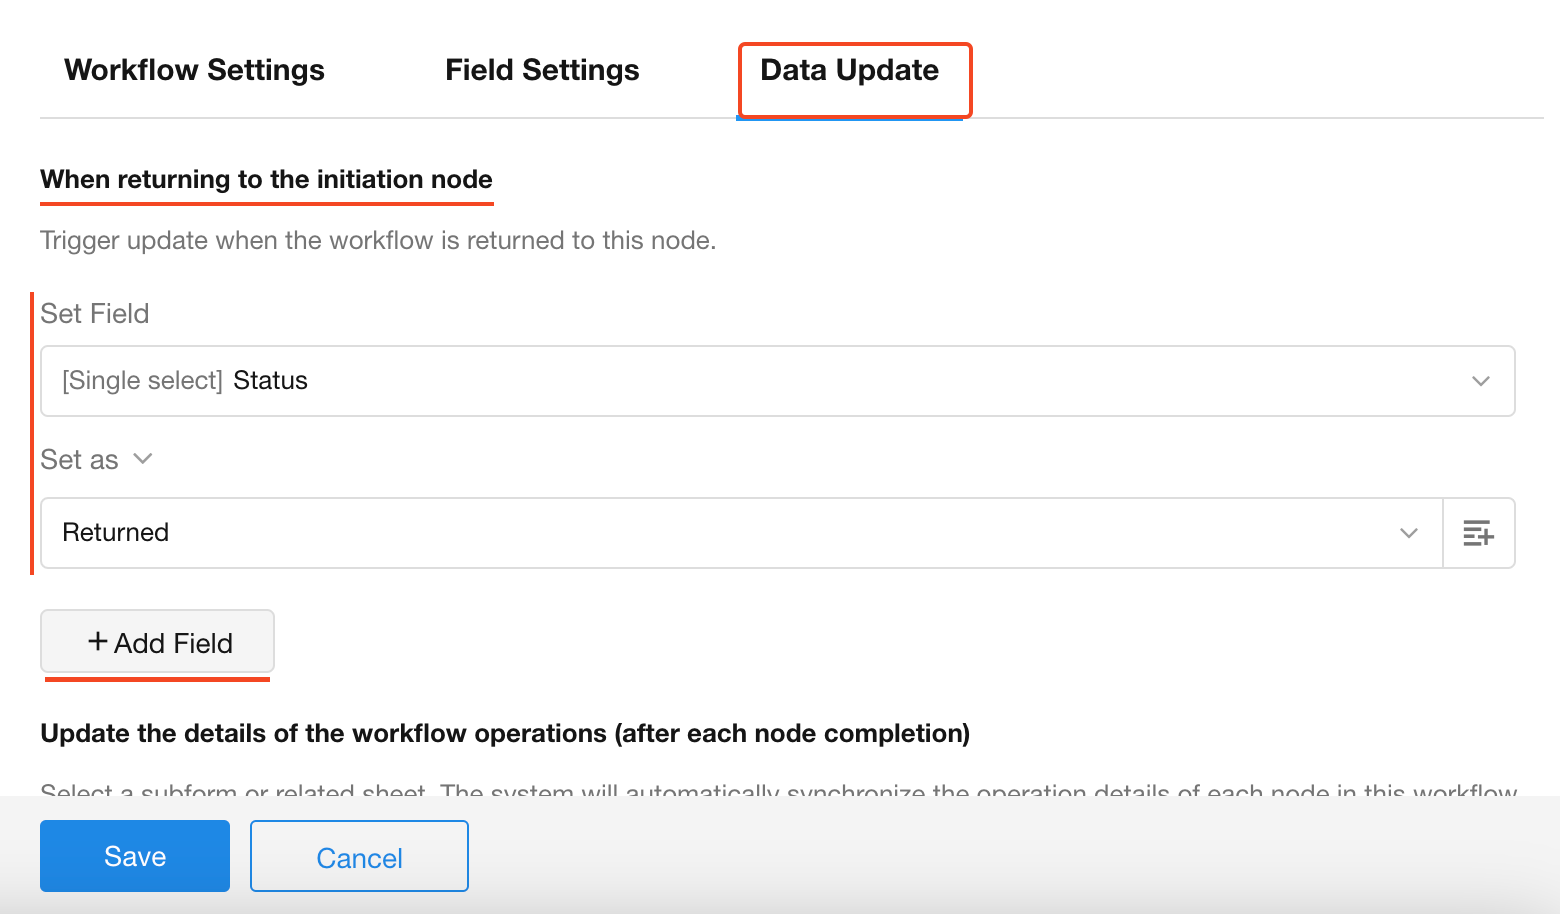
If the data needs be modified when it is returned to the approver, you need to configure in the approval node.
V. How to get the approval operation details
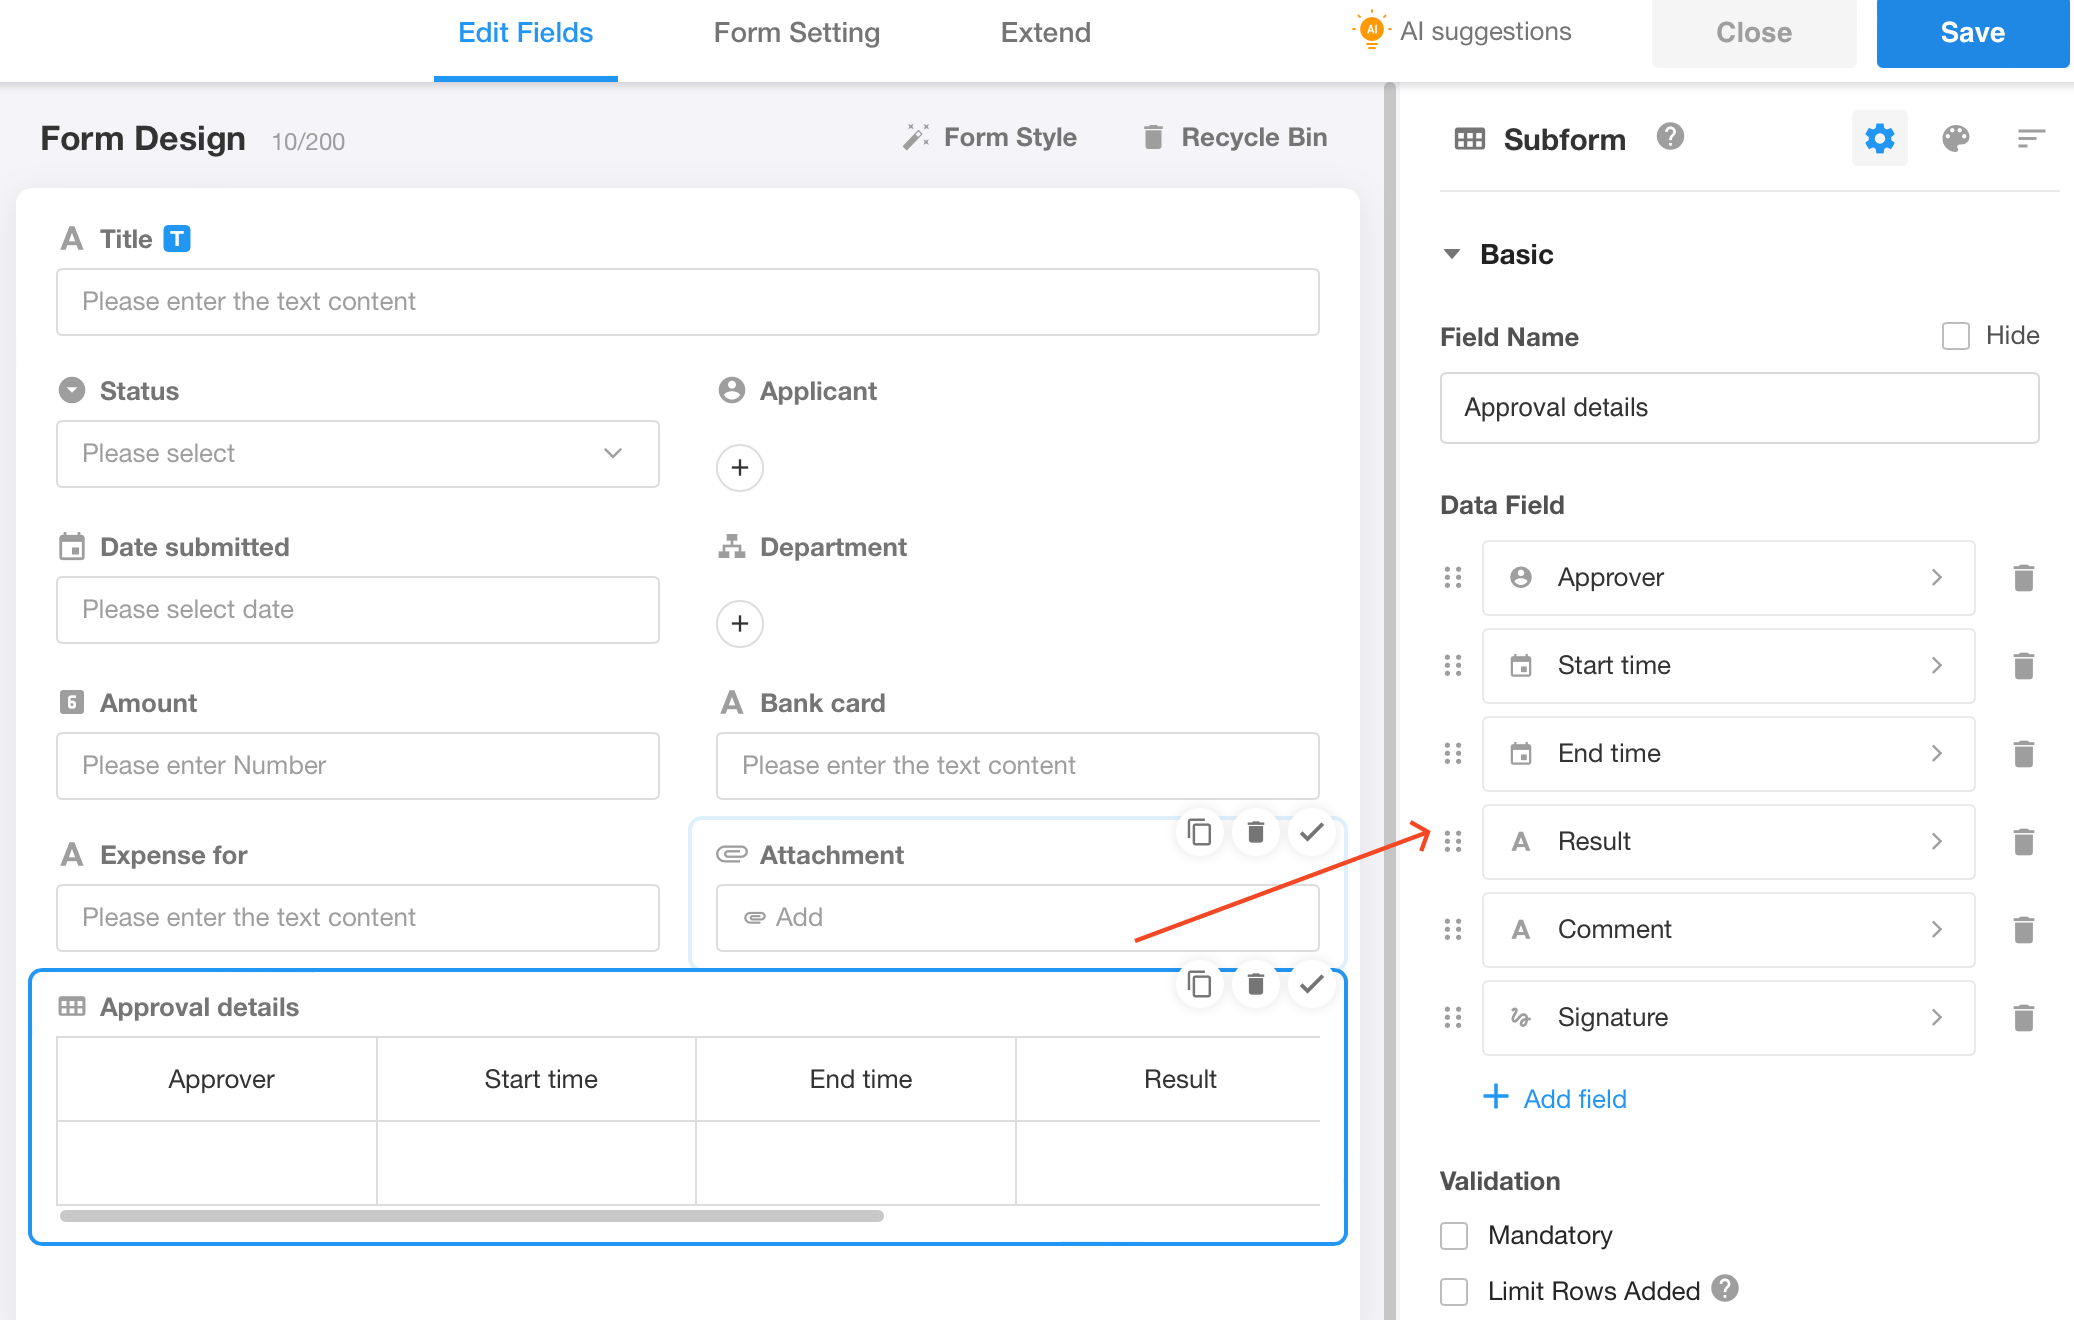
If you need to display the approval details in the worksheet fields, in [Initiate Approval Flow] node, it supports to get the approval details and write them to the subform or related worksheet.
1. Create a subform/related worksheet
2. Configure field mapping in [Initiate Approval Flow] node
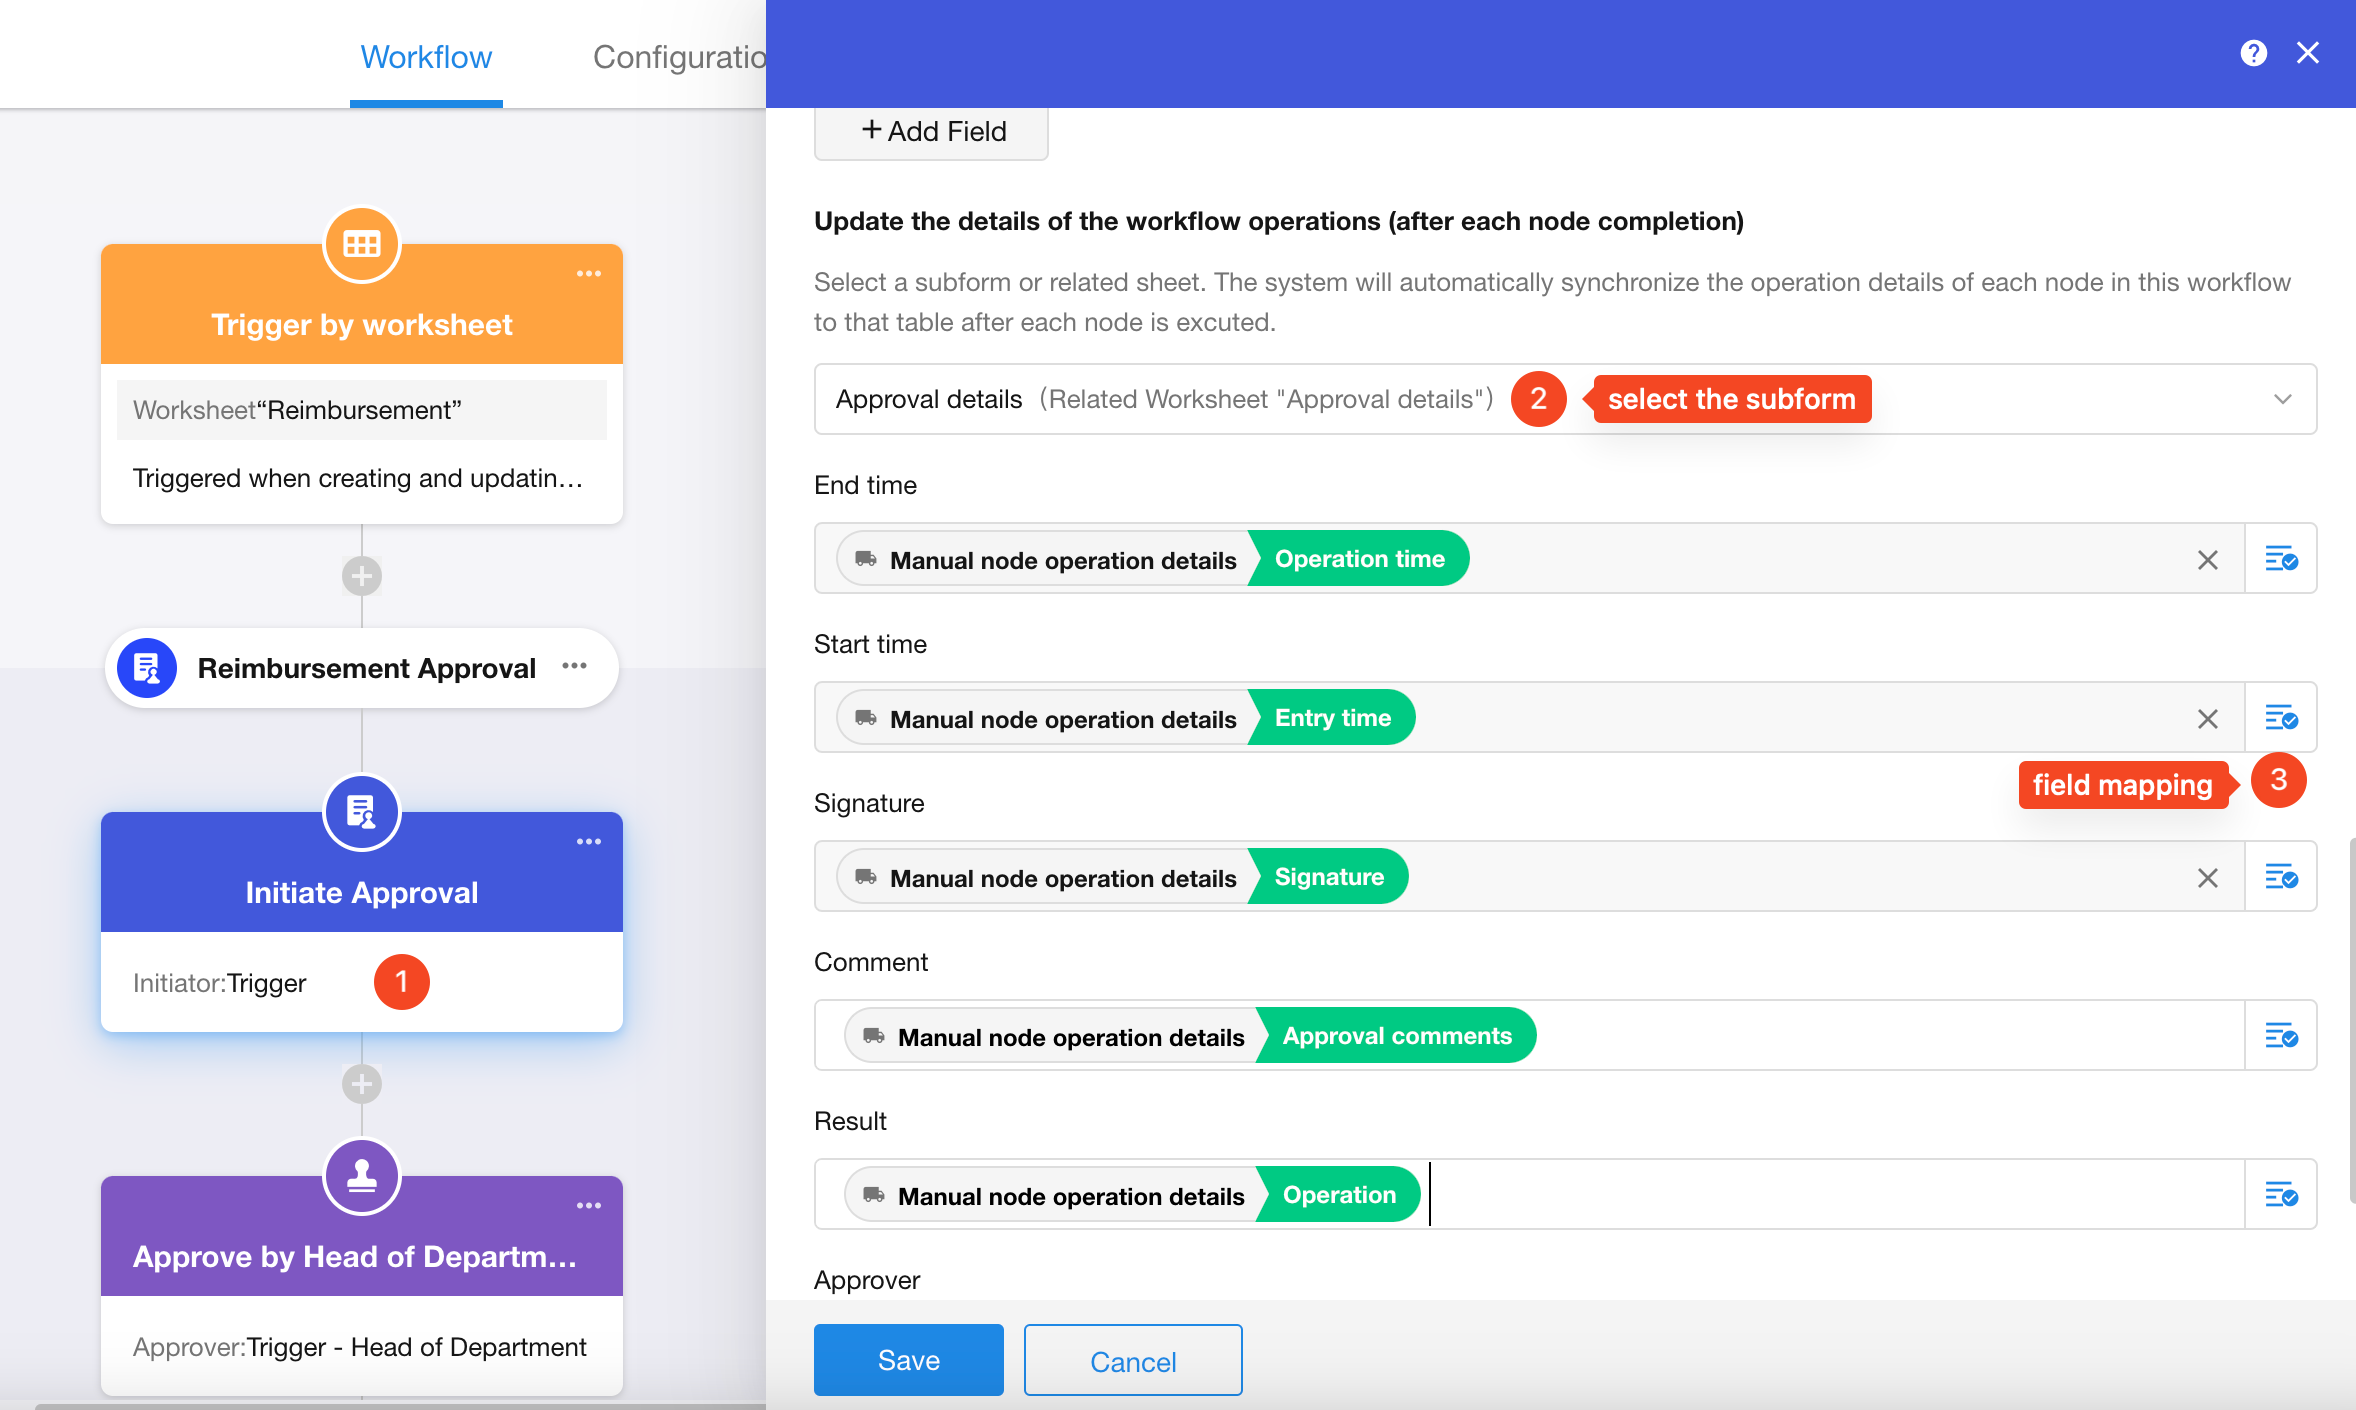
The approval operation details include the following fields:
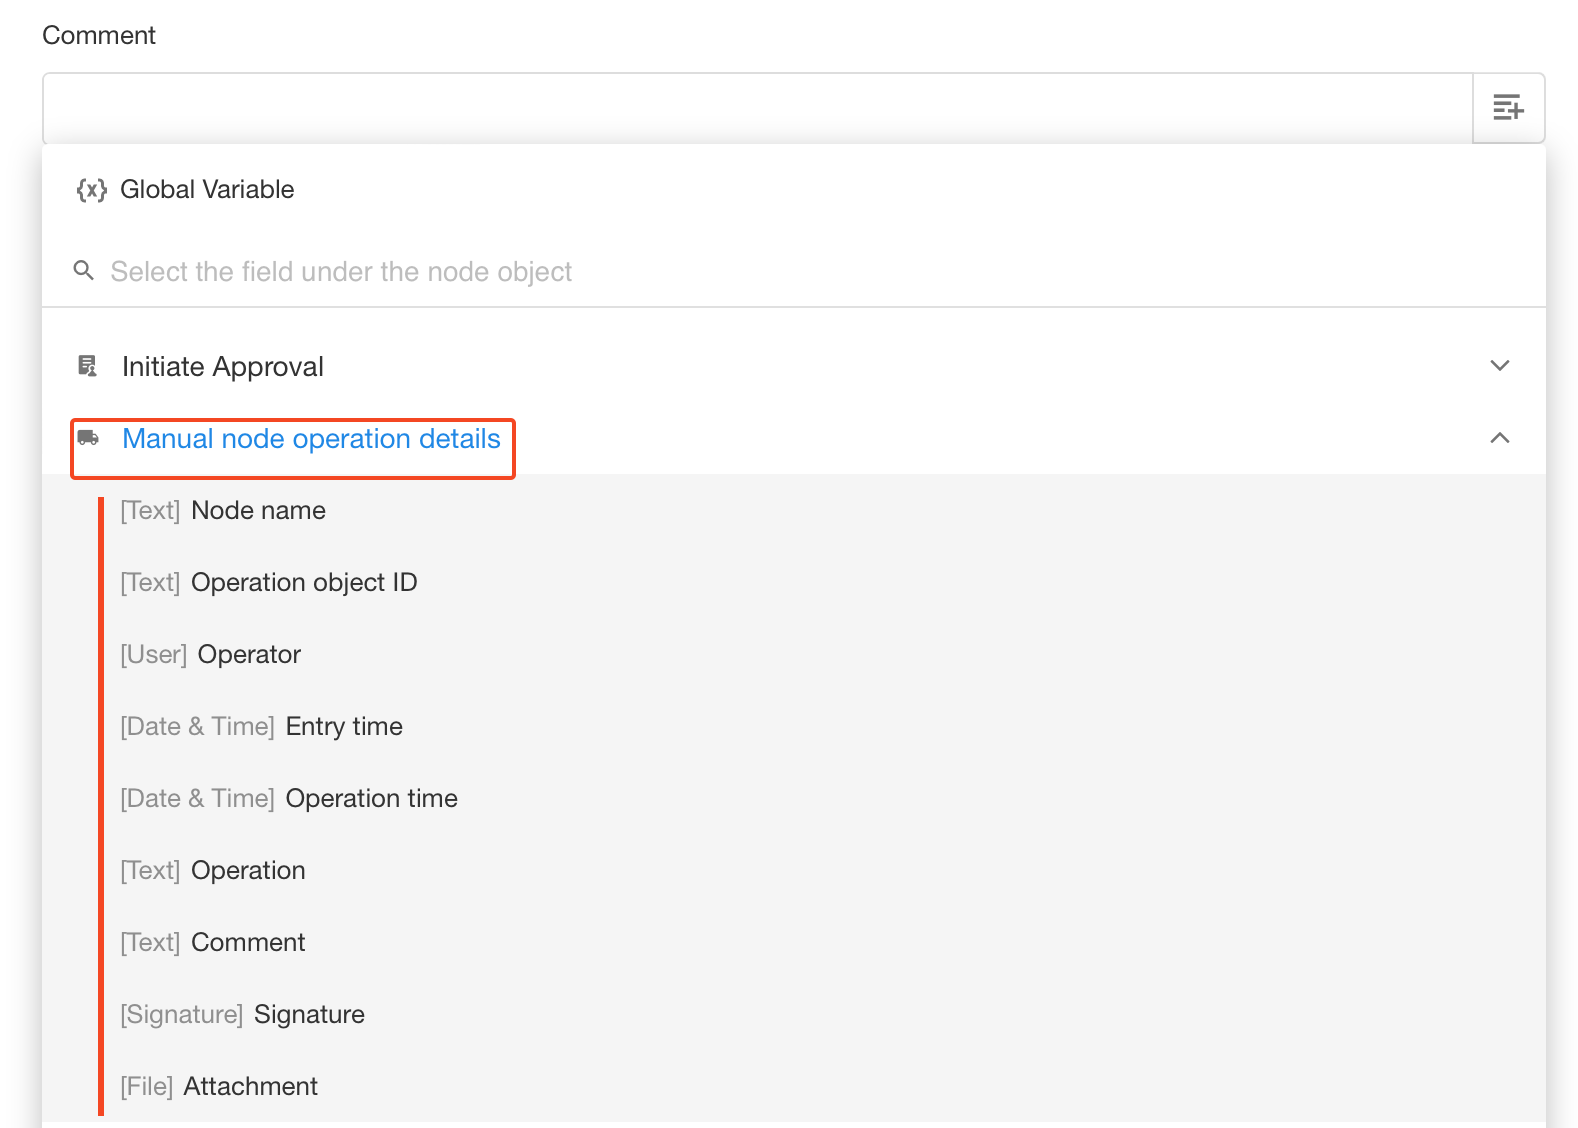
- Node name: custom name of each approval node
- Operation object ID: record ID of the approved record
- Operator: current approver
- Entry time: time to enter the approval node
- Operation time: approval time of the current approver
- Operation: approval result (pass/reject)
- Note: comments
- Signature
For approval flows configured with [Initiate Approval Flow] node, there is no need to obtain operation details separately for each approval node.
3. Example

• Or-Sign: Only the actual executor's operation details are recorded (note: if you select or-sign, you can add approvers, so there may be more than one record when adding).
• Co-Sign: Operation details are recorded for all approvers, including those who do not need to approve (in the case of being approved by proportionate voting).
• Level by level: Add operation details when each level of approval is completed.
VI. How to use the approval results in the workflow
Approval results include Approve, Reject, Withdraw and Terminate.
After the approval flow is completed, you can set branches based on the approval results if needed.
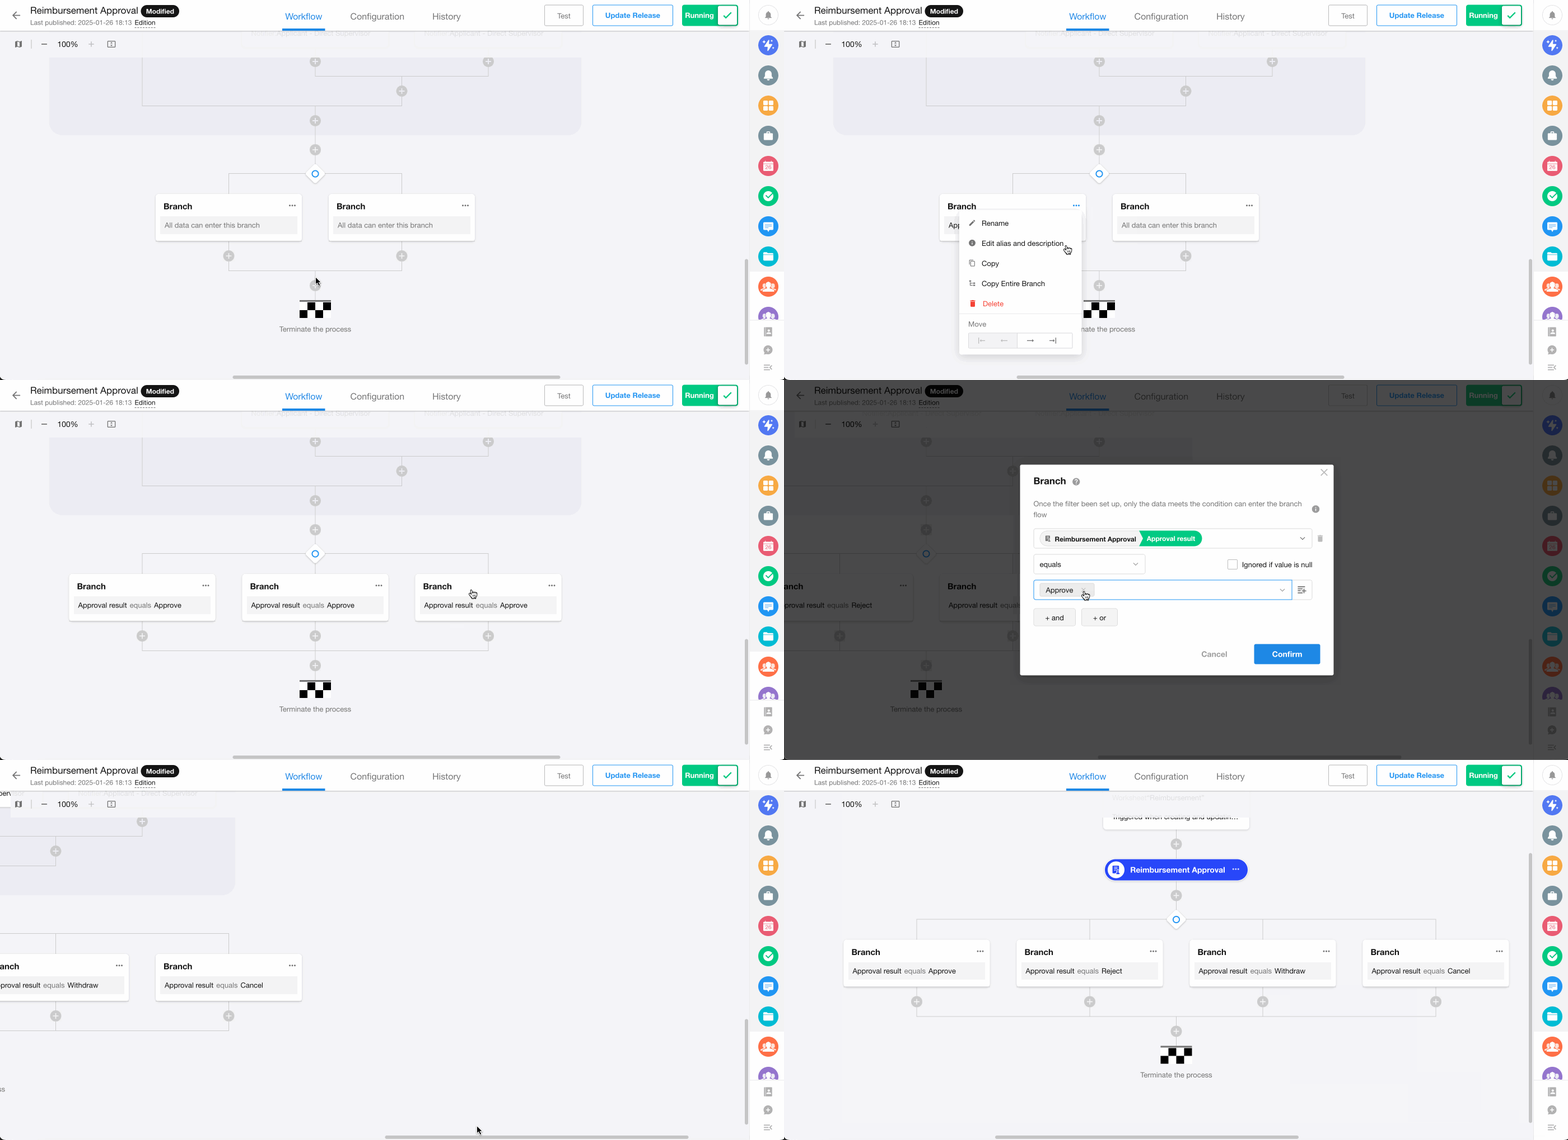
You need to add branches outside of the whole [Initiate Approval Flow] node.
VII. How to configure a parallel approval flow
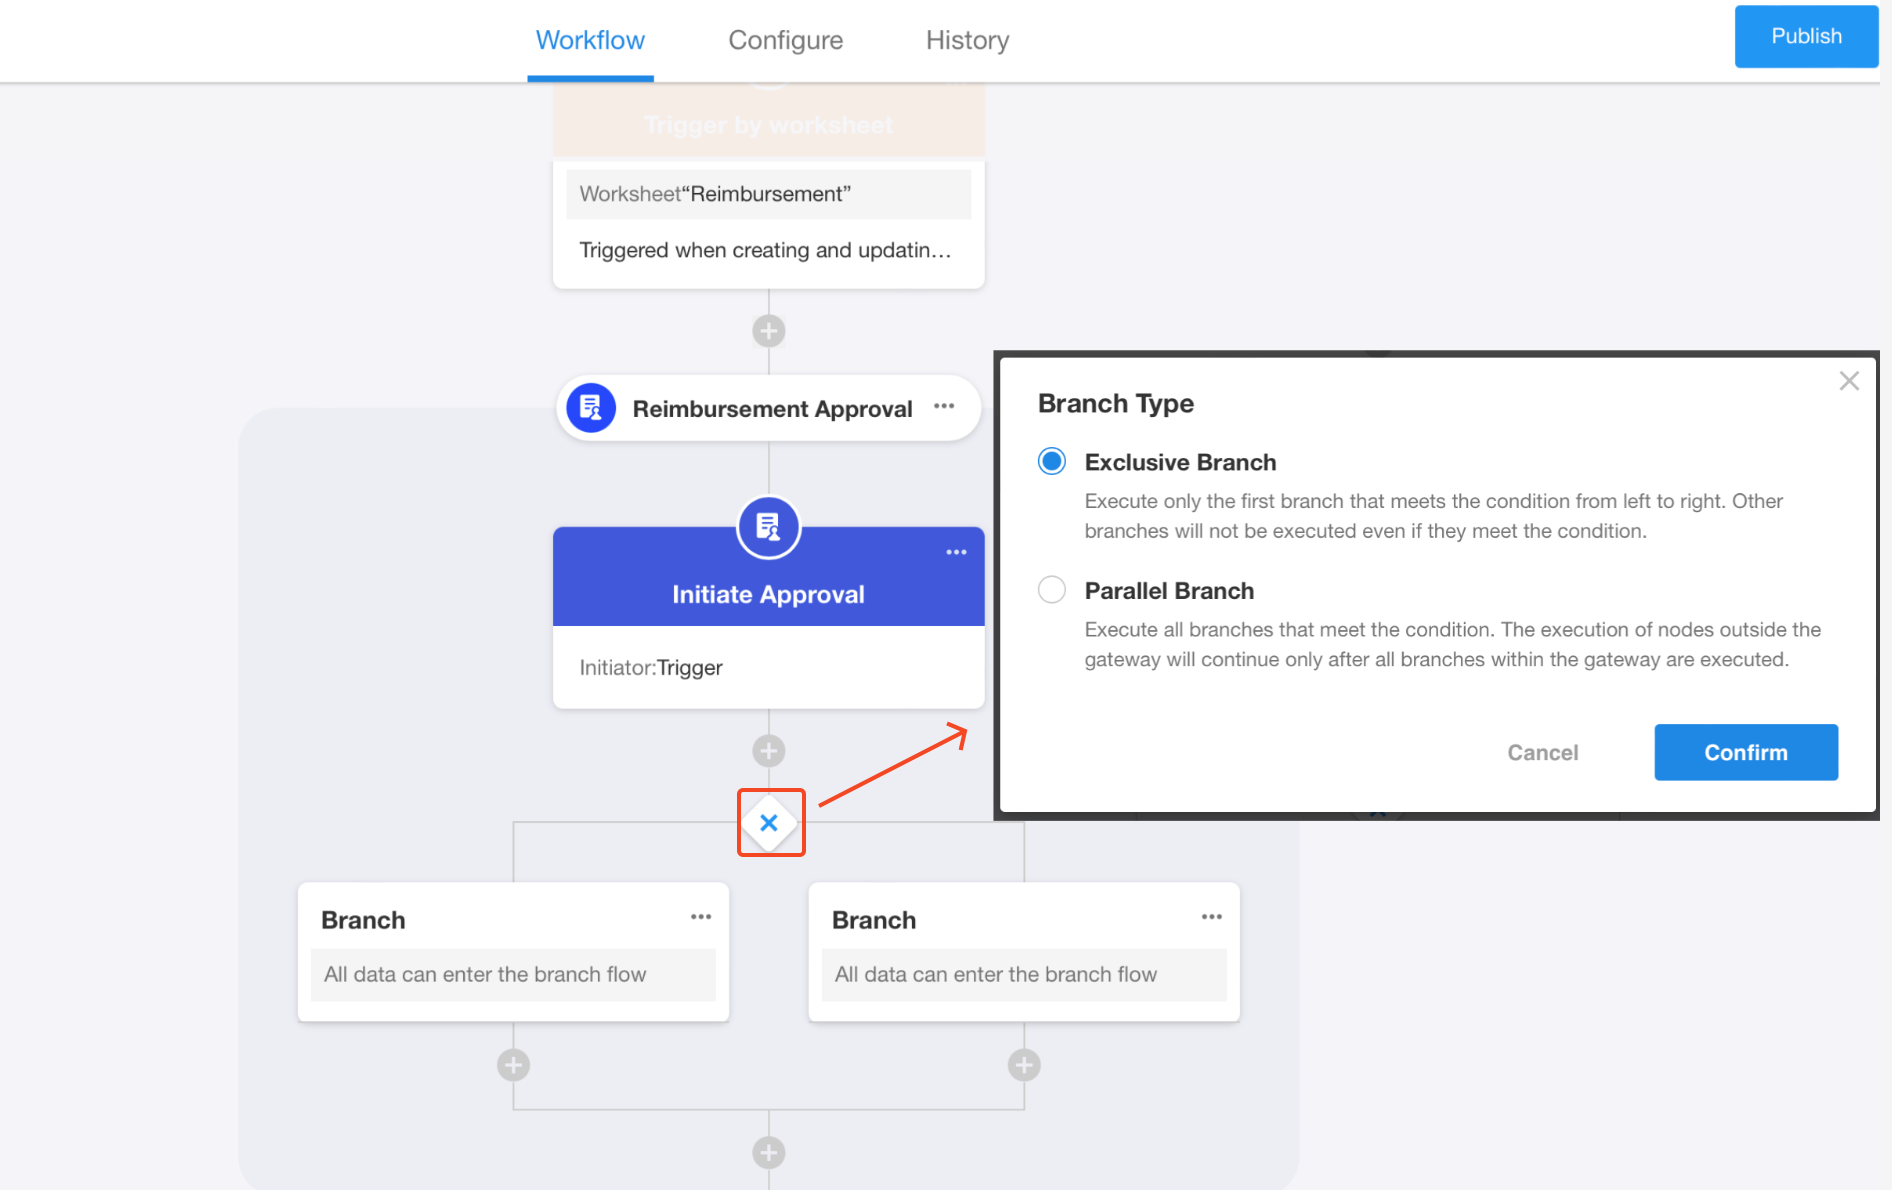
In the approval flow, you can add two types of branching processes, exclusive branch and parallel branch.
Exclusive branch: Execute only the first matching branch in left-to-right order.
Parallel branch: Execute all branches that satisfy the conditions simultaneously, and continue to execute subsequent nodes when all branches are finished. When any branch is rejected, the entire process is rejected.
The newly created branch is exclusive by default, click to change it to a parallel branch.
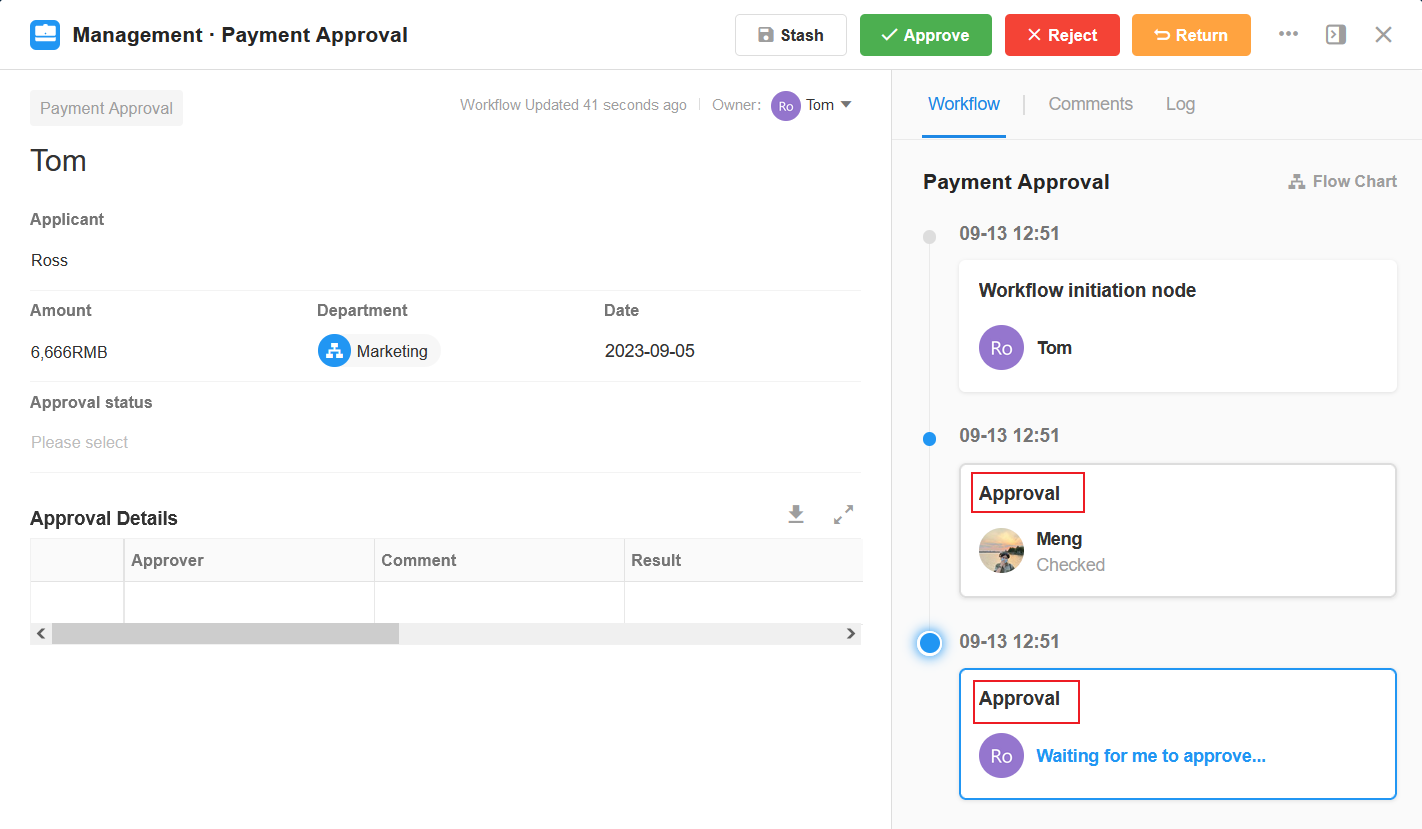
For parallel approvals, the corresponding approval card appears at the same time when viewing the flow.
VIII. Management of approval flows
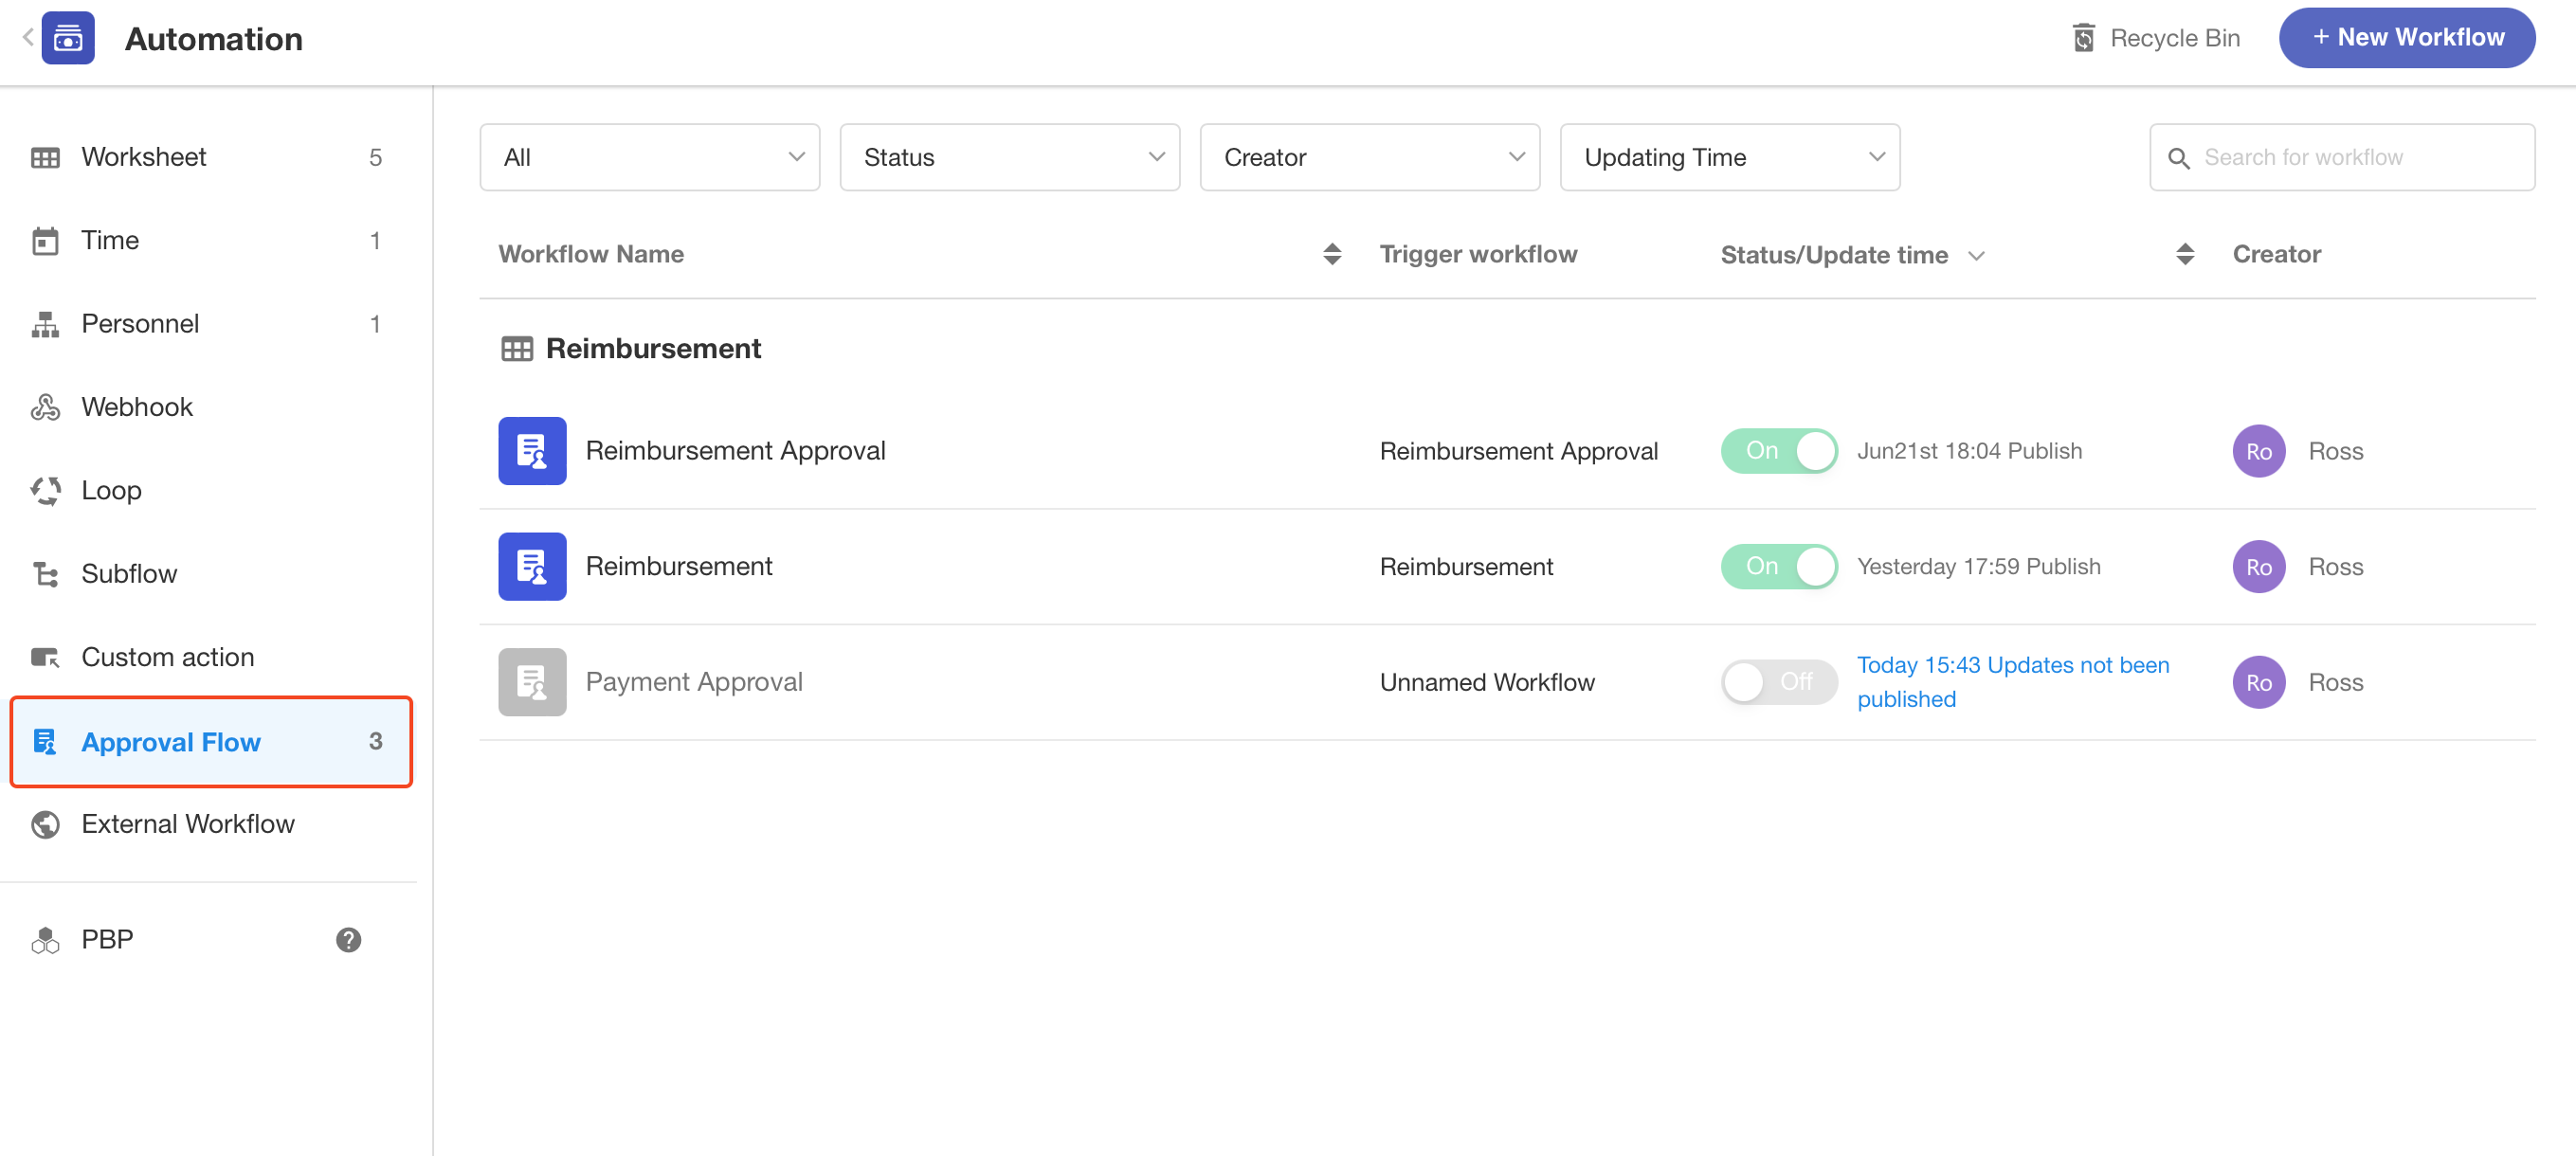
Approval flows configured with the [Initiate Approval Flow] node in an application are also categorized in the Approval Flow tab, where you can see the details and execution history of the approval flows.
IX. How to copy the existing approval flows
Sometimes, for different business approvals, the approver and approval process may also be the same, so if there is an approval flow with the same structure that has been configured, you can just copy and use it.
-
The copied flow is a new approval flow.
-
To copy the flow does not copy the data of the approved record, it needs to be reconfigured, such as the selected members fields.
-
You can copy flow from other applications.